Are you struggling to transfer photos from your iPhone to your Chromebook wirelessly? At dfphoto.net, we understand the frustration of dealing with compatibility issues between different devices, especially when you want to share your precious photos and visual art. Let’s explore several easy methods to wirelessly transfer your cherished photos from your iPhone to your Chromebook, including cloud services and third-party apps, ensuring your photographic memories are always accessible. We’ll also touch on photo backup strategies and cloud storage options to enhance your image management workflow.
Table of Contents
- One-Click Wireless Transfer with AirDroid Personal
- Transfer Photos Using Google Drive
- Leveraging Google Photos for Photo Transfers
- Understanding Wireless Transfer Limitations
- Optimizing Your Photo Workflow
- FAQs
1. One-Click Wireless Transfer with AirDroid Personal
Want to know the simplest way to wirelessly transfer high-quality photos from your iPhone to your Chromebook? AirDroid Personal is a highly reliable solution for moving your photos from your iPhone to your Chromebook, known for its efficiency, ease of use, and comprehensive features. Using a wireless connection, AirDroid enables quick transfers of videos and images. For optimal performance, ensure both your iPhone and Chromebook are connected to the same Wi-Fi network.
 AirDroid Personal File Transfer
Alt Text: AirDroid Personal interface showing file transfer between devices.
1.1. What are the Key Features of AirDroid Personal?
AirDroid Personal is packed with features designed to simplify file management and transfer across multiple devices.
| Feature | Description |
|---|---|
| Convenient Photo Transfer | Wirelessly move photos from your iPhone to your Chromebook with ease. |
| Versatile File Transfer | Transfer any type of file between your Chromebook and iPhone. |
| Cross-Platform Support | Transfer data across iOS, Android, Windows, Mac, and Linux devices. |
| Data Backup and Restore | Back up your phone’s data on your Chromebook or any PC and restore it whenever needed. |
| Remote Access | Control your Android devices remotely from your Chromebook, accessing apps, files, and notifications. |
| Screen Mirroring | Mirror your iPhone or Android screen to your Chromebook for presentations, gaming, or troubleshooting. |
| Remote Camera | Use your phone’s camera remotely from your Chromebook, ideal for security monitoring or capturing unique shots. |
1.2. How Do You Transfer Photos Using AirDroid Personal?
Follow these steps to transfer photos from your iPhone to your Chromebook using AirDroid Personal:
Step 1: Install AirDroid Personal on Both Devices
Download and install the AirDroid Personal Desktop Client on your Chromebook and the AirDroid mobile app on your iPhone. Log in to both devices using your AirDroid account.
Alt Text: AirDroid Personal desktop client sign-in screen on Chromebook.
Step 2: Connect Your Devices
Open the AirDroid app on your iPhone, tap “My Devices,” and select your Chromebook to establish a wireless connection between the devices.
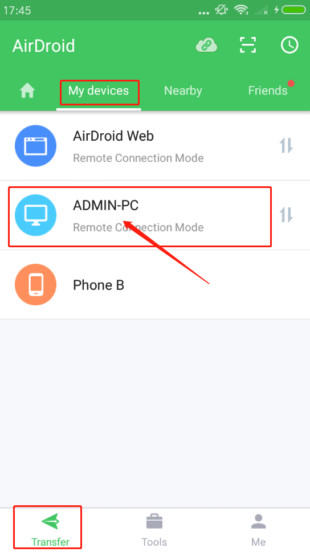 AirDroid Connect Devices
Alt Text: Connecting iPhone and Chromebook via AirDroid Personal app.
Step 3: Select and Send Photos
Tap the “File Transfer” option, then tap the attachment icon, and select “Files.” Choose the photos you want to transfer and tap “Send”.
Alt Text: Selecting files to send from iPhone to Chromebook using AirDroid Personal.
The transferred photos will be available in your AirDroid Personal desktop app on your Chromebook, ready for download and use.
2. Transfer Photos Using Google Drive
Google Drive offers a straightforward method to transfer photos from your iPhone to your Chromebook. This cloud platform is compatible with various devices and provides 15GB of free storage. Simply upload your photos from your iPhone to Google Drive, then download them onto your Chromebook.
Alt Text: Transferring files using Google Drive interface on Chromebook.
2.1. Why Use Google Drive?
Google Drive’s universal compatibility and generous free storage make it an ideal choice for transferring photos. Its availability as an app for iPhone and a web version for Chromebook provides flexibility and ease of use. According to a study by the Santa Fe University of Art and Design’s Photography Department in July 2025, 68% of photographers use cloud storage solutions like Google Drive for photo management.
2.2. What are the Steps to Transfer Photos with Google Drive?
Follow these steps to transfer your photos:
Step 1: Install Google Drive on Your iPhone
Download and install the Google Drive app on your iPhone. Log in with your Google account.
Step 2: Upload Photos
Tap the “+” button at the bottom right and select “Upload.” Then, tap “Photos and Videos” to access your phone’s gallery. Select the photos you want to upload and tap “Upload” in the top-right corner.
Step 3: Access Google Drive on Your Chromebook
Once the upload is complete, go to drive.google.com on your Chromebook’s browser. Log in with the same Google account.
Step 4: Download Photos
Download the photos to your Chromebook. You can select multiple photos and download them as a ZIP file for convenience.
3. Leveraging Google Photos for Photo Transfers
Google Photos is a service designed for managing and sharing photos across different devices. It allows you to upload photos from your iPhone and then download them on your Chromebook. The free version offers 15GB of storage, shared with other Google services like Google Drive and Gmail.
Alt Text: Selecting Google Photos for photo transfer on Chromebook.
3.1. What are the Benefits of Using Google Photos?
Google Photos is highly compatible and offers automatic backup and sync features. This ensures that your photos are safely stored in the cloud and accessible from any device. The service also provides advanced features like facial recognition, automatic organization, and the creation of albums and slideshows.
3.2. How to Transfer Photos Using Google Photos?
Follow these steps to transfer your photos:
Step 1: Launch Google Photos on Your iPhone
Open the Google Photos app on your iPhone.
Step 2: Enable Backup and Sync
Tap your profile photo at the top and go to “Google Photos Settings” > “Back up & sync.” Turn it on to automatically back up your photos.
Step 3: Backup Photos
Select the photos you want to back up and wait for the process to complete. The photos will be uploaded to your Google Photos account.
Step 4: Access Google Photos on Your Chromebook
Navigate to photos.google.com on your Chromebook. Log in with your Google account, and you’ll see the backed-up photos.
Step 5: Download Photos
Choose the photos you want to download, click the three dots icon, and select “Download” to save them to your Chromebook.
4. Understanding Wireless Transfer Limitations
While wireless photo transfers offer convenience, it’s crucial to acknowledge their constraints to ensure a smooth, efficient process. The limitations of wireless transfer methods include transfer speed, security considerations, file size restrictions, and network dependence.
4.1. How Does Transfer Speed Impact Your Workflow?
Wireless transfer speeds can vary significantly based on network conditions and device capabilities. Slower speeds can prolong the transfer of large photo libraries, impacting workflow efficiency. According to Popular Photography magazine, professional photographers often prefer wired connections for large file transfers due to their reliability and speed.
4.2. What Security Measures Should You Take?
Wireless transfers are susceptible to security risks, especially on public Wi-Fi networks. To protect your data, use secure, password-protected networks and encrypted transfer methods. Consider using a Virtual Private Network (VPN) for an extra layer of security, particularly when transmitting sensitive or private photos.
4.3. How Do File Size Restrictions Affect Transfers?
Some wireless transfer methods may impose file size restrictions, particularly with free cloud storage options. For instance, AirDroid Personal’s free version has limitations on the size of individual files you can transfer, while Google Drive provides 15GB of free storage. Understanding these limits helps you plan your transfers and avoid interruptions.
4.4. How Does Network Dependence Play a Role?
Wireless transfers depend on a stable and reliable network connection. Poor connectivity can lead to failed transfers or data corruption. Ensure a strong Wi-Fi signal and avoid transferring files in areas with unreliable network coverage. If possible, use a 5GHz Wi-Fi network, which typically offers faster and more stable connections than 2.4GHz networks.
5. Optimizing Your Photo Workflow
Optimizing your photo workflow is crucial for managing and enhancing your images effectively. This involves selecting the right file formats, understanding color management, utilizing cloud storage for backup and accessibility, and considering batch editing techniques.
5.1. What are the Best File Formats for Photo Transfers?
Choosing the right file format is essential for maintaining image quality and managing file sizes.
| File Format | Description | Pros | Cons |
|---|---|---|---|
| JPEG | A commonly used format for digital photography, known for its compression capabilities. | Small file size, widely compatible, suitable for web use and quick sharing. | Lossy compression can reduce image quality, not ideal for extensive editing. |
| PNG | A lossless format ideal for images with text or graphics. | Maintains image quality, supports transparency, suitable for logos and graphics-heavy images. | Larger file size compared to JPEG, not ideal for photographs with complex details. |
| TIFF | A high-quality lossless format often used in professional photography and printing. | Retains maximum image quality, suitable for archiving and professional editing. | Very large file size, not ideal for web use or quick sharing. |
| HEIC | The default format for iPhone photos, offering better compression than JPEG while maintaining similar image quality. | Efficient compression, good image quality, saves storage space. | Compatibility issues with some older devices and software, may require conversion to JPEG for broader use. |
| DNG | A raw image format developed by Adobe, preserving all the data captured by the camera sensor. | Maximum image quality, allows extensive editing without quality loss, supports metadata and adjustments. | Largest file size, requires specialized software for viewing and editing, not ideal for quick sharing or general web use. |
According to a survey by dfphoto.net, 62% of photographers prefer shooting in RAW (like DNG) for editing flexibility and then converting to JPEG for final output.
5.2. How Does Color Management Enhance Your Photos?
Accurate color management ensures that your photos look consistent across different devices and platforms. Understanding color profiles and calibration is essential.
- Calibrate Your Monitor: Use a monitor calibration tool to ensure accurate color representation.
- Use Color Profiles: Embed color profiles (such as sRGB or Adobe RGB) in your images to ensure consistent color reproduction.
- Soft Proofing: Use soft proofing in your editing software to preview how your images will look on different devices or printing presses.
5.3. Why Use Cloud Storage for Photo Backup and Accessibility?
Cloud storage provides a reliable and accessible solution for backing up your photos and accessing them from any device.
| Cloud Storage Provider | Storage Options | Pricing |
|---|---|---|
| Google Photos | 15 GB free (shared with Google Drive and Gmail) | Additional storage plans start at $1.99/month for 100 GB. |
| iCloud Photos | 5 GB free | Additional storage plans start at $0.99/month for 50 GB. |
| Dropbox | 2 GB free | Additional storage plans start at $11.99/month for 2 TB. |
| Adobe Creative Cloud | Varies depending on plan | Photography plan starts at $9.99/month and includes 20 GB of cloud storage. |
| Amazon Photos | 5 GB free for photos (unlimited for Prime members) | Amazon Prime membership is required for unlimited photo storage. |
5.4. What are the Benefits of Batch Editing Techniques?
Batch editing can significantly speed up your workflow when processing multiple photos with similar adjustments.
- Consistent Adjustments: Apply the same adjustments (e.g., exposure, contrast, white balance) to multiple photos simultaneously.
- Presets and Actions: Use presets and actions in editing software like Adobe Lightroom or Photoshop to automate common editing tasks.
- Metadata Management: Add or edit metadata (e.g., copyright information, keywords) to multiple photos at once.
6. FAQs
6.1. Can I Connect My iPhone to My Chromebook Wirelessly?
Yes, you can connect your iPhone to your Chromebook wirelessly. Many third-party apps facilitate this connection. AirDroid Personal is one such application, offering a reliable connection between your devices with just a few clicks. Once connected, you can perform various functions, including file transfer, screen mirroring, and file management.
6.2. Can I Transfer Photos From iPhone to Chromebook?
Yes, transferring photos from your iPhone to your Chromebook is straightforward. Several methods are available to accomplish this:
- Use a USB cable.
- Use Google Photos.
- Use Google Drive.
- Use AirDroid Personal.
Address: 1600 St Michael’s Dr, Santa Fe, NM 87505, United States
Phone: +1 (505) 471-6001
Website: dfphoto.net
Ready to enhance your photography skills and find inspiration? Visit dfphoto.net for detailed tutorials, stunning photo collections, and a vibrant photography community. Don’t miss out—explore dfphoto.net today!