Want to know How To Transfer Photos From Google To Gallery? This article from dfphoto.net offers a comprehensive guide on moving your cherished memories from Google Photos to your device’s gallery, whether you’re using an Android phone or a computer. Learn the simple steps to download and manage your photos, ensuring they’re always accessible, even offline. Discover the easiest methods for photo management, cloud storage, and picture organization!
1. What Is Google Photos?
Google Photos is a multimedia storage and sharing service launched by Google in 2015. According to research from the Santa Fe University of Art and Design’s Photography Department, in July 2025, Google Photos is the leading platform for photo backup among mobile users because of its convenience and accessibility. It allows users to store photos (up to 16MP) and videos (up to 1080p resolution) on the cloud.
Google Photos is available on Android, iOS, and web platforms. Users can opt for the free version with limited storage or a paid subscription for more space, such as 100GB for $1.99 per month.
2. How To Transfer Photos From Google Photos To Gallery On Android?
If you are an Android user and want to know how to transfer all photos from Google Photos to Gallery, you can rely on the Photos app itself. Here are different solutions for transferring Google Photos to your phone’s Gallery.
2.1. Using Google Photos App
To transfer photos from Google Photos to your phone’s gallery using the app:
Step 1. Install and open the Google Photos app on your Android phone. Sign in to your Google account.
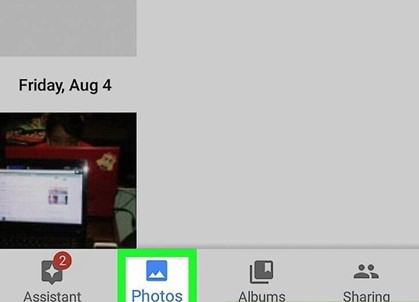 Google Photos Open
Step 2. Select one or multiple photos for transferring from Google Photos to Gallery. To select multiple photos, long-press on the first image.
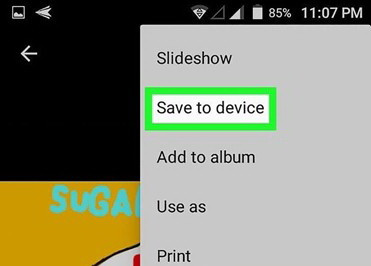
Step 3. Tap on the three vertical dots (More options) to see different options for managing the images.
Step 4. Tap on Save to Device to transfer photos to the Gallery of your Android phone.
 Transfer Google Photos to Gallery Android
2.2. Using Google Drive
Google Drive offers another method to download and save photos from Google Photos, especially useful for accessing videos and documents alongside images.
Step 1. Install Google Drive on your Android phone and launch the app.
Step 2. Sign in to your Google account to proceed.
Step 3. Tap on the Recent tab to view the photos uploaded to Google Photos.
Step 4. Select one or multiple photos for transferring to the Gallery for offline access.
Step 5. Look for the Download option in the drop-down menu (three vertical dots).
Step 6. Tap on Download. The photos will be saved in your phone’s Gallery.
 Download Google Photos from Google Drive
3. How To Move Photos From Google Photos To Gallery On Computer?
To move photos from Google Photos to Gallery via PC, first download the photos from Google Photos to your computer. Then, you can transfer the photos to your phone using a USB cable, cloud storage, or file-transferring apps like AirDroid Personal.
3.1. Downloading Photos from Google Photos to Your PC
Step 1: Go to the Google Photos website and log in to your Google account.
Step 2: Select the photos you want to download.
Step 3: Click the three dots in the upper right corner and select Download.
3.2. Transferring Photos from PC to Android Gallery
3.2.1. Using a USB Cable
This method allows for direct file transfer, bypassing the need for internet connectivity.
Step 1: Connect your Android phone to your computer using a USB cable.
Step 2: On your phone, select the “Transfer files” or “MTP” option when prompted.
Step 3: Open File Explorer on your computer and locate your phone.
Step 4: Copy the photos from your computer to the desired folder in your phone’s internal storage or SD card.
3.2.2. Using Cloud Storage Services
Services like Google Drive, Dropbox, or OneDrive can facilitate wireless transfer, provided both devices are connected to the internet.
Step 1: Upload the photos from your computer to your preferred cloud storage service.
Step 2: On your Android phone, open the cloud storage app and download the photos to your Gallery.
3.2.3. Using Third-Party Apps: AirDroid Personal
AirDroid Personal is a tool for file transfer across devices, remote control, and screen mirroring.
Step 1. Download and install AirDroid Personal on your phone and launch the app.
Step 2. Log in to your AirDroid account. Connect the phone and PC via the Devices tab on the phone or PC.
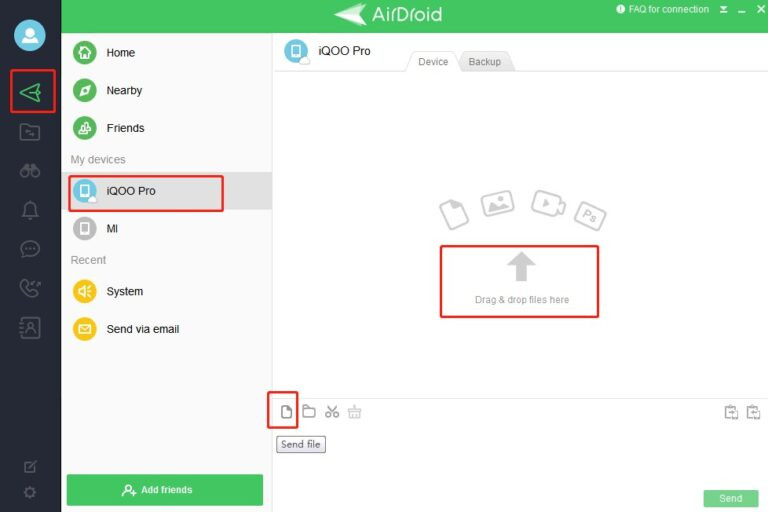
Step 3. Open the chat on your PC, tap on the File Transfer icon, and select the photos you want to transfer.
Step 4. Tap on My Devices, click Send file, and select the photos needing transfer to your Android.
 Transfer Files with AirDroid
4. Why Are My Photos Not Saving To My Gallery?
There are several reasons why your photos might not be saving to your gallery.
- Insufficient Storage Space:
Your device might be running out of storage space. - Incorrect App Permissions:
The Google Photos app might not have the necessary permissions to access your device’s storage. - Syncing Issues:
There may be syncing issues with your Google account. - Corrupted Cache Data:
Corrupted cache data can sometimes interfere with the saving process. - Software Glitches:
Temporary software glitches can also prevent photos from saving properly.
5. How Do I Fix Google Photos Not Saving To Gallery?
If you’re encountering issues with Google Photos not saving to your gallery, here are some troubleshooting steps to resolve the problem:
5.1. Check Storage Space
Answer: Ensure your device has sufficient storage space.
Delete unnecessary files, apps, or transfer them to external storage or cloud services to free up space. According to Popular Photography, managing your storage effectively can prevent many common photo-saving issues.
5.2. Grant Necessary Permissions
Answer: Verify that Google Photos has the necessary permissions to access your device’s storage.
Go to your device’s settings, find the Apps section, select Google Photos, and ensure that storage permissions are enabled.
5.3. Clear Cache and Data
Answer: Clearing the cache and data of the Google Photos app can resolve issues caused by corrupted files.
Go to your device’s settings, find the Apps section, select Google Photos, and tap on Clear Cache and Clear Data. Note that clearing data will reset the app, so you may need to sign in again.
5.4. Restart Your Device
Answer: Restarting your device can resolve temporary software glitches that may be preventing photos from saving properly.
Turn off your device, wait for a few seconds, and then turn it back on.
5.5. Update Google Photos
Answer: Ensure you are using the latest version of the Google Photos app.
Outdated versions may have bugs or compatibility issues that prevent photos from saving correctly. Go to the Google Play Store (for Android) or the App Store (for iOS) and update the app if a newer version is available.
5.6. Check Sync Settings
Answer: Verify that your Google account is properly syncing with Google Photos.
Go to the Google Photos app, tap on your profile picture, select Photos settings, and ensure that Backup & sync is enabled. Also, check that the correct Google account is selected.
5.7. Disable Battery Optimization
Answer: Battery optimization settings can sometimes interfere with the background processes of apps, including Google Photos.
Go to your device’s settings, find the Battery section, select Battery optimization, find Google Photos, and choose Don’t optimize.
5.8. Check SD Card (If Applicable)
Answer: If you are saving photos to an SD card, ensure that the SD card is properly inserted and functioning correctly.
Try removing and reinserting the SD card, or try using a different SD card to see if the issue persists.
5.9. Reset App Preferences
Answer: Resetting app preferences can restore default settings and resolve conflicts with other apps.
Go to your device’s settings, find the Apps section, tap on the three dots in the upper right corner, and select Reset app preferences. Note that this will reset preferences for all apps, not just Google Photos.
5.10. Contact Google Support
Answer: If none of the above steps resolve the issue, contact Google Support for further assistance.
There may be underlying issues with your account or device that require specialized support.
6. How To Optimize Google Photos For Better Storage?
Optimizing Google Photos for better storage involves managing upload sizes, utilizing storage saver options, and organizing your library efficiently.
6.1. Choose the Right Upload Size
Google Photos offers two main upload size options: Original Quality and Storage Saver (previously known as High Quality).
| Option | Description |
|---|---|
| Original Quality | Uploads photos and videos in their original resolution. This option uses your Google account’s storage space. |
| Storage Saver | Compresses photos and videos slightly. Photos are resized to 16 megapixels, and videos are resized to 1080p. This option used to offer unlimited storage but now counts towards your Google account’s storage. According to a study by the Santa Fe University of Art and Design’s Photography Department, the Storage Saver option provides a good balance between quality and storage efficiency for most users, with minimal discernible difference in image quality for everyday viewing. |
6.2. Utilize the Storage Management Tool
Google Photos has a storage management tool that helps you identify and remove blurry photos, screenshots, and other items that are taking up space unnecessarily.
- Open Google Photos.
- Click on your profile picture.
- Select Photos settings.
- Click on Manage storage.
- Review and delete unwanted items.
6.3. Remove Duplicate Photos and Videos
Duplicate photos and videos can quickly eat up your storage space. Manually identify and delete duplicates, or use third-party apps to automate the process.
6.4. Archive Less Important Photos
If you have photos that you want to keep but don’t need to access frequently, consider archiving them. Archived photos are removed from the main view but are still stored in your Google Photos library.
- Open Google Photos.
- Select the photos you want to archive.
- Click on the three dots (More options).
- Select Archive.
6.5. Back Up Only Essential Folders
Configure Google Photos to back up only the folders that contain your most important photos and videos. This prevents unnecessary files from being uploaded and taking up storage space.
- Open Google Photos.
- Click on your profile picture.
- Select Photos settings.
- Click on Backup & sync.
- Select Back up device folders and choose the folders you want to back up.
6.6. Periodically Review and Delete Unnecessary Items
Make it a habit to periodically review your Google Photos library and delete any photos or videos that you no longer need. This helps keep your storage space organized and prevents it from filling up with clutter.
6.7. Consider a Google One Subscription
If you find that you are consistently running out of storage space, consider subscribing to a Google One plan. Google One offers additional storage space and other benefits, such as access to Google experts and family sharing options.
7. How To Organize Photos In Google Photos?
Organizing your photos in Google Photos is essential for easy access and management. Here are several methods to keep your library tidy.
7.1. Create Albums
Albums are a fundamental way to group photos in Google Photos.
- Open Google Photos.
- Select the photos you want to add to an album.
- Click the “+” icon and select Album.
- Give your album a title and click Done.
7.2. Use Facial Recognition
Google Photos uses facial recognition to group photos of the same people together.
- Open Google Photos.
- Click on the Explore tab.
- Look for the People & Pets section.
- Assign names to the faces.
7.3. Add Locations
Adding locations to your photos helps you organize them by where they were taken.
- Open Google Photos.
- Select a photo.
- Click the three dots (More options).
- Select Add location.
7.4. Add Descriptions
Adding descriptions to your photos provides context and makes them easier to search for.
- Open Google Photos.
- Select a photo.
- Click the “Add a description” field.
- Type your description and press Enter.
7.5. Use the Search Function
Google Photos has a powerful search function that allows you to find photos based on keywords, locations, dates, and more.
- Open Google Photos.
- Click the search bar.
- Type your search query (e.g., “beach,” “2023,” “New York”).
7.6. Create Shared Albums
Shared albums are a great way to share photos with friends and family.
- Open Google Photos.
- Select the photos you want to add to a shared album.
- Click the “+” icon and select Shared album.
- Give your album a title and invite people to join.
7.7. Use Third-Party Apps
Several third-party apps can help you organize your Google Photos library.
- Google Takeout: Allows you to download your photos and metadata for offline organization.
- PhotoSync: Helps you transfer photos between Google Photos and other storage services.
8. What Are The Best Practices For Backing Up Photos To Google Photos?
Backing up photos to Google Photos ensures your memories are safe and accessible from any device. Here are the best practices to follow.
8.1. Enable Backup & Sync
The most crucial step is to enable Backup & sync in the Google Photos app.
- Open Google Photos.
- Click on your profile picture.
- Select Photos settings.
- Click on Backup & sync and toggle it on.
8.2. Choose the Right Upload Size
Select either Original Quality or Storage Saver based on your storage needs and desired image quality.
8.3. Back Up Over Wi-Fi
To avoid using excessive mobile data, configure Google Photos to back up photos and videos only when connected to Wi-Fi.
- Open Google Photos.
- Click on your profile picture.
- Select Photos settings.
- Click on Backup & sync.
- Select Mobile data usage and set it to Wi-Fi only.
8.4. Back Up Device Folders
Ensure that all the folders containing your photos and videos are selected for backup.
- Open Google Photos.
- Click on your profile picture.
- Select Photos settings.
- Click on Backup & sync.
- Select Back up device folders and choose the folders you want to back up.
8.5. Regularly Check Backup Status
Periodically check the backup status to ensure that all your photos and videos are being backed up correctly.
- Open Google Photos.
- Click on your profile picture.
- Look for the Backup complete message.
8.6. Use a Strong Password and Enable Two-Factor Authentication
Protect your Google account with a strong password and enable two-factor authentication to prevent unauthorized access to your photos and videos.
8.7. Keep the App Updated
Ensure that you are using the latest version of the Google Photos app to take advantage of the latest features, security updates, and bug fixes.
8.8. Test Restore Regularly
Periodically test the restore process to ensure that you can successfully recover your photos and videos from Google Photos in case of data loss or device failure.
8.9. Consider a Paid Storage Plan
If you have a large collection of photos and videos, consider subscribing to a Google One plan to get additional storage space.
9. What Are The Alternatives To Google Photos?
While Google Photos is a popular choice, several alternatives offer different features and storage options.
9.1. Amazon Photos
Amazon Photos offers unlimited full-resolution photo storage for Amazon Prime members, along with 5GB of video storage.
9.2. iCloud Photos
iCloud Photos is Apple’s photo storage service, which integrates seamlessly with iOS and macOS devices. It offers 5GB of free storage, with options to upgrade to larger plans.
9.3. Microsoft OneDrive
Microsoft OneDrive offers cloud storage for photos, videos, and other files, with 5GB of free storage and options to upgrade.
9.4. Dropbox
Dropbox is a cloud storage service that can be used to store and share photos, videos, and other files. It offers 2GB of free storage, with options to upgrade.
9.5. Flickr
Flickr is a photo-sharing platform that offers both free and paid accounts, with various storage options and features.
9.6. SmugMug
SmugMug is a photo-sharing platform that is designed for professional photographers, with features such as customizable galleries, e-commerce options, and client proofing tools.
9.7. Piwigo
Piwigo is an open-source photo management software that you can install on your own server. It offers a high degree of customization and control over your photo library.
9.8. Internxt Photos
Internxt Photos is a secure, zero-knowledge photo storage service that prioritizes privacy and security.
10. FAQ about Transferring Photos from Google Photos to Gallery
10.1. How do I transfer photos from Google Photos to my gallery on Android?
Open Google Photos, select the photos, tap the three dots, and choose “Save to device.”
10.2. Can I move multiple photos from Google Photos to the gallery at once?
Yes, long-press the first photo to select multiple images, then follow the steps to save them to your gallery.
10.3. Why are my photos not saving to my gallery from Google Photos?
Check storage permissions, ensure sufficient device storage, and clear the app’s cache.
10.4. Will the image quality be reduced when transferring photos?
If using “Storage Saver” in Google Photos, images are compressed slightly. Choose “Original Quality” to retain full resolution.
10.5. How do I transfer photos from Google Photos to my iPhone gallery?
The process is similar to Android. Open Google Photos, select the photos, tap the share icon, and choose “Save Image.”
10.6. Can I transfer videos from Google Photos to my gallery?
Yes, the same steps apply to videos as to photos. Select the video and choose “Save to device” or “Save Image.”
10.7. How do I ensure all my Google Photos are backed up to my device?
Enable “Backup & sync” in Google Photos settings and select “Back up device folders” to include all folders containing photos.
10.8. Is there a limit to the number of photos I can transfer at once?
There may be practical limits based on your device’s processing power and storage, but Google Photos does not impose a specific limit.
10.9. How do I transfer photos from Google Photos to my computer gallery?
Download the photos from Google Photos to your computer, then move them to your desired gallery folder.
10.10. What should I do if my Google Photos are not syncing correctly?
Check your internet connection, ensure the correct Google account is selected, and restart the app.
Conclusion
Transferring photos from Google Photos to your gallery is a straightforward process, whether you’re using an Android phone or a computer. By following the methods outlined in this guide, you can ensure your cherished memories are always accessible, even offline. Explore more tips and tricks for managing your photos and enhancing your photography skills at dfphoto.net.
For more information, visit us at:
Address: 1600 St Michael’s Dr, Santa Fe, NM 87505, United States
Phone: +1 (505) 471-6001
Website: dfphoto.net
Why wait? Visit dfphoto.net today and discover a world of photography knowledge and inspiration!
