Transferring photos from your camera to your MacBook is essential for any photographer, be it a hobbyist or a professional, and dfphoto.net is here to guide you. This article provides various methods to ensure your precious memories are safely stored and easily accessible, including using the Photos app, Image Capture, and even cloud storage. Let’s dive into the simple steps to make this process seamless.
1. Why Transfer Photos From Your Camera to Your MacBook?
Why should you bother transferring photos from your camera to your MacBook?
1.1. Secure Storage
Storing photos on your MacBook provides a secure backup, protecting them from accidental deletion or camera malfunction. As the saying goes, “better safe than sorry.”
1.2. Editing Capabilities
MacBooks offer powerful photo editing software like Adobe Photoshop and Lightroom, allowing you to enhance your images and bring your creative vision to life. Santa Fe University of Art and Design’s Photography Department emphasizes the importance of post-processing in modern photography, enhancing the initial image to align with the photographer’s artistic vision.
1.3. Easy Sharing
Transferring photos to your MacBook makes it easy to share them with friends, family, and clients through social media, email, or online portfolios.
1.4. Organization
A MacBook allows you to organize your photos into folders, albums, and libraries, making it easier to find and manage your growing collection.
1.5. Professional Workflow
For professional photographers, transferring photos to a MacBook is a crucial step in their workflow, enabling them to edit, archive, and deliver images to clients efficiently.
2. Understanding Search Intent
When people search for “How To Transfer Photos From Camera To Macbook,” they typically have one of the following intentions:
- Beginner’s Guide: Seeking a simple, step-by-step guide for transferring photos for the first time.
- Troubleshooting: Looking for solutions to common problems encountered during the transfer process.
- Alternative Methods: Exploring different methods for transferring photos, such as using cloud storage or third-party apps.
- Optimizing Workflow: Seeking tips for speeding up the transfer process and organizing photos efficiently.
- Understanding Compatibility: Ensuring their camera and MacBook are compatible and understanding any necessary software updates.
3. Methods for Transferring Photos
There are several ways to transfer photos from your camera to your MacBook. Let’s explore the most common and effective methods:
3.1. Using the Photos App
The Photos app is a built-in application on macOS that simplifies photo management and transfer.
3.1.1. Connecting Your Camera
- Connect your camera to your MacBook using a USB cable.
- Ensure your camera is turned on and set to the correct mode for importing photos. Refer to your camera’s manual for instructions on selecting the appropriate mode.
- If your camera has a “sleep” mode, disable it or set it to a time span long enough to allow your images to download, as suggested by Popular Photography.
3.1.2. Importing Photos
- Open the Photos app. If it doesn’t open automatically, you can find it in the Applications folder.
- In the Photos app, your camera should appear under the “Devices” section in the sidebar. If it doesn’t, ensure the camera is properly connected and turned on.
- Click on your camera’s name in the sidebar. The Photos app will display all the photos and videos on your device.
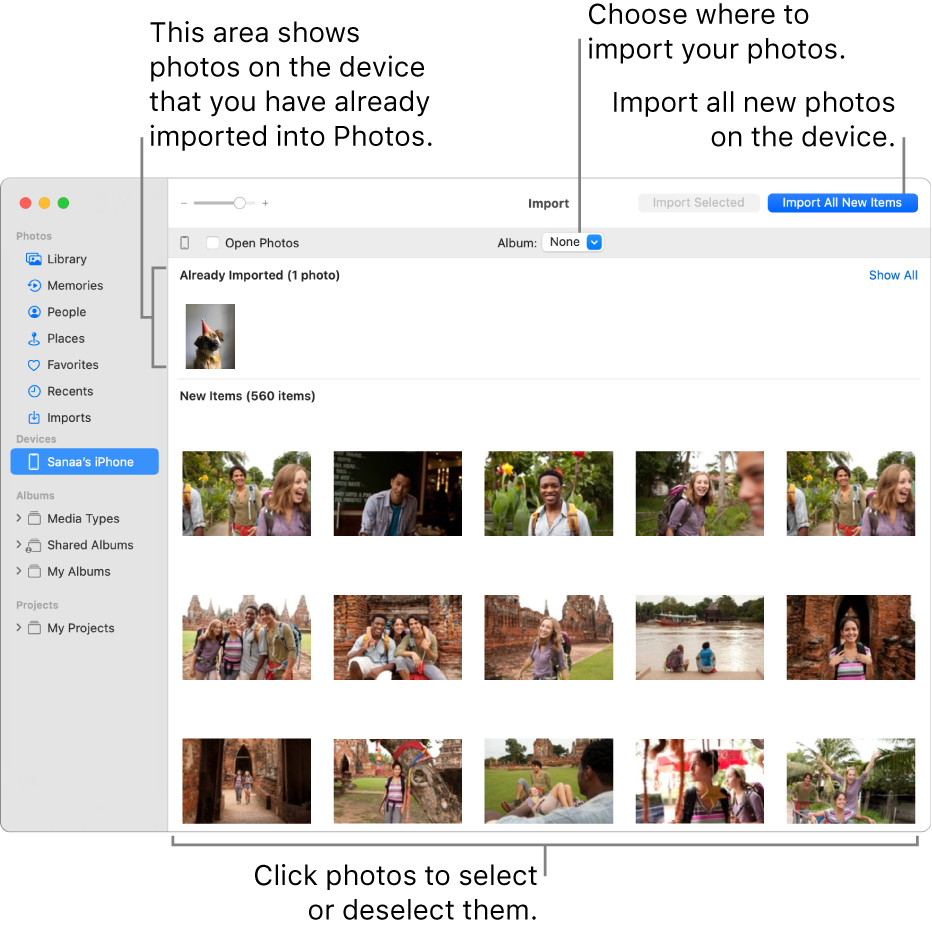 Photos displayed in the Photos app after camera connection, showcasing options for importing all new items or selecting specific photos
3.1.3. Selecting Photos
- To import all new photos, click the “Import All New Items” button in the top-right corner.
- To import a selection of photos, click on the photos you want to import, then click “Import Selected.”
- If a message asks whether you want to delete or keep the photos on your camera after they’re imported, click “Delete Items” to remove the photos or click “Keep Items” to keep them on the camera.
3.1.4. Organizing Photos
- Once the photos are imported, they will appear in the “Imports” album in the sidebar.
- You can also find them among the other days and months in your Photos library by clicking “Library” in the sidebar.
- To organize imported photos into albums, select the photos in the “Imports” album and drag them into albums in the sidebar.
3.2. Using Image Capture
Image Capture is another built-in macOS application that allows you to transfer photos and videos from your camera or other devices.
3.2.1. Connecting Your Camera
- Connect your camera to your MacBook using a USB cable.
- Ensure your camera is turned on and set to the correct mode for importing photos.
3.2.2. Opening Image Capture
- Open the Image Capture application. You can find it in the Applications folder or by using Spotlight search (Command + Spacebar).
3.2.3. Selecting Photos
- In the Image Capture window, select your camera from the “Devices” list on the left.
- Choose the destination folder where you want to save the imported photos. You can select an existing folder or create a new one.
- Select the photos you want to import. You can select individual photos or click “Import All” to import all the photos on your camera.
3.2.4. Importing Photos
- Click the “Download” button to import the selected photos to your chosen destination folder.
- Once the photos are imported, you can disconnect your camera from your MacBook.
3.3. Using a Card Reader
A card reader is a device that allows you to directly access the memory card from your camera, bypassing the need to connect the camera to your MacBook.
3.3.1. Inserting the Memory Card
- Remove the memory card from your camera.
- Insert the memory card into the card reader.
- Connect the card reader to your MacBook using a USB cable.
3.3.2. Accessing the Photos
- Your MacBook will recognize the card reader as an external drive.
- Open Finder and locate the card reader in the sidebar under “Devices.”
- Open the card reader to access the photos and videos stored on the memory card.
3.3.3. Copying Photos
- Create a new folder on your MacBook to store the imported photos.
- Select the photos you want to copy from the memory card.
- Drag and drop the selected photos into the new folder on your MacBook.
3.4. Using Cloud Storage
Cloud storage services like iCloud, Google Photos, and Dropbox offer a convenient way to transfer photos wirelessly.
3.4.1. Setting Up Cloud Storage
- Choose a cloud storage service that suits your needs and budget.
- Install the cloud storage app on your MacBook and camera (if available).
- Create an account and log in to the app on both devices.
3.4.2. Uploading Photos
- On your camera, configure the cloud storage app to automatically upload new photos to your account.
- Alternatively, you can manually upload photos from your camera to the cloud storage service using the app or website.
3.4.3. Downloading Photos
- On your MacBook, open the cloud storage app.
- Locate the photos you uploaded from your camera.
- Download the photos to your MacBook.
3.5. Using Wireless Transfer
Some cameras offer wireless transfer capabilities via Wi-Fi or Bluetooth.
3.5.1. Connecting to Wi-Fi
- Turn on the Wi-Fi function on your camera.
- Connect your camera to the same Wi-Fi network as your MacBook.
- Follow the instructions in your camera’s manual to establish a connection with your MacBook.
3.5.2. Transferring Photos
- Once connected, you can use the camera’s software or a web browser to access the photos stored on your camera.
- Select the photos you want to transfer and download them to your MacBook.
3.6. Using AirDrop
AirDrop is an Apple feature that allows you to wirelessly transfer files between Apple devices, including iPhones, iPads, and MacBooks.
3.6.1. Enabling AirDrop
- On your camera (if it’s an iPhone or iPad), open the Control Center by swiping down from the top-right corner of the screen.
- Tap and hold the Wi-Fi or Bluetooth icon to reveal more options.
- Tap the AirDrop icon and choose “Everyone” or “Contacts Only.”
- On your MacBook, open Finder and click “AirDrop” in the sidebar.
- Make sure your MacBook is discoverable by selecting “Everyone” or “Contacts Only” at the bottom of the AirDrop window.
3.6.2. Transferring Photos
- On your camera, select the photos you want to transfer.
- Tap the Share button (the square with an arrow pointing upwards).
- Choose AirDrop from the share options.
- Select your MacBook from the list of available devices.
- Your MacBook will receive a notification asking you to accept the incoming files. Click “Accept” to save the photos to your Downloads folder.
4. Troubleshooting Common Issues
Even with the best methods, you might encounter some issues during the transfer process. Here are some common problems and their solutions:
| Issue | Solution |
|---|---|
| Camera not recognized by MacBook | 1. Ensure the USB cable is properly connected. 2. Try a different USB port. 3. Restart your MacBook. 4. Update your macOS. |
| Photos app not opening | 1. Force quit the Photos app and reopen it. 2. Restart your MacBook. 3. Update your macOS. |
| Photos not importing | 1. Check the camera’s settings to ensure it’s set to the correct mode for importing photos. 2. Try importing a smaller batch of photos. |
| Insufficient storage space on MacBook | 1. Free up storage space by deleting unnecessary files. 2. Move files to an external drive or cloud storage. |
| Slow transfer speed | 1. Use a USB 3.0 cable and port for faster transfer speeds. 2. Close unnecessary applications to free up system resources. |
| Corrupted photos | 1. Try importing the photos using a different method. 2. Use a photo recovery software to repair the corrupted files. |
| Incompatible file format | 1. Convert the photos to a compatible format using a photo converter tool. 2. Update your macOS to support the latest file formats. |
| Photos app freezes | 1. Close other applications that may be using a lot of system resources. 2. Restart the Photos app. 3. Restart your MacBook. |
| Error message during import | 1. Note the error message and search for solutions online. 2. Contact Apple Support for assistance. 3. Check for software updates for your camera and macOS. |
5. Optimizing Your Photo Transfer Workflow
To make the photo transfer process as efficient as possible, consider these tips:
5.1. Use a Fast Card Reader
Investing in a high-speed card reader can significantly reduce transfer times, especially when dealing with large files.
5.2. Organize Photos During Import
Take the time to organize your photos into folders and albums as you import them. This will save you time and effort later on.
5.3. Use Keyboard Shortcuts
Learn and use keyboard shortcuts in the Photos app or Finder to speed up your workflow. For example, Command + C to copy and Command + V to paste.
5.4. Batch Rename Files
Use batch renaming tools to rename your photo files with descriptive names, making them easier to search and identify.
5.5. Utilize Metadata
Add metadata to your photos, such as keywords, descriptions, and copyright information, to make them more searchable and protect your intellectual property.
5.6. Automate the Process
Explore automation tools and scripts to automate repetitive tasks, such as importing, renaming, and organizing photos.
6. Exploring dfphoto.net for More Photography Tips
For more in-depth guides, tutorials, and inspiration, be sure to visit dfphoto.net. Our website offers a wealth of resources for photographers of all levels, including:
- Detailed articles on various photography techniques
- Reviews of the latest camera equipment and accessories
- Inspiring photo galleries showcasing the work of talented photographers
- A community forum where you can connect with other photographers, share your work, and ask questions
At dfphoto.net, our address is 1600 St Michael’s Dr, Santa Fe, NM 87505, United States. You can reach us by phone at +1 (505) 471-6001. Our website is dfphoto.net.
7. The Future of Photo Transfer
The future of photo transfer is likely to be dominated by wireless technologies and cloud-based solutions. We can expect to see:
- Faster and more reliable Wi-Fi and Bluetooth connections
- Increased integration with cloud storage services
- Artificial intelligence (AI) powered photo management tools
- More cameras with built-in wireless transfer capabilities
8. Ethical Considerations
When transferring and sharing photos, it’s important to consider ethical issues such as:
- Respecting the privacy of individuals in your photos
- Obtaining permission before sharing photos of others
- Avoiding the use of photos for malicious or harmful purposes
- Properly crediting photographers and sources when using their work
- Being aware of copyright laws and regulations
9. Legal Aspects
Copyright laws protect photographers’ rights to their work. When transferring and sharing photos, it’s important to be aware of these laws and regulations. Generally, the photographer owns the copyright to their photos, unless they have transferred those rights to someone else. It is illegal to use someone else’s photos without their permission, unless you have a valid license or are using the photos under fair use principles.
10. Frequently Asked Questions (FAQ)
10.1. Can I transfer photos from my iPhone to my MacBook using these methods?
Yes, all the methods described in this article can be used to transfer photos from your iPhone to your MacBook. AirDrop is a particularly convenient option for Apple devices.
10.2. What if my camera uses a different type of memory card?
You can use a card reader that supports the specific type of memory card used by your camera.
10.3. How do I know if my USB cable is USB 3.0?
USB 3.0 cables typically have a blue connector. You can also check the cable’s documentation or the manufacturer’s website.
10.4. Can I use a USB-C to USB adapter to connect my camera to my MacBook?
Yes, you can use a USB-C to USB adapter if your MacBook only has USB-C ports.
10.5. How do I delete photos from my camera after importing them to my MacBook?
You can select the “Delete Items” checkbox in the Photos app or manually delete the photos from your camera’s memory card after importing them.
10.6. What if my photos are in RAW format?
The Photos app and other photo editing software can handle RAW format photos. However, you may need to install additional codecs or plugins to support certain RAW formats.
10.7. How can I speed up the photo transfer process?
Use a fast card reader, a USB 3.0 cable and port, and close unnecessary applications to free up system resources.
10.8. Is it safe to delete photos from my camera after transferring them to my MacBook?
It’s generally safe to delete photos from your camera after transferring them to your MacBook, but it’s always a good idea to make a backup copy on an external drive or cloud storage first.
10.9. What should I do if I accidentally delete photos from my MacBook?
You can try to recover the deleted photos from the Trash or use a data recovery software.
10.10. How do I ensure my photos are backed up properly?
Use a combination of local and cloud-based backup solutions to ensure your photos are safe from data loss.
11. Conclusion
Transferring photos from your camera to your MacBook is a simple yet essential process for managing and preserving your visual memories. Whether you choose to use the Photos app, Image Capture, a card reader, cloud storage, or wireless transfer, the key is to find a method that suits your needs and workflow. By following the tips and techniques outlined in this article, you can ensure your photos are safely stored, easily accessible, and ready to be shared with the world. And remember, for more photography tips, tutorials, and inspiration, visit dfphoto.net and explore the world of photography with us!
Ready to take your photography to the next level? Visit dfphoto.net today to discover our comprehensive guides, stunning photo galleries, and vibrant community. Let us help you unlock your creative potential and capture the world in breathtaking detail. Don’t wait, start your photographic journey with dfphoto.net now!