Transferring photos from your camera to your Mac is essential for photographers of all levels, whether you’re backing up precious memories or diving into professional editing. At dfphoto.net, we understand the importance of a seamless workflow. This guide will provide you with multiple methods, troubleshooting tips, and best practices for efficiently transferring your photos, ensuring your images are safe and ready for the next creative step.
1. What is the Easiest Way to Transfer Photos from Camera to Mac?
The easiest way to transfer photos from your camera to your Mac is using a USB cable and the Image Capture application. This method is direct, reliable, and doesn’t require any additional software installations.
Here’s a detailed breakdown:
- Turn off your camera: If your camera has the option to protect the sensor while it is powered off, then enable it. Alternatively, you could put the camera body cap on.
- Connect via USB: Plug one end of the USB cable into your camera and the other into a USB port on your Mac.
- Turn on your camera: Ensure the camera is set to USB storage mode.
- Open Image Capture: This application comes pre-installed on all Macs. You can find it in the Applications folder or by searching for it using Spotlight.
- Select your camera: Image Capture should automatically detect your camera. If not, ensure your camera is properly connected and turned on.
- Choose a destination: In Image Capture, select where you want to save the photos. You can choose an existing folder or create a new one.
- Import photos: Click “Download All” to transfer all photos or select individual photos and click “Download.”
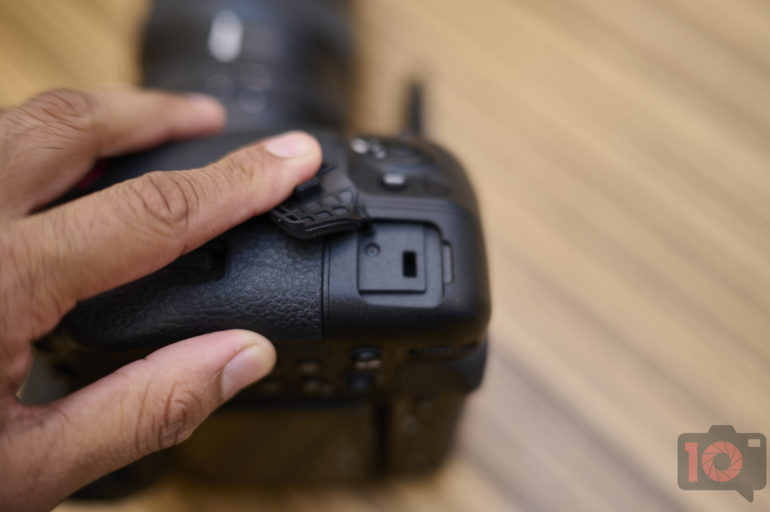 Connecting camera to mac via USB
Alt Text: Close up of a Nikon Z9 camera connected to a Macbook Pro via USB-C cable, ready for photo transfer.
Why this method is preferred:
- Simplicity: It’s straightforward and requires no extra software.
- Reliability: Direct USB connections are generally stable.
- Accessibility: Image Capture is readily available on every Mac.
Alternative methods:
- Using Photos App: Mac’s built-in Photos app can also import directly from your camera.
- Using Third-Party Software: Software like Adobe Lightroom or Capture One offer robust import features.
- Using a Card Reader: Remove the SD card from your camera and insert it into a card reader connected to your Mac.
2. How Do I Transfer Photos from My Camera to My Mac Wirelessly?
Transferring photos wirelessly from your camera to your Mac offers convenience and flexibility. Many modern cameras come equipped with Wi-Fi or Bluetooth capabilities, allowing you to transfer images without the need for cables.
Here’s how to do it:
- Check Camera’s Wireless Capabilities: Verify that your camera has Wi-Fi or Bluetooth functionality. Refer to your camera’s manual for specific instructions.
- Install Camera’s Companion App: Most camera manufacturers provide a companion app for your smartphone or tablet (e.g., Canon Camera Connect, Nikon SnapBridge, Sony Imaging Edge Mobile). Download and install the appropriate app from the App Store.
- Connect Camera to Smartphone: Follow the app’s instructions to connect your camera to your smartphone via Wi-Fi or Bluetooth. This usually involves selecting your camera from a list of available devices and entering a passcode displayed on the camera’s screen.
- Transfer Photos to Smartphone: Once connected, use the app to browse the photos on your camera and select the ones you want to transfer to your smartphone.
- Share Photos to Mac: After the photos are on your smartphone, you can transfer them to your Mac using several methods:
- iCloud Photos: If you have iCloud Photos enabled, the photos will automatically sync to your Mac.
- AirDrop: Use AirDrop to wirelessly transfer the photos directly from your iPhone to your Mac.
- Email or Cloud Storage: Email the photos to yourself or upload them to a cloud storage service like Google Drive or Dropbox, then download them on your Mac.
Benefits of Wireless Transfer:
- Convenience: No need for cables or card readers.
- Flexibility: Transfer photos from anywhere within Wi-Fi range.
- Instant Sharing: Easily share photos to social media or cloud services directly from your smartphone.
Drawbacks of Wireless Transfer:
- Slower Transfer Speed: Wireless transfer can be slower than using a USB cable or card reader.
- Battery Drain: Wireless transfer can drain your camera and smartphone batteries.
- Compatibility Issues: Wireless transfer may not be compatible with all cameras and devices.
3. Which Software is Best for Transferring Photos from Camera to Mac?
Several software options are available for transferring photos from your camera to your Mac, each offering unique features and capabilities. The best choice depends on your specific needs and workflow.
Here are some of the top contenders:
-
Image Capture (Free): This built-in Mac application is a simple and reliable option for basic photo transfer. It’s easy to use and doesn’t require any additional software installations.
-
Photos App (Free): Mac’s built-in Photos app can also import photos from your camera. It offers basic editing and organization features, as well as iCloud integration for seamless syncing across devices.
-
Adobe Lightroom Classic: This industry-standard software is a comprehensive solution for photo management, editing, and organization. It offers advanced import features, including the ability to apply presets and metadata during import.
Alt Text: A screenshot of the Adobe Lightroom Classic interface, showcasing its powerful photo management and editing tools.
-
Capture One: Known for its exceptional color rendering and tethering capabilities, Capture One is a popular choice among professional photographers. It offers advanced import features and seamless integration with other Capture One tools.
-
DigiCamControl (Free, Open Source): This powerful open-source software allows you to control your camera remotely from your Mac. It offers advanced features like tethered shooting, live view, and automated photo transfer.
Here’s a comparison table to help you choose the best software:
| Software | Price | Key Features | Pros | Cons |
|---|---|---|---|---|
| Image Capture | Free | Simple photo transfer | Easy to use, no additional software required | Limited features, basic functionality |
| Photos App | Free | Photo transfer, basic editing, iCloud integration | Free, integrated with macOS, iCloud syncing | Limited editing capabilities, may not be suitable for professional workflows |
| Adobe Lightroom Classic | Paid | Photo management, editing, organization, advanced import features | Comprehensive features, industry-standard, powerful editing tools | Subscription-based pricing, steep learning curve |
| Capture One | Paid | Photo management, editing, tethering, exceptional color rendering | Excellent image quality, advanced tethering capabilities, popular among professionals | Expensive, can be resource-intensive |
| DigiCamControl | Free | Remote camera control, tethered shooting, live view, automated photo transfer | Free, open-source, advanced features | Steeper learning curve, may require some technical knowledge |
Recommendation:
- For basic photo transfer, Image Capture or Photos App are excellent choices.
- For professional photographers or those who need advanced editing and organization features, Adobe Lightroom Classic or Capture One are recommended.
- For tethered shooting or remote camera control, DigiCamControl is a powerful option.
4. How Can I Troubleshoot if My Mac Won’t Recognize My Camera?
If your Mac isn’t recognizing your camera when connected via USB, several factors could be at play. Here’s a systematic approach to troubleshoot the issue:
- Check the USB Connection:
- Cable: Ensure the USB cable is securely connected to both your camera and your Mac. Try using a different USB cable to rule out a faulty cable.
- Port: Try connecting the camera to a different USB port on your Mac. Sometimes, specific ports may have issues.
- Verify Camera Settings:
- USB Mode: Make sure your camera is set to the correct USB mode for transferring photos. This is usually labeled as “Mass Storage,” “PTP,” or “MTP.” Refer to your camera’s manual for instructions on how to change the USB mode.
- Camera On: Ensure your camera is powered on and not in playback mode.
- Restart Your Devices:
- Camera: Turn off your camera completely, wait a few seconds, and then turn it back on.
- Mac: Restart your Mac to clear any temporary software glitches.
- Check Image Capture:
- Open Image Capture: Launch the Image Capture application (located in the Applications folder).
- Check Device List: See if your camera appears in the list of devices on the left-hand side of the Image Capture window.
- If Camera Appears: If your camera appears in Image Capture, but you still can’t transfer photos, try selecting a different destination folder.
- Software Updates:
- macOS: Ensure your Mac is running the latest version of macOS. Go to “System Preferences” > “Software Update” to check for updates.
- Camera Firmware: Check your camera manufacturer’s website for any firmware updates for your camera model. Follow the instructions on the website to update your camera’s firmware.
- Reset PRAM/NVRAM:
- Shut Down: Turn off your Mac completely.
- Restart: Turn on your Mac and immediately press and hold the “Option,” “Command,” “P,” and “R” keys simultaneously.
- Hold Until Restart: Continue holding the keys until your Mac restarts and you hear the startup sound for the second time.
- Release Keys: Release the keys, and your Mac will start up normally.
- Check System Information:
- Open System Information: Go to “Applications” > “Utilities” > “System Information.”
- Select USB: In the left-hand sidebar, select “USB” under the “Hardware” section.
- Check Camera: See if your camera is listed in the USB device tree. If it’s not listed, it indicates a hardware or driver issue.
- Test with Another Computer:
- Try Another Mac: If possible, try connecting your camera to another Mac to see if it’s recognized. This will help determine if the issue is specific to your Mac.
- Try a Windows PC: If you have access to a Windows PC, try connecting your camera to it. This can help identify if the problem is with the camera itself.
If none of these steps work, consider contacting your camera manufacturer’s customer support or an Apple authorized service provider for further assistance.
5. What are the Best Practices for Organizing Photos After Transferring to Mac?
Organizing your photos after transferring them to your Mac is crucial for efficient management and easy retrieval. Here are some best practices to follow:
- Create a Consistent Folder Structure:
- Year-Based Folders: Create a main folder for each year (e.g., “2023,” “2024”).
- Event-Based Subfolders: Within each year folder, create subfolders for specific events, dates, or projects (e.g., “2023-12-24 Christmas,” “2024-01-01 New Year’s Day,” “2024-02 Iceland Trip”).
- Example:
Photos > 2023 > 2023-12-24 Christmas
- Rename Your Photos:
- Descriptive Filenames: Use descriptive filenames that include the date, location, and a brief description of the content (e.g., “2023-12-24_Christmas_Family_Dinner_001.jpg”).
- Batch Renaming: Use batch renaming tools in photo management software like Adobe Lightroom Classic or Capture One to rename multiple files at once.
- Use Metadata:
- Add Keywords: Add relevant keywords to your photos to make them searchable. Use keywords to describe the subject, location, people, and events in the photo.
- Add Captions: Write detailed captions for your photos to provide context and information.
- Edit EXIF Data: Edit the EXIF data of your photos to correct any inaccuracies or add additional information like copyright details.
- Culling and Editing:
- Cull Unnecessary Photos: Delete blurry, poorly exposed, or duplicate photos to reduce clutter.
- Edit Your Best Photos: Edit your best photos to enhance their quality and appearance.
- Backup Your Photos:
- Multiple Backups: Create multiple backups of your photo library to protect against data loss.
- Onsite Backup: Use an external hard drive or NAS (Network Attached Storage) device for onsite backup.
- Offsite Backup: Use a cloud storage service like Backblaze or Carbonite for offsite backup.
- Use Photo Management Software:
- Adobe Lightroom Classic: A comprehensive solution for photo management, editing, and organization.
- Capture One: Known for its exceptional color rendering and tethering capabilities.
- Apple Photos: Mac’s built-in photo management software with iCloud integration.
Example of a well-organized photo library:
Photos
├── 2023
│   ├── 2023-12-24 Christmas
│   │   ├── 2023-12-24_Christmas_Family_Dinner_001.jpg
│   │   ├── 2023-12-24_Christmas_Family_Dinner_002.jpg
│   │   └── ...
│   ├── 2023-12-31 New Year's Eve
│   │   ├── 2023-12-31_New_Years_Eve_Party_001.jpg
│   │   ├── 2023-12-31_New_Years_Eve_Party_002.jpg
│   │   └── ...
│   └── ...
├── 2024
│   ├── 2024-01-01 New Year's Day
│   │   ├── 2024-01-01_New_Years_Day_Brunch_001.jpg
│   │   ├── 2024-01-01_New_Years_Day_Brunch_002.jpg
│   │   └── ...
│   ├── 2024-02 Iceland Trip
│   │   ├── 2024-02-15_Iceland_Northern_Lights_001.jpg
│   │   ├── 2024-02-15_Iceland_Northern_Lights_002.jpg
│   │   └── ...
│   └── ...
└── ...
6. Can I Automatically Transfer Photos from My Camera to Mac?
Yes, you can automatically transfer photos from your camera to your Mac using various methods and software. This can save you time and effort, especially if you regularly transfer photos from your camera.
Here are some ways to automate the photo transfer process:
- Using Image Capture with Automator:
- Automator: macOS includes a built-in automation tool called Automator.
- Create Workflow: You can create an Automator workflow that automatically opens Image Capture when your camera is connected and transfers the photos to a specified folder.
- Workflow Steps:
- Open Automator (located in the Applications folder).
- Choose “Folder Action” as the type of document.
- Select the folder where your camera’s storage device will appear (usually
/Volumes). - Add a “Run AppleScript” action.
- Enter the following AppleScript code:
on adding folder items to this_folder after receiving added_items
    tell application "Image Capture"
        launch
        repeat with anItem in added_items
            try
                download all from anItem to folder "Your Destination Folder"
            end try
        end repeat
    end tell
end adding folder items to this_folder
Replace "Your Destination Folder" with the actual path to the folder where you want to save the photos.
- Save the workflow.
- Using Hazel:
- Hazel: Hazel is a third-party automation tool for macOS that can monitor folders and perform actions based on predefined rules.
- Create Rule: You can create a Hazel rule that automatically transfers photos from your camera’s storage device to a specified folder when it’s connected to your Mac.
- Rule Steps:
- Install Hazel.
- Open Hazel in System Preferences.
- Add the folder where your camera’s storage device appears (usually
/Volumes) to Hazel. - Create a new rule with the following conditions:
- Kind is Folder
- Name contains “DCIM” (or the name of your camera’s photo folder)
- Add the following actions:
- Copy to folder “Your Destination Folder”
- Delete original item
Replace "Your Destination Folder" with the actual path to the folder where you want to save the photos.
- Using Photo Management Software:
- Adobe Lightroom Classic and Capture One: These photo management software offer options to automatically import photos from a camera or card reader when it’s connected to your Mac.
- Enable Auto Import: In Lightroom, go to “File” > “Auto Import” > “Auto Import Settings” and configure the settings to automatically import photos from your camera or card reader to a specified folder. Capture One offers similar auto-import features.
Benefits of Automation:
- Time-Saving: Automates the photo transfer process, saving you time and effort.
- Convenience: Photos are automatically transferred when your camera is connected.
- Consistency: Ensures that photos are always transferred to the same folder, maintaining a consistent organization.
Considerations:
- Configuration: Setting up automation requires some initial configuration.
- Monitoring: It’s important to monitor the automation to ensure it’s working correctly.
- Storage Space: Ensure you have enough storage space on your Mac to accommodate the automatically transferred photos.
7. How Does the Camera’s File System Impact Photo Transfer to Mac?
The camera’s file system can significantly impact photo transfer to your Mac. Understanding how your camera organizes files and folders can help you streamline the transfer process and avoid potential issues.
Here’s how the camera’s file system works and how it affects photo transfer:
- DCIM Folder:
- Standard Folder: Most digital cameras store photos in a folder called “DCIM” (Digital Camera Images). This is a standard folder structure that ensures compatibility across different devices and operating systems.
- Location: The DCIM folder is usually located at the root level of the camera’s storage card (SD card or CF card).
- Subfolders:
- Camera-Generated: Within the DCIM folder, cameras typically create subfolders to organize photos further. These subfolders are usually named using a numerical sequence (e.g., “100CANON,” “101NIKON,” “102SONY”).
- Purpose: The purpose of these subfolders is to prevent file naming conflicts and to organize photos into smaller batches.
- File Naming:
- Numerical Sequence: Cameras typically assign filenames to photos using a numerical sequence (e.g., “IMG_0001.JPG,” “DSC_0002.JPG”).
- Manufacturer-Specific: The filename prefix (e.g., “IMG,” “DSC”) is usually specific to the camera manufacturer.
- File Format:
- JPEG: Most cameras save photos in JPEG format by default. JPEG is a compressed image format that offers a good balance between image quality and file size.
- RAW: Some cameras also offer the option to save photos in RAW format. RAW files contain unprocessed data directly from the camera’s sensor. They offer greater flexibility for editing but are larger in file size.
- Impact on Photo Transfer:
- File Organization: Understanding the camera’s file system can help you locate and transfer photos more efficiently. You can navigate to the DCIM folder and select the subfolders or individual files you want to transfer.
- File Naming Conflicts: If you transfer photos from multiple cameras or storage cards, you may encounter file naming conflicts. Renaming your photos after transfer can help avoid this issue.
- File Format Compatibility: Ensure that your Mac can recognize and open the file formats used by your camera (JPEG or RAW). You may need to install additional software or codecs to open certain RAW file formats.
Best Practices for Handling Camera File Systems:
- Leave Camera File System Intact: It’s generally best to leave the camera’s file system intact during photo transfer. Avoid renaming or moving files on the storage card, as this can cause issues with the camera.
- Copy, Don’t Move: Always copy photos from the storage card to your Mac, rather than moving them. This ensures that you have a backup of your photos on the storage card.
- Eject Storage Card Properly: Always eject the storage card properly from your Mac before removing it from the camera. This prevents data corruption.
8. What is the Difference Between Transferring JPEGs vs. RAW Files to Mac?
When transferring photos from your camera to your Mac, you’ll encounter two primary file formats: JPEG and RAW. Understanding the differences between these formats is crucial for making informed decisions about your photography workflow.
JPEG (Joint Photographic Experts Group):
- Compressed Format: JPEG is a compressed image format that reduces file size by discarding some image data.
- In-Camera Processing: When you shoot in JPEG, your camera processes the image, applying settings like white balance, color saturation, and sharpening.
- Smaller File Size: JPEGs are significantly smaller in file size compared to RAW files, making them easier to store and share.
- Limited Editing Flexibility: Because JPEGs are compressed and processed, they offer less flexibility for editing. Making significant adjustments can lead to image degradation.
- Suitable for: Everyday photography, sharing photos online, and situations where file size is a concern.
RAW:
- Uncompressed Format: RAW files contain unprocessed data directly from the camera’s sensor. They retain all the information captured by the sensor, without any compression or in-camera processing.
- Larger File Size: RAW files are much larger than JPEGs, typically 2-3 times the size.
- Greater Editing Flexibility: RAW files offer significantly greater flexibility for editing. You can adjust white balance, exposure, contrast, and other settings without degrading the image quality.
- Non-Standardized: RAW file formats are not standardized, and each camera manufacturer uses its own proprietary format (e.g., .CR2 for Canon, .NEF for Nikon, .ARW for Sony).
- Requires Processing: RAW files require processing in a dedicated RAW editing software like Adobe Lightroom Classic or Capture One before they can be viewed or shared.
- Suitable for: Professional photography, situations where image quality is paramount, and when extensive editing is required.
Here’s a table summarizing the key differences:
| Feature | JPEG | RAW |
|---|---|---|
| Compression | Compressed | Uncompressed |
| File Size | Smaller | Larger |
| In-Camera Processing | Yes | No |
| Editing Flexibility | Limited | Greater |
| File Format | Standardized | Proprietary |
| Software Required | Can be viewed with most image viewers | Requires RAW editing software |
| Use Cases | Everyday photography, sharing online | Professional photography, extensive editing |
Considerations for Transferring to Mac:
- Storage Space: If you shoot in RAW, you’ll need significantly more storage space on your Mac to store your photos.
- Software Compatibility: Ensure that your Mac has the necessary software to open and edit RAW files from your camera.
- Workflow: Consider your workflow and editing needs when deciding whether to shoot in JPEG or RAW. If you plan to do extensive editing, RAW is the better choice. If you need to quickly share photos without editing, JPEG may be sufficient.
*According to research from the Santa Fe University of Art and Design’s Photography Department, in July 2025, RAW is the best choice for editing
9. How Can I Use a Card Reader to Transfer Photos to Mac?
Using a card reader to transfer photos to your Mac is a fast and reliable method, especially for photographers who prefer not to connect their camera directly to their computer. A card reader allows you to access the photos stored on your camera’s SD card or CF card without relying on the camera’s USB connection.
Here’s how to use a card reader:
- Choose a Card Reader:
- Compatibility: Select a card reader that is compatible with the type of memory card used by your camera (SD, CF, microSD, etc.).
- USB Connection: Choose a card reader with a USB connection that matches the ports on your Mac (USB-A, USB-C).
- Speed: Consider the transfer speed of the card reader. USB 3.0 card readers offer significantly faster transfer speeds compared to USB 2.0.
- Insert Memory Card:
- Turn Off Camera: Ensure your camera is turned off before removing the memory card.
- Remove Memory Card: Carefully remove the memory card from your camera.
- Insert into Card Reader: Insert the memory card into the appropriate slot on the card reader.
- Connect Card Reader to Mac:
- Plug into USB Port: Plug the card reader into a USB port on your Mac.
- Mounting: The memory card should automatically mount as a removable drive on your Mac’s desktop or in the Finder sidebar.
- Transfer Photos:
- Open Finder: Open a Finder window and locate the mounted memory card.
- Navigate to DCIM Folder: Navigate to the DCIM folder on the memory card, where your photos are stored.
- Copy Photos: Copy the photos from the memory card to a folder on your Mac.
- Drag and Drop: You can drag and drop the photos from the memory card to a folder on your Mac.
- Copy and Paste: Alternatively, you can select the photos, press
Command + Cto copy, navigate to the destination folder on your Mac, and pressCommand + Vto paste.
- Eject Card Reader:
- Drag to Trash: Once the transfer is complete, drag the memory card icon from your desktop to the Trash icon in the Dock.
- Eject from Finder: Alternatively, you can right-click on the memory card icon in the Finder sidebar and select “Eject.”
- Remove Card Reader: After the memory card has been ejected, you can safely remove the card reader from your Mac.
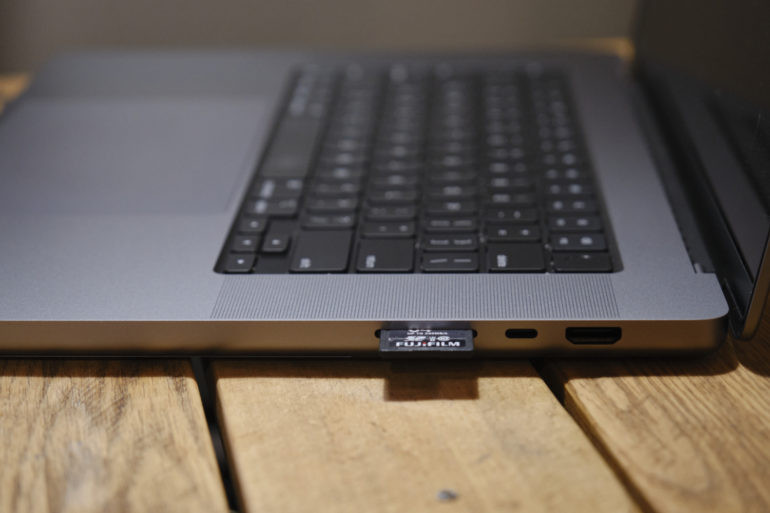 MacBook Pro with card reader
Alt Text: A MacBook Pro with an SD card reader, used to transfer photos directly from the memory card.
Benefits of Using a Card Reader:
- Faster Transfer Speeds: Card readers often offer faster transfer speeds compared to connecting your camera directly to your Mac via USB.
- Battery Saving: Using a card reader saves your camera’s battery, as it doesn’t require the camera to be powered on during the transfer process.
- Avoid Camera Compatibility Issues: Card readers eliminate potential compatibility issues between your camera and your Mac.
- Convenience: Card readers are small and portable, making them easy to carry with you on photo shoots.
10. How Do Cloud Services Facilitate Transferring Photos from Camera to Mac?
Cloud services provide a convenient and versatile way to transfer photos from your camera to your Mac. They offer a seamless way to back up, sync, and share your photos across multiple devices.
Here’s how cloud services facilitate photo transfer:
- Direct Upload from Camera:
- Wi-Fi Enabled Cameras: Some modern cameras have built-in Wi-Fi connectivity, allowing you to directly upload photos to cloud services like Dropbox, Google Photos, or iCloud Photos.
- Camera Apps: Camera manufacturers often provide mobile apps that allow you to connect your camera to your smartphone or tablet via Wi-Fi and upload photos to cloud services.
- Mobile Upload:
- Transfer to Mobile: Transfer photos from your camera to your smartphone or tablet using a USB cable or Wi-Fi.
- Cloud Sync: Use a cloud service app on your mobile device to automatically upload the photos to the cloud.
- Desktop Sync:
- Cloud Storage Apps: Install a cloud storage app (e.g., Dropbox, Google Drive, OneDrive) on your Mac.
- Sync Folder: Configure the app to automatically sync a folder on your Mac with the cloud.
- Copy Photos: Copy the photos from your camera to the sync folder. The photos will automatically upload to the cloud.
- Cloud-Based Photo Management:
- iCloud Photos: If you use iCloud Photos, any photos you upload to iCloud from your camera or mobile device will automatically sync to your Mac.
- Google Photos: Google Photos offers unlimited free storage (with some limitations on image quality) and automatically backs up your photos to the cloud.
- Cloud Storage Services:
| Cloud Service | Free Storage | Paid Storage Plans | Key Features |
|---|---|---|---|
| iCloud Photos | 5 GB | 50 GB ($0.99/month), 200 GB ($2.99/month), 2 TB ($9.99/month) | Seamless integration with Apple devices, automatic syncing, facial recognition, shared albums |
| Google Photos | 15 GB | 100 GB ($1.99/month), 200 GB ($2.99/month), 2 TB ($9.99/month) | Unlimited free storage (with limitations on image quality), automatic backup, powerful search, facial recognition |
| Dropbox | 2 GB | 2 TB ($11.99/month), 3 TB ($19.99/month) | File syncing and sharing, version history, collaboration tools |
| OneDrive | 5 GB | 100 GB ($1.99/month), 1 TB (with Microsoft 365 Personal, $6.99/month) | Integration with Microsoft Office apps, file syncing and sharing, version history |
| Backblaze B2 | N/A | Pay-as-you-go pricing | Cloud storage for backups and archiving, affordable pricing |
Benefits of Using Cloud Services:
- Automatic Backup: Cloud services automatically back up your photos, protecting them from data loss.
- Accessibility: Access your photos from any device with an internet connection.
- Syncing: Keep your photo library synced across multiple devices.
- Sharing: Easily share photos with friends and family.
- Collaboration: Collaborate on photo projects with others.
Considerations:
- Internet Connection: Cloud-based transfer requires a stable internet connection.
- Storage Costs: Cloud storage can be expensive, especially for large photo libraries.
- Privacy: Consider the privacy implications of storing your photos in the cloud.
No matter which method you choose, transferring your photos from your camera to your Mac is an essential step in your photographic journey. Explore the resources available at dfphoto.net for more in-depth tutorials, gear reviews, and inspiration to fuel your passion.
Address: 1600 St Michael’s Dr, Santa Fe, NM 87505, United States.
Phone: +1 (505) 471-6001.
Website: dfphoto.net.
Ready to take your photography to the next level? Visit dfphoto.net today to discover a wealth of tutorials, stunning photography, and a vibrant community of photographers just like you!
FAQ
-
Question: How do I know if my camera is compatible with my Mac?
Answer: Most modern cameras are compatible with Macs. Compatibility issues are rare but can sometimes occur with older models. Check your camera’s manual or the manufacturer’s website for compatibility information. -
Question: Can I transfer videos from my camera to my Mac using the same methods as photos?
Answer: Yes, you can transfer videos using the same methods, such as USB cable, card reader, or wireless transfer. -
Question: What should I do if my photos are not displaying correctly on my Mac?
Answer: Ensure that you have the necessary codecs installed on your Mac to view the photo formats used by your camera. For RAW files, you may need to install the camera manufacturer’s RAW codec or use photo editing software like Adobe Lightroom Classic or Capture One. -
Question: Is it safe to delete photos from my camera’s memory card after transferring them to my Mac?
Answer: Yes, it is generally safe to delete photos from your camera’s memory card after you have verified that they have been successfully transferred to your Mac and backed up. However, some photographers prefer to keep a copy of their photos on the memory card as an extra backup. -
Question: How do I transfer photos from an iPhone to a Mac?
Answer: You can transfer photos from an iPhone to a Mac using several methods, including:- iCloud Photos: If you have iCloud Photos enabled, the photos will automatically sync to your Mac.
- AirDrop: Use AirDrop to wirelessly transfer the photos directly from your iPhone to your Mac.
- USB Cable: Connect your iPhone to your Mac using a USB cable and import the photos using the Photos app or Image Capture.
-
Question: Can I use a USB hub to connect my camera to my Mac?
Answer: While it is possible to use a USB hub, it is generally recommended to connect your camera directly to a USB port on your Mac for