We’ve all been there – you’ve captured countless precious moments on your Android phone and now you need to get those photos onto your computer. Whether it’s for editing, backup, or simply freeing up space on your phone, knowing how to transfer photos from your Android phone to your computer is a fundamental skill in today’s digital world.
This guide will walk you through several straightforward methods to transfer pictures from your Android to PC without any technical expertise required. We’ll cover everything from the trusty USB cable to wireless options, ensuring you can choose the method that best suits your needs and preferences.
Let’s explore the easiest and most effective solutions to transfer your photos from your Android phone to your computer, maintaining their original quality and making the process as smooth as possible.
Part 1: Transferring Photos from Android to Computer via USB Cable
The USB cable method remains a reliable and widely used approach for transferring photos. It’s direct, generally fast, and requires minimal setup. Most importantly, it offers a secure and consistent connection for transferring large amounts of data. While it might be slightly slower than some wireless options for very large transfers, its reliability makes it a go-to for many users.
However, keep in mind that this method depends on a working USB port on your computer and a compatible cable.
Here’s a step-by-step guide on how to transfer pictures from phone to computer with a USB cable:
Step 1.
Begin by connecting your Android phone to your computer using a USB cable. For the best connection and speed, using the original cable that came with your phone is recommended.
Step 2.
Once connected, look for a USB notification on your Android phone. Swipe down from the top of your screen to access the notification shade and tap on the “USB charging” or similar notification. From the options presented, select “File Transfer” or “MTP” (Media Transfer Protocol). This allows your computer to access your phone’s files.
Step 3.
On your computer, open File Explorer (Windows) or Finder (Mac). You should see your Android phone listed as a portable device, usually under “This PC” or in the sidebar. Click on your phone’s name to access its internal storage. Navigate to the “DCIM” folder. DCIM stands for “Digital Camera Images,” and this is where most Android phones store photos and videos taken with the camera.
Step 4.
Inside the DCIM folder, you’ll find subfolders like “Camera” where your photos are typically stored. Now, simply select the photos you want to transfer. You can drag and drop them to a folder on your computer, or copy and paste them. Choose your desired destination on your PC and initiate the transfer.
Part 2: Alternative Methods to Transfer Photos from Android to Computer
While USB is a solid option, there are several other convenient ways to transfer your photos, offering flexibility and often wireless convenience. Let’s explore these alternatives.
**1. Utilizing the Built-in Microsoft Photos App
For Windows users, the “Photos” app offers a seamless way to import photos directly from your Android phone. This method is particularly efficient if you have a large collection of photos and videos to transfer.
Follow these steps to transfer photos from your Android phone to your Windows PC using the Photos app:
Step 1.
Connect your Android phone to your PC using a USB cable, ensuring it’s set to “File Transfer” mode as described in Part 1.
Step 2.
Open the “Photos” app on your Windows computer. You can find it by searching for “Photos” in the Start Menu.
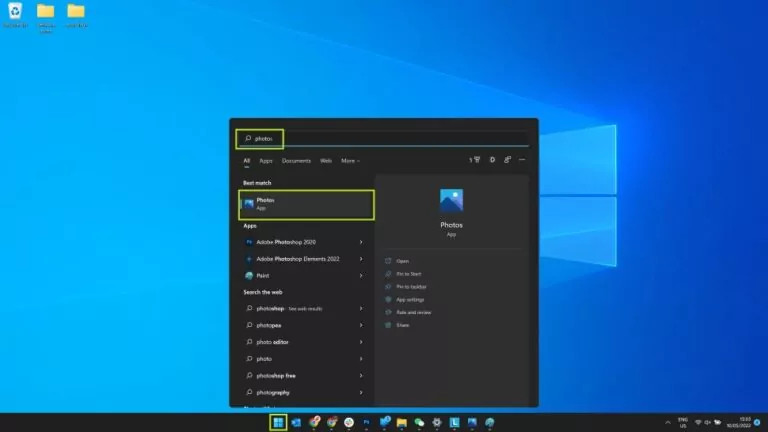 Opening Microsoft Photos App on Windows
Step 3.
In the Photos app, look for the “Import” button, usually located in the top-right corner. Click on it and select “From a connected device” or “From a USB device” depending on the options available.
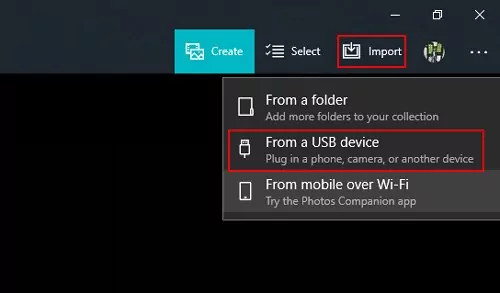 Importing Photos from Connected Device using Microsoft Photos App
Step 4.
The Photos app will detect your connected Android phone. Select your device from the list. The app will then automatically scan your phone for photos and videos.
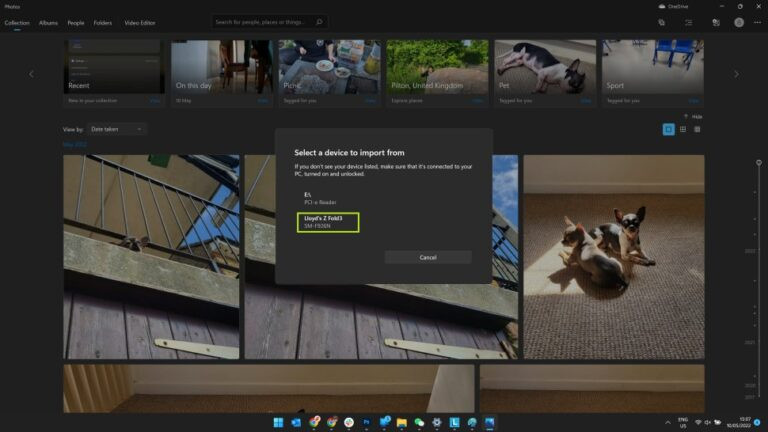
Step 5.
After scanning, the Photos app will display all the new photos and videos on your phone. You can preview them, select individual items, or click “Select all” to choose everything.
 Selecting Photos for Import in Microsoft Photos App
Step 6.
Before importing, you can customize the destination folder for your photos by clicking “Change destination.” Choose your desired location on your PC. Once you’re ready, click “Import” to begin the transfer process.
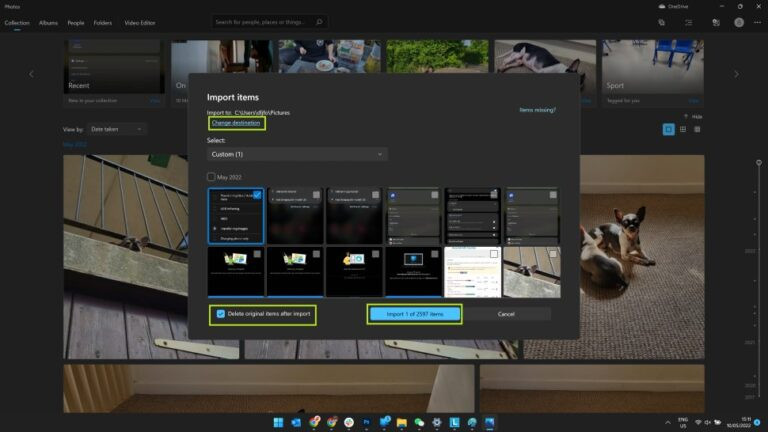 Changing Import Destination and Importing Photos in Microsoft Photos App
**2. Transferring Photos from Android to PC Using Google Photos
Google Photos provides a convenient and cloud-based solution for transferring photos. This method is ideal if you already use Google Photos for backing up your phone’s photos. It offers wireless transfer and accessibility from any device with internet access.
Here’s how to transfer photos from phone to computer using Google Photos:
Step 1.
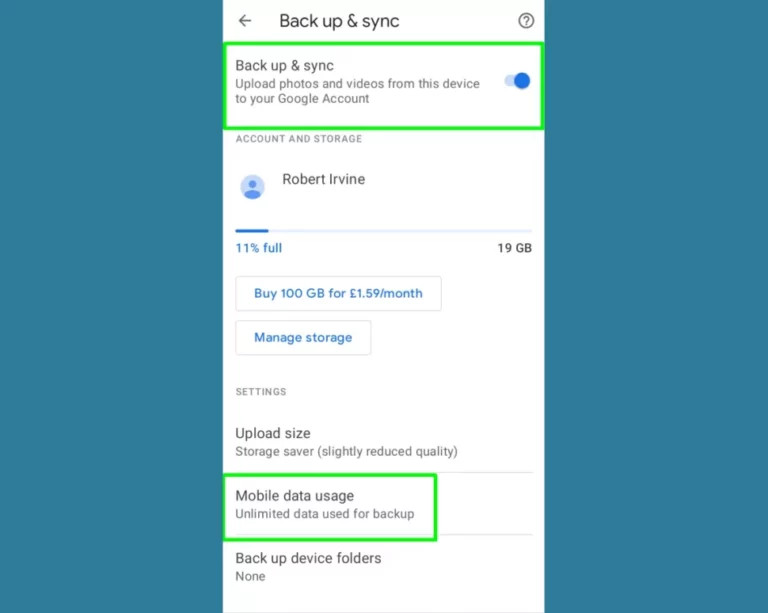
Ensure you have the Google Photos app installed on your Android phone and that backup and sync are enabled. Open the Google Photos app and make sure the photos you want to transfer are uploaded to Google Photos.
Step 2.
To manually upload photos, tap the “Upload” icon within the app. Wait for the upload process to complete. The time it takes will depend on the number of photos and your internet connection speed.
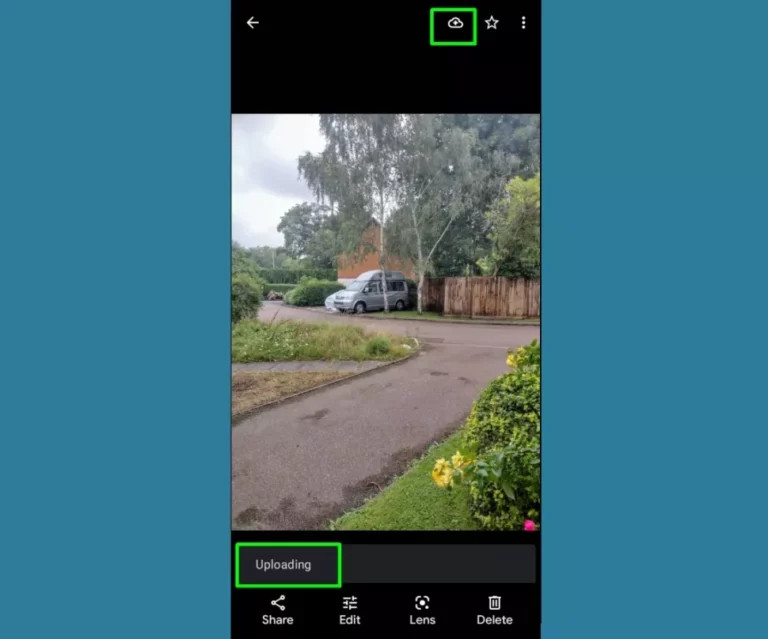
If you don’t see the cloud “upload” icon, tap the three-line menu button (hamburger icon) in the top-left corner and ensure “Backup & sync” is turned on. You can also tap “Back up now” to initiate an immediate backup.
Step 3.
On your computer, open a web browser and go to photos.google.com. Sign in with the same Google account you use on your Android phone. You should see all your uploaded photos and videos.
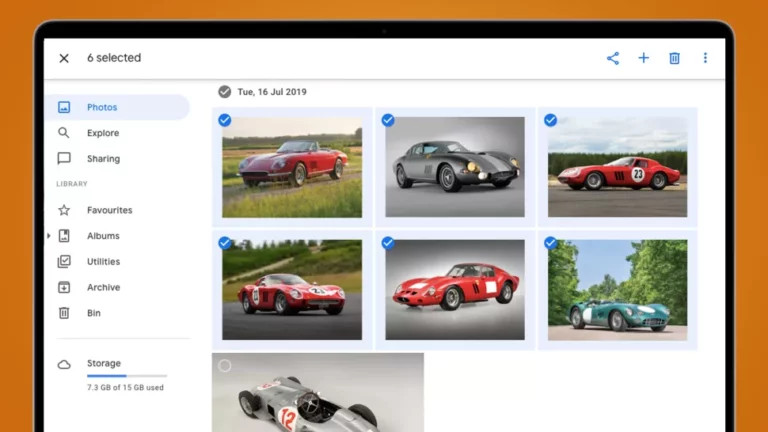
Step 4.
Select the photos you want to download to your computer. You can select multiple photos by holding down the Shift or Ctrl key (Cmd key on Mac) while clicking. Once you’ve selected your photos, click the three-dot menu icon (More options) and choose “Download.” Your photos will be downloaded to your computer, usually in a zip file if you’ve selected multiple images.
**3. Transferring Photos from Android Phone to Computer Using Bluetooth
Bluetooth offers a wireless option for transferring photos, especially useful for transferring a small number of images when a USB cable or Wi-Fi isn’t readily available. However, Bluetooth is generally slower than Wi-Fi or USB, so it’s best suited for smaller transfers.
Before proceeding, ensure your computer has Bluetooth capabilities. Most laptops have built-in Bluetooth, but desktop computers may require a Bluetooth adapter.
Here’s how to transfer photos from Android to PC via Bluetooth:
Step 1.
Enable Bluetooth on your computer. On Windows, go to Settings > Devices > Bluetooth & other devices and turn Bluetooth on.
Step 2.
Enable Bluetooth on your Android phone and pair it with your computer. Go to Settings > Bluetooth on your phone and turn Bluetooth on. Your phone will scan for nearby Bluetooth devices. Select your computer from the list of available devices to pair them. You may need to confirm a pairing code on both devices.
Step 3.
Once paired, select the photos you want to transfer on your Android phone. Tap the “Share” icon (usually a three-pronged icon) and choose Bluetooth from the sharing options.
Step 4.
Select your computer from the list of Bluetooth devices. On your computer, you may receive a notification asking you to accept the incoming file. Accept the transfer to begin receiving the photos. The photos will be saved in your computer’s default Bluetooth receiving folder, which you can usually configure in Bluetooth settings.
**4. Transferring Photos Using Email
Email is a simple and universally accessible method for sending a few photos from your Android phone to your computer. It’s ideal for quickly sharing a small selection of images. However, email services typically have file size limits (often around 25MB), so this method isn’t suitable for transferring large numbers of high-resolution photos or videos.
The process is straightforward:
Select the photos you wish to transfer on your Android phone. Tap the “Share” icon and choose your email app (like Gmail, Outlook, etc.). Compose an email to yourself or another email address you can access on your computer. Attach the selected photos to the email. Send the email. Open your email account on your computer. Locate the email you sent and download the attached photos to your computer.
Part 3: The Most Efficient Method: AirDroid Personal
For a more comprehensive and efficient solution, consider using AirDroid Personal. This versatile app offers a robust way to transfer photos from Android to computer and manage your Android device from your PC. AirDroid Personal excels in cross-platform compatibility, working seamlessly across Windows, Mac, Linux, and even iOS. It provides fast transfer speeds and a user-friendly interface, making it an excellent choice for regular photo transfers and device management. Notably, AirDroid Personal can also facilitate file transfers even when your phone is offline, within the same network.
Here are some of the key advantages of AirDroid Personal:
Advanced Features of AirDroid Personal
- Cross-Platform File Transfer: Transfer files effortlessly between Android, iOS, Windows, Mac, and Linux.
- Versatile Data Support: Supports transferring various file types, including photos, videos, documents, APKs, and more.
- High-Speed Transfer: Experience lightning-fast transfer speeds, significantly quicker than Bluetooth and often faster than cloud-based solutions for large files.
- Screen Mirroring: Mirror your Android screen to your PC for presentations, gaming, or easier app control.
- SMS & Call Management: Send and receive SMS messages and manage calls directly from your computer.
- Remote File Management: Intuitively manage your Android device’s files from the convenience of your computer.
- Remote Camera Access: Utilize your Android phone’s camera remotely for monitoring or other purposes.
Get Free App
Using AirDroid Personal is remarkably easy. Here’s a step-by-step guide on how to transfer pictures from an Android phone to a computer using AirDroid Personal:
Step 1.
Download and install the AirDroid Personal Desktop Client on your computer and the AirDroid Personal app on your Android phone. Create an AirDroid account and log in to both the desktop client and the mobile app using the same account credentials.
Step 2.
In the AirDroid Personal mobile app, under the “My Devices” section, you will see your computer listed (assuming both devices are logged into the same account and connected to the internet or same network). Tap on your computer’s name to establish a connection.
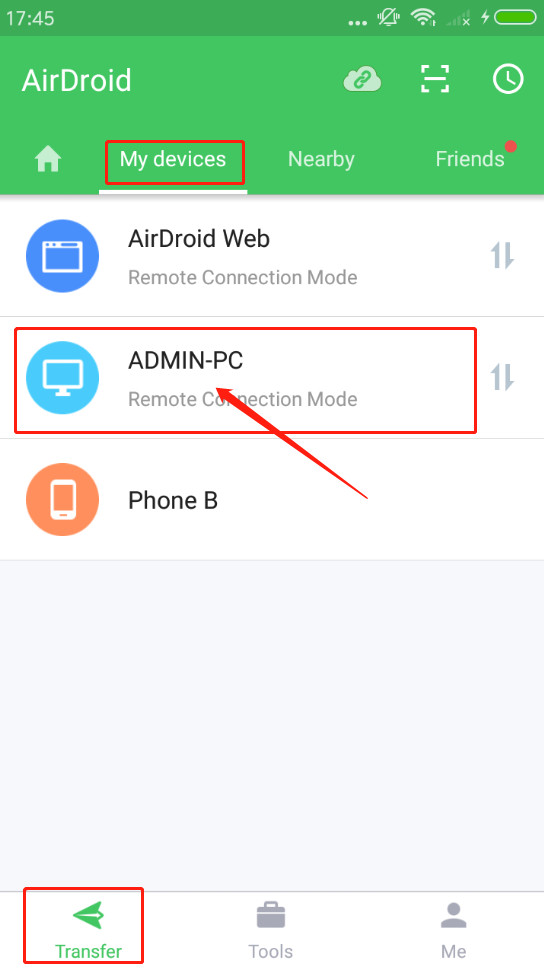 Connecting Devices in AirDroid Personal App
Step 3.
Once connected, in the AirDroid Personal app, tap “File Transfer” at the bottom of the screen. Then, tap the attachment icon (usually a plus sign or paperclip) and select “Files.” Browse your phone’s storage, select the photos you want to transfer, and tap “Send.” The selected photos will be instantly transferred to your computer.
 Sending Photos via File Transfer in AirDroid Personal App
By default, AirDroid Personal automatically downloads received files to a designated folder on your computer. To customize the download location:
Step 1.
Open the AirDroid Personal Desktop Client on your computer and access its settings menu (usually found in the top-right corner or application menu).
Step 2.
Look for the “Transfer” or “File Transfer” settings. Here, you will find an option to “Save received files to.” Click “Browse” or “Change” to select your desired output folder on your computer. Confirm your selection, and all future photo transfers will be saved to this location.
 Selecting Output Folder for Received Files in AirDroid Personal Desktop Client Settings
Final Thoughts
You now have a comprehensive understanding of how to transfer photos from your Android phone to your computer using various methods. From the simplicity of a USB cable to the advanced features of AirDroid Personal, choose the method that best aligns with your needs and workflow.
While all methods discussed are viable, AirDroid Personal stands out as a highly efficient and feature-rich solution, particularly for users who frequently transfer files between devices and seek a seamless, cross-platform experience.
FAQs
- How do I transfer pics from my Android to my computer?
You can transfer photos from your Android phone to your computer using a USB cable, Google Photos, email, Bluetooth, or a third-party app like AirDroid Personal. Each method has its advantages depending on your needs and the number of photos you want to transfer.
- What is the best way to transfer my pics from Android to my computer?
 Author Charudatta Image
For quickly transferring a large number of photos and for overall efficiency and feature richness, AirDroid Personal is highly recommended. It offers fast speeds, cross-platform support, and additional device management features, making it a top choice for regular photo and file transfers between Android and computers.