Want to get your photos from your Android phone onto your Chromebook computer? It’s a common need, whether you’re backing up precious memories, editing photos on a larger screen, or simply sharing them with your Chromebook. Fortunately, transferring photos from your Android phone to your Chromebook computer is easier than you might think. This guide will walk you through three straightforward methods, from the newest seamless options to reliable wired connections, ensuring you can choose the best way to transfer your photos quickly and efficiently.
Method 1: Leveraging Phone Hub for Instant Photo Access
For Chromebook users deeply embedded in the Google ecosystem, Phone Hub offers the most integrated and convenient way to access your recent photos. This feature eliminates the need for actual transfer in many cases, providing instant access to your phone’s latest snapshots directly on your Chromebook. Think of it as a bridge between your devices, allowing you to view and download photos as needed.
However, before you can enjoy this seamless integration, there are a few prerequisites and a quick setup process to follow. Ensure your devices meet these minimum requirements:
- Android Phone: Must be running Android 8 or higher. Most modern Android phones will meet this requirement.
- Chromebook: Needs to be on ChromeOS version 103 or newer. Keep your Chromebook updated to benefit from the latest features.
Once you’ve confirmed compatibility, follow these simple steps to set up Phone Hub and enable photo access:
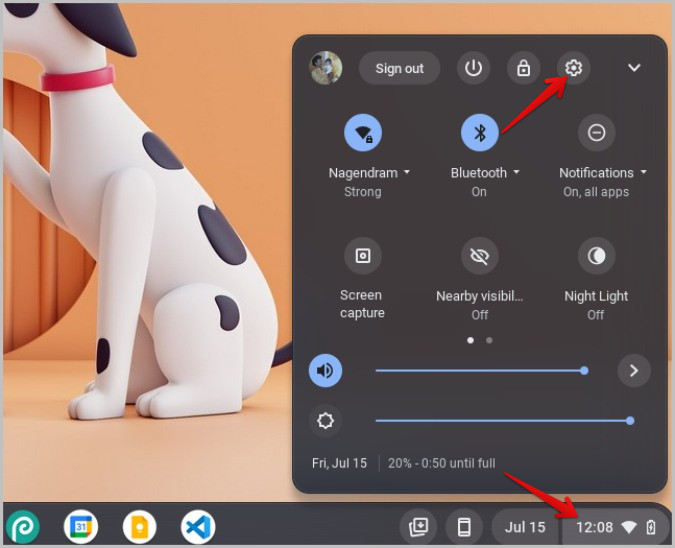
- Open ChromeOS Settings: On your Chromebook, locate the system tray in the bottom right corner of the screen (where the time is displayed). Click on it, and then select the Settings icon (shaped like a cog) to open the ChromeOS Settings app.
 Opening ChromeOS Settings
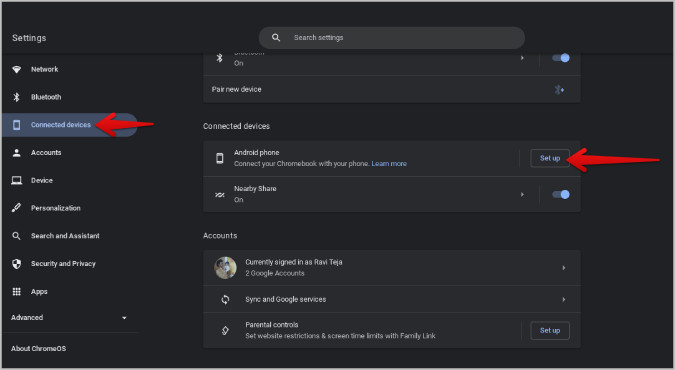
- Navigate to Connected Devices: In the Settings menu, find and click on the Connected devices option. Then, next to “Android phone,” you’ll see a Set-up button. Click on this button to begin the connection process.
 Setting Up Android Phone Connection on ChromeOS
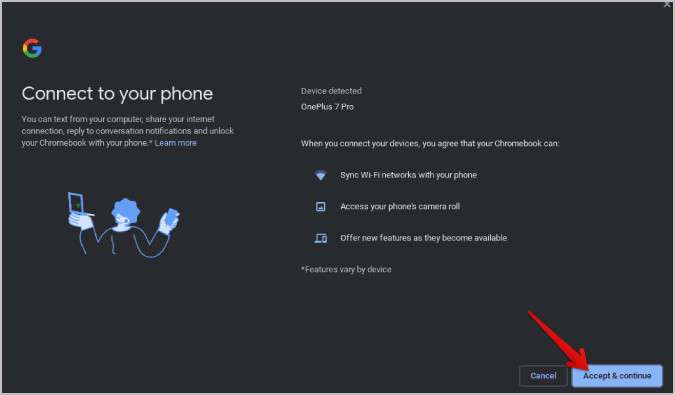
- Confirm Your Google Account: Follow the on-screen prompts to continue the setup. You may be asked to enter your Google password for security confirmation. ChromeOS will typically detect the Android phone associated with the Google account you’re currently using on your Chromebook, streamlining the process.
 Accepting to connect the Android device with ChromeOS
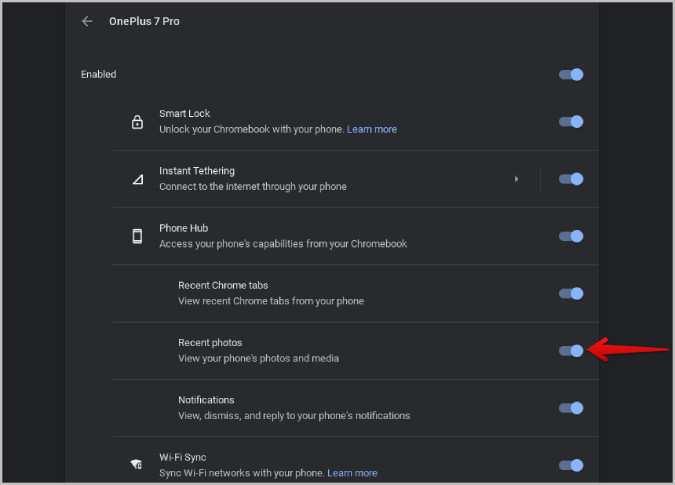
- Enable Recent Photos: After successful connection, you’ll see your Android phone listed under “Connected devices.” Click on your phone’s name and then find the Recent photos option. Toggle the switch next to it to enable this feature.
 Enabling Recent Photos on ChromeOS
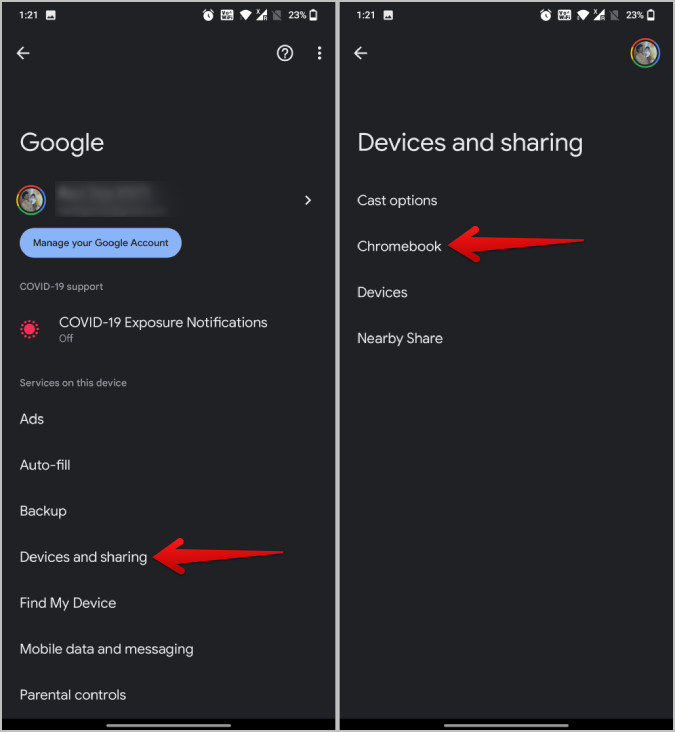
- Configure Android Settings: Now, switch to your Android phone. Open the System settings app on your phone (usually accessed by swiping down from the top of the screen and tapping the settings cog icon). Scroll down and select the Google option.
 Opening Google Settings on Android
- Access Devices & Sharing: Within the Google settings, tap on Devices & sharing. Then, select the Chromebook option from the list.
 Opening Chromebook Settings on Android
- Activate Photos and Media Sharing: Finally, on the Chromebook settings page within your Android phone, enable the toggle next to Photos and media. If you don’t see this option, double-check that you’ve correctly connected your phone to your Chromebook as outlined in the previous steps.
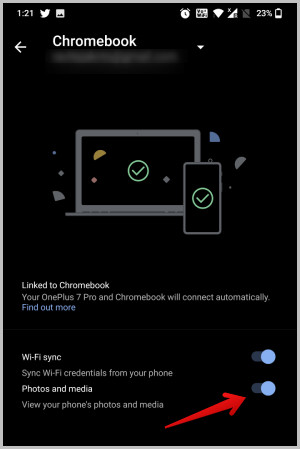 Enabling Photos and Media on Android Phone for Chromebook
With setup complete, accessing your recent photos is incredibly simple. Click the Phone Hub icon in your Chromebook’s dock (it looks like a phone). You’ll see a “Recent photos” section displaying the latest images from your Android phone.
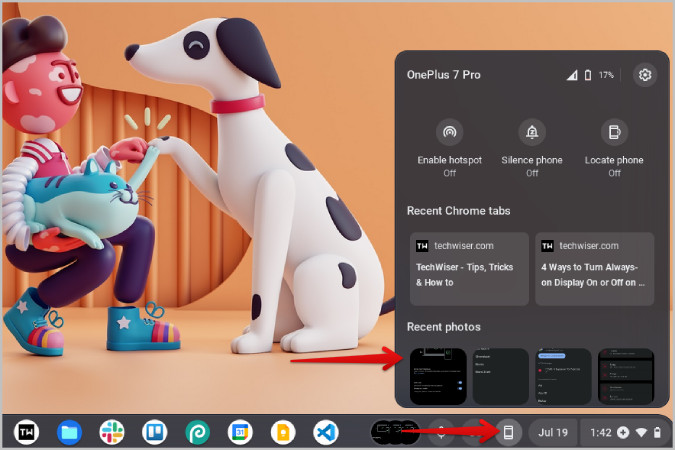 Recent Photos option on Chromebook in Phone Hub
To use a photo, simply click on it. This will download the photo to your Chromebook, allowing you to access and use it instantly without a formal transfer process. Keep in mind that Phone Hub typically shows only the most recent photos, so for larger transfers or accessing older images, you’ll need to explore other methods.
Method 2: Utilizing Nearby Share for Wireless Photo Transfers
While Phone Hub provides convenient access to recent photos, its limitation to the latest few images might not suffice for all users. This is where Nearby Share shines. Functionally similar to Apple’s AirDrop, Nearby Share offers a straightforward and wireless way to transfer photos and other files between Android devices and Chromebooks.
Before you can use Nearby Share, ensure it’s enabled on both your Android phone and your Chromebook. In most cases, Nearby Share is enabled by default, but it’s worth a quick check in your device settings. Also, Nearby Share relies on both Bluetooth and Wi-Fi for operation, so confirm that both are turned on for both devices.
Follow these steps to transfer photos from your Android phone to your Chromebook computer using Nearby Share:
- Select Photos to Share on Android: Open the Gallery app (or your preferred photo management app) on your Android phone. Select the photos you wish to transfer to your Chromebook. Then, tap the Share icon (usually represented by three connected dots or an upward-pointing arrow).
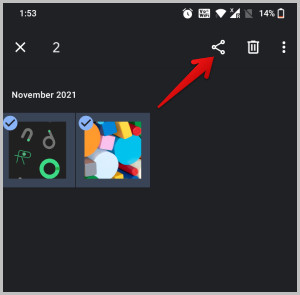 Sharing photos from Android phone
-
Choose Nearby Share: In the Android share sheet menu that appears, look for and select the Nearby Share option. Note that some gallery apps may use their own custom share sheets. If you don’t immediately see Nearby Share, look for a “More” or “Other options” button within the share sheet to access the standard Android share options where Nearby Share should be available.
-
Select Your Chromebook: If both your Android phone and Chromebook are logged in with the same Google account and have Nearby Share, Wi-Fi, and Bluetooth enabled, your Chromebook should appear in the Nearby Share menu on your phone as a recognized device. Tap on your Chromebook’s name to initiate the transfer.
 Sharing photos from Android to Chromebook through Nearby Share
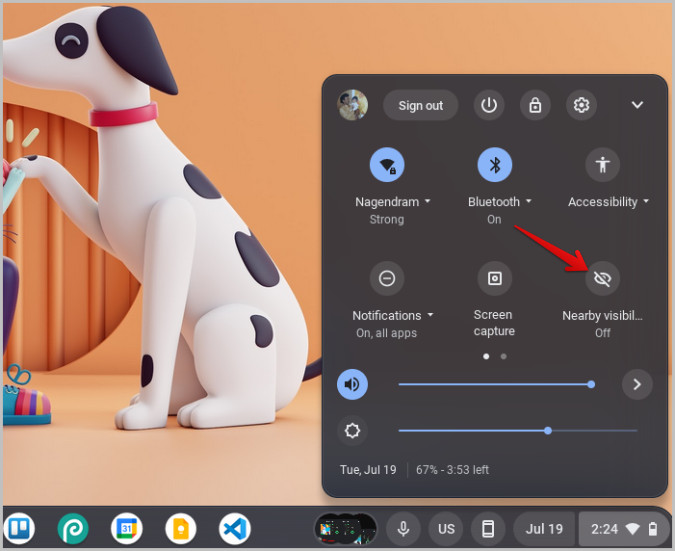
- Enable Nearby Visibility (If Needed): If your Chromebook doesn’t appear in the Nearby Share menu, it might be due to visibility settings. On your Chromebook, click on the system tray (bottom right corner) and select the Nearby Share option. Choose “Everyone” or “Contacts” under “Device visibility” to make your Chromebook discoverable. Now, your Chromebook should appear in the Nearby Share panel on your Android device.
 Enabling Nearby Visibility on ChromeOS
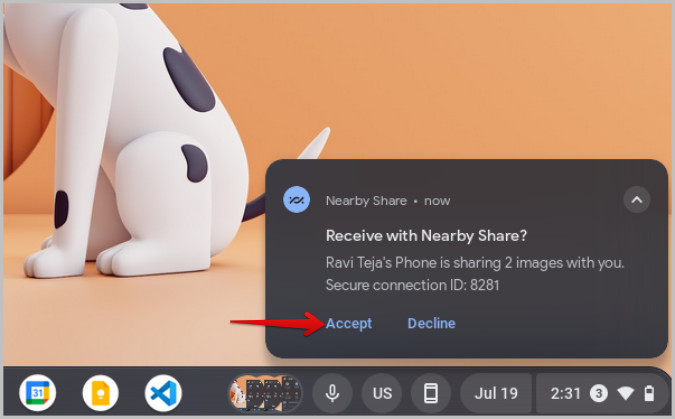
- Accept Incoming Files on Chromebook: When you initiate the share from your Android phone, your Chromebook will display a notification prompting you to accept the incoming files from Nearby Share. Click on Accept to proceed with the photo transfer.
 Accepting the files from Android through Nearby Share on ChromeOS
- Transferring Photos: Once accepted, the photo transfer process will begin automatically. You’ll see a progress indicator on both devices. Upon completion, the photos will be saved to your Chromebook’s “Downloads” folder by default.
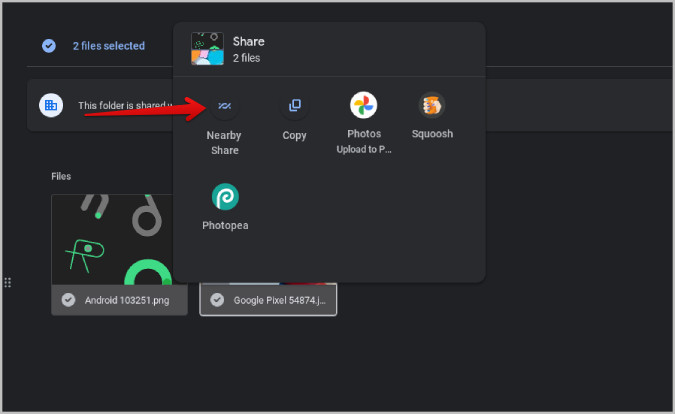
You can also use Nearby Share to transfer photos in the opposite direction – from your Chromebook to your Android phone. To do this, open the Files app on your Chromebook, select the photos you want to share, right-click (or two-finger tap) on the selected photos, and choose Share. In the share sheet, select Nearby Share and then choose your Android phone from the list of available devices.
 Sharing through Nearby Share from ChromeOS
Nearby Share provides a fast and convenient wireless solution for transferring photos between your Android phone and Chromebook, especially for larger batches of photos or when you need to transfer files beyond just recent images.
Method 3: Reliable USB Transfer for Wired Connection
While wireless methods like Phone Hub and Nearby Share offer convenience, sometimes a wired connection provides the most reliable and stable transfer, particularly when dealing with a large number of photos or if you encounter issues with wireless connectivity. Using a USB cable is a tried-and-true method for transferring photos from your Android phone to your Chromebook computer.
Here’s how to transfer photos using a USB cable:
-
Connect with USB Cable: Use a USB cable to physically connect your Android phone to your Chromebook computer. Typically, a USB-C cable is used for modern Android phones and Chromebooks, but older devices might use Micro-USB.
-
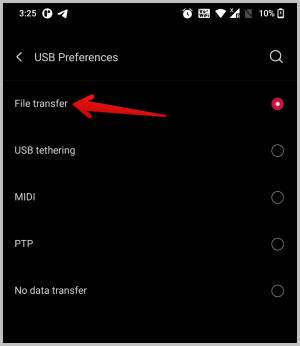
Select File Transfer Mode on Android: Once connected, your Android phone will usually display a notification indicating the USB connection. Swipe down from the top of your phone screen to access notifications and tap on the USB notification. You will be presented with options for USB usage. Select File Transfer (or sometimes labeled as MTP or PTP) to enable data transfer between your devices.
 Using File Transfer option for USB Preference on Android
- Access Android Files on Chromebook: Open the Files app on your Chromebook (the blue folder icon in the dock). In the left-hand sidebar of the Files app, you should see your Android phone listed as a connected device. Click on your phone’s name to access its file system.
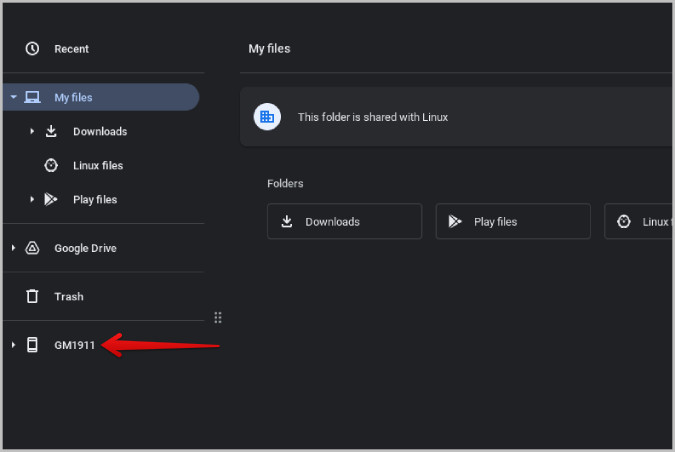 Android Phone files on Chromebook
- Copy Photos: Navigate through your Android phone’s folders within the Files app to locate your photos (usually found in the “DCIM” folder for camera photos or “Pictures” for screenshots and other images). Select the photos you want to transfer. You can select multiple photos by holding down the Shift or Ctrl key while clicking. Right-click (or two-finger tap) on the selected photos and choose Copy.
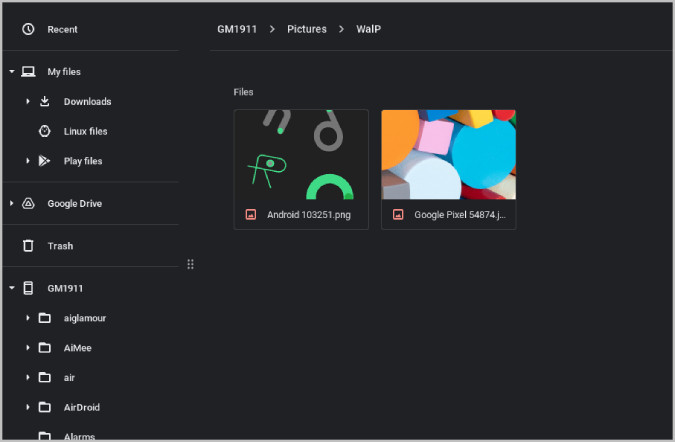 Sharing files from Android to ChromeOS with USB
- Paste Photos to Chromebook: In the Files app sidebar, navigate to a folder on your Chromebook where you want to save the photos (e.g., “Downloads,” “Pictures,” or Google Drive). Right-click in the desired folder and select Paste. The photos will be copied from your Android phone to your Chromebook. Alternatively, you can also drag and drop the selected photos from your phone’s window to a Chromebook folder window. Important Note: Dragging and dropping might move files instead of copying them, potentially removing them from your phone. Using “Copy” and “Paste” ensures you retain the original photos on your Android phone.
The process for transferring photos from your Chromebook to your Android phone via USB is similar. Connect your phone via USB, select “File Transfer” mode, access your Chromebook’s files in the Files app on your phone (if supported), copy photos from your Chromebook, and paste them into a folder on your Android phone. A more common approach for Chromebook to Android transfer via USB is to simply navigate to the desired photos on your Chromebook within the Files app, copy them, then navigate to your phone in the sidebar and paste them into a chosen folder on your phone.
Choosing the Best Method for You
Each of these methods offers a convenient way to transfer photos from your Android phone to your Chromebook computer. The best method for you will depend on your specific needs and preferences:
- Phone Hub: Ideal for quickly accessing and using recent photos directly from your Chromebook without a formal transfer. Best for seamless integration and fast access to the latest snapshots.
- Nearby Share: Excellent for wireless transfers of larger batches of photos and other files. Great for convenience and ease of use when both devices are nearby.
- USB Transfer: The most reliable method, especially for large transfers or when wireless connections are unstable. Provides a secure and direct wired connection for dependable photo transfers.
No matter which method you choose, transferring photos from your Android phone to your Chromebook computer is a simple process. Start exploring these options and find the one that best fits your workflow!