Transferring photos from your iPhone to your PC is a common need for various reasons, whether it’s for creating backups, freeing up storage space on your phone, or simply wanting to edit them on a larger screen. Fortunately, there are several straightforward methods to transfer photos from your iPhone to a PC, ensuring your precious memories are safely stored and easily accessible. This guide will walk you through the most effective ways to achieve this, catering to different needs and preferences.
Method 1: Utilizing iCloud Photos for Seamless Transfer
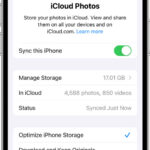
iCloud Photos offers a seamless and automatic way to manage your photo library across all your Apple devices, and even your PC. By enabling iCloud Photos, any new photos and videos you capture on your iPhone will be automatically uploaded to iCloud and become accessible on your PC through the iCloud for Windows application or via iCloud.com.
The primary advantage of using iCloud Photos is its convenience and continuous synchronization. Once set up, you won’t need to manually transfer photos from your iPhone to your PC again for new captures. Your photos are always backed up and readily available. iCloud Photos stores your original, high-resolution photos and videos, ensuring no loss in quality. You also have the option to optimize device storage, keeping smaller, device-optimized versions on your iPhone while the full-resolution originals remain in iCloud, ready for download when needed.
To use iCloud Photos:
- On your iPhone, navigate to Settings > [Your Name] > iCloud > Photos.
- Toggle iCloud Photos to the On position.
- On your PC, download and install iCloud for Windows from the Microsoft Store.
- Sign in to iCloud for Windows using your Apple ID.
- Ensure Photos is selected within iCloud for Windows settings.
 Accessory prompt to allow or don’t allow accessory to connect.
Keep in mind that iCloud Photos uses your iCloud storage. Ensure you have sufficient storage space to accommodate your photo and video library. You can check your current storage usage and upgrade your iCloud storage plan if necessary through your Apple ID account settings.
Method 2: Importing Photos to Your PC Using a USB Cable
For users who prefer a direct connection or want to transfer photos from iPhone to PC without relying on cloud services, using a USB cable is a reliable and straightforward method. This approach involves physically connecting your iPhone to your PC and importing photos using either the Apple Devices app or the Photos app in Windows.
Transferring Photos to Windows PC via USB
To transfer photos from your iPhone to a Windows PC using a USB cable, follow these steps:
- Install the Apple Devices app: If you haven’t already, download and install the Apple Devices app from the Microsoft Store on your PC. This application is essential for your Windows PC to recognize your iPhone correctly for file transfer.
- Connect your iPhone: Connect your iPhone to your PC using a USB cable. Ensure both devices are powered on.
- Unlock your iPhone and Trust the Computer: Unlock your iPhone using your passcode. You may see a prompt asking “Trust This Computer?”. Tap Trust or Allow to proceed. This step is crucial for your PC to access files on your iPhone.
- Access Photos via File Explorer or Microsoft Photos App: Once your iPhone is connected and trusted, it should appear as a portable device in Windows File Explorer under “This PC”. You can browse the internal storage to locate your photos, typically found in the DCIM folder. Alternatively, you can use the Microsoft Photos app which often automatically detects connected devices and prompts you to import photos. For detailed instructions on using the Microsoft Photos app, you can visit Microsoft’s official guide on importing photos from iPhone to PC.
If you are using iCloud Photos, remember that the photos stored in iCloud might not be readily available for direct USB transfer unless they are downloaded in their original, full-resolution format to your iPhone. Ensure your desired photos are downloaded to your device if you intend to transfer them via USB.
For video compatibility, it’s worth noting that some videos transferred from iPhone might appear rotated incorrectly in the Microsoft Photos app. In such cases, adding these videos to iTunes on your PC can ensure they play in the correct orientation.
To enhance compatibility of your iPhone photos and videos with Windows, you can adjust your iPhone camera settings:
- On your iPhone, open the Settings app.
- Tap Camera, then Formats.
- Select Most Compatible. This setting will ensure your iPhone captures photos and videos in JPEG and H.264 formats, which are widely compatible with Windows systems.
 Mac screen showing the photos available for import
Transferring Photos to Mac via USB (Simplified)
While this guide focuses on transferring to PC, for Mac users, the process is even simpler as Macs natively support iPhone connections. To transfer photos from iPhone to Mac, connect your iPhone via USB, open the Photos app on your Mac, and follow the on-screen prompts to import your photos. The Photos app on Mac is designed to seamlessly recognize your iPhone and guide you through the import process, similar to the steps outlined for Windows but without the need for a separate Apple Devices app.
Conclusion: Choosing the Best Method to Transfer iPhone Photos to PC
Both iCloud Photos and USB cable transfer methods offer effective ways to transfer photos from your iPhone to your PC. iCloud Photos provides continuous, automatic syncing and backup, ideal for users within the Apple ecosystem and those who value cloud convenience. USB transfer offers a direct, cable-based approach, suitable for one-time transfers or users who prefer not to use cloud services.
Ultimately, the best method depends on your individual needs and preferences. Whether you choose the cloud-based efficiency of iCloud Photos or the direct control of USB transfer, you can confidently transfer photos from your iPhone to your PC, ensuring your valuable memories are preserved and accessible.