Are you looking for the easiest and most effective methods on How To Transfer Photos And Videos From Android To Pc? At dfphoto.net, we understand the importance of preserving your precious memories and creative work. This guide provides various solutions, including USB, Wi-Fi, and cloud-based options, ensuring you can effortlessly manage your visual content. We’ll cover everything from quick drag-and-drop techniques to more advanced features like differential backups and photo organization. Let’s explore the best ways to safeguard and enjoy your photos and videos with seamless Android to PC transfer, photo backup, and efficient file management.
1. Understanding Your Needs for Android to PC Transfer
Before diving into the methods, let’s consider why you might need to transfer photos and videos from your Android device to your PC. Understanding your specific needs will help you choose the most suitable method.
- Backing Up Memories: Ensuring your precious photos and videos are safe from device loss or damage.
- Freeing Up Storage: Clearing space on your Android device by moving files to your PC.
- Editing and Enhancing: Transferring files for professional editing on your computer using software like Adobe Photoshop or Lightroom.
- Sharing and Presentation: Easily sharing photos and videos on a larger screen or creating presentations.
- Archiving: Creating a personal archive of your visual content for long-term preservation.
Knowing your primary reason for transferring will guide you in selecting the most efficient and effective method.
2. Method 1: Transferring Photos and Videos via USB Cable
Using a USB cable is one of the simplest and fastest ways to transfer files from your Android device to your PC. It’s a direct connection, eliminating the need for an internet connection.
2.1. Step-by-Step Guide
-
Connect Your Android Device: Use a USB cable to connect your Android device to your PC.
 Connecting Android to PC via USB for photo transfer
 -
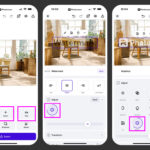
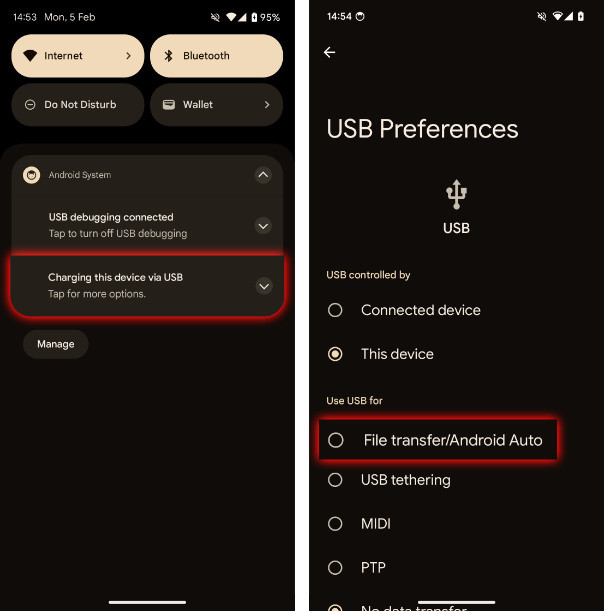
Select File Transfer Mode: On your Android device, swipe down from the top of the screen and tap the notification that says “Charging this device via USB.” Choose “File Transfer” or “MTP (Media Transfer Protocol).”
-
Access Your Device on PC: Open File Explorer on your PC. Your Android device should appear as a removable drive.
-
Navigate to Your Photos and Videos: Typically, photos and videos are stored in the “DCIM” (Digital Camera Images) folder or the “Pictures” folder on your device’s internal storage or SD card.
-
Copy and Paste: Select the files you want to transfer and drag them to your desired folder on your PC, or use copy-paste commands.
2.2. Pros of Using USB Transfer
- Speed: USB transfers are generally faster than wireless methods, especially for large files.
- Simplicity: The drag-and-drop method is straightforward and easy to understand.
- No Internet Required: You don’t need an internet connection, making it ideal for offline transfers.
- Direct Transfer: Files are directly transferred from your device to your PC without any intermediaries.
2.3. Cons of Using USB Transfer
- Cable Dependency: Requires a USB cable, which might not always be available.
- Manual Process: The transfer process is manual and can be time-consuming for large libraries.
- Limited Features: Lacks advanced features like automatic backups or photo organization.
- Driver Issues: Sometimes, driver issues can prevent your PC from recognizing your Android device.
3. Method 2: Wireless Transfer Using Droid Transfer
For a more versatile solution, consider using Droid Transfer, a software designed to wirelessly transfer photos, videos, and other files from your Android device to your PC.
3.1. Step-by-Step Guide
-
Download and Install: Download and install Droid Transfer on your PC from dfphoto.net. Also, install the Transfer Companion app on your Android device.
-
Connect to the Same Network: Ensure both your PC and Android device are connected to the same Wi-Fi network.
-
Scan the QR Code: Open Transfer Companion on your Android device and Droid Transfer on your PC. Use Transfer Companion to scan the QR code displayed in Droid Transfer to establish a connection.
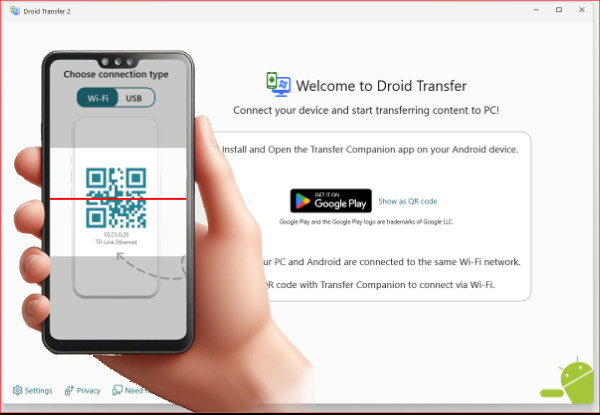 QR Code Scan for wireless Android connection
 -
Select Photos: In Droid Transfer on your PC, click the “Photos” category. Select the photos and videos you want to transfer.
-
Save to PC: Click the “Save to PC” button and choose the folder where you want to save your files.
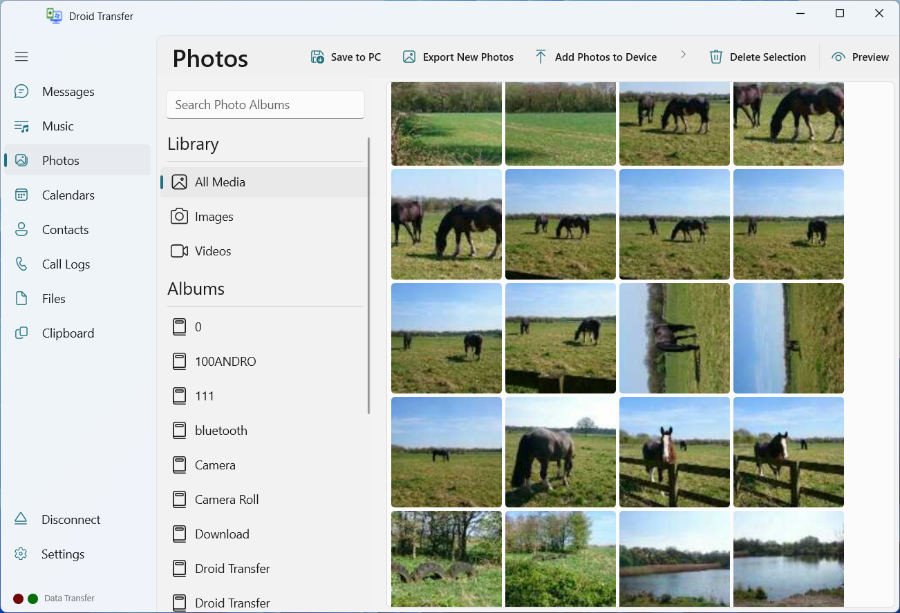 Android Photos transfer to PC
3.2. Advanced Features of Droid Transfer
-
Differential Backups: Only transfer new photos and videos since the last backup, saving time and storage space.
-
Photo Organization: Group photos by date (year/month/day) for better organization.
-
Message Photo Saving: Save photos directly from text messages.
-
Delete After Backup: Option to delete photos from your Android device after they have been successfully backed up to your PC.
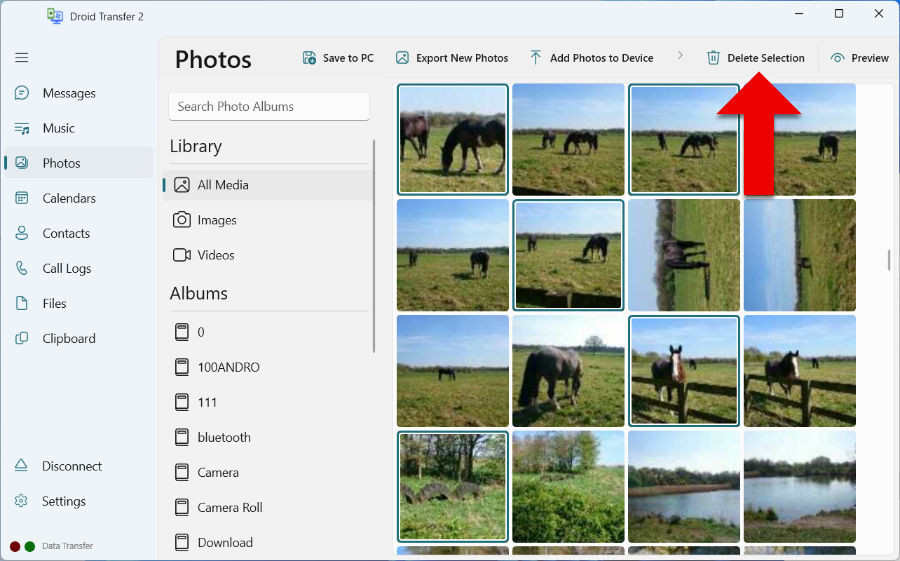 Deleting photos after they have been copied for Android
 -
Dual Connection Options: Supports both Wi-Fi and USB cable connections.
-
Comprehensive Backup: Allows backup of various image formats including JPEG, PNG, GIF, and WebP.
3.3. Pros of Using Droid Transfer
- Advanced Features: Offers features like differential backups and photo organization that USB transfer lacks.
- Wireless Convenience: Wirelessly transfer files, providing flexibility and ease of use.
- User-Friendly Interface: Easy to navigate and use, even for beginners.
- Versatile Connectivity: Supports both Wi-Fi and USB connections.
3.4. Cons of Using Droid Transfer
- Software Dependency: Requires installing software on both your PC and Android device.
- Potential Connectivity Issues: Wireless transfers can be affected by network stability.
- Cost: While a free trial is available, the full version requires a purchase.
4. Method 3: Syncing with Google Photos
Google Photos is a cloud-based service that automatically backs up your photos and videos, making them accessible on any device.
4.1. Step-by-Step Guide
-
Install and Open Google Photos: Download and open the Google Photos app on your Android device.
-
Sign In: Sign in to your Google account.
-
Enable Backup: Tap your profile picture or initial to open the menu. If you see “Backup is off,” tap “Turn on backup.”
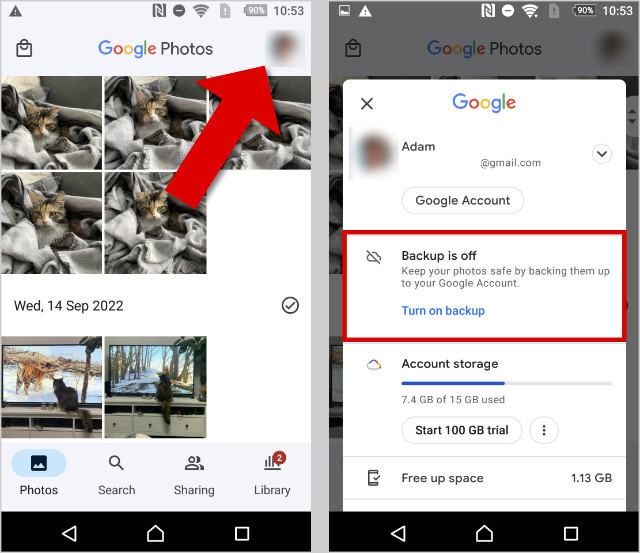 Back up photos from Android to Google Photos via the Google Photos app
 -
Choose Backup Settings: Select your preferred backup settings, such as upload size and which folders to back up.
-
Access on PC: Once the backup is complete, open your internet browser on your PC and visit photos.google.com. Log in to your Google account to access your synced photos and videos.
-
Download to PC: Select the photos you want to download, click the three-dot menu, and choose “Download.”
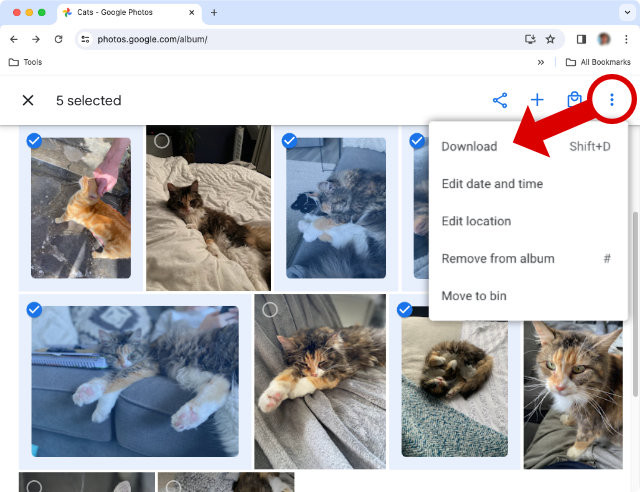 Downloading pictures from Google Photos to PC via browser
4.2. Tips for Downloading Large Batches
- Google Takeout: For downloading more than 500 photos, use Google Takeout to download your entire Google Photos library as a ZIP file. Note that albums are not maintained when using Google Takeout; photos are saved in folders by the year they were taken.
- Selective Downloading: Download photos in batches of fewer than 500 to avoid limitations.
4.3. Pros of Using Google Photos
- Automatic Backup: Photos and videos are automatically backed up, providing peace of mind.
- Accessibility: Access your photos and videos from any device with an internet connection.
- Organization: Google Photos offers features like facial recognition and location tagging for easy organization.
- Free Storage: Offers 15 GB of free storage shared across Google Drive, Gmail, and Google Photos.
4.4. Cons of Using Google Photos
- Limited Free Storage: 15 GB might not be enough for large photo and video libraries. Additional storage requires a paid subscription.
- Internet Dependency: Requires a stable internet connection for backups and access.
- Download Limits: Google Photos limits downloads to 500 photos per operation.
- Privacy Concerns: Storing your photos in the cloud might raise privacy concerns for some users.
5. Method 4: Transferring via Bluetooth
Bluetooth offers a wireless transfer option when USB and Wi-Fi are not available, but it’s generally slower and less reliable.
5.1. Step-by-Step Guide
-
Enable Bluetooth on Android: Go to Settings > Bluetooth and turn Bluetooth on. Make sure your device is discoverable.
-
Enable Bluetooth on PC: Go to Start > Settings > Devices > Bluetooth & other devices and turn Bluetooth on.
-
Pair Devices: On your PC, click “Add Bluetooth or other device” and select your Android device. Confirm the pairing code on both devices.
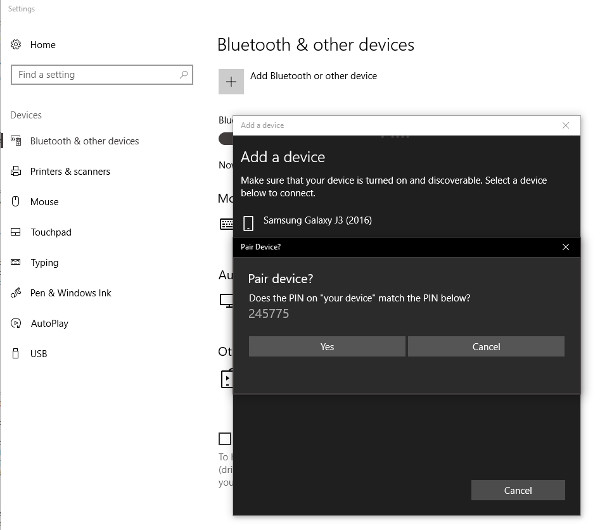 Pair Android with PC with Bluetooth connection setup
 -
Set File Transfer Permissions: In your PC’s Bluetooth settings, click “Send or receive files via Bluetooth” and select “Receive files.”
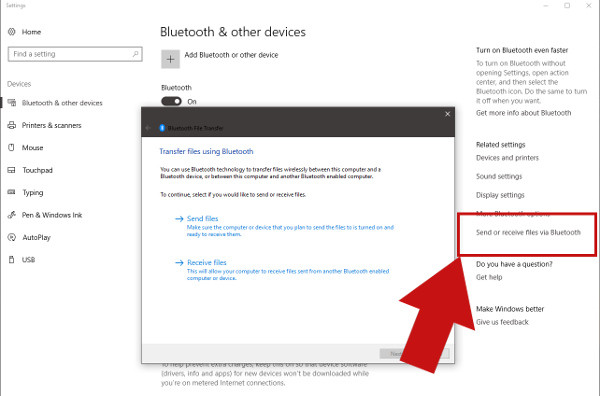 Allow PC to receive files from Android by Bluetooth sharing
 -
Share Photos: On your Android device, open the Photos app, select the photos you want to transfer, tap “Share,” and choose “Bluetooth.”
-
Accept Transfer: On your PC, accept the incoming file transfer and choose a location to save the files.
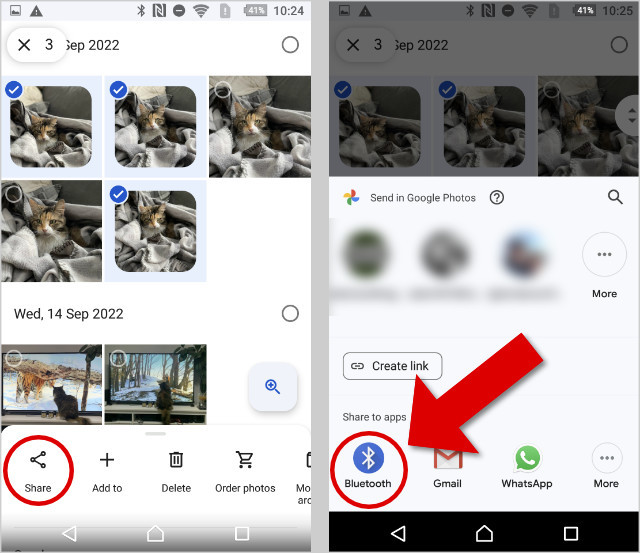 Transfer photos from Android via Bluetooth sharing
5.2. Pros of Using Bluetooth
- Wireless: No need for cables or Wi-Fi.
- Direct Transfer: Direct file transfer between devices.
5.3. Cons of Using Bluetooth
- Slow Speed: Much slower than USB or Wi-Fi transfers.
- Complex Setup: The initial setup and pairing process can be cumbersome.
- Unreliable Connection: Bluetooth connections can be unstable, especially for large files.
- No Album Support: Unable to maintain album structures.
6. Additional Tips for Efficient Photo and Video Management
To ensure efficient photo and video management, consider these additional tips:
- Regular Backups: Schedule regular backups to prevent data loss.
- Organize Your Files: Create a structured folder system on your PC for easy access.
- Use Metadata: Leverage metadata (like date, location, and tags) to easily search and sort your photos and videos.
- Compress Large Files: Compress large video files to save storage space.
- Consider External Storage: Use external hard drives or NAS (Network Attached Storage) devices for additional backup and storage options.
7. Addressing Common Transfer Issues
Encountering issues during the transfer process is not uncommon. Here are some troubleshooting tips:
- USB Connection Problems:
- Ensure the USB cable is properly connected.
- Try a different USB port.
- Update or reinstall USB drivers.
- Restart both your Android device and PC.
- Wi-Fi Connectivity Issues:
- Check your Wi-Fi connection on both devices.
- Ensure both devices are on the same network.
- Restart your router.
- Google Photos Sync Problems:
- Check your internet connection.
- Ensure backup is enabled in Google Photos settings.
- Clear the cache and data of the Google Photos app.
- Bluetooth Pairing Problems:
- Ensure both devices are discoverable.
- Restart Bluetooth on both devices.
- Clear the Bluetooth cache.
- Update Bluetooth drivers on your PC.
8. Understanding User Intent and Optimizing Your Experience
When searching for solutions on how to transfer photos and videos from your Android device to your PC, users typically have several intentions:
- Finding the Easiest Method: Users seek the most straightforward way to transfer files without technical complexities.
- Ensuring Data Security: Users want to protect their valuable memories and prevent data loss during the transfer process.
- Saving Time: Users look for quick and efficient methods to transfer large numbers of files.
- Maintaining Quality: Users want to preserve the original quality of their photos and videos.
- Freeing Up Space: Users aim to clear storage space on their Android devices by moving files to their PCs.
9. Why Choose dfphoto.net for Your Photography Needs?
At dfphoto.net, we are committed to providing comprehensive resources and solutions for photographers of all levels. Whether you’re an amateur enthusiast or a seasoned professional, our platform offers a wealth of information to enhance your skills and inspire your creativity.
- Extensive Tutorials: Access detailed guides on various photography techniques, from basic composition to advanced editing.
- Equipment Reviews: Stay updated with the latest camera and lens reviews to make informed purchasing decisions.
- Inspiration Gallery: Explore stunning photography from around the world to spark your imagination.
- Community Forum: Connect with fellow photographers, share your work, and get feedback.
We understand the importance of having reliable tools and knowledge to support your passion for photography. That’s why we strive to deliver high-quality content and resources that empower you to achieve your creative goals.
10. Testimonials and Success Stories
Many photographers have successfully used our methods to transfer and manage their photos and videos. Here are a few testimonials:
- Sarah M., Santa Fe, NM: “Droid Transfer has been a lifesaver for me. I can easily back up my photos and organize them by date. Highly recommended dfphoto.net.”
- John L., Los Angeles, CA: “The USB transfer method is quick and easy. I appreciate the step-by-step guide on dfphoto.net. It helped me free up space on my phone in no time.”
- Emily K., New York, NY: “Google Photos is great for automatic backups, but I needed more storage. Thanks to dfphoto.net, I learned about Google Takeout and managed to download my entire library.”
These success stories highlight the effectiveness of our recommended methods and the value of the resources available on dfphoto.net.
11. FAQs: Frequently Asked Questions About Android to PC Transfer
Q1: What is the easiest way to transfer photos from Android to PC?
The easiest way to transfer photos is generally using a USB cable. Connect your Android to your PC, select “File Transfer” mode, and drag and drop the photos to your desired folder on your PC.
Q2: How can I transfer photos from Android to PC wirelessly?
You can wirelessly transfer photos using Droid Transfer, Google Photos, or Bluetooth. Droid Transfer offers advanced features like differential backups, while Google Photos provides automatic syncing.
Q3: How do I transfer large video files from Android to PC?
For large video files, USB transfer or Droid Transfer (using Wi-Fi) are recommended. These methods are faster and more reliable than Bluetooth.
Q4: How can I transfer photos from my Android phone to my computer without a USB cable?
You can use Google Photos, Droid Transfer, or Bluetooth to transfer photos without a USB cable. Google Photos offers automatic syncing, while Droid Transfer provides more control over the transfer process.
Q5: Is it possible to transfer photos from text messages on my Android to my PC?
Yes, Droid Transfer allows you to save photos directly from text messages to your PC.
Q6: How do I ensure the photos maintain their quality during transfer?
When using Google Photos, select the “Original Quality” option in the backup settings. For USB and Droid Transfer, the photos are transferred in their original quality.
Q7: What do I do if my PC doesn’t recognize my Android device when connected via USB?
Ensure the USB cable is properly connected, try a different USB port, update or reinstall USB drivers, and restart both devices.
Q8: How can I organize my photos after transferring them to my PC?
Create a structured folder system on your PC and use metadata (like date, location, and tags) to easily search and sort your photos and videos. Droid Transfer offers options to group photos by date during transfer.
Q9: What is the best way to back up my photos from Android to PC?
The best way to back up your photos is using a combination of methods. Google Photos provides automatic cloud backup, while Droid Transfer allows for differential backups to your PC.
Q10: How much does it cost to transfer photos from Android to PC using these methods?
USB transfer and Bluetooth are free. Google Photos offers 15 GB of free storage, but additional storage requires a paid subscription. Droid Transfer offers a free trial, but the full version requires a purchase.
12. Conclusion: Choosing the Right Method for You
Transferring photos and videos from your Android device to your PC is essential for backing up memories, freeing up storage, and enhancing your creative work. Each method—USB transfer, Droid Transfer, Google Photos, and Bluetooth—offers its unique advantages and disadvantages.
- For simplicity and speed, USB transfer is a great option.
- For advanced features like differential backups and photo organization, Droid Transfer is highly recommended.
- For automatic syncing and accessibility, Google Photos is an excellent choice.
- For situations where USB and Wi-Fi are unavailable, Bluetooth provides a wireless alternative.
Remember to consider your specific needs and preferences when choosing the right method. And for more photography tips, techniques, and resources, visit dfphoto.net.
Ready to take control of your photo and video management? Explore dfphoto.net today for more tutorials, inspiration, and community support. Enhance your photography skills and ensure your precious memories are always safe and accessible. Visit us at Address: 1600 St Michael’s Dr, Santa Fe, NM 87505, United States. Phone: +1 (505) 471-6001 or check out our Website: dfphoto.net.