Transferring photos to glass with Mod Podge is a fantastic way to personalize your home decor and create unique gifts. Are you ready to discover the secrets to this beautiful craft? At dfphoto.net, we are excited to help you master this technique, ensuring your creations are stunning and long-lasting. Let’s dive into the art of photo transfer!
1. Understanding The Basics Of Photo Transfer To Glass
1.1. What Is Mod Podge And Why Use It?
Mod Podge is an all-in-one glue, sealer, and finish used extensively in crafting. Have you heard of it? Why is it so popular? Mod Podge is water-based, non-toxic, and dries clear, making it perfect for various projects, including adhering paper to glass. It provides a protective layer that seals and preserves your transferred image.
1.2. Why Transfer Photos To Glass?
Transferring photos to glass offers a unique way to display cherished memories. Glass provides a smooth, transparent surface that enhances the image, giving it a professional and artistic look. This technique is ideal for creating personalized gifts, home decor, and keepsakes. Displaying family photos on decorative glass vases or creating custom glass coasters adds a personal touch to any space.
1.3. What Is The Decal Method And Why Is It Recommended?
The decal method is a technique where you create a Mod Podge “decal” of your image and then apply it to the glass. Have you tried it? This method is highly recommended because it allows for a cleaner, more durable transfer compared to directly applying the photo to the glass. The decal acts as a protective layer, preventing the image from peeling or fading over time. Plus, decals can often be removed and repositioned, offering flexibility in your crafting process.
1.4. What Are The Challenges?
While transferring photos to glass with Mod Podge is rewarding, there are challenges to consider:
- Bubbles: Air bubbles can get trapped under the image, creating imperfections.
- Tearing: The paper can tear during the rubbing process, especially with thinner paper.
- Clarity: Achieving a clear, crisp image transfer requires patience and precision.
- Vintage Look: Mod Podge often imparts a vintage or slightly distressed look, which may not appeal to everyone.
- Slick Surfaces: Glass surfaces can be difficult to work with.
1.5. What Are The Benefits?
Despite the challenges, the benefits of photo transfer to glass are numerous:
- Personalization: Create unique, personalized items that reflect your style and memories.
- Durability: Protect your photos with a sealed, long-lasting finish.
- Versatility: Apply this technique to various glass surfaces, such as vases, jars, and coasters.
- Affordability: Mod Podge is an inexpensive craft supply, making this a budget-friendly project.
- Creativity: Experiment with different image styles, sizes, and glass surfaces to create one-of-a-kind pieces.
2. Materials You’ll Need For Photo Transfer
2.1. Mod Podge Photo Transfer Medium
What’s the primary ingredient? Mod Podge Photo Transfer Medium is specially formulated for transferring images. It allows you to create a clear, durable decal that adheres well to glass. This medium is different from regular Mod Podge, as it is designed to release the paper backing while leaving the image intact.
2.2. Glass Surface
Select a clean, smooth glass surface for your project. What kind of glass works best? Vases, jars, frames, and coasters are all excellent choices. Ensure the glass is free of dust, oils, and fingerprints to ensure proper adhesion. According to glass experts at Santa Fe University of Art and Design’s Photography Department, cleaning the glass with rubbing alcohol before starting can significantly improve the transfer quality.
2.3. Printer And Paper
Use a standard inkjet or laser printer to print your photos. Do you have any preference? Regular printer paper works best for the decal method because it is thin and allows the Mod Podge to penetrate the paper fibers. Avoid using photo paper, as it is too thick and will not transfer well.
2.4. Foam Brush
A foam brush is ideal for applying the Mod Podge evenly and smoothly. Why is that? The foam material prevents brush strokes and ensures a consistent layer of medium. Have you tried using one before? Use a clean brush for each coat to avoid contamination.
2.5. Scissors
Use scissors to trim your printed image to the desired size and shape. Why is it important? Leave a small border around the image to allow for easier handling during the transfer process.
2.6. Wax Paper Or Silicone Mat
Protect your work surface with wax paper or a silicone mat. These materials prevent the Mod Podge from sticking to your table and make cleanup easier.
2.7. Water
You’ll need water to dampen the paper during the rubbing process. A small bowl of water or a spray bottle works well.
2.8. Soft Cloth Or Sponge
A soft cloth or sponge is used to gently rub away the paper backing. Use a lint-free cloth to avoid leaving fibers on the transferred image.
3. Step-By-Step Guide To Transferring Photos To Glass With Mod Podge
3.1. Preparing Your Image
3.1.1. Selecting The Right Photo
Choose a high-resolution photo that you love. Do you have one in mind? Keep in mind that the image may appear slightly distressed after the transfer, so select a photo with good contrast and detail. Black and white photos often look particularly striking on glass.
3.1.2. Reversing The Image (If Necessary)
If your photo contains text or is asymmetrical, reverse the image before printing. Why? This ensures that the image appears correctly after the transfer. You can reverse the image using photo editing software or by selecting the “mirror image” option in your printer settings.
3.1.3. Printing The Image
Print your image on regular printer paper using an inkjet or laser printer. Adjust your printer settings to ensure the image is printed at the correct size and resolution.
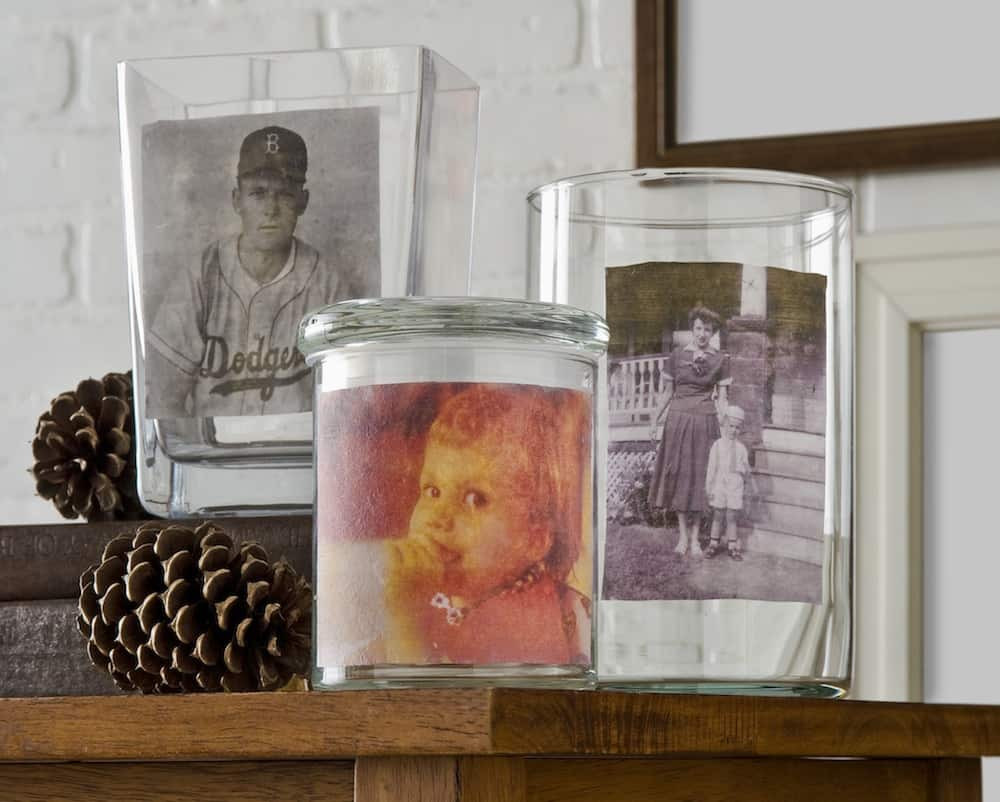 Photo Transfer on Glass
3.2. Applying Mod Podge
3.2.1. Cutting The Image
Cut out your printed image, leaving a small border around the edges. This border will make it easier to handle the image during the transfer process.
3.2.2. Applying The First Layer Of Mod Podge
Place the image face up on wax paper or a silicone mat. Using a foam brush, apply a thick, even layer of Mod Podge Photo Transfer Medium over the entire image. Ensure that the image is completely covered and that there are no dry spots. How thick should the layer be? According to crafting experts at dfphoto.net, the layer should be thick enough to obscure the image entirely when viewed from above.
3.2.3. Drying Time
Allow the Mod Podge to dry completely. This usually takes at least 24 hours, depending on the humidity and temperature. The Mod Podge should be clear and hard to the touch when fully dried.
3.3. Removing The Paper Backing
3.3.1. Dampening The Paper
Once the Mod Podge is completely dry, dampen the paper backing with water. You can use a spray bottle or gently wet the paper with a sponge. Be careful not to saturate the paper, as this can cause the image to peel or tear.
3.3.2. Rubbing Away The Paper
Gently rub away the paper backing with your fingers or a soft cloth. Start at one corner and work your way across the image, using small, circular motions. As you rub, the paper will begin to peel away, revealing the transferred image. Be patient and avoid rubbing too hard, as this can damage the decal.
3.3.3. Drying And Repeating (If Necessary)
Allow the image to dry completely. If there are still patches of paper remaining, repeat the dampening and rubbing process. Continue until all of the paper backing has been removed and the image is clear.
3.4. Adhering The Decal To Glass
3.4.1. Preparing The Glass Surface
Ensure that the glass surface is clean and dry. Wipe it down with a lint-free cloth to remove any dust or fingerprints.
3.4.2. Positioning The Decal
Carefully position the decal on the glass surface. Once the decal is in place, gently press it down to ensure it adheres to the glass. Start from the center and work your way outwards to avoid trapping air bubbles.
3.4.3. Smoothing Out Bubbles
If any air bubbles appear, smooth them out with your fingers or a soft cloth. Work from the center of the bubble towards the edge to release the air.
3.4.4. Sealing The Decal (Optional)
For added protection, you can seal the decal with a layer of Mod Podge Sealer. This will help protect the image from scratches and moisture. Apply a thin, even layer of sealer over the decal and allow it to dry completely.
4. Tips And Tricks For A Perfect Photo Transfer
4.1. Choosing The Right Mod Podge
Use Mod Podge Photo Transfer Medium for the best results. This specific formula is designed to release the paper backing while leaving the image intact. Regular Mod Podge may not work as effectively.
4.2. Preparing Your Photos
Select high-resolution photos for the clearest transfer. Avoid using images with excessive shadows or dark areas, as these may not transfer well. Also, remember to reverse any images with text!
4.3. Applying Mod Podge Evenly
Apply a thick, even layer of Mod Podge over the image. Ensure that the entire image is covered and that there are no dry spots. Uneven application can result in a patchy or uneven transfer.
4.4. Patience Is Key
Allow the Mod Podge to dry completely before attempting to remove the paper backing. Rushing the drying process can result in a damaged or incomplete transfer.
4.5. Gentle Rubbing
When removing the paper backing, rub gently to avoid tearing the image. Use small, circular motions and avoid applying too much pressure.
4.6. Dealing With Bubbles
If air bubbles appear, smooth them out with your fingers or a soft cloth. Work from the center of the bubble towards the edge to release the air.
4.7. Sealing For Protection
Seal the decal with a layer of Mod Podge Sealer for added protection. This will help protect the image from scratches and moisture.
4.8. Experimenting With Different Surfaces
Try transferring photos to different glass surfaces, such as vases, jars, and coasters. Each surface will offer a unique look and feel.
4.9. Adding Embellishments
Enhance your transferred photos with embellishments, such as glitter, paint, or ribbon. These additions can add a personal touch and make your creations even more unique.
5. Creative Ideas For Photo Transfer Projects
5.1. Personalized Vases
Transfer family photos or scenic landscapes onto glass vases to create unique centerpieces or decorative accents.
5.2. Custom Coasters
Create custom coasters with your favorite photos or quotes. These make great gifts or additions to your home decor.
5.3. Photo Frames
Transfer photos onto glass photo frames for a personalized touch. These frames can showcase your favorite memories in a stylish way.
5.4. Decorative Jars
Transfer photos onto glass jars to create decorative storage containers. These jars can be used to store anything from kitchen staples to craft supplies.
5.5. Holiday Ornaments
Create personalized holiday ornaments by transferring photos onto glass balls. These ornaments can be cherished for years to come.
5.6. Glass Magnets
Transfer small photos onto glass magnets for a fun and functional addition to your refrigerator.
5.7. Table Decor
Creating glass table decor will provide a warm welcome for your guests.
6. Troubleshooting Common Issues
6.1. Image Not Transferring Clearly
- Issue: The image appears blurry or incomplete after the transfer.
- Solution: Ensure that you are using a high-resolution photo and that the Mod Podge is applied evenly. Also, make sure to remove all of the paper backing.
6.2. Paper Tearing During Rubbing
- Issue: The paper tears while you are removing the paper backing.
- Solution: Be gentle when rubbing and avoid applying too much pressure. Dampen the paper lightly and allow it to soak for a few minutes before rubbing.
6.3. Air Bubbles Appearing
- Issue: Air bubbles get trapped under the image during the transfer.
- Solution: Smooth out the bubbles with your fingers or a soft cloth. Work from the center of the bubble towards the edge to release the air.
6.4. Mod Podge Not Drying Properly
- Issue: The Mod Podge remains sticky or tacky after drying.
- Solution: Ensure that you are applying a thin, even layer of Mod Podge. Allow it to dry completely before proceeding to the next step.
6.5. Image Peeling Off
- Issue: The transferred image begins to peel off the glass surface.
- Solution: Ensure that the glass surface is clean and dry before applying the decal. Seal the decal with a layer of Mod Podge Sealer for added protection.
7. Advanced Techniques And Ideas
7.1. Using Multiple Photos
Create a collage effect by transferring multiple photos onto a single glass surface. Arrange the photos in a visually appealing layout and adhere them using the same Mod Podge technique.
7.2. Adding Text And Graphics
Incorporate text and graphics into your photo transfer projects. You can print text or graphics onto the same paper as your photo or add them separately using stencils and paint.
7.3. Creating 3D Effects
Add dimension to your transferred photos by incorporating 3D elements, such as beads, buttons, or fabric scraps. Adhere these elements to the glass surface using Mod Podge or other strong adhesives.
7.4. Backlighting Your Transfers
Create stunning backlit displays by transferring photos onto translucent glass surfaces and placing them in front of a light source. This technique can highlight the details of your image and create a captivating visual effect.
7.5. Combining With Other Craft Techniques
Combine photo transfer with other craft techniques, such as decoupage, painting, and mixed media. This can add depth and complexity to your projects and allow you to create truly unique works of art.
8. Preserving And Caring For Your Transferred Photos
8.1. Cleaning Your Transferred Photos
Clean your transferred photos with a soft, damp cloth. Avoid using harsh chemicals or abrasive cleaners, as these can damage the image.
8.2. Protecting From UV Light
Protect your transferred photos from direct sunlight to prevent fading. Display them in areas with indirect light or use UV-protective coatings to minimize fading.
8.3. Storing Your Transferred Photos
Store your transferred photos in a cool, dry place to prevent moisture damage. Avoid stacking them directly on top of each other, as this can cause scratches or damage to the surface.
8.4. Repairing Damaged Transfers
Repair minor damage to your transferred photos by applying a thin layer of Mod Podge Sealer over the affected area. This can help to re-adhere any peeling edges or smooth out scratches.
8.5. Long-Term Preservation
For long-term preservation, consider framing your transferred photos behind UV-protective glass. This can help to protect them from fading, moisture, and other environmental factors.
9. Where To Find Inspiration And Supplies
9.1. Online Craft Stores
Find a wide variety of Mod Podge products and other craft supplies at online craft stores, such as Amazon, Etsy, and Michaels.
9.2. Local Craft Stores
Support your local craft stores by purchasing Mod Podge and other supplies from them. These stores often offer knowledgeable staff and helpful advice.
9.3. Craft Blogs And Websites
Find inspiration and tutorials for photo transfer projects on craft blogs and websites, such as dfphoto.net, Pinterest, and DIY sites.
9.4. Social Media
Follow craft enthusiasts and DIY experts on social media platforms, such as Instagram, Facebook, and YouTube, for inspiration and ideas.
9.5. Craft Fairs And Markets
Attend craft fairs and markets to see examples of photo transfer projects and purchase unique, handmade items.
10. Call To Action
Ready to start your photo transfer journey? Visit dfphoto.net today for more tutorials, tips, and inspiration. Share your creations with us and join our community of passionate crafters!
Address: 1600 St Michael’s Dr, Santa Fe, NM 87505, United States.
Phone: +1 (505) 471-6001.
Website: dfphoto.net.
Let’s transform your cherished memories into stunning works of art together!
FAQ: Photo Transfer to Glass with Mod Podge
1. Can I use regular Mod Podge for photo transfer to glass?
No, it is recommended to use Mod Podge Photo Transfer Medium. Regular Mod Podge is not designed to release the paper backing while leaving the image intact, which is crucial for a clear transfer.
2. What kind of paper should I use to print my photos for transfer?
Use regular printer paper for the best results. Photo paper is too thick and will not allow the Mod Podge to penetrate properly.
3. Do I need to reverse my image before transferring it to glass?
Yes, if your image contains text or is asymmetrical, reverse it before printing. This ensures the image appears correctly after the transfer.
4. How long does it take for Mod Podge Photo Transfer Medium to dry?
It usually takes at least 24 hours for Mod Podge Photo Transfer Medium to dry completely, depending on the humidity and temperature.
5. How do I prevent air bubbles from forming during the transfer process?
Smooth out any air bubbles with your fingers or a soft cloth, working from the center of the bubble towards the edge to release the air.
6. What should I do if the paper tears while I am removing the paper backing?
Be gentle when rubbing and avoid applying too much pressure. Dampen the paper lightly and allow it to soak for a few minutes before rubbing.
7. How can I protect my transferred photo on glass from scratches and moisture?
Seal the decal with a layer of Mod Podge Sealer for added protection. This will help protect the image from scratches and moisture.
8. Can I transfer photos to any type of glass surface?
Yes, you can transfer photos to various glass surfaces, such as vases, jars, frames, and coasters. Ensure the surface is clean and smooth for the best results.
9. How do I clean a transferred photo on glass?
Clean your transferred photos with a soft, damp cloth. Avoid using harsh chemicals or abrasive cleaners, as these can damage the image.
10. Where can I find inspiration for photo transfer projects?
Find inspiration on craft blogs and websites like dfphoto.net, Pinterest, and DIY sites. Also, follow craft enthusiasts on social media platforms for ideas.
