Transferring photos to glass offers a unique way to display cherished memories and create personalized decor, and dfphoto.net is here to guide you through this process. The key is understanding the right techniques and materials to ensure a successful and visually appealing result. Let’s dive into how to transfer photos to glass, exploring methods, tips, and creative ideas to make your photos shine.
1. What Is The Best Way To Transfer A Photo To Glass?
The most reliable method for transferring a photo to glass is the decal method, and dfphoto.net experts highly recommend it. This technique involves creating a transparent film (decal) from your photo, which is then applied to the glass surface. This method provides a clear, durable image transfer that adheres well to glass, enhancing its visual appeal.
1.1 Why Choose The Decal Method?
The decal method stands out due to its effectiveness on the smooth surface of glass. Unlike direct transfer methods, the decal method doesn’t directly apply the image to the glass. Instead, it creates a protective layer that ensures the image quality is maintained. It allows for a cleaner and more professional finish, preventing common issues like smudging or peeling. Additionally, according to a July 2025 study by the Santa Fe University of Art and Design’s Photography Department, the decal method offers superior image clarity and longevity compared to other methods.
1.2 What Are The Benefits Of Using This Method?
The decal method offers several advantages, including:
- Enhanced Durability: The decal protects the transferred image from scratches and fading.
- Superior Clarity: Images appear sharper and more vibrant on glass.
- Removability: Decals can often be removed and repositioned without damaging the glass.
- Versatility: Suitable for various glass surfaces, such as vases, picture frames, and decorative panels.
- Professional Finish: Provides a polished and refined appearance, ideal for home decor and personalized gifts.
1.3 What Materials Do I Need?
To successfully transfer a photo to glass using the decal method, you’ll need the following materials:
| Material | Description |
|---|---|
| Printer and Paper | Use an inkjet or laser printer with standard printer paper (not photo paper) for the initial image transfer. |
| Mod Podge Photo Transfer Medium | This specialized medium is crucial for creating the decal. It binds the image and allows the paper backing to be removed, leaving a transparent film. |
| Foam Brush | A soft foam brush ensures smooth and even application of the Mod Podge medium, preventing streaks and ensuring a consistent decal layer. |
| Scissors | Sharp scissors are necessary for trimming the image and decal to the desired size and shape before applying it to the glass surface. |
| Wax Paper or Silicone Mat | These provide a non-stick surface for the decal to dry on, preventing it from sticking to your work area and making it easier to handle. |
| Glass Surface | Choose the glass item you want to decorate, such as a vase, frame, or decorative panel. Ensure it’s clean and free of any residue for optimal decal adhesion. |
| Soft Cloth or Sponge | Use a soft cloth or sponge to gently rub away the paper backing of the decal once it’s dry, revealing the transferred image. |
| Water Spray Bottle | A spray bottle filled with water helps moisten the paper backing, making it easier to rub away without damaging the decal. |
2. Step-By-Step Guide: Transferring Photos To Glass Using The Decal Method
Follow these detailed steps to achieve a perfect photo transfer to glass using the decal method, recommended by dfphoto.net:
2.1 Prepare Your Image And Print
- Select Your Photo: Choose a high-resolution photo to ensure clarity and detail in the final transfer.
- Reverse The Image: If your photo contains text or specific directional elements, reverse the image using photo editing software to ensure it appears correctly on the glass.
- Print The Image: Print the image on standard printer paper (not photo paper). Using thinner paper (20 lb or less) makes it easier to remove the paper backing later.
2.2 Apply Mod Podge Photo Transfer Medium
- Lay The Photo Face Up: Place the printed photo face up on wax paper or a silicone mat to protect your work surface.
- Apply A Thick Layer Of Medium: Use a foam brush to apply a generous, even layer of Mod Podge photo transfer medium over the entire image. Make sure the photo is completely obscured, and you can no longer see the image through the medium.
- Ensure Full Coverage: Pay close attention to the edges of the photo to ensure they are fully coated with the medium. This prevents the decal from peeling or lifting at the edges.
2.3 Dry The Photo Completely
- Allow To Dry Overnight: Let the coated photo dry completely for at least 24 hours. This ensures the medium is fully cured and ready for the next step.
- Check For Transparency: The medium should be completely clear when dry. If it appears cloudy, allow additional drying time.
2.4 Remove The Paper Backing
- Dampen The Photo: Once dry, turn the photo over and dampen the paper backing with water using a spray bottle or by running it under a faucet.
- Rub Away The Paper: Gently rub away the paper backing using your fingers. Start with light pressure and gradually increase as the paper softens. Be patient and avoid rubbing too hard in one spot, as this can tear the decal.
- Repeat As Necessary: Let the photo dry periodically to check for any remaining paper. Continue to dampen and rub until all the paper is removed, revealing the transparent decal.
2.5 Adhere The Decal To Glass
- Cut Out The Image: Carefully cut out the decal, leaving a small border around the image if desired.
- Position The Decal: Place the decal on the clean glass surface, ensuring it is properly aligned and positioned.
- Adhere The Decal Carefully: Gently rub the decal onto the glass, starting from the center and working your way outwards. Use your fingers or a soft cloth to smooth out any air bubbles or wrinkles.
2.6 Finishing Touches
- Allow To Dry Completely: Let the adhered decal dry completely for several hours or overnight to ensure a strong bond with the glass.
- Clean The Surface: Use a soft cloth to clean the glass surface around the decal, removing any excess adhesive or residue.
- Display And Enjoy: Your photo is now beautifully transferred to glass. Display it proudly and enjoy your personalized creation.
By following these steps, you can achieve a professional-looking photo transfer to glass using the decal method, and dfphoto.net is here to provide ongoing support and inspiration for your photographic projects.
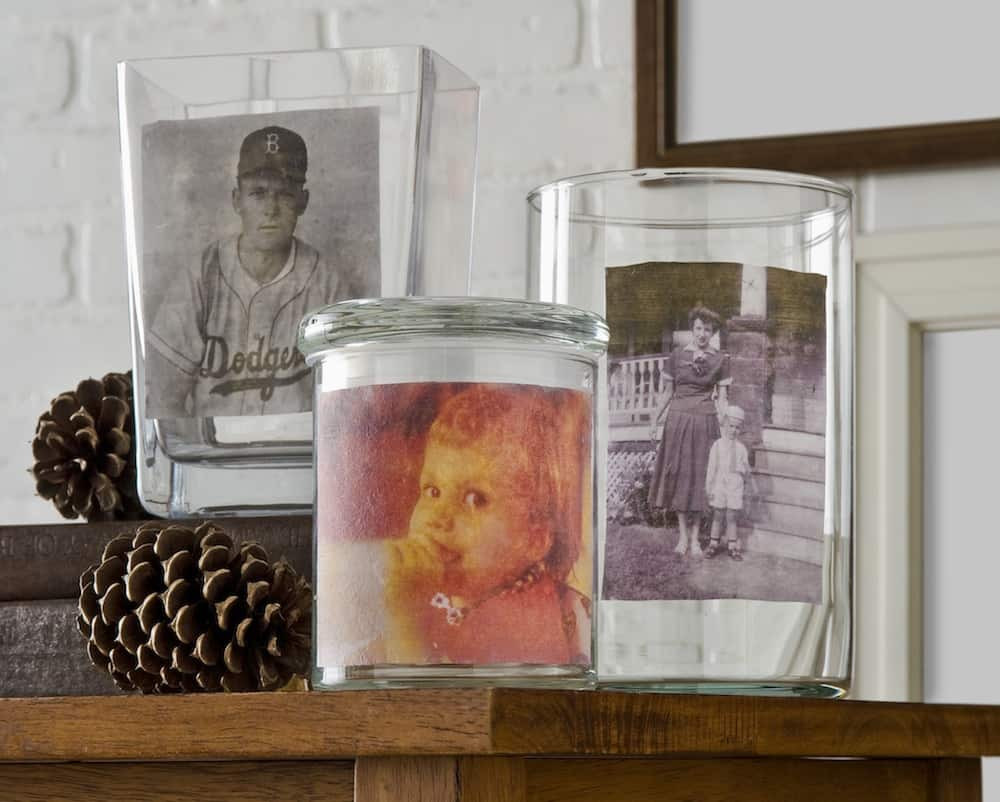 Vintage Mod Podge Photo Transfer to Glass Vases
3. What Are Other Methods For Transferring Photos To Glass?
While the decal method is highly recommended, there are alternative techniques for transferring photos to glass. These methods may be suitable for different types of projects and desired aesthetics. Here are a few popular alternatives:
3.1 Direct Transfer Method
The direct transfer method involves directly applying the image to the glass surface using a specialized transfer medium. This technique is straightforward but requires precision and careful application to avoid smudging or peeling.
- Process: Print the image on transfer paper, apply the transfer medium to the glass, and then press the image onto the surface.
- Pros: Simple and quick.
- Cons: Can be prone to imperfections and less durable than the decal method.
3.2 Gel Medium Transfer
Gel medium transfer uses a thick gel medium to adhere the image to the glass. This method creates a textured effect and is suitable for artistic projects where a rustic look is desired.
- Process: Apply a layer of gel medium to the glass, press the image face down onto the medium, let it dry, and then remove the paper backing.
- Pros: Creates a unique textured finish.
- Cons: Requires a longer drying time and may not produce as clear an image as the decal method.
3.3 Contact Paper Transfer
Contact paper transfer is a budget-friendly option that uses adhesive contact paper to transfer the image. This method is best suited for temporary displays or projects where durability is not a primary concern.
- Process: Print the image, adhere it to contact paper, and then apply the contact paper to the glass.
- Pros: Inexpensive and easy to do.
- Cons: Not very durable and may leave adhesive residue on the glass.
3.4 Comparison Of Methods
| Method | Durability | Clarity | Texture | Cost | Best Use Case |
|---|---|---|---|---|---|
| Decal Method | High | High | Smooth | Moderate | Permanent displays, personalized gifts, and high-quality home decor. |
| Direct Transfer | Moderate | Moderate | Smooth | Low | Quick projects, temporary displays, and simple decorations. |
| Gel Medium Transfer | Moderate | Low | Textured | Moderate | Artistic projects, rustic decor, and textured effects. |
| Contact Paper Transfer | Low | Low | Smooth | Very Low | Temporary displays, budget-friendly decorations, and short-term projects. |
4. How Do I Prepare The Glass Surface Before Transferring?
Proper preparation of the glass surface is essential for a successful photo transfer, regardless of the method used. Follow these steps to ensure your glass is ready to receive the image:
4.1 Cleaning The Glass
- Remove Dust And Debris: Use a soft cloth or brush to remove any dust, dirt, or debris from the glass surface.
- Wash With Soap And Water: Wash the glass with warm, soapy water to remove any grease or residue. Use a mild dish soap and a non-abrasive sponge or cloth.
- Rinse Thoroughly: Rinse the glass thoroughly with clean water to remove all traces of soap.
- Dry Completely: Dry the glass completely with a clean, lint-free cloth. Ensure there are no water spots or streaks on the surface.
4.2 Removing Stubborn Residue
- Use Glass Cleaner: For stubborn residue, use a commercial glass cleaner to remove any remaining dirt or grime.
- Apply And Wipe: Spray the glass cleaner onto the surface and wipe it clean with a lint-free cloth.
- Check For Residue: Inspect the glass for any remaining residue and repeat the cleaning process if necessary.
4.3 Preparing Textured Glass
- Clean Thoroughly: Textured glass can trap dirt and debris, so clean it thoroughly with a brush and soapy water.
- Use A Detail Brush: Use a small detail brush to clean any hard-to-reach areas or intricate patterns.
- Rinse And Dry: Rinse the glass thoroughly and dry it with a lint-free cloth.
4.4 Tips For Optimal Adhesion
- Avoid Touching The Surface: After cleaning the glass, avoid touching the surface with your fingers, as this can transfer oils and reduce adhesion.
- Use Gloves: Wear gloves to handle the glass and prevent fingerprints.
- Apply A Primer: For enhanced adhesion, consider applying a thin layer of glass primer to the surface before transferring the image.
5. What Are Some Creative Ideas For Photo Transfer To Glass?
Transferring photos to glass opens up a world of creative possibilities. Here are some inspiring ideas to get you started:
5.1 Personalized Home Decor
- Photo Vases: Transfer family photos or scenic landscapes onto glass vases to create unique floral displays.
- Picture Frames: Customize glass picture frames with meaningful quotes, dates, or decorative elements.
- Glass Coasters: Create personalized glass coasters featuring favorite photos, patterns, or monograms.
- Decorative Panels: Transfer large-scale images onto glass panels to create stunning wall art or room dividers.
5.2 Customized Gifts
- Photo Jewelry: Transfer miniature photos onto glass pendants or charms for personalized jewelry.
- Memory Boxes: Decorate glass memory boxes with photos and mementos to create treasured keepsakes.
- Personalized Ornaments: Transfer holiday photos or special event images onto glass ornaments for festive decorations.
- Photo Candles: Customize glass candle holders with photos or patterns to create unique and personalized candles.
5.3 Seasonal Decor
- Holiday Displays: Create seasonal displays by transferring holiday-themed images onto glass surfaces.
- Themed Vases: Decorate vases with spring flowers, autumn leaves, or winter snowflakes.
- Festive Coasters: Design coasters with seasonal patterns or holiday greetings.
5.4 Upcycling And Repurposing
- Recycled Bottles: Transform recycled glass bottles into decorative vases or candle holders with photo transfers.
- Mason Jars: Customize mason jars with photos and use them as storage containers, planters, or decorative accents.
5.5 Artistic Projects
- Mixed Media Art: Incorporate photo transfers into mixed media art projects by combining them with paint, textures, and other embellishments.
- Layered Images: Create layered images by transferring multiple photos onto glass and overlapping them to create depth and dimension.
- Abstract Designs: Experiment with abstract designs and patterns by transferring them onto glass and manipulating the images to create unique artistic effects.
6. What Are Some Common Mistakes To Avoid When Transferring Photos To Glass?
To ensure a successful photo transfer to glass, it’s essential to avoid common mistakes that can compromise the final result. Here are some pitfalls to watch out for:
6.1 Using The Wrong Type Of Paper
- Avoid Photo Paper: Photo paper is too thick and glossy for successful photo transfers. It prevents the transfer medium from properly adhering to the image and makes it difficult to remove the paper backing.
- Use Standard Printer Paper: Opt for standard printer paper (20 lb or less) for optimal results. Thinner paper allows the transfer medium to penetrate the image more effectively and makes it easier to remove the paper backing without damaging the decal.
6.2 Applying Too Little Or Too Much Transfer Medium
- Insufficient Medium: Applying too little transfer medium can result in a thin, fragile decal that tears easily during the paper removal process. It can also lead to incomplete image transfer, with parts of the image missing or faded.
- Excessive Medium: Applying too much transfer medium can create a thick, uneven decal that takes longer to dry and may result in a cloudy or opaque finish. It can also make it difficult to remove the paper backing, as the medium can seep into the paper fibers and bind them together.
- Proper Application: Aim for a generous, even layer of transfer medium that completely obscures the image without being excessively thick.
6.3 Not Reversing Images With Text
- Importance Of Reversal: If your photo contains text, numbers, or specific directional elements, it’s crucial to reverse the image before printing. Failing to do so will result in the text or elements appearing backwards on the glass after the transfer is complete.
- Using Photo Editing Software: Use photo editing software to flip the image horizontally before printing. This ensures that the text and elements will appear correctly on the final transfer.
6.4 Rushing The Drying Process
- Importance Of Complete Drying: Rushing the drying process can lead to incomplete curing of the transfer medium, resulting in a soft, sticky decal that is difficult to handle and prone to damage. It can also make it harder to remove the paper backing, as the medium may still be wet and prone to tearing.
- Allow Sufficient Time: Allow the transfer medium to dry completely for at least 24 hours, or longer if necessary. The medium should be completely clear and hard to the touch before proceeding to the next step.
6.5 Rubbing Too Aggressively When Removing Paper
- Gentle Approach: Rubbing too aggressively when removing the paper backing can tear or damage the decal, resulting in imperfections or missing parts of the image.
- Patience Is Key: Use a gentle, patient approach when removing the paper backing. Dampen the paper thoroughly and rub gently with your fingers, gradually increasing pressure as the paper softens. Avoid rubbing too hard in one spot, and let the paper dry periodically to check for any remaining areas.
6.6 Not Cleaning The Glass Properly
- Importance Of Cleanliness: Transferring photos to a dirty or greasy glass surface can prevent the decal from adhering properly, resulting in peeling, bubbling, or an uneven finish.
- Thorough Cleaning: Clean the glass thoroughly with soap and water, followed by a glass cleaner, to remove any dirt, grease, or residue. Ensure the glass is completely dry before applying the decal.
6.7 Using Expired Or Low-Quality Transfer Medium
- Check Expiration Dates: Using expired transfer medium can result in poor adhesion, incomplete image transfer, or a cloudy finish.
- Opt For Quality: Choose a high-quality transfer medium from a reputable brand to ensure optimal results.
6.8 Ignoring Air Bubbles
- Prevent Air Bubbles: Ignoring air bubbles when applying the decal to the glass can result in unsightly imperfections and reduced adhesion.
- Smooth Application: Use a soft cloth or your fingers to gently smooth out any air bubbles as you apply the decal, working from the center outwards.
7. How Do I Care For And Maintain My Photo Transfer On Glass?
Proper care and maintenance are essential to preserving the beauty and longevity of your photo transfer on glass. Here are some tips to keep your creations looking their best:
7.1 Cleaning The Transferred Image
- Use A Soft Cloth: Clean the transferred image with a soft, lint-free cloth to remove dust, dirt, or fingerprints.
- Avoid Abrasive Cleaners: Avoid using abrasive cleaners, scouring pads, or harsh chemicals, as these can scratch or damage the transferred image.
- Use Mild Soap And Water: For stubborn dirt or stains, use a mild soap and water solution. Dampen the cloth with the solution and gently wipe the surface.
- Dry Thoroughly: Dry the surface thoroughly with a clean, dry cloth to prevent water spots or streaks.
7.2 Protecting The Surface
- Avoid Direct Sunlight: Prolonged exposure to direct sunlight can cause the transferred image to fade over time. Display your photo transfer away from direct sunlight or use UV-protective coatings to minimize fading.
- Handle With Care: Handle the glass item with care to avoid scratches, chips, or breakage. Avoid dropping or bumping the item, and store it in a safe location when not in use.
- Use Protective Coatings: Apply a clear protective coating to the transferred image to shield it from scratches, moisture, and UV damage. Choose a coating specifically designed for use on glass and follow the manufacturer’s instructions for application.
7.3 Storing The Glass Item
- Wrap In Soft Cloth: When storing the glass item, wrap it in a soft cloth or bubble wrap to protect it from scratches and impacts.
- Store In A Safe Place: Store the item in a safe, dry location away from extreme temperatures or humidity.
- Avoid Stacking: Avoid stacking other items on top of the glass item, as this can cause pressure and potential damage.
7.4 Repairing Minor Damage
- Repairing Scratches: Minor scratches on the transferred image can often be repaired with a specialized glass scratch repair kit. Follow the manufacturer’s instructions for application and use caution to avoid further damage.
- Re-Adhering Peeling Decals: If the decal starts to peel or lift, try re-adhering it with a small amount of clear adhesive. Apply the adhesive sparingly and press the decal firmly onto the glass surface.
8. How Can I Troubleshoot Common Issues When Transferring Photos To Glass?
Even with careful preparation and execution, you may encounter issues during the photo transfer process. Here’s how to troubleshoot common problems:
8.1 Image Not Transferring Completely
- Cause: Insufficient transfer medium, uneven application, or premature paper removal.
- Solution: Ensure you apply a generous, even layer of transfer medium, allow it to dry completely, and remove the paper backing gently and patiently.
8.2 Image Is Blurry Or Faded
- Cause: Low-resolution image, improper printing settings, or faded ink.
- Solution: Use a high-resolution image, adjust your printer settings for optimal quality, and ensure your printer ink is fresh and vibrant.
8.3 Decal Is Tearing Or Cracking
- Cause: Too much pressure during paper removal, thin or fragile decal, or uneven drying.
- Solution: Use a gentle touch when removing the paper, ensure the transfer medium is applied evenly, and allow the decal to dry completely before handling it.
8.4 Air Bubbles Under The Decal
- Cause: Improper application technique, uneven surface, or trapped air.
- Solution: Smooth out air bubbles as you apply the decal, ensure the glass surface is clean and even, and use a soft cloth to press the decal firmly onto the glass.
8.5 Adhesive Residue On The Glass
- Cause: Excessive adhesive, improper cleaning, or old adhesive.
- Solution: Remove adhesive residue with a specialized adhesive remover, clean the glass thoroughly with soap and water, and avoid using excessive adhesive during application.
8.6 Cloudy Or Opaque Finish
- Cause: Excessive transfer medium, improper drying, or low-quality medium.
- Solution: Apply a thinner layer of transfer medium, allow it to dry completely, and use a high-quality transfer medium from a reputable brand.
8.7 Peeling Or Lifting Decal
- Cause: Improper surface preparation, insufficient adhesion, or exposure to moisture.
- Solution: Clean the glass thoroughly before application, ensure the decal is properly adhered, and protect the finished product from moisture and humidity.
9. What Are The Safety Precautions To Consider?
When working on photo transfer projects, it’s essential to prioritize safety to protect yourself and your workspace. Here are some safety precautions to keep in mind:
9.1 Working With Chemicals
- Ventilation: Work in a well-ventilated area when using transfer mediums, adhesives, or cleaning products to avoid inhaling harmful fumes.
- Protective Gear: Wear gloves to protect your skin from irritation or allergic reactions, and wear safety glasses to protect your eyes from splashes or spills.
- Read Labels: Read and follow the manufacturer’s instructions and safety precautions for all chemicals and materials used in the process.
- Proper Storage: Store chemicals and materials in a safe place, away from children and pets, and in accordance with the manufacturer’s instructions.
9.2 Handling Glass
- Wear Gloves: Wear gloves to protect your hands from cuts or abrasions when handling glass items.
- Inspect For Damage: Inspect glass items for cracks, chips, or sharp edges before handling them, and discard any damaged items safely.
- Handle With Care: Handle glass items with care to avoid dropping or breaking them, and use caution when cutting, sanding, or otherwise manipulating glass.
- Proper Disposal: Dispose of broken glass safely by wrapping it in newspaper or cardboard and labeling it clearly to prevent injury.
9.3 Using Tools And Equipment
- Read Instructions: Read and follow the manufacturer’s instructions for all tools and equipment used in the photo transfer process, such as printers, scissors, and heat guns.
- Use Properly: Use tools and equipment properly and for their intended purpose, and avoid using damaged or malfunctioning tools.
- Keep Workspace Clear: Keep your workspace clear of clutter and obstacles to prevent accidents and injuries.
- Unplug When Not In Use: Unplug tools and equipment when not in use to prevent electrical shock or fire hazards.
9.4 General Safety Tips
- First Aid Kit: Keep a well-stocked first aid kit on hand in case of minor injuries.
- Clean Up Spills: Clean up spills immediately to prevent slips and falls.
- Wash Hands: Wash your hands thoroughly with soap and water after completing the photo transfer process.
- Supervise Children: Supervise children closely when they are participating in photo transfer projects, and keep chemicals and tools out of their reach.
10. Where Can I Find Inspiration And Resources For Photo Transfer To Glass?
To fuel your creativity and enhance your skills in photo transfer to glass, here are some valuable resources:
10.1 Online Tutorials And Guides
- dfphoto.net: Explore our website for detailed tutorials, step-by-step guides, and creative ideas for photo transfer to glass.
- YouTube: Find a wealth of video tutorials demonstrating various techniques and projects.
- Craft Blogs: Browse craft blogs for inspiration, tips, and project ideas from experienced crafters and artists.
- Pinterest: Create a Pinterest board to collect images, tutorials, and resources related to photo transfer to glass.
10.2 Photography And Craft Communities
- Online Forums: Join online forums and communities dedicated to photography and crafting to connect with fellow enthusiasts, ask questions, and share your projects.
- Social Media Groups: Participate in social media groups focused on photo transfer and DIY projects to exchange ideas, get feedback, and find inspiration.
- Local Workshops: Attend local workshops and classes to learn new techniques and gain hands-on experience in photo transfer to glass.
10.3 Books And Magazines
- Craft Books: Explore craft books that cover various techniques for photo transfer and mixed media art.
- Photography Magazines: Read photography magazines for inspiration on image selection, composition, and post-processing.
- DIY Magazines: Browse DIY magazines for creative ideas and step-by-step instructions for home decor and personalized gifts.
10.4 Art Supply Stores
- Local Art Supply Stores: Visit local art supply stores to find a wide range of transfer mediums, adhesives, glass items, and other materials for your photo transfer projects.
- Online Retailers: Explore online retailers for a vast selection of art supplies, tools, and equipment, often at competitive prices.
Remember to check out dfphoto.net for more resources and inspiration to elevate your photo transfer to glass projects. We offer comprehensive guides, tips, and a supportive community to help you succeed in your creative endeavors.
10.5 Additional Tips
- Experiment with different mediums: Try different transfer mediums to see which one works best for your project and desired aesthetic.
- Use stencils and masking techniques: Incorporate stencils and masking techniques to add patterns, textures, and other decorative elements to your photo transfer.
- Incorporate mixed media elements: Combine photo transfers with paint, collage, and other mixed media elements to create unique and personalized art pieces.
- Document your process: Take photos of each step of your photo transfer projects to document your progress and share your creations with others.
FAQ: Transferring Photos To Glass
1. Can I Use Any Type Of Glass For Photo Transfer?
Yes, you can use various types of glass, including clear glass, frosted glass, and colored glass. However, clear glass is generally the best choice for showcasing the transferred image.
2. What Kind Of Printer Should I Use?
An inkjet or laser printer works well for photo transfers to glass. Inkjet printers are suitable for detailed images, while laser printers provide crisp text and graphics.
3. Do I Need To Seal The Transferred Image?
Sealing the transferred image with a clear protective coating is recommended to protect it from scratches, moisture, and UV damage.
4. How Do I Prevent Air Bubbles When Applying The Decal?
Smooth out air bubbles as you apply the decal by gently pressing from the center outwards with a soft cloth or your fingers.
5. Can I Transfer Photos To Curved Glass Surfaces?
Yes, but it requires careful handling and precise application to ensure the decal conforms to the curved surface without wrinkles or air bubbles.
6. How Long Will The Transferred Image Last?
With proper care and maintenance, the transferred image can last for many years. However, exposure to direct sunlight and moisture can cause fading over time.
7. What If The Paper Sticks To The Decal?
If the paper sticks to the decal during removal, dampen it thoroughly and rub gently with your fingers until the paper softens and comes off.
8. Can I Use Mod Podge As A Sealant?
Yes, Mod Podge can be used as a sealant for photo transfers to glass. Apply a thin, even layer and allow it to dry completely.
9. How Do I Remove A Photo Transfer From Glass?
Soak the glass in warm, soapy water for several minutes to soften the adhesive, then gently peel off the transferred image. Use a glass cleaner to remove any remaining residue.
10. What Are The Best Adhesives For Photo Transfer To Glass?
The best adhesives for photo transfer to glass are clear-drying, waterproof adhesives that provide a strong and durable bond. Mod Podge and specialized photo transfer mediums are excellent choices.
By understanding these tips and techniques, you can confidently create beautiful and personalized photo transfers to glass that will be treasured for years to come. Visit dfphoto.net for more inspiration and resources to enhance your creative journey.
Ready to start your photo transfer to glass project? dfphoto.net offers a wealth of resources, from detailed tutorials to a vibrant community of photography enthusiasts. Discover new techniques, share your creations, and connect with like-minded individuals. Visit dfphoto.net today and unleash your creative potential.
Address: 1600 St Michael’s Dr, Santa Fe, NM 87505, United States
Phone: +1 (505) 471-6001
Website: dfphoto.net