Are you wondering how to transfer photos from Samsung to Samsung without losing precious memories? At dfphoto.net, we understand the importance of preserving your visual stories, and we’re here to guide you through several seamless methods for transferring your cherished photos from one Samsung device to another, ensuring your memories are safe and sound. We’ll also cover some common issues and provide solutions to make the transfer process as smooth as possible using advanced tools. Let’s explore how to move your photos easily and keep your memories alive.
1. Understanding Your Photo Transfer Needs
Before diving into the methods, let’s consider what you want to achieve. The best approach to copy your photos from Samsung to Samsung depends on several factors:
- Number of Photos: Are you transferring a few snapshots or your entire photo library?
- Transfer Speed: Do you need a quick solution or can you wait longer for a wireless transfer?
- Technical Skill: Are you comfortable with advanced methods or do you prefer simple, user-friendly options?
- Data Security: Are you concerned about data loss or privacy during the transfer?
Understanding your needs will help you choose the best method for your situation.
2. Top 5 Ways to Transfer Photos from Samsung to Samsung
Here’s a detailed breakdown of five popular methods for transferring photos from one Samsung device to another:
2.1. Method 1: Samsung Smart Switch – The Official Way
What is Samsung Smart Switch?
Samsung Smart Switch is a free app developed by Samsung to simplify data transfer between devices, especially from an old phone (Android or iOS) to a new Samsung phone. It can move various types of data, including photos, videos, contacts, messages, call logs, and even app data.
According to Samsung, Smart Switch has been downloaded over 500 million times, reflecting its popularity and reliability among Samsung users.
How does it work?
Smart Switch allows you to connect your devices wirelessly via Wi-Fi or using a USB cable and adapter. The process is straightforward, making it a great option for most users.
Steps to Transfer Photos Using Smart Switch:
- Install Smart Switch: Download and install the Samsung Smart Switch app on both your old and new Samsung devices. You can find it on the Google Play Store or the Samsung Galaxy Store.
- Launch the App: Open Smart Switch on both devices.
- Choose Transfer Method: Select whether you want to transfer data wirelessly (Wi-Fi) or via USB cable. A USB connection is generally faster and more stable.
- Select Sending and Receiving Devices: On your old phone, select “Send data.” On your new phone, select “Receive data.”
- Choose Operating System: If you’re transferring from another Android device, select “Android.”
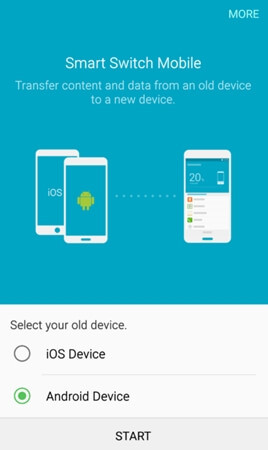 Smart Switch Interface
 - Establish Connection: If using Wi-Fi, the devices will search for each other. Confirm the connection on both devices when prompted. If using USB, connect the phones with a USB cable and adapter.
- Select Data to Transfer: Once connected, you’ll see a list of data types you can transfer. Select “Photos” (or “Pictures”). You can also select other data you want to move, such as videos, contacts, and messages.
- Start Transfer: Tap “Transfer” or “Send” on your old phone. The transfer process will begin.
- Wait for Completion: Keep both devices close and connected until the transfer is complete. The time it takes will depend on the amount of data being transferred.
 Transfer Progress
 - Finish: Once the transfer is complete, tap “Done” on both devices. You can now find your photos on your new Samsung phone.
Pros of Using Smart Switch:
- Free and Official: It’s a free app developed by Samsung, ensuring compatibility and reliability.
- Easy to Use: The interface is intuitive and user-friendly, making it accessible for users of all technical levels.
- Versatile: Supports both wireless and USB transfer methods.
- Comprehensive Data Transfer: Transfers not only photos but also other data types, such as contacts, messages, and app data.
Cons of Using Smart Switch:
- Time-Consuming for Large Transfers: Wireless transfers can be slow if you have a large photo library.
- Potential Connectivity Issues: Wireless connections can sometimes be unstable, leading to interrupted transfers.
- Samsung-Specific: Designed primarily for Samsung devices, so it may not work as effectively with other brands.
Who is it best for?
Smart Switch is ideal for Samsung users who want a free, easy-to-use, and comprehensive data transfer solution. It’s perfect for those upgrading to a new Samsung phone and want to move all their data seamlessly.
2.2. Method 2: Wondershare MobileTrans – The One-Click Solution
What is Wondershare MobileTrans?
Wondershare MobileTrans is a powerful desktop application designed for phone-to-phone data transfer, backup, and restore. It supports a wide range of devices, including Android and iOS, and can transfer various types of data, including photos, videos, contacts, messages, and apps.
How does it work?
MobileTrans simplifies the transfer process with its one-click solution. You connect both phones to your computer, select the data types you want to transfer, and start the process. MobileTrans handles the rest.
Steps to Transfer Photos Using Wondershare MobileTrans:
- Download and Install MobileTrans: Download and install the Wondershare MobileTrans application on your Windows or Mac computer from dfphoto.net.
- Launch MobileTrans: Open the MobileTrans application.
- Select “Phone Transfer”: From the home screen, choose the “Phone Transfer” option.
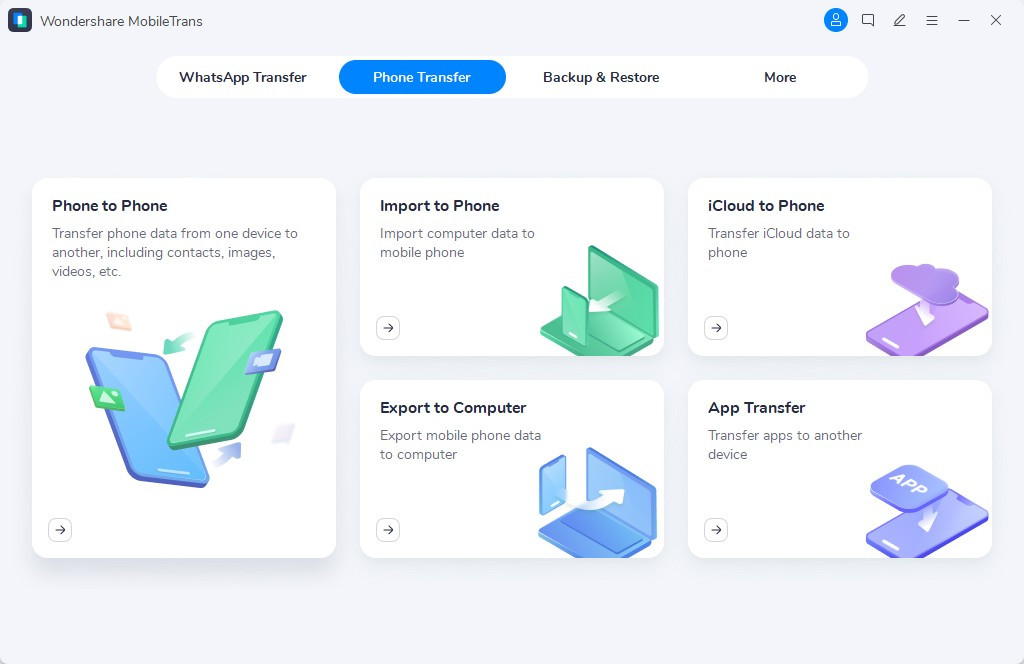 MobileTrans Home Screen
 - Connect Devices: Connect both your old and new Samsung phones to your computer using USB cables. Ensure that USB debugging is enabled on both devices.
- Recognize Devices: MobileTrans will detect both phones. Make sure the source (old) and destination (new) phones are correctly identified. Use the “Flip” button if necessary.
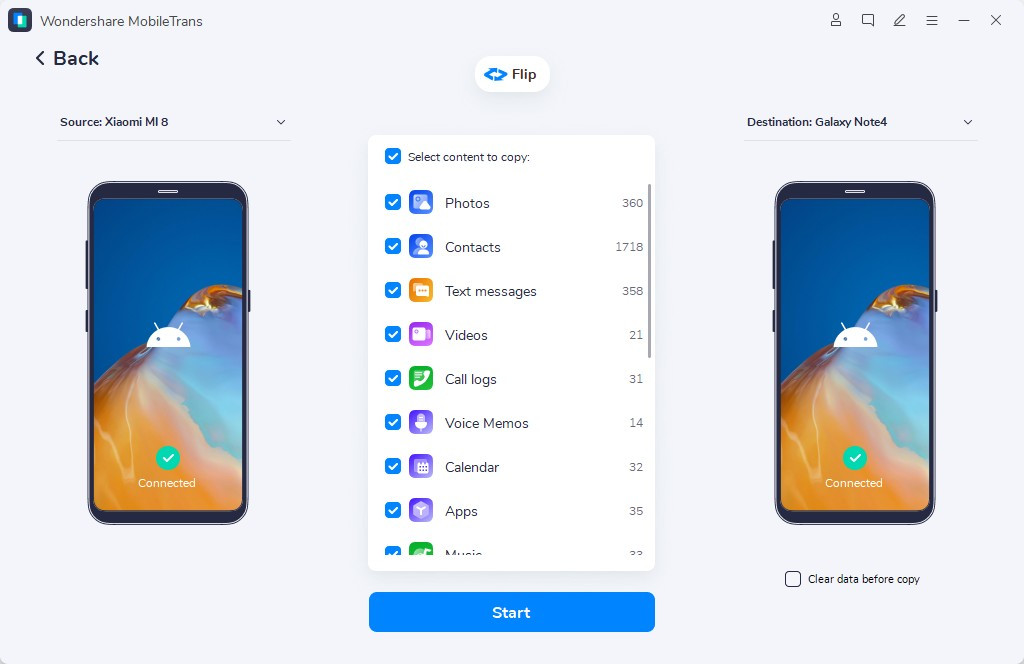 Connect Phones
 - Select Data Types: Choose the types of data you want to transfer. In this case, select “Photos.”
- Start Transfer: Click the “Start” button to begin the transfer process.
- Wait for Completion: Keep both devices connected until the transfer is complete. MobileTrans will display the progress.
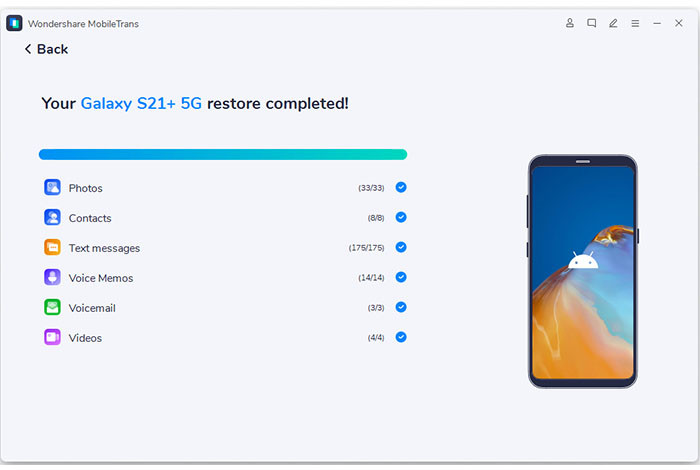 Transferring Photos
 - Finish: Once the transfer is finished, disconnect your phones and check your new Samsung device for the transferred photos.
Pros of Using Wondershare MobileTrans:
- One-Click Transfer: Simplifies the process with a single click, saving time and effort.
- Cross-Platform Support: Supports data transfer between Android and iOS devices.
- Wide Range of Data Types: Transfers up to 18 different types of data.
- Fast Transfer Speed: Generally faster than wireless methods, especially for large amounts of data.
- User-Friendly Interface: Easy to navigate and use, even for non-technical users.
Cons of Using Wondershare MobileTrans:
- Requires Computer: Needs a computer to facilitate the transfer.
- Paid Software: While there is a free trial, the full version requires a purchase.
Who is it best for?
MobileTrans is ideal for users who want a fast, reliable, and comprehensive data transfer solution. It’s particularly useful for those transferring large amounts of data or switching between Android and iOS devices.
2.3. Method 3: Bluetooth or Wi-Fi Direct – The Wireless Way
What are Bluetooth and Wi-Fi Direct?
Bluetooth and Wi-Fi Direct are wireless technologies that allow you to transfer files directly between devices without needing an internet connection. Bluetooth is best for small files due to its slower transfer speed, while Wi-Fi Direct offers faster speeds and is suitable for larger files.
How does it work?
These methods create a direct wireless connection between your phones, allowing you to share files.
Steps to Transfer Photos Using Bluetooth or Wi-Fi Direct:
- Enable Bluetooth or Wi-Fi Direct: On both your old and new Samsung phones, go to Settings and enable either Bluetooth or Wi-Fi Direct.
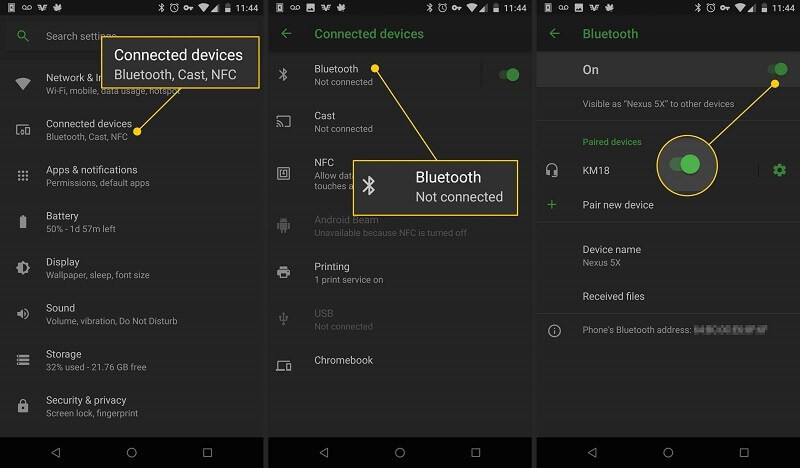 Bluetooth Settings
 - Pair Devices: If using Bluetooth, pair the devices by selecting the name of the other device from the list and confirming the pairing code.
- Connect via Wi-Fi Direct: If using Wi-Fi Direct, one device will scan for available devices and connect to the other.
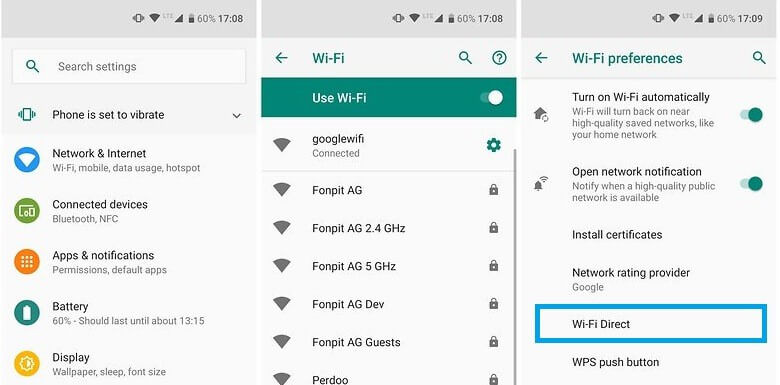 Wi-Fi Direct Settings
 - Select Photos: On your old phone, open the Gallery app and select the photos you want to transfer.
- Share Photos: Tap the “Share” icon and choose either “Bluetooth” or “Wi-Fi Direct” from the sharing options.
- Select Receiving Device: Choose the name of your new Samsung phone from the list of available devices.
- Accept Transfer: On your new phone, accept the incoming file transfer request.
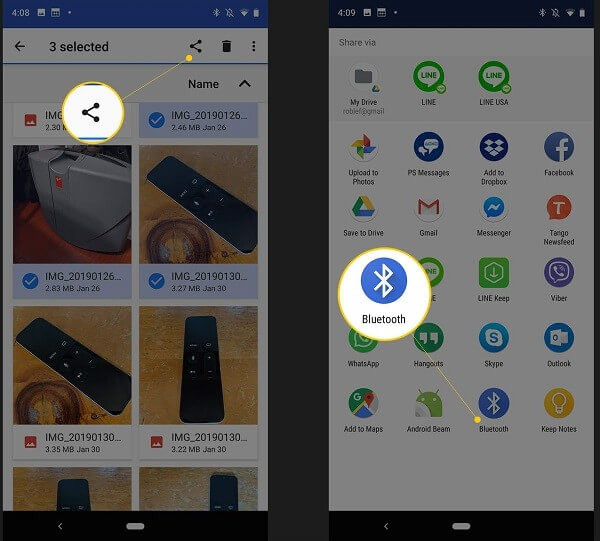 Sharing Options
 - Wait for Completion: The photos will be transferred. The time it takes will depend on the number and size of the photos.
Pros of Using Bluetooth or Wi-Fi Direct:
- Wireless: No need for cables or a computer.
- Free: Uses built-in features of your phone.
- Simple for Small Transfers: Easy to use for transferring a few photos.
Cons of Using Bluetooth or Wi-Fi Direct:
- Slow Transfer Speed: Bluetooth is particularly slow, making it unsuitable for large transfers.
- Manual Selection: You need to select and share photos one by one.
- Not Ideal for Large Libraries: Not practical for transferring your entire photo library.
Who is it best for?
Bluetooth or Wi-Fi Direct is best for users who want to transfer a small number of photos wirelessly and don’t mind the slower transfer speeds.
2.4. Method 4: Email – The Limited Option
What is Email Transfer?
Email transfer involves sending photos as attachments from one email account to another, accessible on both devices.
How does it work?
This method is simple: you send photos from your old phone to your email address and then download them onto your new phone.
Steps to Transfer Photos Using Email:
- Compose Email: On your old phone, open your email app (e.g., Gmail) and compose a new email.
- Attach Photos: Tap the attachment icon and select the photos you want to transfer.
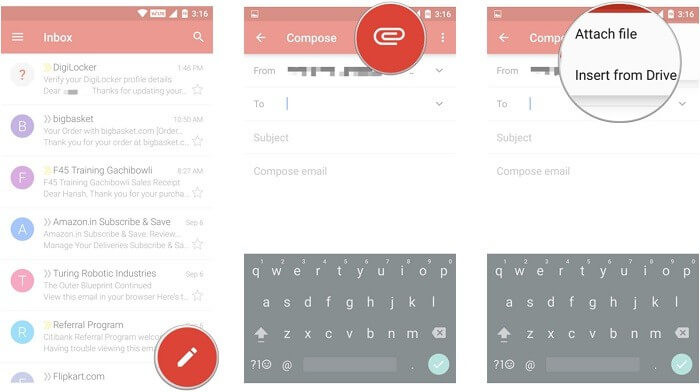 Attaching Photos to Email
 - Send Email: Enter your own email address as the recipient and send the email.
- Access Email on New Phone: On your new phone, open the same email app and access the email you sent.
- Download Photos: Download the attached photos to your new phone.
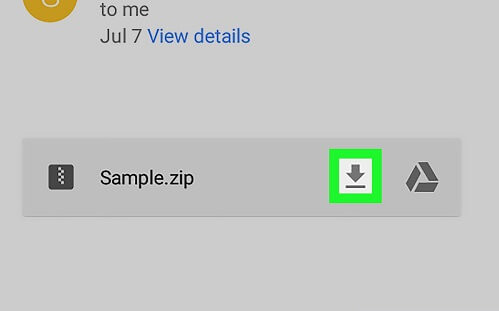 Downloading Photos from Email
Pros of Using Email:
- Simple: Easy to understand and use.
- No Additional Software: Uses built-in email functionality.
- Backup: Photos are also saved in your email.
Cons of Using Email:
- Time-Consuming: Slow and tedious for more than a few photos.
- Size Limits: Email providers have attachment size limits, restricting the number of photos you can send in one email.
- Impractical for Large Transfers: Not suitable for transferring your entire photo library.
Who is it best for?
Email transfer is best for users who only need to transfer a very small number of photos and don’t have other options available.
2.5. Method 5: Third-Party Apps – The Versatile Approach
What are Third-Party Transfer Apps?
Numerous third-party apps are designed to facilitate data transfer between devices, including photo transfer. Popular options include Photo Transfer App, SHAREit, CLONEit, and Copy My Data.
How do they work?
These apps typically use Wi-Fi to transfer data between devices. They offer a user-friendly interface and can transfer various types of data, including photos, videos, and contacts.
Steps to Transfer Photos Using a Third-Party App (Example: Photo Transfer App):
- Download and Install App: Download and install the Photo Transfer App on both your old and new Samsung phones.
- Open App and Connect Devices: Open the app on both devices. Ensure both phones are connected to the same Wi-Fi network.
- Select Sending and Receiving Devices: Designate one phone as the sender and the other as the receiver.
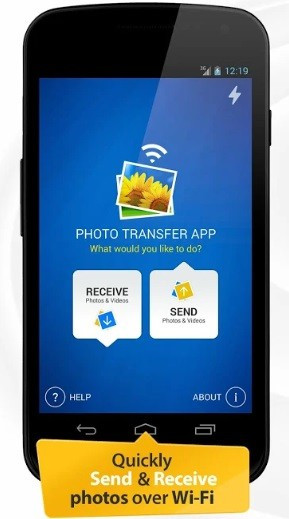 Photo Transfer App Interface
 - Establish Connection: The app will search for available devices. Select your new Samsung phone from the list on your old phone.
- Select Photos: Choose the photos you want to transfer from your old phone.
- Start Transfer: Tap the “Send” or “Transfer” button.
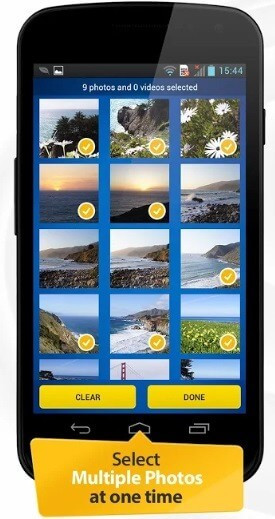 Selecting Photos for Transfer
 - Receive Photos: On your new phone, the photos will be automatically received and saved.
Pros of Using Third-Party Apps:
- Wireless Transfer: No need for cables or a computer.
- User-Friendly Interface: Often have intuitive interfaces.
- Versatile: Support various data types.
Cons of Using Third-Party Apps:
- Dependence on Wi-Fi: Requires a stable Wi-Fi connection.
- Security Concerns: Using third-party apps can raise privacy concerns.
- Potential Ads: Some apps may contain ads or require a subscription for full functionality.
Who is it best for?
Third-party apps are best for users who want a wireless transfer solution with a user-friendly interface and support for various data types. However, it’s important to choose a reputable app and be aware of potential security concerns.
3. Troubleshooting Common Issues During Photo Transfer
Even with the best methods, you might encounter issues. Here are some common problems and how to solve them:
- Slow Transfer Speed:
- Solution: Use a USB connection instead of Wi-Fi. Close unnecessary apps to free up resources.
- Connection Problems:
- Solution: Ensure both devices are on the same Wi-Fi network. Restart both devices and try again.
- Incomplete Transfer:
- Solution: Check storage space on your new phone. Ensure both devices have enough battery power.
- File Compatibility Issues:
- Solution: Convert photos to a more universal format like JPEG before transferring.
4. Tips for Optimizing Your Photo Management on Samsung Devices
Once you’ve successfully transferred your photos, here are some tips to keep them organized and accessible:
- Use Cloud Storage: Services like Google Photos or Samsung Cloud provide automatic backup and syncing, ensuring your photos are safe and accessible across devices.
- Create Albums: Organize your photos into albums for easy browsing and sharing.
- Regularly Backup Your Photos: Use a combination of cloud storage and local backups (e.g., to an external hard drive) for maximum protection.
- Delete Unnecessary Photos: Regularly review your photo library and delete duplicates or low-quality photos to save storage space.
5. Why dfphoto.net is Your Go-To Resource for Photography Tips and Inspiration
At dfphoto.net, we’re passionate about photography and committed to providing you with the best resources to enhance your skills and creativity. Whether you’re a beginner or a professional, you’ll find valuable information, inspiration, and a supportive community.
- Detailed Tutorials: We offer in-depth tutorials on various photography techniques, from basic composition to advanced editing.
- Gear Reviews: Stay updated with the latest camera and equipment reviews to make informed decisions.
- Inspirational Galleries: Explore stunning photo galleries to spark your creativity and discover new perspectives.
- Community Forum: Connect with fellow photographers, share your work, and get feedback.
We believe that everyone can capture beautiful moments and tell compelling stories through photography, and we’re here to help you on your journey.
6. Search Intent and How This Article Addresses It
This article is crafted to comprehensively address the various search intents behind the query “how to transfer photos from Samsung to Samsung.” Here’s a breakdown:
- Informational Intent:
- User Question: “What are the ways to transfer photos from my old Samsung to my new one?”
- How This Article Addresses It: We provide five detailed methods, each explained step-by-step, ensuring users understand the various options available.
- Practical/Actionable Intent:
- User Question: “How do I actually transfer the photos? What are the specific steps?”
- How This Article Addresses It: Each method includes a detailed, numbered list of steps with visual aids, making it easy for users to follow along and execute the transfer.
- Comparative Intent:
- User Question: “Which method is the best for my specific needs (speed, ease of use, etc.)?”
- How This Article Addresses It: Each method is accompanied by a list of pros and cons, along with a “Who is it best for?” section, helping users choose the most suitable option based on their requirements.
- Troubleshooting Intent:
- User Question: “What if something goes wrong during the transfer? How do I fix it?”
- How This Article Addresses It: A dedicated section addresses common issues and provides practical solutions, ensuring users can overcome any obstacles they might encounter.
- Exploratory Intent:
- User Question: “Are there any additional tips for managing my photos once they’re transferred?”
- How This Article Addresses It: We offer tips for optimizing photo management, including using cloud storage, creating albums, and regularly backing up photos, enhancing the user’s overall experience.
7. FAQ: Frequently Asked Questions
7.1. Can I transfer photos from Samsung to Samsung without Wi-Fi?
Yes, you can use methods like USB transfer with Smart Switch or MobileTrans, Bluetooth, or direct transfer via USB cable.
7.2. How long does it take to transfer photos using Smart Switch?
The transfer time depends on the amount of data and the connection method. USB transfers are generally faster than Wi-Fi.
7.3. Is Samsung Smart Switch free to use?
Yes, Samsung Smart Switch is a free app available on the Google Play Store and Samsung Galaxy Store.
7.4. Can I transfer other data besides photos using these methods?
Yes, most of these methods allow you to transfer various types of data, including videos, contacts, messages, and apps.
7.5. What should I do if the transfer process gets interrupted?
Ensure both devices have enough battery and are connected to a stable network or USB connection. Restart the transfer process.
7.6. How do I enable USB debugging on my Samsung phone?
Go to Settings > About Phone > Software Information. Tap “Build number” seven times to enable Developer Options. Then, go to Settings > Developer Options and enable USB debugging.
7.7. What if my new Samsung phone doesn’t have enough storage space?
You can use cloud storage solutions like Google Photos or Samsung Cloud to store your photos or transfer some photos to an external storage device.
7.8. Are there any security concerns when using third-party apps for photo transfer?
Yes, always download apps from reputable sources and review their permissions to ensure they’re not accessing unnecessary data.
7.9. Can I transfer photos from my Samsung phone to an iPhone using these methods?
Some methods like MobileTrans and third-party apps support cross-platform transfers between Android and iOS devices.
7.10. How do I ensure my photos are backed up after transferring them to my new Samsung phone?
Enable automatic backup to cloud storage services like Google Photos or Samsung Cloud.
8. Conclusion: Seamless Photo Transfer for Lasting Memories
Transferring photos from one Samsung device to another doesn’t have to be a daunting task. With the right method and a little preparation, you can seamlessly move your cherished memories to your new phone. Whether you choose the official Samsung Smart Switch, the one-click solution of Wondershare MobileTrans, or a simple wireless transfer, we hope this guide has provided you with the knowledge and confidence to make the process smooth and enjoyable.
Remember, at dfphoto.net, we’re here to support your photography journey every step of the way. Visit our website to discover more tips, tutorials, and inspiration to elevate your skills and capture the world around you. Explore our detailed guides, stunning photo galleries, and connect with a vibrant community of fellow photographers. Start capturing and preserving your precious moments today.
Ready to take your photography to the next level? Visit dfphoto.net now and unlock a world of resources, inspiration, and community support. Let’s capture and preserve the beauty of life together!
Address: 1600 St Michael’s Dr, Santa Fe, NM 87505, United States. Phone: +1 (505) 471-6001. Website: dfphoto.net.