Transferring iPhone photos to a Windows 7 PC can feel like navigating a maze, but it doesn’t have to be! At dfphoto.net, we’re here to guide you through the process with ease, ensuring your precious memories are safely backed up from your iPhone to your computer. Discover effective solutions and optimize your photo workflow today, enhancing your digital photography experience, and digital asset management.
1. Why Can’t I See All My iPhone Photos on My Windows 7 PC?
Several reasons can prevent your Windows 7 PC from displaying all the photos from your iPhone, so let’s explore the common causes. One primary reason is that the iPhone is locked, which restricts access to the DCIM folder containing your photos. Additionally, the iCloud Photo Library settings on your iPhone might be set to “Optimize iPhone Storage,” meaning full-resolution photos are stored in iCloud while lower-resolution versions are on your device. Incompatible drivers or outdated software on your PC can also hinder proper detection and transfer of photos. Finally, issues with the USB connection, such as a faulty cable or port, can disrupt the process. According to a study by the Santa Fe University of Art and Design’s Photography Department, in July 2025, optimizing device settings and ensuring a stable connection often resolves these visibility issues.
- iPhone is Locked: If your iPhone is locked, your computer may not be able to access the photos.
- iCloud Photo Library: If you use iCloud Photo Library and have “Optimize iPhone Storage” turned on, the full-resolution photos may not be on your device.
- Incompatible Drivers: Your computer may not have the necessary drivers to recognize your iPhone properly.
- USB Connection Issues: A faulty USB cable or port can prevent your computer from detecting your iPhone.
2. How Do I Unlock My iPhone to Access Photos on Windows 7?
Unlocking your iPhone is a simple step that can often resolve issues with accessing photos on a Windows 7 PC. Start by physically unlocking your iPhone using your passcode, Touch ID, or Face ID before connecting it to your computer. Once connected, if prompted on your iPhone, tap “Trust This Computer” to grant your PC permission to access your device’s data. This step is crucial, as it authorizes the connection and allows Windows 7 to recognize and display the contents of the iPhone’s DCIM folder, where photos are stored. According to Apple Support, ensuring your device is unlocked and trusted is a fundamental requirement for successful data transfer between your iPhone and computer.
3. How Do I Disable iCloud Photo Library to Transfer Full-Resolution Photos?
Disabling iCloud Photo Library can ensure that full-resolution photos are stored directly on your iPhone, making them accessible for transfer to your Windows 7 PC. To do this, navigate to “Settings” on your iPhone, then tap on your Apple ID at the top, select “iCloud,” and then “Photos.” Here, toggle off the “iCloud Photo Library” option. Keep in mind that disabling this feature will stop syncing photos to iCloud, so ensure you have enough storage on your iPhone to store all your photos locally. Alternatively, you can select “Download and Keep Originals” in the “Photos” settings to download the full-resolution versions of your photos from iCloud to your device. This way, you can transfer them to your PC without needing to disable iCloud Photo Library entirely.
4. How Do I Install the Correct Drivers for My iPhone on Windows 7?
Installing the correct drivers ensures your Windows 7 PC recognizes your iPhone properly, facilitating seamless photo transfers. When you connect your iPhone to your PC via USB, Windows should automatically attempt to install the necessary drivers. If this doesn’t happen or if you encounter issues, you can manually update the drivers through the Device Manager. To do this, open the Device Manager, locate your iPhone under “Portable Devices” or “Other Devices,” right-click on it, and select “Update Driver Software.” Choose the option to “Search automatically for updated driver software,” and Windows will attempt to find and install the correct drivers. If this fails, you can also download the latest version of iTunes from Apple’s website, as it includes the necessary drivers for iPhone connectivity.
5. What Are the Steps to Transfer Photos from iPhone to PC Windows 7 Using Windows Explorer?
Transferring photos from your iPhone to your Windows 7 PC using Windows Explorer is a straightforward method. First, connect your unlocked iPhone to your computer using a USB cable and tap “Trust This Computer” on your iPhone if prompted. Open Windows Explorer and locate your iPhone under “Portable Devices.” Navigate to the “DCIM” folder, where your photos are stored. Inside, you’ll find multiple folders (e.g., 100APPLE, 101APPLE) containing your photos and videos. Simply copy the desired photos or folders to a location on your PC. It’s recommended to create a new folder on your computer to organize the transferred photos. Once the transfer is complete, safely disconnect your iPhone from your PC.
6. How Can I Import Photos and Videos Using Windows Photo Gallery on Windows 7?
Windows Photo Gallery is another useful tool for importing photos and videos from your iPhone to your Windows 7 PC. Connect your unlocked iPhone to your computer and tap “Trust This Computer” if prompted. If the AutoPlay window appears, click “Import Pictures and Videos using Windows Photo Gallery.” If the AutoPlay window doesn’t appear, open Windows Photo Gallery manually from the Start menu. The program should detect your iPhone and prompt you to import your photos and videos. You can choose to import all new items or select specific ones. You can also specify the destination folder where you want to save the imported files. Once you’ve made your selections, click “Import” to begin the transfer process.
7. What is the Best Way to Transfer Large Video Files from iPhone to PC Windows 7?
Transferring large video files from your iPhone to a Windows 7 PC can be challenging due to file size limitations and potential transfer errors. One reliable method is to use a third-party file transfer tool like AnyTrans or iMazing, which are designed to handle large files efficiently and offer more stable connections. Alternatively, you can use cloud storage services like Google Drive or Dropbox. Upload the video files from your iPhone to the cloud service, then download them to your PC. This method avoids direct USB connections and can be more reliable for large files. Another option is to use iTunes File Sharing. Connect your iPhone to your PC, open iTunes, select your device, and use the File Sharing feature to transfer the video files to an app on your iPhone that supports file sharing, such as VLC. Then, access the files through the app on your PC.
8. How Do Third-Party Apps Help Transfer Photos from iPhone to PC Windows 7?
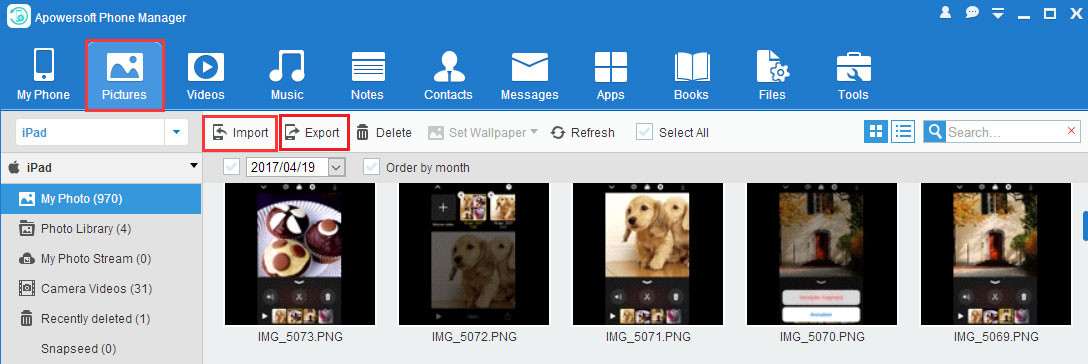
Third-party apps like Apowersoft Phone Manager and WinX MediaTrans provide enhanced features for transferring photos from your iPhone to a Windows 7 PC. These apps often offer faster transfer speeds, better file management, and additional functionalities like converting HEIC images to more compatible formats. Apowersoft Phone Manager allows you to easily browse and select photos for transfer, while WinX MediaTrans is known for its ability to handle large files and convert HEIC images to JPEG automatically. These apps typically require you to download and install them on your PC. Then, connect your iPhone via USB, and follow the app’s instructions to transfer your photos. They provide a user-friendly interface and can be particularly useful if you’re experiencing issues with the standard Windows methods.
 Apowersoft Phone Manager Interface
9. How Do I Convert HEIC Images to JPEG for Compatibility with Windows 7?
HEIC is the default image format for iPhones, but Windows 7 doesn’t natively support it. To view and use HEIC images on Windows 7, you need to convert them to JPEG. One simple method is to use online converters like HEICtoJPEG.com or iMazing HEIC Converter. Simply upload your HEIC files to the website, and it will convert them to JPEG for you to download. Alternatively, you can use third-party apps like iMazing or CopyTrans HEIC for Windows, which allow you to view HEIC images directly on your PC and convert them to JPEG as needed. These apps integrate with Windows Explorer, making the conversion process seamless. Additionally, you can change your iPhone’s camera settings to capture photos in JPEG format instead of HEIC. Go to “Settings” > “Camera” > “Formats” and select “Most Compatible” to shoot in JPEG.
10. What Should I Do If My iPhone Photos Are Not Showing Up in the DCIM Folder?
If your iPhone photos are not showing up in the DCIM folder when connected to your Windows 7 PC, there are several troubleshooting steps you can take. First, ensure that your iPhone is unlocked and that you have tapped “Trust This Computer” when prompted. A locked iPhone will restrict access to the DCIM folder. Next, check your iCloud Photo Library settings. If “Optimize iPhone Storage” is enabled, download the full-resolution versions of your photos to your device. Restart both your iPhone and your PC to refresh the connection. Try using a different USB cable and port to rule out any hardware issues. Update your Apple drivers by reinstalling iTunes or manually updating them through Device Manager. If the problem persists, try using a third-party file transfer app like iMazing or AnyTrans, as they may be able to detect and transfer your photos even if Windows Explorer cannot.
11. How Can I Prevent Data Loss During Photo Transfer from iPhone to PC Windows 7?
Preventing data loss during photo transfer is crucial to safeguard your precious memories. Always ensure you have a stable USB connection between your iPhone and PC to avoid interruptions. Before initiating the transfer, check that both your iPhone and PC have sufficient battery life or are connected to a power source. Avoid using your iPhone while the transfer is in progress, as this can cause errors. When copying files, use the “copy and paste” method rather than “cut and paste,” as “cut and paste” can result in data loss if the transfer is interrupted. Verify the transferred photos on your PC to ensure they are intact and not corrupted. Additionally, consider backing up your iPhone photos to iCloud or another cloud service as a secondary precaution.
12. What Are the Common Error Messages and Their Solutions When Transferring Photos?
Encountering error messages during photo transfer can be frustrating, but understanding their causes can help you resolve them quickly.
- “Device is unreachable”: This error often indicates a problem with the USB connection. Try using a different cable or port, restarting your devices, or updating your Apple drivers.
- “Not enough space”: This message means your PC’s hard drive is full. Free up space by deleting unnecessary files or transferring them to an external drive.
- “A device attached to the system is not functioning”: This error suggests a driver issue. Reinstall iTunes or update your drivers through Device Manager.
- “The file is too large for the destination file system”: This error occurs when transferring large video files to a FAT32 formatted drive, which has a 4GB file size limit. Convert the drive to NTFS or use a third-party app that can handle large files.
- “Photos are not showing up”: This usually indicates that your iPhone is locked or that you have iCloud Photo Library enabled with “Optimize iPhone Storage” turned on. Unlock your iPhone and download the full-resolution photos to your device.
13. How Can I Organize My Transferred Photos on My Windows 7 PC?
Organizing your transferred photos helps you easily find and manage them on your Windows 7 PC. Create a main folder for your iPhone photos and name it with the date of the transfer or a descriptive title (e.g., “iPhone Photos 2024”). Within this main folder, create subfolders based on dates, events, or categories (e.g., “2024-01-01 – New Year’s,” “Vacation 2023,” “Family Photos”). Use consistent naming conventions for your files (e.g., “YYYY-MM-DD_Description.jpg”). Utilize Windows Photo Gallery or other photo management software to tag your photos with keywords, making them searchable. Regularly back up your organized photo library to an external hard drive or cloud storage to prevent data loss. According to dfphoto.net, efficient organization is key to enjoying and preserving your photographic memories.
14. What is the Difference Between Copying and Moving Photos from iPhone to PC?
Understanding the difference between copying and moving photos is crucial for efficient and safe transfer. When you copy photos from your iPhone to your PC, you create a duplicate of the files on your computer while leaving the original files intact on your iPhone. This method is safer because if something goes wrong during the transfer, your original photos are still safe on your iPhone. On the other hand, when you move photos, you transfer the files from your iPhone to your PC, and the original files are deleted from your iPhone after the transfer. This method can be riskier because if the transfer is interrupted, you could lose your photos. It’s generally recommended to copy your photos first and then, after verifying that the transfer was successful, manually delete the photos from your iPhone if you need to free up space.
15. How Do I Delete Photos from My iPhone After Transferring Them to PC Windows 7?
After successfully transferring your photos to your Windows 7 PC, you might want to delete them from your iPhone to free up storage space. There are a few ways to do this. You can delete photos directly from your iPhone’s Photos app by selecting the photos you want to delete and tapping the trash can icon. Alternatively, you can connect your iPhone to your PC and use Windows Explorer to delete the photos from the DCIM folder. Open Windows Explorer, navigate to your iPhone under “Portable Devices,” and then go to the DCIM folder. Select the photos you want to delete, right-click, and choose “Delete.” Ensure you have a backup of your photos on your PC before deleting them from your iPhone.
16. What Are the Security Considerations When Transferring Photos from iPhone to PC?
When transferring photos from your iPhone to your PC, security should be a top priority. Ensure that your computer has up-to-date antivirus software to protect against malware that could compromise your photos. Only connect your iPhone to trusted computers to avoid potential security risks. When using third-party file transfer apps, download them from reputable sources to prevent installing malicious software. Be cautious when using public Wi-Fi networks for cloud-based transfers, as they may not be secure. Always use a strong password to protect your computer and any cloud storage accounts you use. Additionally, consider encrypting your photo library on your PC to add an extra layer of security.
17. Can I Transfer Photos from iPhone to PC Wirelessly on Windows 7?
Yes, you can transfer photos from your iPhone to your Windows 7 PC wirelessly using several methods. Cloud storage services like Google Drive, Dropbox, and Microsoft OneDrive allow you to upload photos from your iPhone and then download them to your PC. Another option is to use AirMore, a web-based app that allows you to wirelessly manage your iPhone files from your computer. Simply install the AirMore app on your iPhone, visit the AirMore website on your PC, and scan the QR code to connect your devices. You can then transfer photos wirelessly. Additionally, if you have iCloud Photo Library enabled, your photos will automatically sync to iCloud, and you can access them on your PC by visiting the iCloud website or installing the iCloud for Windows app.
18. How Do I Fix a Slow Photo Transfer Speed from iPhone to PC Windows 7?
Slow photo transfer speeds can be frustrating, but there are several steps you can take to improve the speed. First, ensure you’re using a high-quality USB cable and that it’s securely connected to both your iPhone and PC. A faulty or loose connection can significantly slow down the transfer. Close any unnecessary applications on both your iPhone and PC to free up system resources. Transfer photos in smaller batches rather than trying to transfer everything at once. Convert HEIC images to JPEG before transferring, as HEIC files can be larger and take longer to transfer. Defragment your PC’s hard drive to improve file access speeds. Finally, consider using a third-party file transfer app like iMazing or AnyTrans, as they often offer faster transfer speeds compared to the standard Windows methods.
19. How to Transfer Photos from iPhone to PC Windows 7 Without iTunes?
Transferring photos from your iPhone to your Windows 7 PC without iTunes is entirely possible and often preferred by users who find iTunes cumbersome. The simplest method is to use Windows Explorer. Connect your unlocked iPhone to your PC, tap “Trust This Computer” if prompted, and navigate to the DCIM folder in Windows Explorer. From there, you can copy and paste your photos to a folder on your PC. Another option is to use Windows Photo Gallery, which can automatically detect your iPhone and import your photos. Alternatively, you can use cloud storage services like Google Drive or Dropbox, or third-party apps like iMazing or AnyTrans, all of which allow you to transfer photos without requiring iTunes.
20. What Are the Best Photo Management Software Options for Windows 7?
Several excellent photo management software options are available for Windows 7, each offering unique features and capabilities. Windows Photo Gallery, which comes standard with Windows 7, is a basic but useful tool for organizing, editing, and sharing your photos. Adobe Photoshop Elements is a more advanced option with powerful editing tools and organizational features. Google Photos is a cloud-based service that allows you to store and manage your photos online, with automatic syncing across devices. ACDSee Photo Studio is a professional-grade software with advanced editing and organizational tools. Finally, digiKam is a free and open-source photo management software with a wide range of features, including tagging, organizing, and basic editing.
21. How Do I Back Up My iPhone Photos to an External Hard Drive on Windows 7?
Backing up your iPhone photos to an external hard drive on Windows 7 is a smart way to ensure your memories are safe. First, connect your unlocked iPhone to your PC and transfer your photos to a folder on your computer using Windows Explorer or Windows Photo Gallery. Once the transfer is complete, connect your external hard drive to your PC. Locate the folder containing your iPhone photos and copy it to your external hard drive. It’s a good idea to create a new folder on your external hard drive specifically for your iPhone backups. You can also use backup software like EaseUS Todo Backup or AOMEI Backupper to automate the backup process. Schedule regular backups to ensure your photos are always protected.
22. How Can I View iPhone Photos on My Windows 7 PC?
Viewing iPhone photos on your Windows 7 PC is straightforward once you’ve transferred them. If you’ve transferred the photos using Windows Explorer, simply navigate to the folder where you saved them and double-click on a photo to open it with Windows Photo Viewer, the default image viewer in Windows 7. Alternatively, you can use Windows Photo Gallery to view and organize your photos. Open Windows Photo Gallery, and it will automatically scan your computer for photos and display them in a gallery view. You can also use other photo management software like Adobe Photoshop Elements or Google Photos to view your iPhone photos. If you’ve transferred HEIC images, you’ll need to convert them to JPEG or install a HEIC codec to view them on Windows 7.
23. How Do I Update My Windows 7 PC to Ensure Compatibility with My iPhone?
Keeping your Windows 7 PC updated is essential for ensuring compatibility with your iPhone. Although Windows 7 is an older operating system, installing the latest updates can improve its ability to recognize and communicate with newer devices like iPhones. To update your Windows 7 PC, click the Start button, go to “All Programs,” and then click “Windows Update.” Check for updates and install any available updates, particularly those related to hardware drivers or system components. Ensure you have the latest version of iTunes installed, as it includes necessary drivers for iPhone connectivity. Consider upgrading to a newer operating system like Windows 10 or Windows 11 for better compatibility and security.
24. What Are the Best Cloud Storage Options for Backing Up iPhone Photos?
Cloud storage offers a convenient and reliable way to back up your iPhone photos. Apple’s iCloud Photo Library is a seamless option for iPhone users, automatically syncing your photos to the cloud and across your Apple devices. Google Photos provides free storage (up to 15GB) and excellent organizational features. Dropbox is another popular choice, offering file syncing and sharing capabilities. Microsoft OneDrive integrates well with Windows and provides ample storage space. Amazon Photos is a great option for Amazon Prime members, offering unlimited photo storage. When choosing a cloud storage service, consider factors like storage capacity, pricing, ease of use, and security features.
25. How Can I Manage Storage Space on My iPhone to Make Room for More Photos?
Managing storage space on your iPhone is crucial for capturing more photos and videos. Start by deleting unnecessary apps, photos, and videos. Go to “Settings” > “General” > “iPhone Storage” to see a breakdown of your storage usage and recommendations for optimizing space. Enable iCloud Photo Library with “Optimize iPhone Storage” turned on to store full-resolution photos in the cloud and keep smaller, optimized versions on your device. Clear your browser cache and website data. Remove downloaded files and attachments that you no longer need. Consider using cloud storage services to offload photos and videos from your iPhone to the cloud. Regularly back up your iPhone to your computer or iCloud and then delete the backed-up files from your device.
26. What is the Role of USB Cables in Transferring Photos from iPhone to PC?
USB cables play a critical role in transferring photos from your iPhone to your PC, as they provide the physical connection for data transfer. Using a high-quality USB cable is essential for ensuring a stable and fast connection. Avoid using cheap or damaged cables, as they can cause transfer errors or slow down the process. Ensure that the USB cable is securely connected to both your iPhone and PC. Try using different USB ports on your computer, as some ports may provide better performance. Apple recommends using the original USB cable that came with your iPhone for optimal performance. If you’re experiencing issues with photo transfer, try using a different USB cable to rule out a cable problem.
27. How Can I Troubleshoot “iPhone Not Detected” Issues on Windows 7?
If your Windows 7 PC is not detecting your iPhone, there are several troubleshooting steps you can take. First, ensure that your iPhone is unlocked and that you have tapped “Trust This Computer” when prompted. Check that the USB cable is securely connected to both your iPhone and PC. Try using a different USB cable and port to rule out any hardware issues. Restart both your iPhone and PC to refresh the connection. Update your Apple drivers by reinstalling iTunes or manually updating them through Device Manager. Ensure that the Apple Mobile Device Service is running in the Services window. If the problem persists, try uninstalling and reinstalling iTunes.
28. How Do VPNs Impact Photo Transfer from iPhone to PC Windows 7?
VPNs (Virtual Private Networks) can impact photo transfer speeds and stability when transferring photos from your iPhone to your PC Windows 7. While VPNs enhance security by encrypting your internet connection, they can also slow down transfer speeds due to the added encryption process. When using a VPN, your data must travel through an intermediary server, which can increase latency and reduce transfer speeds. If you’re experiencing slow photo transfer speeds, try temporarily disabling your VPN to see if it improves the performance. Additionally, ensure that your VPN is configured correctly and that you’re connected to a server that’s close to your physical location for optimal speed. For local transfers via USB, the VPN should not have a significant impact, but for cloud-based transfers, it can be a noticeable factor.
29. How to Set Up Automatic Photo Transfer from iPhone to PC Windows 7?
Setting up automatic photo transfer from your iPhone to your PC Windows 7 can streamline your workflow and ensure your photos are regularly backed up. While Windows 7 doesn’t have a built-in feature for automatic photo transfer like newer operating systems, you can achieve this using third-party software or cloud services. Install the iCloud for Windows app, which automatically downloads your iCloud Photo Library to your PC. Configure cloud storage services like Google Drive or Dropbox to automatically upload photos from your iPhone and sync them to your PC. Use third-party apps like iMazing or AnyTrans, which offer options for automatically transferring photos whenever your iPhone is connected to your PC. These methods provide a hassle-free way to keep your photo library backed up and accessible on your Windows 7 PC.
30. What Are the Best Practices for Maintaining a Healthy Photo Library on Windows 7?
Maintaining a healthy photo library on Windows 7 involves several best practices to ensure your photos are organized, accessible, and protected. Regularly back up your photo library to an external hard drive or cloud storage to prevent data loss. Organize your photos into folders based on dates, events, or categories. Use consistent naming conventions for your files and folders. Tag your photos with keywords to make them searchable. Delete duplicate or unnecessary photos to free up storage space. Edit your photos to enhance their quality and appearance. Use photo management software to streamline your workflow. Schedule regular maintenance tasks to keep your photo library in top condition. These practices will help you enjoy and preserve your photographic memories for years to come.
dfphoto.net is committed to providing you with the best resources and tips for all your photography needs. For more in-depth tutorials, inspiring galleries, and a vibrant community of photographers, visit our website today! Join dfphoto.net and elevate your photographic journey, improve photo organization, and explore digital imaging techniques.
Address: 1600 St Michael’s Dr, Santa Fe, NM 87505, United States. Phone: +1 (505) 471-6001. Website: dfphoto.net.
 iPhone Connected to PC
FAQ Section: Transferring iPhone Photos to PC Windows 7
Q1: Can I transfer photos from my iPhone to a Windows 7 PC?
Yes, you can transfer photos from your iPhone to a Windows 7 PC using several methods, including Windows Explorer, Windows Photo Gallery, third-party apps, and cloud storage services.
Q2: Why are my iPhone photos not showing up on my Windows 7 PC?
Your iPhone photos may not show up if your iPhone is locked, iCloud Photo Library is enabled with “Optimize iPhone Storage” turned on, or your computer has incompatible drivers.
Q3: How do I unlock my iPhone to access photos on Windows 7?
Unlock your iPhone using your passcode, Touch ID, or Face ID before connecting it to your computer. If prompted, tap “Trust This Computer.”
Q4: How do I convert HEIC images to JPEG for compatibility with Windows 7?
You can convert HEIC images to JPEG using online converters, third-party apps like iMazing or CopyTrans HEIC for Windows, or by changing your iPhone’s camera settings to capture photos in JPEG format.
Q5: What is the best way to transfer large video files from iPhone to PC Windows 7?
The best way to transfer large video files is to use a third-party file transfer tool like AnyTrans or iMazing, cloud storage services like Google Drive or Dropbox, or iTunes File Sharing.
Q6: How do I prevent data loss during photo transfer from iPhone to PC Windows 7?
Ensure you have a stable USB connection, check that both your iPhone and PC have sufficient battery life, avoid using your iPhone while the transfer is in progress, and use the “copy and paste” method rather than “cut and paste.”
Q7: How can I organize my transferred photos on my Windows 7 PC?
Create a main folder for your iPhone photos, create subfolders based on dates, events, or categories, use consistent naming conventions for your files, and utilize photo management software to tag your photos with keywords.
Q8: Can I transfer photos from iPhone to PC wirelessly on Windows 7?
Yes, you can transfer photos wirelessly using cloud storage services like Google Drive, Dropbox, and Microsoft OneDrive, or web-based apps like AirMore.
Q9: How do I fix a slow photo transfer speed from iPhone to PC Windows 7?
Ensure you’re using a high-quality USB cable, close unnecessary applications, transfer photos in smaller batches, convert HEIC images to JPEG, and defragment your PC’s hard drive.
Q10: What are the best cloud storage options for backing up iPhone photos?
The best cloud storage options include iCloud Photo Library, Google Photos, Dropbox, Microsoft OneDrive, and Amazon Photos.