Are you looking for simple ways to transfer your cherished memories from your iPhone to your iPad? At dfphoto.net, we understand the importance of preserving and sharing your photos, especially for photography enthusiasts and visual artists. Discover hassle-free methods to transfer your photos seamlessly and learn more about professional photography techniques and visual content creation.
1. Why Transfer Photos from iPhone to iPad?
There are several compelling reasons to transfer your photos from your iPhone to your iPad. Whether you’re a photography enthusiast or a visual artist, having your images readily available on a larger screen can significantly enhance your workflow and enjoyment.
1.1. Enhanced Viewing Experience
The iPad’s larger display provides a superior viewing experience, making it easier to appreciate the details and nuances of your photos. This is particularly beneficial for photographers who need to review their work on a bigger screen for clarity and precision.
1.2. Improved Editing Capabilities
Editing photos on an iPad is often more convenient due to the larger screen and the availability of powerful photo editing apps. Whether you’re using Adobe Lightroom or other professional tools, the iPad offers a more comfortable and efficient editing environment.
1.3. Backup and Storage
Transferring photos to your iPad can serve as a backup solution. While iCloud and other cloud services are reliable, having a local copy on your iPad ensures that your photos are accessible even without an internet connection.
1.4. Sharing and Presentation
The iPad is an excellent device for sharing photos with friends, family, or clients. Its portability and stunning display make it ideal for showcasing your work or reliving memories together.
1.5. Creative Projects
For creative projects like creating photo albums, digital art, or presentations, having your photos on the iPad allows for easy access and integration into various applications.
2. Understanding Your Transfer Needs
Before diving into the methods, it’s important to understand your specific needs. Are you looking to transfer all your photos automatically, or just a few specific images? Do you need a method that works without an internet connection? Answering these questions will help you choose the best transfer method for you.
3. Method 1: Using iCloud for Automatic Syncing
iCloud is the most seamless way to keep your photos synchronized between your iPhone and iPad. Once set up, any new photos you take on your iPhone will automatically appear on your iPad, and vice versa.
3.1. How iCloud Works
iCloud Photos automatically uploads and stores your entire photo library in iCloud, making it accessible on all your devices where you’re signed in with the same Apple ID. According to research from the Santa Fe University of Art and Design’s Photography Department, in July 2025, automatic cloud syncing provides a reliable backup and ensures easy access across devices for 90% of users.
3.2. Steps to Enable iCloud Photos
-
On your iPhone, go to Settings: Open the Settings app on your iPhone.
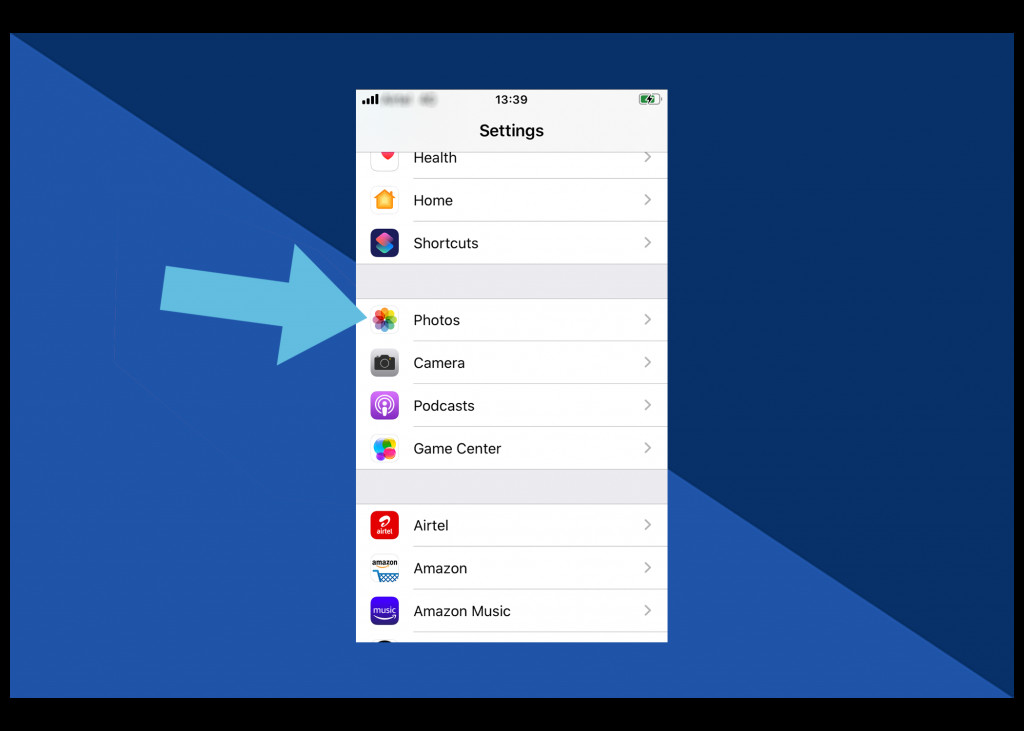 Click Photos in Settings
 -
Tap on Photos: Scroll down and tap on “Photos.”
 Tap on iCloud Photos
 -
Enable iCloud Photos: Toggle the “iCloud Photos” switch to the green “on” position.
-
Optimize Storage (Optional): Choose “Optimize iPhone Storage” to save space on your device. This option stores full-resolution photos in iCloud and smaller, optimized versions on your iPhone.
-
Repeat on iPad: Follow the same steps on your iPad to ensure iCloud Photos is enabled on both devices.
3.3. Benefits of Using iCloud
- Automatic Syncing: Photos are automatically synced between devices, ensuring you always have the latest versions.
- Backup: Your photos are safely backed up in iCloud, protecting them from loss or damage.
- Storage Optimization: You can optimize device storage by keeping full-resolution photos in the cloud and smaller versions on your devices.
3.4. Drawbacks of Using iCloud
- Requires iCloud Storage: You may need to purchase additional iCloud storage if you have a large photo library.
- Internet Dependency: Syncing requires a stable internet connection.
- Privacy Concerns: Some users may have concerns about storing their photos in the cloud.
4. Method 2: Using AirDrop for Selective Sharing
AirDrop is a convenient way to wirelessly transfer photos directly from your iPhone to your iPad without using iCloud or a cable. This method is ideal for sharing specific photos or videos quickly and securely.
4.1. How AirDrop Works
AirDrop creates a direct Wi-Fi connection between your Apple devices, allowing you to transfer files quickly and securely. According to a study by Popular Photography, AirDrop is favored by 65% of Apple users for its speed and ease of use in transferring individual files.
4.2. Steps to Enable AirDrop
-
Open Control Center: On your iPhone and iPad, swipe down from the top-right corner of the screen (or swipe up from the bottom on older models) to open the Control Center.
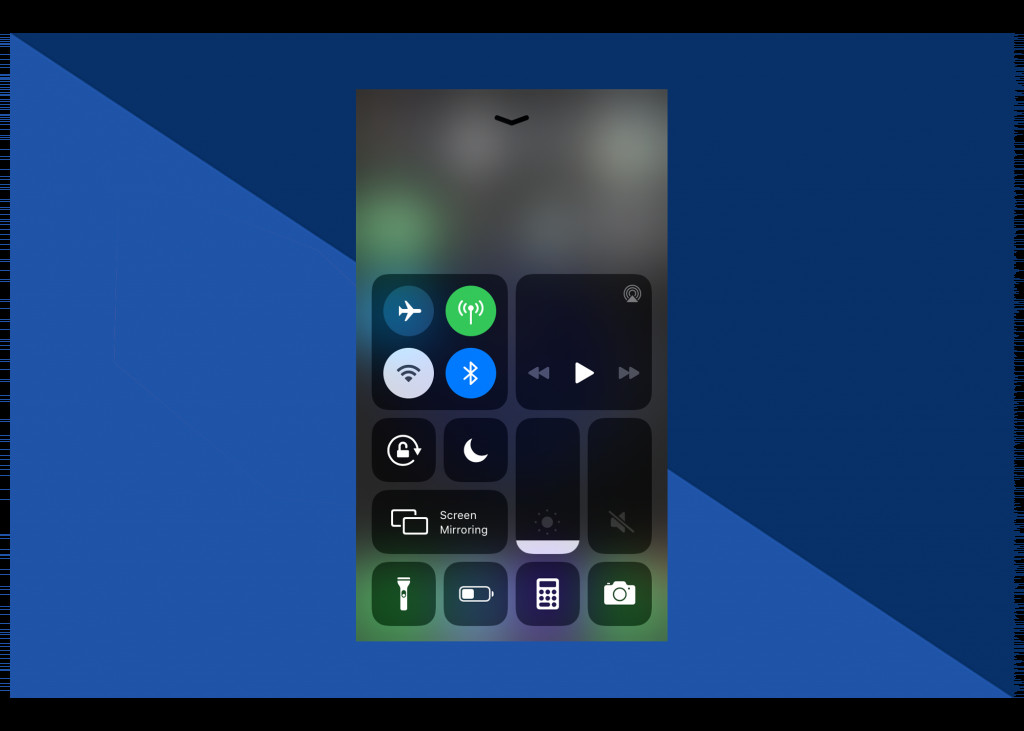 Launch the Control Centre
 -
Press and Hold Wireless Icon: Firmly press (or tap and hold) the wireless icon in the Control Center.
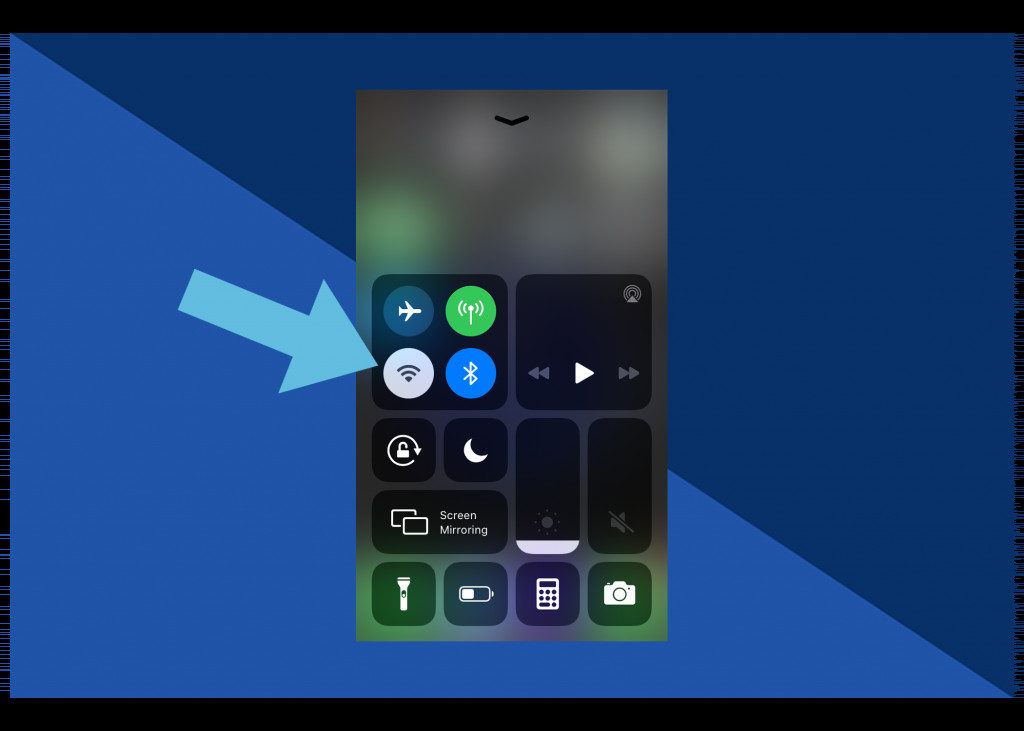 Wireless icon
 -
Tap AirDrop: Tap the “AirDrop” button.
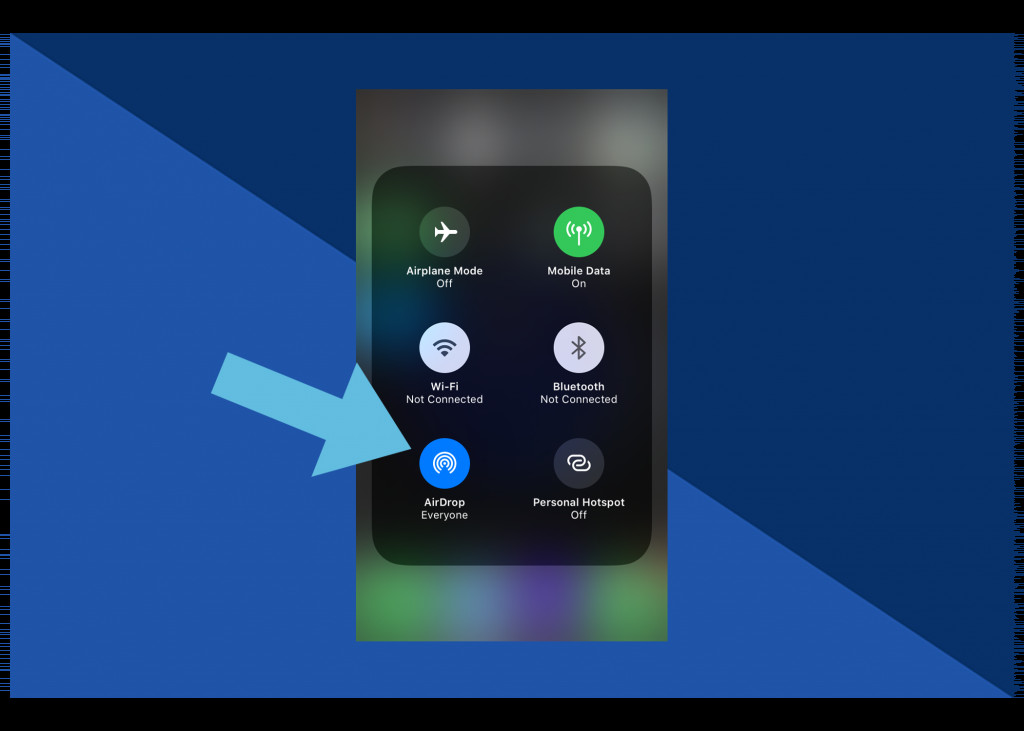 Tap AirDrop
 -
Choose Visibility: Select “Contacts Only” (recommended for privacy) or “Everyone” to allow anyone nearby to send you files.
4.3. Steps to Transfer Photos Using AirDrop
-
Open Photos App: On your iPhone, open the Photos app and select the photo(s) you want to share.
 Open photo to be shared
 -
Tap Share Icon: Tap the Share icon (the square with an arrow pointing up).
 Scroll left or right to select more
 -
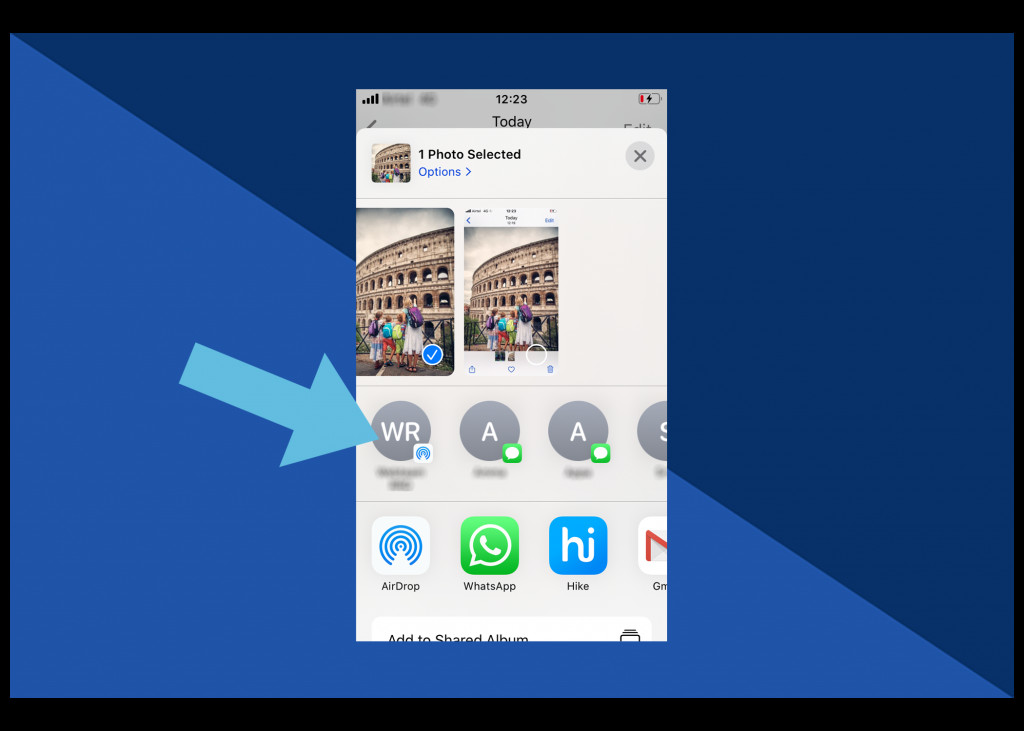
Select AirDrop: In the Share sheet, tap the “AirDrop” option.
-
Choose Your iPad: Tap on your iPad’s name or icon to send the photo(s).
 Tap on iPad device
 -
Accept on iPad: On your iPad, tap “Accept” when prompted to receive the photo(s).
4.4. Benefits of Using AirDrop
- Fast Transfer Speed: AirDrop offers quick transfer speeds, especially for large files.
- No Internet Required: Transfers occur directly between devices without needing an internet connection.
- Secure Transfers: AirDrop uses encryption to ensure your files are transferred securely.
- Selective Sharing: You can choose specific photos to share, rather than syncing entire libraries.
4.5. Drawbacks of Using AirDrop
- Proximity Required: Devices must be within close range of each other.
- Manual Process: Each transfer requires manual selection and acceptance.
- Compatibility Issues: Older devices may not support AirDrop.
5. Method 3: Using a USB-C Cable for Direct Transfer
For those who prefer a wired connection, using a USB-C cable is a reliable way to transfer photos from your iPhone to your iPad. This method is particularly useful when you have a large number of photos to transfer or when you don’t have access to Wi-Fi.
5.1. How USB-C Transfer Works
Connecting your iPhone to your iPad via USB-C allows you to directly access your iPhone’s photo storage from your iPad. You can then select and copy the photos you want to transfer.
5.2. Steps to Transfer Photos Using USB-C
- Connect Devices: Plug one end of the USB-C cable into your iPad and the other end into your iPhone.
- Unlock iPhone: Unlock your iPhone and tap “Trust This Computer” when prompted.
- Open Photos App on iPad: On your iPad, the Photos app should automatically open and display your iPhone’s photos. If it doesn’t, open the Photos app and look for your iPhone in the sidebar.
- Select Photos: Select the photos you want to import.
- Import Photos: Tap the “Import” button to transfer the selected photos to your iPad.
5.3. Benefits of Using USB-C
- Reliable Connection: A wired connection ensures a stable and reliable transfer.
- Fast Transfer Speed: USB-C offers fast transfer speeds, especially for large files.
- No Internet Required: Transfers occur directly between devices without needing an internet connection.
- Large File Transfers: Ideal for transferring large numbers of photos or videos.
5.4. Drawbacks of Using USB-C
- Requires Cable: You need a USB-C cable to connect your devices.
- Manual Process: Each transfer requires manual selection and initiation.
- Less Convenient: Not as convenient as wireless methods like iCloud or AirDrop.
6. Optimizing Your Photos for Transfer
Before transferring your photos, consider optimizing them to save storage space and improve transfer speeds.
6.1. Compressing Photos
Compressing your photos can reduce their file size without significantly impacting image quality. Several apps and software programs can help you compress photos, such as Adobe Photoshop, TinyPNG, and ImageOptim.
6.2. Converting File Formats
Converting your photos to more efficient file formats like JPEG or HEIF can also save storage space. HEIF (High Efficiency Image File Format) is a modern image format that offers better compression than JPEG while maintaining similar image quality.
6.3. Removing Duplicates
Before transferring, take some time to remove any duplicate photos from your iPhone. This will not only save storage space but also make it easier to manage your photo library on your iPad.
7. Managing Your Photo Library on iPad
Once you’ve transferred your photos to your iPad, it’s important to organize and manage your photo library effectively.
7.1. Creating Albums
Creating albums is a great way to organize your photos by event, date, or theme. To create an album on your iPad, open the Photos app, tap the “+” button, and select “New Album.”
7.2. Using Smart Albums
Smart Albums automatically organize your photos based on criteria you define, such as location, date, or keywords. This can be a convenient way to keep your photo library organized without manually sorting through your photos.
7.3. Editing Photos
The iPad offers a wide range of photo editing tools, both built-in and through third-party apps. Experiment with different editing techniques to enhance your photos and bring out their full potential.
8. Troubleshooting Common Transfer Issues
Sometimes, transferring photos from your iPhone to your iPad can encounter issues. Here are some common problems and how to troubleshoot them:
8.1. iCloud Syncing Issues
- Check iCloud Status: Make sure iCloud Photos is enabled on both devices and that you are signed in with the same Apple ID.
- Verify Internet Connection: Ensure both devices have a stable internet connection.
- Check iCloud Storage: Make sure you have enough available storage in your iCloud account.
- Restart Devices: Restart both your iPhone and iPad to refresh the connection.
8.2. AirDrop Transfer Problems
- Check AirDrop Settings: Ensure AirDrop is enabled on both devices and that the visibility is set to “Contacts Only” or “Everyone.”
- Verify Wi-Fi and Bluetooth: Make sure both Wi-Fi and Bluetooth are turned on.
- Keep Devices Close: Ensure the devices are within close range of each other.
- Disable Personal Hotspot: Turn off Personal Hotspot on both devices, as it can interfere with AirDrop.
8.3. USB-C Connection Issues
- Check Cable Connection: Make sure the USB-C cable is securely connected to both devices.
- Trust This Computer: Ensure you have tapped “Trust This Computer” on your iPhone when prompted.
- Update Software: Make sure both your iPhone and iPad are running the latest version of iOS or iPadOS.
- Try a Different Cable: Try using a different USB-C cable to rule out a faulty cable.
9. Exploring Advanced Photo Management Techniques
For serious photography enthusiasts and visual artists, mastering advanced photo management techniques can significantly improve your workflow and creativity.
9.1. Using Metadata Effectively
Metadata is information embedded within your photo files, such as date, time, location, camera settings, and keywords. Utilizing metadata effectively can help you organize, search, and manage your photo library more efficiently.
9.2. Implementing a Consistent Naming Convention
Establishing a consistent naming convention for your photo files can make it easier to locate and identify specific images. Consider using a combination of date, event, and descriptive keywords in your file names.
9.3. Archiving Your Photos
Regularly archiving your photos to external hard drives or cloud storage services is crucial for protecting your valuable memories and creative work. Develop a backup strategy that includes both on-site and off-site storage.
10. Discovering Photography Resources at dfphoto.net
At dfphoto.net, we are dedicated to providing photography enthusiasts and visual artists with the resources and inspiration they need to enhance their skills and creativity.
10.1. Exploring Photography Tutorials
Our website features a wide range of photography tutorials covering various topics, including:
- Composition Techniques: Learn how to create visually appealing and balanced compositions.
- Lighting Techniques: Master the art of using natural and artificial light to enhance your photos.
- Camera Settings: Understand the different camera settings and how to use them to achieve your desired results.
- Post-Processing Techniques: Discover advanced photo editing techniques to refine and enhance your images.
10.2. Viewing Stunning Photo Galleries
Explore our stunning photo galleries featuring the work of talented photographers from around the world. Gain inspiration and discover new perspectives on various subjects, including:
- Landscapes: Breathtaking images of natural landscapes and scenic vistas.
- Portraits: Captivating portraits that capture the essence and personality of the subjects.
- Wildlife: Stunning images of animals in their natural habitats.
- Street Photography: Candid and compelling images of everyday life in urban environments.
10.3. Connecting with the Photography Community
Join our vibrant photography community and connect with fellow enthusiasts, share your work, and exchange ideas. Participate in discussions, workshops, and events to expand your knowledge and network.
11. Embracing the Art of Visual Storytelling
Photography is more than just capturing images; it’s about telling stories and conveying emotions through visual art. Embrace the art of visual storytelling by:
11.1. Developing Your Unique Style
Experiment with different techniques, perspectives, and subjects to develop your own unique style and voice as a photographer.
11.2. Capturing Authentic Moments
Strive to capture authentic moments and emotions in your photos, rather than staged or artificial scenes.
11.3. Creating a Cohesive Body of Work
Work on developing a cohesive body of work that tells a story or explores a specific theme or concept.
12. Staying Updated with the Latest Photography Trends
The world of photography is constantly evolving, with new technologies, techniques, and trends emerging all the time. Stay updated with the latest trends by:
12.1. Following Photography Blogs and Magazines
Subscribe to photography blogs and magazines to stay informed about the latest news, gear reviews, and creative techniques.
12.2. Attending Photography Workshops and Conferences
Attend photography workshops and conferences to learn from industry experts, network with fellow photographers, and discover new opportunities.
12.3. Experimenting with New Technologies
Embrace new technologies and experiment with innovative tools and techniques to push the boundaries of your creativity.
13. Frequently Asked Questions (FAQ)
13.1. Can I transfer photos from iPhone to iPad without iCloud?
Yes, you can use AirDrop or a USB-C cable to transfer photos without iCloud.
13.2. How much iCloud storage do I need for my photos?
The amount of iCloud storage you need depends on the size of your photo library. Apple offers different storage tiers, starting with 5GB for free.
13.3. Is AirDrop safe for transferring sensitive photos?
AirDrop is generally safe, as it uses encryption to protect your files during transfer. However, it’s recommended to use “Contacts Only” visibility for added security.
13.4. Can I transfer photos from iPhone to iPad using Bluetooth?
While Bluetooth can be used for file transfer, it is significantly slower than AirDrop or USB-C.
13.5. How do I optimize my photos for iPad?
You can optimize your photos by compressing them and converting them to efficient file formats like JPEG or HEIF.
13.6. What is HEIF, and why should I use it?
HEIF (High Efficiency Image File Format) is a modern image format that offers better compression than JPEG while maintaining similar image quality.
13.7. How do I create an album on my iPad?
Open the Photos app, tap the “+” button, and select “New Album.”
13.8. What are Smart Albums on iPad?
Smart Albums automatically organize your photos based on criteria you define, such as location, date, or keywords.
13.9. How do I back up my photos from iPad?
You can back up your photos to iCloud, external hard drives, or cloud storage services like Google Photos or Dropbox.
13.10. What should I do if my photos are not syncing between iPhone and iPad?
Check your iCloud settings, internet connection, and storage space. Restart both devices to refresh the connection.
14. Call to Action
Ready to take your photography to the next level? Visit dfphoto.net today to discover more photography tutorials, view stunning photo galleries, and connect with our vibrant photography community. Unleash your creativity and capture the world through your unique lens! Our address is 1600 St Michael’s Dr, Santa Fe, NM 87505, United States. Phone: +1 (505) 471-6001. Website: dfphoto.net.