Navigating the Google ecosystem can sometimes feel like managing two separate photo libraries when you realize Google Drive and Google Photos operate independently. While Google Drive is a versatile cloud storage solution, Google Photos is specifically designed for photo and video management, offering features like enhanced viewing, smart search, and basic editing tools. If you’re looking to consolidate your memories and take advantage of Google Photos’ superior photo-centric features, transferring your photos from Google Drive is a necessary step.
This guide will walk you through several effective methods to transfer your precious photos from Google Drive to Google Photos. Whether you’re working on a computer, Android device, or iPhone, we’ve got you covered with step-by-step instructions to make the process smooth and efficient.
Why Move Photos to Google Photos? Understanding the Benefits
Before diving into the “how-to,” let’s clarify why transferring your photos from Google Drive to Google Photos is a worthwhile endeavor. While both services are from Google and can store photos, they serve different primary purposes and offer distinct advantages:
-
Superior Photo Viewing Experience: Google Photos is designed for visual browsing. Its interface at photos.google.com or through the mobile app organizes your images chronologically, making it incredibly easy to scroll through years of memories by date. This intuitive date-based sorting is far more user-friendly for photo viewing than Google Drive’s file-folder structure.
-
Intelligent AI-Powered Search: One of the most compelling reasons to use Google Photos is its powerful AI search capabilities. Forget tagging every photo; Google Photos can recognize objects, people, places, and even themes within your images. Simply type “beach,” “dog,” or “birthday party” into the search bar, and Google Photos will surface relevant images with impressive accuracy. This smart search functionality drastically simplifies finding specific photos within large collections.
-
Integrated Photo Editing Tools: Google Photos offers a range of basic yet useful photo editing tools directly within the platform. You can easily apply filters, adjust brightness and contrast, rotate or crop images, and even perform more advanced edits like adjusting levels. While not as comprehensive as dedicated photo editing software, these built-in tools are perfect for quick enhancements and touch-ups, directly within your photo library.
In essence, Google Photos is a specialized, feature-rich photo library application designed to enhance how you view, manage, and interact with your visual memories. By transferring your photos from the more general-purpose Google Drive to Google Photos, you unlock these photo-centric benefits and create a more streamlined and enjoyable photo management experience.
How to Transfer Photos from Google Drive to Google Photos on Computer: 4 Practical Methods
For users working on a computer, there are several methods to efficiently transfer photos from Google Drive to Google Photos. Here are four popular and effective approaches:
Method 1: Leverage MultCloud for Direct Cloud-to-Cloud Transfer [Easiest & Fastest]
For the most seamless and efficient transfer, consider using a third-party cloud management tool like MultCloud. This free service is designed to manage multiple cloud storage accounts in one place and offers a direct cloud-to-cloud transfer feature, eliminating the need for downloading and re-uploading.
 Adding Google Drive and Google Photos to MultCloud for transfer
Here’s how to move photos from Google Drive to Google Photos using MultCloud in just a few steps:
-
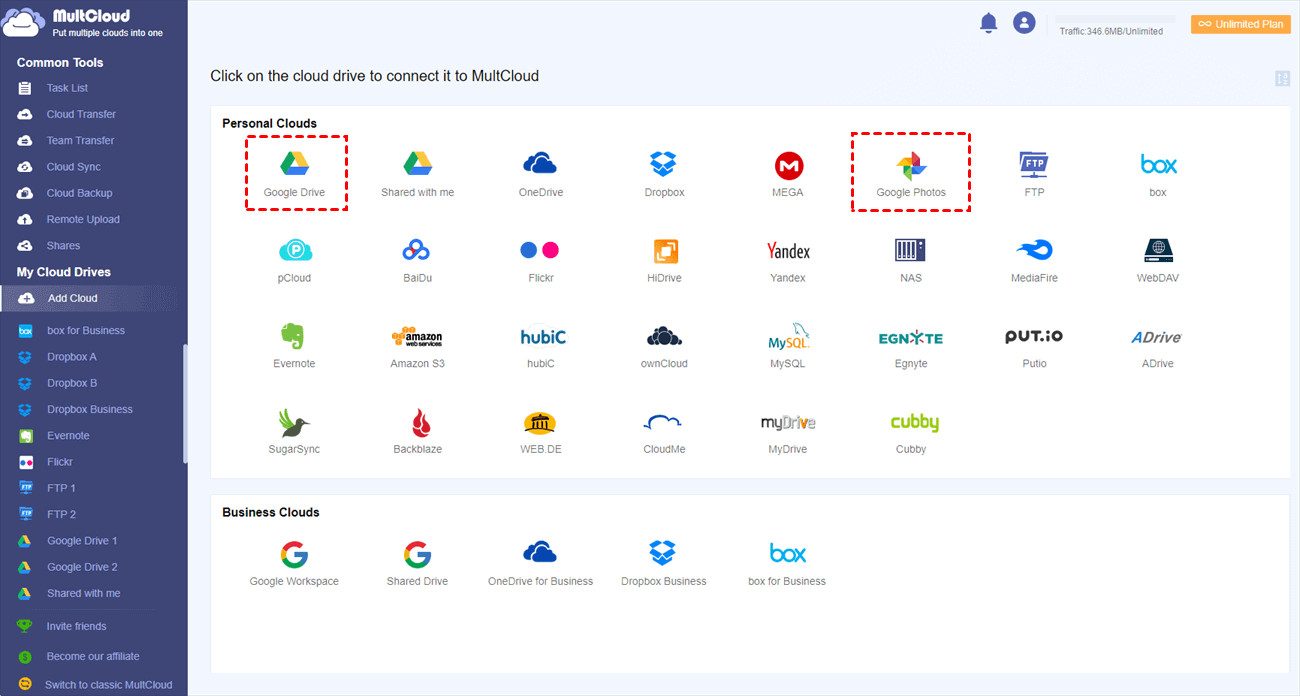
Create a MultCloud Account and Log In: Visit MultCloud’s website and sign up for a free account. Log in once your account is created.
-
Add Google Drive and Google Photos: Click the “Add Cloud” button and select “Google Drive.” Follow the on-screen instructions to authorize MultCloud to access your Google Drive account. Repeat this process to add your Google Photos account.
-
Initiate “Cloud Sync”: Click on the “Cloud Sync” tab. Set Google Drive as the source cloud (where your photos are currently located) and Google Photos as the destination cloud. Choose the specific folders or files within Google Drive that contain the photos you wish to transfer.
-
Start the Transfer: Click the “Sync Now” button to begin the transfer process. MultCloud will directly move your photos from Google Drive to Google Photos without requiring you to download and re-upload them manually.
Advantages of Using MultCloud:
- Direct Transfer: No downloading and re-uploading, saving time and bandwidth.
- Background Operation: MultCloud operates in the cloud, so you can close your browser or turn off your computer once the transfer starts, and it will continue to run.
- Scheduled Transfers: Set up automatic, recurring transfers on a daily, weekly, or monthly basis.
- Multiple Sync Modes: Offers various sync options like one-way sync, two-way sync, and real-time sync for more advanced users.
- Filter Feature: Easily filter files by type (e.g., only transfer photos) using the filter option.
MultCloud provides a user-friendly and efficient solution for transferring photos between cloud services, making it an excellent choice for moving your photos from Google Drive to Google Photos.
Method 2: Manual Download and Re-Upload: The Traditional Approach
The most straightforward, albeit less efficient, method is to manually download your photos from Google Drive and then upload them to Google Photos.
 Filtering images in Google Drive for download before uploading to Google Photos
Follow these steps for manual transfer:
-
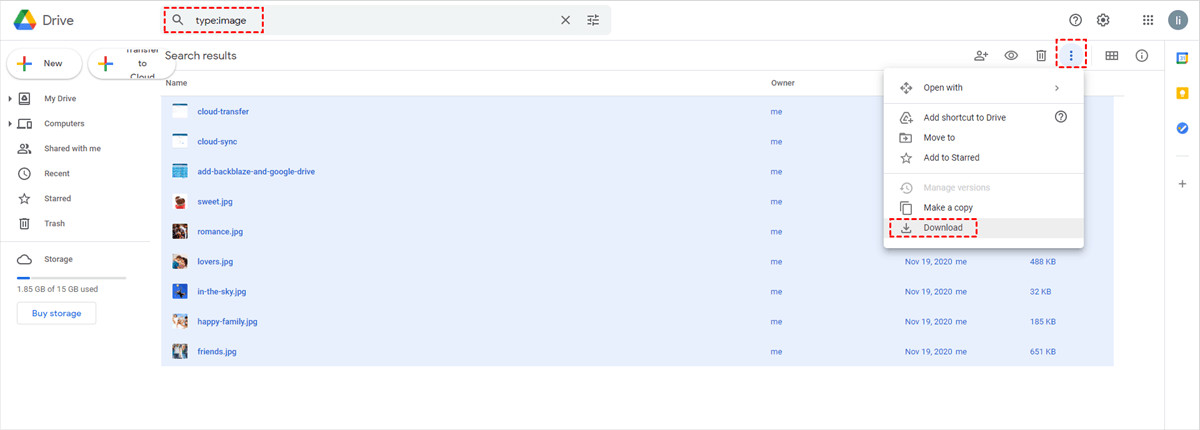
Download Photos from Google Drive: Open Google Drive in your web browser and locate the folders or files containing the photos you want to move. Select the desired photos or folders, click the three-dot menu icon, and choose “Download.” The selected items will be downloaded as a ZIP file.
-
Unzip the Downloaded File: Once the download is complete, locate the ZIP file on your computer and unzip it to extract your photos.
-
Upload to Google Photos: Go to photos.google.com and log in to your Google account. Click the “Upload” button and select “Computer.” Navigate to the unzipped folder on your computer and select the photos you want to upload to Google Photos.
Disadvantages of Manual Download and Re-upload:
- Time-Consuming: Downloading and re-uploading can be slow, especially for large photo libraries.
- Local Storage Required: You need sufficient free space on your computer to temporarily store the downloaded photos.
- Bandwidth Usage: This method consumes significant bandwidth for both downloading and uploading.
While this method is universally applicable, it’s less convenient and efficient compared to direct cloud-to-cloud transfer methods.
Method 3: Direct Import from Google Drive via Google Photos Website: Streamlined Upload
Google Photos offers a built-in feature to directly import photos from Google Drive, streamlining the upload process compared to manual download and re-upload.
Here’s how to use the direct import feature:
-
Go to Google Photos Website: Open photos.google.com in your web browser and log in to your Google account.
-
Click “Upload” and Select “Google Drive”: Click the “Upload” button located at the top right corner of the Google Photos interface. In the dropdown menu, select “Google Drive.”
-
Choose Photos from Google Drive: A window will pop up displaying your Google Drive files and folders. Navigate to the folders containing the photos you wish to transfer. You can filter by file type, date, or owner to easily locate your images. Select the photos and click “Upload.”
Advantages of Direct Import:
- No Downloading Required: Skips the download step, saving time and local storage space.
- Relatively Faster: Generally faster than manual download and re-upload.
Limitations of Direct Import:
- File Type and Size Restrictions: Google Photos has limitations on supported file types (jpg, gif, webp, tiff, raw) and minimum photo size (256 pixels). Ensure your photos meet these requirements.
- Account Restrictions: If you are using a Google account provided by work or school, this direct import feature might be restricted. In such cases, you may need to download and re-upload.
Direct import provides a more convenient way to transfer photos from Google Drive to Google Photos compared to manual download and re-upload, especially if you are working within the Google ecosystem.
Method 4: Utilizing Google Drive for Desktop for Local Sync
If you use Google Drive for Desktop application, you can leverage its synchronization capabilities to back up photos to Google Photos. This method requires having the Google Drive desktop app installed and your photos synced locally.
 Google Drive Preferences in Google Drive for Desktop Application
Follow these steps to use Google Drive for Desktop:
-
Install Google Drive for Desktop: Download and install the Google Drive for Desktop application on your computer if you haven’t already.
-
Run and Sign In: Launch the Google Drive for Desktop application and sign in with your Google account credentials.
-
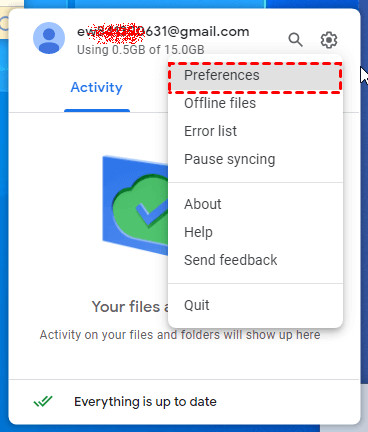
Access Preferences: Right-click the Google Drive icon in your system tray (bottom right on Windows, top right on Mac) and select “Preferences.”
-
Add Google Drive Folder: In the Preferences window, go to “My Computer” and click “Add Folder.” Navigate to the Google Drive folder on your local computer (this folder is created when you install Google Drive for Desktop and sync your Drive files locally) and select the folder containing your photos.
-
Choose “Back up to Google Photos”: After selecting the folder, you will see backup options. Ensure “Back up to Google Photos” is checked. Click “Done” to save the settings.
Google Drive for Desktop will now continuously back up the selected photos folder to Google Photos, ensuring that any new photos added to that folder in Google Drive will also be synced to Google Photos.
Prerequisites and Considerations:
- Google Drive for Desktop Installation: Requires installing and setting up Google Drive for Desktop.
- Local Syncing: Photos must be synced locally to your computer via Google Drive for Desktop for this method to work.
- Continuous Backup: This method sets up ongoing backup, meaning changes made to the local folder will be reflected in Google Photos.
Google Drive for Desktop offers a way to automate the process of backing up photos from Google Drive to Google Photos, especially useful if you prefer managing your files locally.
How to Move Photos from Google Drive to Google Photos on Android
Transferring photos directly from Google Drive to Google Photos on an Android device is straightforward using the “Send a copy” feature within the Google Drive app.
 Google Drive Files view on Android
Here’s how to do it:
-
Open Google Drive App: Launch the Google Drive app on your Android phone or tablet.
-
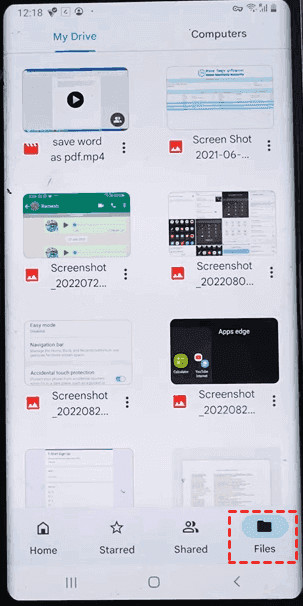
Navigate to Photos: Tap “Files” at the bottom right to browse your Google Drive files and folders. Locate the photos you want to transfer.
-
Select Photos: Long-press on a photo to select it. You can then tap on other photos to select multiple images for transfer.
-
Tap Three-Dot Menu and “Send a copy”: Once you’ve selected your photos, tap the three-dot menu icon (usually at the top right). From the menu, choose “Send a copy.”
-
Choose “Upload to Photos”: In the “Send a copy” menu, select “Upload to Photos.”
-
Select Account and Upload: If you have multiple Google accounts on your device, you may be prompted to choose the account you want to upload to Google Photos. Select the desired account and tap “Upload.”
Your selected photos will now be uploaded from Google Drive to Google Photos directly from your Android device.
How to Move Photos from Google Drive to Google Photos on iPhone
Transferring photos from Google Drive to Google Photos on an iPhone involves a two-step process: first, downloading photos from Google Drive to your iPhone, and then uploading them to Google Photos.
-
Open Google Drive App: Open the Google Drive app on your iPhone.
-
Locate and Select Photos: Find the photos you want to move within your Google Drive. Tap the three-dot icon next to the photo or at the top right to access the options menu.
-
“Send a copy” and “Save Image”: Choose “Send a copy” from the menu. Then, from the share sheet that appears, select “Save Image.” This will download the selected photo to your iPhone’s Photos app (Camera Roll). Repeat this for each photo you want to transfer, or select multiple photos if the app allows and “Send a copy” to save them.
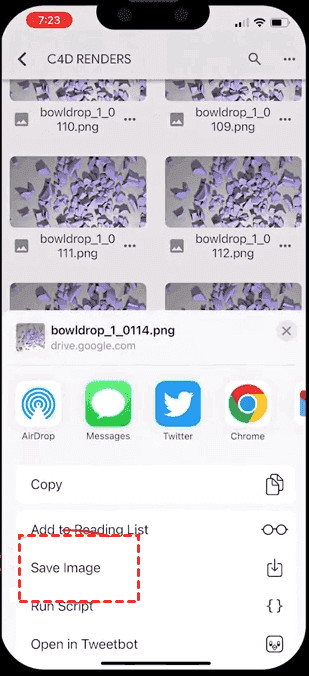 Saving photos from Google Drive to iPhone device using "Send a copy" and "Save Image"
- Open Google Photos App and Upload: Launch the Google Photos app on your iPhone. Tap “Photos” at the bottom left to view your device’s photos. Select the photos you just downloaded from Google Drive (they should be in your Camera Roll). Tap the “Backup” icon (cloud icon) to upload these photos to Google Photos.
Your photos are now transferred from Google Drive to Google Photos on your iPhone. This method involves a manual download and upload process on iOS due to the operating system’s file management restrictions.
Conclusion: Choosing the Right Method for Your Needs
Moving photos from Google Drive to Google Photos is a beneficial step for anyone wanting to leverage Google Photos’ superior photo management features. The best method for you depends on your device, the volume of photos you need to transfer, and your technical comfort level.
- For simplicity and speed on a computer: MultCloud stands out as the easiest and fastest option for direct cloud-to-cloud transfer.
- For a free and direct option on computer (if suitable): Direct import via the Google Photos website is a good choice if your photos meet the file type and size requirements, and you don’t need advanced features.
- For users comfortable with desktop applications and local syncing: Google Drive for Desktop provides an automated backup solution.
- For mobile transfers: Android users benefit from the convenient “Send a copy” to Google Photos feature. iPhone users will need to use the slightly more manual download and re-upload approach.
No matter which method you choose, transferring your photos to Google Photos will enhance your photo viewing, searching, and editing experience, allowing you to better enjoy and manage your precious memories.