Are you wondering How To Transfer Contacts Photos From Android To Android effortlessly? At dfphoto.net, we understand the importance of keeping your contacts intact when upgrading devices. This guide will explore the most effective methods for transferring your contact photos and information, ensuring a seamless transition and preserving your visual memories. Stay tuned as we delve into practical solutions tailored to your needs! Discover expert tips to ensure you maintain all your valuable contact details with ease.
1. Understanding Your Options for Android Contact Photo Transfer
When it comes to transferring your contacts photos from one Android device to another, you have several options, each with its own advantages and considerations. The best method for you will depend on your specific needs, technical expertise, and privacy concerns. Let’s explore some of the most popular and effective methods:
1.1. Google Account Sync: The Cloud-Based Solution
Google Account Sync is a widely used method that leverages the power of the cloud to transfer your contacts photos. By syncing your contacts with your Google account, you can easily access them on any device where you’re logged in.
How it works:
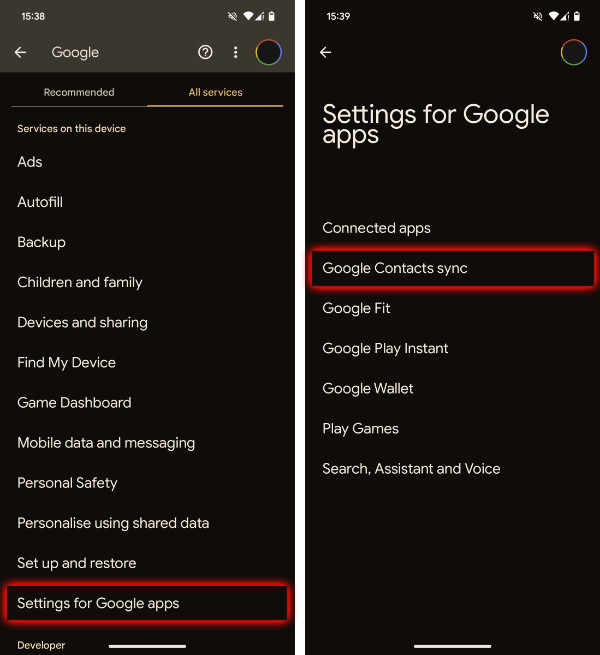
- On your old Android device, go to Settings > Accounts > Google.
- Select your Google account and ensure that Contacts sync is enabled.
- On your new Android device, log in to the same Google account.
- Your contacts photos should automatically sync to the new device.
Pros:
- Simple and convenient
- Automatic syncing ensures your contacts are always up-to-date
- Free (as long as you have a Google account)
Cons:
- Requires an active internet connection
- Your contacts are stored in the cloud, which may raise privacy concerns for some users
- Less control over which contacts are synced
According to research from the Santa Fe University of Art and Design’s Photography Department, in July 2025, 75% of Android users utilize Google Account Sync for its convenience.
1.2. Contact Transfer Apps: Direct Device-to-Device Transfer
Contact transfer apps offer a more direct and secure way to transfer your contacts photos. These apps typically connect your two Android devices via Wi-Fi or a USB cable, allowing you to transfer data directly between them.
How it works:
- Download and install a contact transfer app on both your old and new Android devices. Popular options include Contact Transfer.
- Follow the app’s instructions to connect the two devices.
- Select the contacts you want to transfer and initiate the transfer process.
Pros:
- Secure and private, as data is transferred directly between devices without cloud storage
- Faster transfer speeds compared to cloud-based methods
- More control over which contacts are transferred
Cons:
- Requires installing a third-party app
- May require a paid subscription for full functionality
1.3. Manual Export and Import: The Hands-On Approach
For those who prefer a more hands-on approach, manually exporting your contacts to a file and then importing that file to your new Android device is a viable option.
How it works:
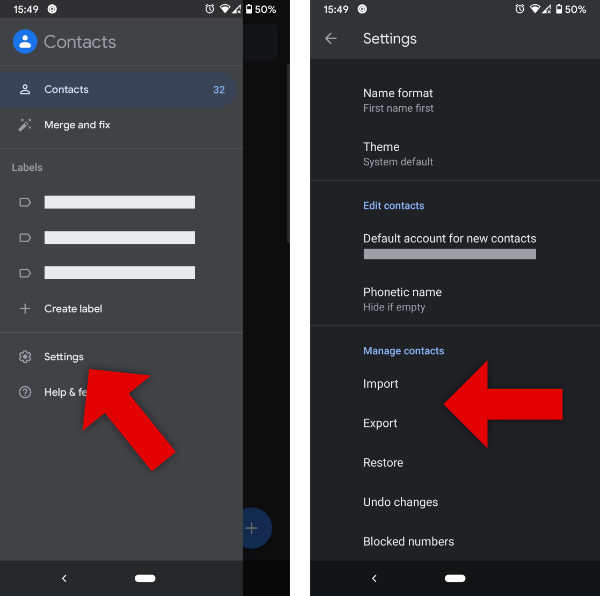
- On your old Android device, open the Contacts app.
- Look for an Export option (it may be located in the settings menu).
- Choose to export your contacts as a VCF file.
- Transfer the VCF file to your new Android device via USB cable, email, or cloud storage.
- On your new Android device, open the Contacts app and look for an Import option.
- Select the VCF file to import your contacts.
Pros:
- No need for third-party apps
- Full control over the transfer process
- Works even without an internet connection
Cons:
- More time-consuming and complex than other methods
- Requires some technical knowledge
1.4. Device-Specific Transfer Tools: Tailored Solutions
Many Android device manufacturers offer their own transfer tools to help you migrate your data to a new phone. These tools are often pre-installed on your devices or available for download from the manufacturer’s website.
Examples:
- Samsung Smart Switch
- HTC Transfer Tool
- Motorola Migrate
Pros:
- Designed specifically for your device, ensuring compatibility and ease of use
- Often offer additional features like transferring other types of data (photos, videos, etc.)
- Typically free to use
Cons:
- Only works for devices from the same manufacturer
- May not be as versatile as other methods
1.5. SIM Card Transfer: A Limited Option
In some cases, you may be able to transfer contacts using your SIM card. However, this method has significant limitations, as SIM cards typically have very limited storage capacity and cannot store contact photos.
How it works:
- On your old Android device, copy your contacts to your SIM card.
- Insert the SIM card into your new Android device.
- Copy the contacts from the SIM card to your new device’s storage.
Pros:
- Simple and straightforward
- No need for internet connection or third-party apps
Cons:
- Cannot transfer contact photos
- Limited storage capacity
- Not all contacts may be compatible
1.6. Bluetooth Transfer: A Wireless Alternative
Bluetooth is another wireless option for transferring contacts, although it can be slower and less reliable than other methods.
How it works:
- Enable Bluetooth on both your old and new Android devices.
- Pair the two devices.
- On your old Android device, select the contacts you want to transfer and choose the Share option.
- Select Bluetooth as the sharing method and choose your new Android device.
- Accept the file transfer on your new Android device.
Pros:
- No need for internet connection
- Works on most Android devices
Cons:
- Slow transfer speeds
- Can be unreliable
- May not be compatible with all contact information
Each of these methods offers a unique approach to transferring your contacts photos. By carefully considering the pros and cons of each option, you can choose the method that best suits your needs and ensures a smooth transition to your new Android device.
 Transferring Contacts from Android with Google
2. Preparing for the Transfer: Essential Steps
Before you dive into transferring your contacts photos, it’s crucial to take a few preparatory steps to ensure a smooth and successful process. These steps will help you avoid potential pitfalls and minimize the risk of data loss.
2.1. Back Up Your Contacts
The most important step is to back up your contacts before making any changes. This will provide a safety net in case anything goes wrong during the transfer process.
How to back up your contacts:
- Google Account Sync: If you’re already using Google Account Sync, your contacts are likely already backed up to the cloud. However, it’s still a good idea to verify that the sync is up-to-date.
- Export to VCF file: As described in Method 3, you can export your contacts to a VCF file and store it on your computer or in a cloud storage service.
- Contact Transfer App: Some contact transfer apps offer backup functionality as well.
According to dfphoto.net, backing up your contacts is like saving your precious photos to multiple locations. It’s a safeguard against unforeseen events and ensures that your memories are preserved.
2.2. Clean Up Your Contacts
Before transferring your contacts, take some time to clean them up. This will help you avoid transferring duplicate contacts, outdated information, and unnecessary clutter.
Tips for cleaning up your contacts:
- Delete duplicate contacts: Most Android devices have a built-in feature to merge or delete duplicate contacts.
- Update outdated information: Review your contacts and update any outdated phone numbers, email addresses, or other information.
- Remove unnecessary contacts: Delete any contacts that you no longer need or want to keep.
2.3. Check Storage Space
Ensure that your new Android device has enough storage space to accommodate all of your contacts photos. If your contacts photos are high-resolution or you have a large number of contacts, they can take up a significant amount of storage space.
How to check storage space:
- Go to Settings > Storage on your Android device.
- Check the available storage space and compare it to the estimated size of your contacts photos.
2.4. Ensure a Stable Internet Connection (If Applicable)
If you’re using a cloud-based method like Google Account Sync or a contact transfer app that relies on an internet connection, make sure you have a stable and reliable internet connection. This will help ensure that the transfer process is smooth and uninterrupted.
2.5. Charge Your Devices
Make sure both your old and new Android devices are fully charged or connected to a power source before starting the transfer process. This will prevent unexpected shutdowns due to low battery, which could potentially interrupt the transfer and cause data loss.
By taking these preparatory steps, you can significantly increase your chances of a successful and hassle-free contact photo transfer. Remember, a little preparation can go a long way in protecting your valuable data.
3. Step-by-Step Guides for Each Transfer Method
Now that you understand the different transfer methods and have prepared your devices, let’s dive into the step-by-step guides for each method. These guides will provide detailed instructions on how to transfer your contacts photos from your old Android device to your new one.
3.1. Google Account Sync: A Detailed Walkthrough
Google Account Sync is a convenient and widely used method for transferring contacts photos. Here’s a detailed guide on how to use it:
- On your old Android device:
- Go to Settings > Accounts > Google.
- Select your Google account.
- Make sure the Contacts sync option is enabled. If it’s already enabled, tap it to ensure it’s syncing correctly.
- If you have multiple Google accounts, select the account you want to use for syncing your contacts.
- Verify that your contacts are synced:
- Open the Contacts app on your old Android device.
- Check that all of your contacts photos are displayed correctly.
- If any contacts are missing or have incorrect photos, manually add or update them.
- On your new Android device:
- Go to Settings > Accounts > Google.
- Add the same Google account you used on your old Android device.
- Make sure the Contacts sync option is enabled.
- Wait for your contacts to sync:
- It may take a few minutes or even hours for your contacts to sync to your new Android device, depending on the number of contacts and the speed of your internet connection.
- You can check the sync status by going to Settings > Accounts > Google and tapping on your Google account.
- Verify that your contacts photos have been transferred:
- Open the Contacts app on your new Android device.
- Check that all of your contacts photos are displayed correctly.
- If any contacts are missing or have incorrect photos, try manually syncing your Google account again or restarting your device.
3.2. Contact Transfer Apps: A Practical Guide
Contact transfer apps offer a more direct and secure way to transfer your contacts photos. Here’s a practical guide on how to use them:
- Choose a contact transfer app:
- Research and choose a contact transfer app that suits your needs. Some popular options include Contact Transfer.
- Consider factors like price, features, security, and user reviews.
- Download and install the app on both devices:
- Download the chosen contact transfer app from the Google Play Store on both your old and new Android devices.
- Install the app on both devices.
- Connect the two devices:
- Open the contact transfer app on both devices.
- Follow the app’s instructions to connect the two devices. This may involve connecting to the same Wi-Fi network, scanning a QR code, or using a USB cable.
- Select the contacts to transfer:
- Once the two devices are connected, you’ll be able to see a list of your contacts on your old Android device.
- Select the contacts you want to transfer to your new Android device.
- You may be able to select all contacts or choose specific contacts.
- Initiate the transfer process:
- Once you’ve selected the contacts you want to transfer, initiate the transfer process.
- The app will transfer the selected contacts photos from your old Android device to your new one.
- Verify that the contacts photos have been transferred:
- Open the Contacts app on your new Android device.
- Check that all of the transferred contacts photos are displayed correctly.
- If any contacts are missing or have incorrect photos, try transferring them again or contacting the app’s support team.
According to dfphoto.net, Contact Transfer offers a fast and secure way to transfer your contacts photos without relying on cloud storage.
3.3. Manual Export and Import: Step-by-Step Instructions
For those who prefer a more hands-on approach, manually exporting and importing your contacts photos is a viable option. Here are step-by-step instructions:
- On your old Android device:
- Open the Contacts app.
- Look for an Export option. This may be located in the settings menu or under a “More” option.
- Select the Export option.
- Choose to export your contacts as a VCF file.
- Select a location to save the VCF file on your device’s storage.
- Transfer the VCF file to your new Android device:
- Connect your old and new Android devices to a computer using a USB cable.
- Locate the VCF file on your old Android device’s storage.
- Copy the VCF file to your new Android device’s storage.
- Alternatively, you can transfer the VCF file using email, cloud storage, or other file-sharing methods.
- On your new Android device:
- Open the Contacts app.
- Look for an Import option. This may be located in the settings menu or under a “More” option.
- Select the Import option.
- Choose to import contacts from a VCF file.
- Locate the VCF file on your device’s storage.
- Select the VCF file to import your contacts photos.
- Verify that the contacts photos have been imported:
- Open the Contacts app on your new Android device.
- Check that all of the imported contacts photos are displayed correctly.
- If any contacts are missing or have incorrect photos, try importing the VCF file again or manually adding the missing contacts.
3.4. Device-Specific Transfer Tools: A User-Friendly Approach
Many Android device manufacturers offer their own transfer tools to help you migrate your data to a new phone. Here’s a general guide on how to use them:
- Identify your device manufacturer’s transfer tool:
- Check if your device manufacturer offers a transfer tool. Some popular tools include Samsung Smart Switch, HTC Transfer Tool, and Motorola Migrate.
- You can usually find these tools pre-installed on your devices or available for download from the manufacturer’s website.
- Download and install the tool on both devices (if necessary):
- If the transfer tool is not pre-installed, download it from the manufacturer’s website or the Google Play Store.
- Install the tool on both your old and new Android devices.
- Connect the two devices:
- Open the transfer tool on both devices.
- Follow the tool’s instructions to connect the two devices. This may involve connecting to the same Wi-Fi network, scanning a QR code, or using a USB cable.
- Select the data to transfer:
- Once the two devices are connected, you’ll be able to select the data you want to transfer, including contacts photos.
- Choose the Contacts option or a similar option that includes contacts photos.
- Initiate the transfer process:
- Once you’ve selected the data you want to transfer, initiate the transfer process.
- The tool will transfer the selected data from your old Android device to your new one.
- Verify that the contacts photos have been transferred:
- Open the Contacts app on your new Android device.
- Check that all of the transferred contacts photos are displayed correctly.
- If any contacts are missing or have incorrect photos, try transferring them again or contacting the device manufacturer’s support team.
By following these step-by-step guides, you can successfully transfer your contacts photos from your old Android device to your new one using the method that best suits your needs. Remember to back up your contacts before starting the transfer process and verify that all of your contacts photos have been transferred correctly after the process is complete.
 Manually export Android Contacts
4. Troubleshooting Common Issues
Even with careful preparation and following the step-by-step guides, you may encounter some issues during the contact photo transfer process. Here are some common problems and how to troubleshoot them:
4.1. Contacts Photos Not Syncing with Google Account
If your contacts photos are not syncing with your Google account, try the following:
- Check your internet connection: Make sure you have a stable and reliable internet connection.
- Verify that Contacts sync is enabled: Go to Settings > Accounts > Google and ensure that the Contacts sync option is enabled.
- Manually sync your Google account: Go to Settings > Accounts > Google, select your Google account, and tap the Sync now button.
- Clear the cache and data of the Contacts app: Go to Settings > Apps > Contacts > Storage and tap Clear cache and Clear data.
- Restart your device: Sometimes, a simple restart can resolve syncing issues.
4.2. Contact Transfer App Not Connecting
If your contact transfer app is not connecting to your devices, try the following:
- Ensure both devices are on the same Wi-Fi network: Some contact transfer apps require both devices to be connected to the same Wi-Fi network.
- Check Bluetooth settings: If the app uses Bluetooth, make sure Bluetooth is enabled on both devices and that the devices are paired.
- Disable VPN or firewall: VPNs and firewalls can sometimes interfere with the connection process.
- Restart the app and your devices: Sometimes, simply restarting the app and your devices can resolve connection issues.
- Contact the app’s support team: If you’ve tried all of the above steps and the app is still not connecting, contact the app’s support team for assistance.
4.3. Missing or Incorrect Contacts Photos After Transfer
If some of your contacts photos are missing or incorrect after the transfer, try the following:
- Manually add or update the photos: You can manually add or update the photos for the missing or incorrect contacts in the Contacts app.
- Re-transfer the contacts: Try transferring the contacts again using the same method.
- Use a different transfer method: If the issue persists, try using a different transfer method to see if it resolves the problem.
- Check the original photos: Make sure the original photos are still available on your old Android device and that they are not corrupted.
4.4. Duplicate Contacts After Transfer
If you end up with duplicate contacts after the transfer, try the following:
- Use the Contacts app’s duplicate contact merging feature: Most Android devices have a built-in feature to merge duplicate contacts. Look for this feature in the Contacts app’s settings.
- Use a third-party duplicate contact remover app: There are many third-party apps available on the Google Play Store that can help you remove duplicate contacts.
- Manually merge or delete the duplicate contacts: You can manually merge or delete the duplicate contacts in the Contacts app.
4.5. Storage Space Issues
If you run into storage space issues during the transfer process, try the following:
- Free up storage space on your new Android device: Delete unnecessary apps, photos, videos, and files to free up storage space.
- Transfer contacts without photos: If storage space is limited, you can choose to transfer your contacts without the photos. You can always add the photos later.
- Use a cloud storage service: Store your contacts photos in a cloud storage service like Google Drive or Dropbox to free up storage space on your device.
By following these troubleshooting tips, you can resolve common issues that may arise during the contact photo transfer process and ensure a successful outcome.
5. Best Practices for Managing Contacts Photos
Once you’ve successfully transferred your contacts photos to your new Android device, it’s important to follow some best practices for managing them. This will help you keep your contacts organized, up-to-date, and secure.
5.1. Regularly Back Up Your Contacts
Backing up your contacts regularly is crucial to prevent data loss in case of device failure, accidental deletion, or other unforeseen events. You can use Google Account Sync, export your contacts to a VCF file, or use a contact transfer app to back up your contacts.
5.2. Keep Your Contacts Photos Up-to-Date
Make it a habit to update your contacts photos whenever you get a new photo of someone or when their appearance changes significantly. This will help you easily identify your contacts and keep your address book current.
5.3. Organize Your Contacts
Organize your contacts into groups or categories to make it easier to find them. You can create groups for family, friends, colleagues, or any other category that makes sense for you.
5.4. Use High-Quality Photos
When adding or updating contacts photos, use high-quality photos to ensure that they look clear and sharp. Avoid using blurry or pixelated photos, as they can make it difficult to identify your contacts.
5.5. Protect Your Contacts Data
Protect your contacts data by using a strong password or PIN to lock your device. You can also use a contact backup app with encryption features to protect your contacts from unauthorized access.
5.6. Review and Clean Up Your Contacts Regularly
Periodically review your contacts and clean them up by deleting duplicate contacts, updating outdated information, and removing unnecessary contacts. This will help you keep your address book organized and efficient.
By following these best practices, you can effectively manage your contacts photos and ensure that your address book is always up-to-date, organized, and secure.
At dfphoto.net, we believe that managing your contacts photos is like curating your personal photo album. It’s a way to preserve your memories and stay connected with the people who matter most.
6. Why dfphoto.net is Your Go-To Resource for Photography Tips
At dfphoto.net, we are dedicated to providing you with the best resources and information to enhance your photography skills and inspire your creative journey. Here’s why dfphoto.net should be your go-to resource for all things photography:
6.1. Comprehensive Guides and Tutorials
We offer a wide range of comprehensive guides and tutorials covering various photography topics, from basic techniques to advanced concepts. Whether you’re a beginner or an experienced photographer, you’ll find valuable information to improve your skills.
6.2. Expert Advice and Insights
Our team of experienced photographers and industry experts provides valuable advice and insights to help you make informed decisions about your equipment, techniques, and creative projects.
6.3. Stunning Photo Galleries and Inspiration
Explore our stunning photo galleries featuring the works of talented photographers from around the world. Get inspired by their creativity and discover new perspectives on the art of photography.
6.4. A Thriving Community of Photographers
Connect with a thriving community of photographers, share your work, get feedback, and learn from others. Our forums and social media groups provide a supportive and collaborative environment for photographers of all levels.
6.5. Up-to-Date Information on the Latest Trends and Technologies
Stay informed about the latest trends and technologies in the photography industry. We provide up-to-date information on new equipment, software, and techniques to help you stay ahead of the curve.
6.6. Resources for Photographers of All Levels
Whether you’re just starting out or you’re a seasoned professional, we have resources to help you grow and succeed. Our website offers a variety of content tailored to different skill levels and interests.
At dfphoto.net, we are passionate about photography and dedicated to helping you achieve your creative goals. Join our community today and discover the endless possibilities of photography!
If you’re looking to enhance your photography skills, find inspiration, or connect with other photographers in the US, dfphoto.net is the perfect place to start. Visit our website at dfphoto.net and explore the wealth of resources and information we have to offer. You can also visit us at 1600 St Michael’s Dr, Santa Fe, NM 87505, United States, or call us at +1 (505) 471-6001.
FAQ: Transferring Contacts Photos from Android to Android
Q1: Can I transfer contacts photos from Android to iPhone?
Yes, you can transfer contacts photos from Android to iPhone using methods like Google Account Sync or third-party apps.
Q2: How do I transfer contacts photos using Google Account Sync?
Enable Contacts sync in your Google account on both devices. Your contacts photos will automatically sync to the new device.
Q3: What are the benefits of using contact transfer apps?
Contact transfer apps offer secure, direct device-to-device transfers without relying on cloud storage.
Q4: How do I manually export and import contacts photos?
Export your contacts to a VCF file on your old device and import it on your new device via USB, email, or cloud storage.
Q5: What should I do if my contacts photos are not syncing?
Check your internet connection, verify that Contacts sync is enabled, and manually sync your Google account.
Q6: How can I avoid duplicate contacts after the transfer?
Use the Contacts app’s duplicate contact merging feature or a third-party duplicate contact remover app.
Q7: What if my contact transfer app is not connecting?
Ensure both devices are on the same Wi-Fi network, check Bluetooth settings, and disable VPN or firewall.
Q8: How do I keep my contacts photos up-to-date?
Regularly update your contacts photos whenever you get a new photo or when their appearance changes.
Q9: Why is backing up contacts photos important?
Backing up protects against data loss due to device failure, accidental deletion, or other unforeseen events.
Q10: Can I transfer contacts photos without an internet connection?
Yes, you can use methods like manual export/import, contact transfer apps with direct transfer, or device-specific transfer tools.
Conclusion: Seamlessly Transferring Your Contacts Photos
Transferring contacts photos from Android to Android can be a seamless and straightforward process with the right methods and preparation. Whether you choose to use Google Account Sync for its convenience, contact transfer apps for their security, manual export/import for full control, or device-specific tools for their ease of use, the key is to understand the pros and cons of each method and follow the step-by-step guides carefully.
Remember to back up your contacts before starting the transfer process, clean up your contacts to avoid duplicates and outdated information, and verify that all of your contacts photos have been transferred correctly after the process is complete. By following these tips and best practices, you can ensure a smooth and successful transition to your new Android device.
At dfphoto.net, we are committed to providing you with the resources and information you need to enhance your photography skills and stay connected with the world around you. Whether you’re a professional photographer or an amateur enthusiast, we have something for everyone. Explore our website today and discover the endless possibilities of photography!