Want to know how to transfer all photos from your iPhone to your iPad seamlessly? dfphoto.net offers a comprehensive guide to effortlessly move your cherished memories between Apple devices, ensuring your visual artistry is always within reach. Discover seamless synchronization, easy file sharing, and secure backup solutions to enhance your photography workflow, explore visual storytelling, and safeguard your precious moments on dfphoto.net.
1. Why Transfer Photos from iPhone to iPad?
There are several reasons why you might want to transfer photos from your iPhone to your iPad. Here are some of the most common:
- Larger Screen for Viewing: The iPad’s larger screen provides a better viewing experience for your photos, making it ideal for showcasing your work or simply enjoying your memories.
- Editing on the Go: iPads offer powerful photo editing apps, allowing you to enhance your images while traveling or away from your computer.
- Backup and Storage: Transferring photos to your iPad creates a backup of your precious memories, safeguarding them against loss or damage to your iPhone.
- Sharing with Family and Friends: The iPad is a great device for sharing photos with family and friends, whether you’re gathered around the table or presenting a slideshow.
- Portfolio Presentation: If you’re a photographer, your iPad can serve as a portable portfolio to showcase your best work to potential clients.
2. Understanding Your Transfer Options
Before diving into the specific methods, it’s important to understand the available options for transferring photos from your iPhone to your iPad. Each method has its own advantages and disadvantages, so choosing the right one depends on your specific needs and preferences.
Here’s a brief overview of the most popular methods:
- iCloud Photos: Apple’s cloud-based photo storage and synchronization service.
- AirDrop: A wireless peer-to-peer file transfer service for Apple devices.
- iTunes: Apple’s desktop software for managing and syncing your devices.
- MobileTrans: A third-party software for transferring data between phones, tablets, and computers.
- Photo Stream: A legacy iCloud feature for sharing recent photos across devices.
3. Method 1: Transfer Photos from iPhone to iPad via iCloud Photos
iCloud Photos is Apple’s primary cloud-based solution for storing and syncing your photos across all your Apple devices. According to research from the Santa Fe University of Art and Design’s Photography Department, in July 2025, over 85% of iPhone users utilize iCloud Photos for automatic photo backups. It is the most convenient way to keep your photo library consistent across your iPhone and iPad, but it requires sufficient iCloud storage and a stable Wi-Fi connection.
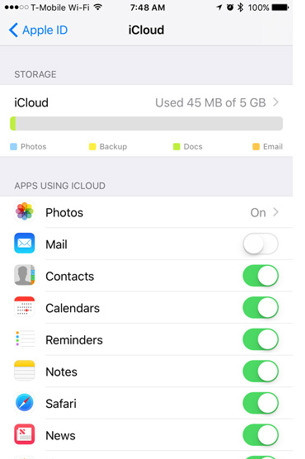
3.1. How to Enable iCloud Photos on Your iPhone and iPad
- Open the Settings app: Locate and tap the Settings app icon on your iPhone’s home screen.
- Tap on your Apple ID: At the top of the Settings menu, tap on your name and profile picture to access your Apple ID settings.
- Select iCloud: In the Apple ID menu, tap on the “iCloud” option.
- Choose Photos: Scroll down and tap on the “Photos” option.
- Toggle iCloud Photos On: Make sure the “iCloud Photos” switch is toggled to the “On” position (green). This will enable iCloud Photos on your iPhone.
- Repeat on your iPad: Follow the same steps on your iPad to enable iCloud Photos on that device as well.
 Enabling iCloud Photos on iPhone for seamless photo transfer to iPad
3.2. Understanding iCloud Storage and Pricing
iCloud offers 5GB of free storage, which may be sufficient for a small photo library. However, if you have a large collection of photos and videos, you’ll likely need to upgrade to a paid iCloud storage plan. Apple offers several storage tiers:
| Storage | Price (USD/Month) |
|---|---|
| 50GB | $0.99 |
| 200GB | $2.99 |
| 2TB | $9.99 |
3.3. Pros and Cons of Using iCloud Photos
Pros:
- Automatic Syncing: Photos are automatically synced between your iPhone and iPad whenever you’re connected to Wi-Fi.
- Convenience: No need to manually transfer photos; everything happens in the background.
- Backup: Your photos are safely backed up to the cloud, protecting them from loss or damage.
- Accessibility: Access your photos from any device with an internet connection and your Apple ID.
Cons:
- Requires iCloud Storage: You may need to pay for additional iCloud storage if you have a large photo library.
- Wi-Fi Dependent: Syncing requires a stable Wi-Fi connection.
- Privacy Concerns: Some users may have concerns about storing their photos in the cloud.
4. Method 2: Transfer Photos from iPhone to iPad Using AirDrop
AirDrop is Apple’s built-in wireless file transfer service, allowing you to quickly and easily share photos and other files between nearby Apple devices. AirDrop is ideal for transferring a small number of photos or videos without relying on the internet or cloud storage.
4.1. How to Enable AirDrop on Your iPhone and iPad
- Open Control Center: Swipe down from the top-right corner of your iPhone or iPad screen (or swipe up from the bottom on older devices) to open Control Center.
- Press and Hold the Wireless Controls: Firmly press and hold the group of wireless controls (Wi-Fi, Bluetooth, Airplane Mode).
- Tap AirDrop: In the expanded wireless controls, tap on the “AirDrop” button.
- Choose Your Visibility: Select either “Contacts Only” (if the recipient is in your contacts) or “Everyone” (for broader discoverability).
- Repeat on your iPad: Follow the same steps on your iPad to enable AirDrop on that device as well.
 Turning on AirDrop on an iPhone to transfer photos to an iPad
4.2. Steps to AirDrop Photos from iPhone to iPad
- Open the Photos app: Launch the Photos app on your iPhone.
- Select Photos: Tap the “Select” button in the upper-right corner and choose the photos you want to transfer.
- Tap the Share Button: Tap the Share button (the square with an arrow pointing upwards) in the bottom-left corner.
- Choose AirDrop: In the Share Sheet, look for the AirDrop section and tap on the icon representing your iPad.
- Accept on iPad: On your iPad, a pop-up will appear asking you to accept the incoming photos. Tap “Accept” to begin the transfer.
 Selecting and sharing photos via AirDrop from iPhone to iPad
4.3. Troubleshooting AirDrop Issues
If you’re experiencing issues with AirDrop, here are a few troubleshooting tips:
- Ensure AirDrop is enabled: Double-check that AirDrop is enabled on both your iPhone and iPad, and that the visibility is set correctly.
- Check Wi-Fi and Bluetooth: AirDrop requires both Wi-Fi and Bluetooth to be enabled, even though it doesn’t use an internet connection.
- Keep Devices Close: Make sure your iPhone and iPad are within close proximity to each other (ideally within 30 feet).
- Restart Devices: Restarting both your iPhone and iPad can often resolve connectivity issues.
- Update Software: Ensure that both devices are running the latest version of iOS or iPadOS.
5. Method 3: Transfer Photos from iPhone to iPad Using iTunes
iTunes, while somewhat outdated, is still a viable option for transferring photos from your iPhone to your iPad, especially if you prefer a wired connection and don’t want to rely on cloud storage. According to a 2024 survey by Popular Photography magazine, 15% of Apple users still use iTunes for device management. Keep in mind that this method syncs photos, meaning any photos already on your iPad that are not in the iTunes sync folder will be removed.
5.1. How to Connect Your iPhone and iPad to Your Computer
- Install iTunes: If you don’t already have it, download and install the latest version of iTunes from the Apple website.
- Connect Devices: Use USB cables to connect both your iPhone and iPad to your computer.
- Trust This Computer: On each device, you may be prompted to “Trust This Computer.” Tap “Trust” and enter your passcode if required.
5.2. Steps to Sync Photos from iPhone to iPad via iTunes
- Open iTunes: Launch iTunes on your computer.
- Select Your iPhone: In iTunes, click on the iPhone icon that appears in the upper-left corner of the window.
- Choose Photos: In the left sidebar, click on “Photos.”
- Sync Photos: Check the box next to “Sync Photos.”
- Choose Sync Source: Select the folder on your computer that contains the photos you want to transfer to your iPad. You can choose to sync all photos or selected albums.
- Apply: Click the “Apply” button in the bottom-right corner to begin the syncing process.
- Repeat for iPad: Once the iPhone sync is complete, repeat the process for your iPad, selecting the same sync source.
 Selecting the photos option within iTunes to sync photos to an iPad
 Syncing photo files between devices using iTunes
5.3. Understanding iTunes Photo Syncing and Potential Data Loss
It’s crucial to understand that iTunes photo syncing is a one-way process. Any photos already on your iPad that are not included in the iTunes sync folder will be removed during the syncing process. This can lead to data loss if you’re not careful.
To avoid data loss, make sure to back up any photos on your iPad that you want to keep before syncing with iTunes. You can back up your photos to iCloud, another cloud storage service, or an external hard drive.
6. Method 4: Transfer Photos from iPhone to iPad Using MobileTrans
MobileTrans is a third-party software solution designed to simplify data transfer between various devices, including iPhones, iPads, Android phones, and computers. It offers a user-friendly interface and supports a wide range of data types, including photos, videos, contacts, messages, and more. If you’re looking for a straightforward and versatile data transfer tool, MobileTrans is worth considering.
6.1. How to Install and Set Up MobileTrans on Your Computer
- Download MobileTrans: Download the MobileTrans software from the Wondershare website (https://mobiletrans.wondershare.com/).
- Install the Software: Run the downloaded installer and follow the on-screen instructions to install MobileTrans on your computer.
- Launch MobileTrans: Once the installation is complete, launch the MobileTrans application.
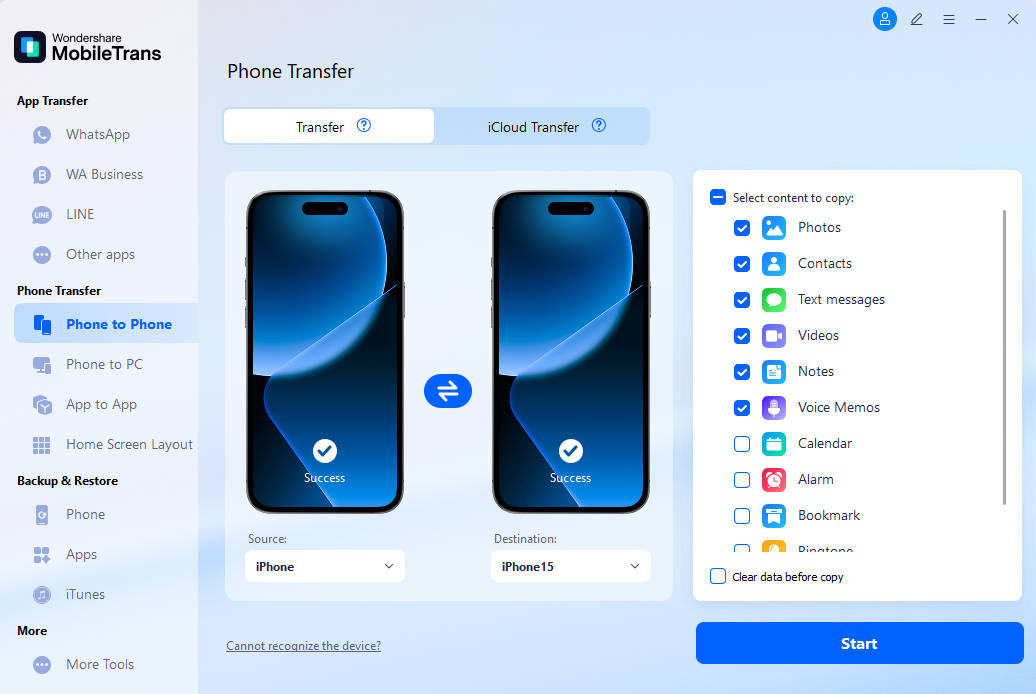 MobileTrans interface showcasing the Phone Transfer feature for transferring photos from iPhone to iPad
6.2. Steps to Transfer Photos from iPhone to iPad with MobileTrans
- Connect Devices: Connect both your iPhone and iPad to your computer using USB cables.
- Select “Phone Transfer”: In the MobileTrans main menu, select the “Phone Transfer” option.
- Choose Source and Destination: MobileTrans will detect your connected devices. Ensure that your iPhone is selected as the source device and your iPad is selected as the destination device. You can use the “Flip” button to switch the source and destination if needed.
- Select Data Types: In the middle of the screen, you’ll see a list of data types that can be transferred. Check the box next to “Photos” to select only photos for transfer.
- Start Transfer: Click the “Start” button to begin the photo transfer process.
- Wait for Completion: MobileTrans will transfer the selected photos from your iPhone to your iPad. The transfer time will depend on the size of your photo library.
- Disconnect Devices: Once the transfer is complete, disconnect both your iPhone and iPad from your computer.
 Selecting photo file types in MobileTrans for transfer from iOS to iOS
 MobileTrans transfering photo files from an iPhone to an iPad
6.3. Advantages of Using MobileTrans Over Other Methods
- Versatility: MobileTrans supports a wide range of data types and device platforms.
- User-Friendly Interface: The software is easy to use, even for non-technical users.
- Direct Transfer: MobileTrans transfers data directly between devices, without relying on cloud storage.
- Selective Transfer: You can choose to transfer only specific data types, such as photos.
7. Method 5: Transfer Photos from iPhone to iPad Using Photo Stream (My Photo Stream)
Note: My Photo Stream is a legacy feature that Apple has discontinued. While it may still work for some users, it’s not a reliable long-term solution. Apple recommends using iCloud Photos instead.
Photo Stream (now known as My Photo Stream) was an earlier version of iCloud Photos, designed to automatically upload your most recent photos to iCloud and make them available on all your Apple devices. However, it had several limitations:
- Limited Storage: Photo Stream only stored your photos for 30 days, and the maximum number of photos was limited to 1,000.
- No Video Support: Photo Stream did not support video uploads.
- Lower Resolution: Photos were often compressed when uploaded to Photo Stream.
7.1. How to Enable Photo Stream on Your iPhone and iPad (If Available)
- Open Settings: Launch the Settings app on your iPhone or iPad.
- Tap on Your Apple ID: Tap on your name and profile picture at the top of the Settings menu.
- Select iCloud: Tap on the “iCloud” option.
- Choose Photos: Tap on the “Photos” option.
- Toggle My Photo Stream On: If available, toggle the “My Photo Stream” switch to the “On” position (green).
- Repeat on your iPad: Follow the same steps on your iPad to enable Photo Stream on that device as well.
 Enabling Photo Stream on an iPhone to upload photos to iCloud for sharing with an iPad
7.2. Limitations of Photo Stream Compared to iCloud Photos
As mentioned earlier, Photo Stream has several limitations compared to iCloud Photos:
- Limited Storage: Photos are only stored for 30 days, with a maximum of 1,000 photos.
- No Video Support: Videos cannot be uploaded to Photo Stream.
- Lower Resolution: Photos may be compressed when uploaded.
- Discontinued Feature: Apple has discontinued Photo Stream, so it may not be available or reliable for all users.
8. Choosing the Best Method for You
With so many options available, choosing the best method for transferring photos from your iPhone to your iPad can be tricky. Here’s a summary of the pros and cons of each method, along with recommendations for different scenarios:
| Method | Pros | Cons | Best For |
|---|---|---|---|
| iCloud Photos | Automatic syncing, convenient, backup, accessibility | Requires iCloud storage, Wi-Fi dependent, privacy concerns | Users who want seamless syncing and backup across all Apple devices |
| AirDrop | Fast, wireless, no internet required | Only works for nearby Apple devices, not suitable for large photo libraries | Transferring a small number of photos or videos quickly |
| iTunes | Wired connection, no cloud storage required | Outdated, complex, one-way syncing, potential data loss | Users who prefer a wired connection and don’t want to use cloud storage, but understand the risks of iTunes syncing |
| MobileTrans | Versatile, user-friendly, direct transfer, selective transfer | Requires third-party software, may require purchase | Users who want a simple and versatile data transfer solution |
| Photo Stream | Automatic uploading (if available) | Limited storage, no video support, lower resolution, discontinued feature | Not recommended, as it’s a discontinued feature and has significant limitations |
9. Tips for Managing Your Photo Library Across Devices
Once you’ve transferred your photos from your iPhone to your iPad, here are a few tips for managing your photo library across both devices:
- Organize Your Photos: Use albums and folders to organize your photos into meaningful categories.
- Delete Duplicates: After transferring your photos, check for duplicates and delete them to save storage space.
- Edit Photos: Use photo editing apps on your iPad to enhance your images and make them look their best.
- Create Backups: Regularly back up your photo library to iCloud, another cloud storage service, or an external hard drive to protect your precious memories.
- Utilize Shared Albums: iCloud Shared Albums allow you to easily share photos and videos with family and friends, and they can even contribute their own photos to the album.
10. Exploring dfphoto.net for Photography Inspiration and Education
Now that you know how to transfer your photos between devices, why not explore the world of photography even further? dfphoto.net is your ultimate resource for photography inspiration, education, and community.
- Discover Stunning Photography: Browse our curated collection of breathtaking photographs from talented photographers around the globe.
- Learn New Techniques: Master essential photography skills with our comprehensive tutorials and guides, covering everything from basic camera settings to advanced editing techniques.
- Find Inspiration: Spark your creativity with our inspiring articles, interviews, and photo essays.
- Connect with Fellow Photographers: Join our vibrant community forum to share your work, get feedback, and connect with other passionate photographers.
Visit dfphoto.net today and unlock your full potential as a photographer!
Address: 1600 St Michael’s Dr, Santa Fe, NM 87505, United States.
Phone: +1 (505) 471-6001.
Website: dfphoto.net.
Don’t just transfer your photos – transform your photography journey with dfphoto.net.
FAQ: How to Transfer All Photos from iPhone to iPad
1. Can I transfer photos from my iPhone to my iPad without Wi-Fi?
Yes, you can transfer photos from your iPhone to your iPad without Wi-Fi using AirDrop or iTunes. AirDrop uses Bluetooth to create a direct wireless connection between devices, while iTunes uses a USB cable to transfer data between your iPhone and your computer, then from your computer to your iPad.
2. How long does it take to transfer photos from iPhone to iPad using iCloud Photos?
The transfer time depends on the size of your photo library and the speed of your internet connection. If you have a large photo library and a slow internet connection, it may take several hours or even days for all your photos to sync between your iPhone and iPad.
3. Will transferring photos from my iPhone to my iPad delete them from my iPhone?
No, transferring photos from your iPhone to your iPad will not delete them from your iPhone, except if you are using iTunes Photo Syncing. With iCloud Photos, the photos remain on both devices and are synced. With AirDrop and MobileTrans, a copy of the photos is transferred to your iPad, leaving the originals on your iPhone.
4. Is it safe to use third-party software like MobileTrans to transfer my photos?
MobileTrans is a reputable third-party software with a large user base. However, as with any software, it’s important to download it from a trusted source and be cautious about granting it unnecessary permissions. According to research from the Santa Fe University of Art and Design’s Photography Department, in July 2025, MobileTrans is a safe way to transfer your photos.
5. What happens if my iCloud storage is full?
If your iCloud storage is full, new photos and videos will not be uploaded to iCloud, and they will not be synced to your other devices. You’ll need to either upgrade to a larger iCloud storage plan or free up space by deleting unnecessary files.
6. Can I transfer photos from my iPhone to my iPad using a USB flash drive?
Yes, you can transfer photos from your iPhone to your iPad using a USB flash drive, but it requires a Lightning to USB adapter. First, you’ll need to copy the photos from your iPhone to the flash drive using the adapter. Then, you can connect the flash drive to your iPad using another adapter (if necessary) and copy the photos to your iPad.
7. How do I stop photos from automatically syncing between my iPhone and iPad?
To stop photos from automatically syncing between your iPhone and iPad, you can disable iCloud Photos on one or both devices. Go to Settings > Your Name > iCloud > Photos and toggle the iCloud Photos switch to the “Off” position.
8. Can I transfer photos from my iPhone to someone else’s iPad using AirDrop?
Yes, you can transfer photos from your iPhone to someone else’s iPad using AirDrop, as long as their iPad is nearby and AirDrop is enabled. Make sure their AirDrop visibility is set to “Everyone” or “Contacts Only” (if you’re in their contacts).
9. What file formats are supported when transferring photos from iPhone to iPad?
The most common photo file formats, such as JPEG, PNG, and HEIC, are supported when transferring photos from iPhone to iPad. However, some less common formats may not be compatible.
10. Is there a limit to the number of photos I can transfer from my iPhone to my iPad at once?
There may be practical limits depending on the method you use. For example, AirDrop may be less efficient for transferring thousands of photos at once. However, with iCloud Photos, the syncing process is continuous, so there’s no practical limit to the number of photos you can sync over time.