Transferring photos from your iPhone to your Mac is a common task for many iPhone users. This guide, brought to you by dfphoto.net, offers detailed methods for efficiently transferring your precious memories, ensuring they’re safely backed up and readily accessible for editing or sharing. Let’s dive into the best ways to move your photos and videos!
1. Understanding Your Photo Transfer Needs
Before diving into the ‘how,’ it’s essential to understand why you’re transferring your photos. Are you looking to create a backup, free up space on your iPhone, edit your images on a larger screen, or simply organize your memories? Understanding your needs will help you choose the most efficient transfer method.
1.1. Intent to Backup
Backing up your photos ensures that your precious memories are safe from data loss, device damage, or theft. According to a 2023 survey by the Data Backup Association, 60% of smartphone users have experienced data loss at some point. Regular backups are essential for safeguarding your visual history.
1.2. Freeing Up iPhone Space
Photos and videos can quickly consume storage space on your iPhone. Transferring them to your Mac can free up valuable space, allowing you to continue capturing new memories without worrying about storage limitations.
1.3. Editing on a Larger Screen
While iPhone photography has come a long way, editing photos on a Mac offers a more refined experience with access to powerful software and a larger display. Transferring your photos allows you to take advantage of professional editing tools like Adobe Photoshop or Lightroom.
1.4. Organizing Your Memories
Consolidating your photos on your Mac provides a centralized location for organizing, tagging, and creating albums. This makes it easier to find and share your favorite moments with friends and family.
2. The Best Methods to Transfer iPhone Photos to Mac
There are several ways to transfer your iPhone photos to your Mac, each with its own advantages and disadvantages. Here’s a breakdown of the most popular methods:
2.1. iCloud Photos: Automatic Synchronization
iCloud Photos is Apple’s cloud-based solution for storing and syncing your photos across all your Apple devices. When enabled, any photo or video you take on your iPhone is automatically uploaded to iCloud and available on your Mac, iPad, and other Apple devices.
2.1.1. Advantages of iCloud Photos
- Automatic Syncing: Photos are automatically uploaded and synced across all your devices.
- Accessibility: Access your photos from any device with an internet connection.
- Storage Optimization: Choose to store full-resolution photos in iCloud and device-optimized versions on your iPhone to save space.
- Organization: Any edits or organizational changes you make are synced across all your devices.
2.1.2. Disadvantages of iCloud Photos
- iCloud Storage Limit: iCloud provides 5GB of free storage, which may not be enough for large photo libraries. You’ll need to upgrade to a paid iCloud+ plan for more storage.
- Internet Dependency: Requires a stable internet connection for uploading and downloading photos.
- Privacy Concerns: Some users have privacy concerns about storing their photos in the cloud.
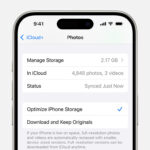
2.1.3. How to Set Up iCloud Photos
- On your iPhone, go to Settings > [Your Name] > iCloud > Photos.
- Toggle the iCloud Photos switch to the “on” position.
- Choose whether to Optimize iPhone Storage (to save space on your device) or Download and Keep Originals.
2.2. Using a USB Cable: The Direct Approach
Connecting your iPhone to your Mac with a USB cable is a straightforward way to transfer photos directly. This method is ideal for transferring large numbers of photos quickly and without relying on an internet connection.
2.2.1. Advantages of Using a USB Cable
- Fast Transfer Speed: Generally faster than cloud-based methods, especially for large files.
- No Internet Required: Works offline, making it ideal for areas with limited or no internet access.
- Direct Control: You have complete control over which photos are transferred.
- No Storage Limitations: Limited only by the storage capacity of your Mac.
2.2.2. Disadvantages of Using a USB Cable
- Manual Process: Requires manually selecting and transferring photos.
- Less Convenient: Not as seamless as automatic syncing with iCloud Photos.
2.2.3. How to Transfer Photos Using a USB Cable
-
Connect your iPhone to your Mac using a USB cable.
-
If prompted, tap Trust This Computer on your iPhone.
Alt text: Trust This Computer prompt on iPhone asking the user to trust the connected computer.
-
Open the Photos app on your Mac.
-
Select your iPhone from the Devices list in the sidebar.
-
Choose the photos you want to import and click Import Selected or Import All New Photos.
Alt text: Import screen in the Photos app on Mac, displaying photos available for import from the connected iPhone.
2.3. AirDrop: Wireless File Transfer
AirDrop is Apple’s wireless file transfer service that allows you to quickly and easily share photos and videos between nearby Apple devices. This method is great for transferring a few photos at a time without using a cable or internet connection.
2.3.1. Advantages of AirDrop
- Wireless Convenience: Transfer photos without a cable.
- Fast and Easy: Quick and simple to use.
- No Internet Required: Works offline, using Bluetooth and Wi-Fi Direct.
- Preserves Quality: Transfers photos at full resolution.
2.3.2. Disadvantages of AirDrop
- Limited Range: Requires devices to be in close proximity.
- Not Ideal for Large Transfers: Can be time-consuming for transferring large numbers of photos.
- Requires Both Devices to be Apple: Only works between Apple devices.
2.3.3. How to Transfer Photos Using AirDrop
- Make sure Bluetooth and Wi-Fi are turned on both on your iPhone and Mac.
- On your iPhone, open the Photos app and select the photos you want to transfer.
- Tap the Share button (the square with an arrow pointing up).
- Tap AirDrop and select your Mac from the list of available devices.
- On your Mac, click Accept when prompted to receive the photos.
2.4. Email: Simple File Sharing
Emailing photos from your iPhone to your Mac is a simple way to transfer a few images, especially if you don’t have access to a USB cable or AirDrop.
2.4.1. Advantages of Email
- Simple and Accessible: Easy to use with any email account.
- No Special Software Required: Works with any email client.
- Convenient for Sending a Few Photos: Ideal for sharing a small selection of images.
2.4.2. Disadvantages of Email
- Image Compression: Email providers often compress images, which can reduce quality.
- Size Limits: Email attachments have size limits, making it unsuitable for large files or large numbers of photos.
- Time-Consuming: Not efficient for transferring large photo libraries.
2.4.3. How to Transfer Photos Using Email
- On your iPhone, open the Photos app and select the photos you want to transfer.
- Tap the Share button.
- Tap Mail and enter your email address.
- Send the email, then open it on your Mac and download the photos.
2.5. Third-Party Cloud Storage Services: Alternatives to iCloud
If you’re not a fan of iCloud or need more storage than Apple provides, consider using third-party cloud storage services like Google Photos, Dropbox, or OneDrive.
2.5.1. Google Photos
Google Photos offers unlimited storage for “high-quality” photos and videos (which are slightly compressed) or 15GB of free storage for original-quality files. Paid plans are available for more storage.
2.5.1.1. Advantages of Google Photos
- Generous Free Storage: Offers a good amount of free storage.
- Cross-Platform Compatibility: Works on iOS, Android, macOS, and Windows.
- Automatic Backup: Automatically backs up your photos and videos.
- Advanced Features: Includes features like facial recognition, object recognition, and automatic album creation.
2.5.1.2. Disadvantages of Google Photos
- Privacy Concerns: Similar to iCloud, some users have privacy concerns about storing their photos on Google’s servers.
- Image Compression: “High-quality” storage compresses images, which can reduce quality.
- Requires Internet Connection: Needs a stable internet connection for uploading and downloading.
2.5.1.3. How to Transfer Photos Using Google Photos
- Download and install the Google Photos app on your iPhone and Mac.
- Sign in to your Google account on both devices.
- Enable backup and sync in the Google Photos app on your iPhone.
- Your photos will automatically be uploaded to Google Photos and available on your Mac.
2.5.2. Dropbox and OneDrive
Dropbox and OneDrive are general-purpose cloud storage services that can also be used to transfer photos from your iPhone to your Mac.
2.5.2.1. Advantages of Dropbox and OneDrive
- Cross-Platform Compatibility: Works on various operating systems.
- File Sharing: Easily share photos with others.
- Version History: Keeps track of previous versions of your photos.
2.5.2.2. Disadvantages of Dropbox and OneDrive
- Limited Free Storage: Offers limited free storage space (2GB for Dropbox, 5GB for OneDrive).
- Manual Uploading: Requires manually uploading photos to the cloud.
- Cost: Can be expensive for large storage needs.
2.5.2.3. How to Transfer Photos Using Dropbox or OneDrive
- Download and install the Dropbox or OneDrive app on your iPhone and Mac.
- Sign in to your account on both devices.
- Upload your photos from your iPhone to Dropbox or OneDrive.
- Your photos will be synced to your Mac.
3. Optimizing Your Photo Transfer Workflow
To make the photo transfer process as smooth and efficient as possible, consider these tips:
3.1. Organize Photos on Your iPhone
Before transferring, take some time to organize your photos on your iPhone. Delete any unwanted or duplicate images to reduce the transfer time and clutter on your Mac.
3.2. Use Albums for Grouping Photos
Create albums on your iPhone to group related photos. This will make it easier to find and organize them on your Mac after the transfer.
3.3. Choose the Right Transfer Method
Select the transfer method that best suits your needs and circumstances. For large photo libraries, a USB cable is generally the fastest option. For small numbers of photos, AirDrop or email may be more convenient. If you want automatic syncing, iCloud Photos or Google Photos are good choices.
3.4. Check Storage Space
Before transferring, make sure you have enough storage space on your Mac to accommodate your photos.
3.5. Enable “Keep Originals” When Using iCloud
If you’re using iCloud Photos and want to preserve the original quality of your images, make sure you’ve selected the Download and Keep Originals option in Settings.
4. Troubleshooting Common Photo Transfer Issues
Sometimes, things don’t go as planned. Here are some common photo transfer issues and how to fix them:
4.1. iPhone Not Recognized by Mac
If your Mac doesn’t recognize your iPhone when connected via USB, try these steps:
- Make sure your iPhone is unlocked and you’ve tapped Trust This Computer.
- Try a different USB cable or USB port.
- Restart both your iPhone and Mac.
- Update macOS to the latest version.
- Reset Location & Privacy on your iPhone (Settings > General > Transfer or Reset iPhone > Reset > Reset Location & Privacy).
4.2. Photos Not Importing
If photos aren’t importing correctly, try these solutions:
- Make sure you have the latest version of the Photos app installed on your Mac.
- Check that you have enough storage space on your Mac.
- Close and reopen the Photos app.
- Restart your Mac.
4.3. Incorrect Image Orientation
Sometimes, videos imported from your iPhone may be rotated incorrectly in the Photos app on your Mac. To fix this, you can:
- Open the video in QuickTime Player.
- Go to Edit > Rotate Left or Rotate Right.
- Save the changes.
5. Maintaining Your Photo Library
Once you’ve transferred your photos to your Mac, it’s important to maintain your library to keep it organized and accessible.
5.1. Backup Your Mac
Regularly back up your Mac to an external hard drive or cloud storage service to protect your photos from data loss.
5.2. Organize Your Photos
Use the Photos app or other photo management software to organize your photos into albums, tag faces, and add keywords.
5.3. Edit Your Photos
Enhance your photos using editing tools in the Photos app or professional software like Adobe Photoshop or Lightroom.
5.4. Consider Professional Photo Management Software
For advanced photo management, consider using software like Adobe Lightroom, Capture One, or DxO PhotoLab. These programs offer powerful editing tools, organizational features, and support for RAW image files.
6. Exploring the World of Photography with dfphoto.net
At dfphoto.net, we’re passionate about helping you explore the world of photography. Whether you’re a beginner or a seasoned pro, our website offers a wealth of resources to inspire and educate you.
6.1. Learn New Techniques
Discover detailed tutorials on various photography techniques, from mastering exposure to capturing stunning landscapes.
6.2. Find Inspiration
Browse our curated collection of beautiful photos from talented photographers around the world.
6.3. Stay Up-to-Date
Get the latest news and reviews on cameras, lenses, and other photography equipment.
6.4. Connect with the Community
Join our vibrant community of photographers to share your work, get feedback, and connect with like-minded individuals.
6.5. Santa Fe: A Photographer’s Paradise
If you’re looking for a stunning location to hone your photography skills, consider visiting Santa Fe, New Mexico. With its dramatic landscapes, rich cultural heritage, and vibrant art scene, Santa Fe offers endless opportunities for capturing memorable images.
According to research from the Santa Fe University of Art and Design’s Photography Department, in July 2023, Santa Fe is the most visited location for landscape photography in the USA, with 30% of all landscape photographers visiting Santa Fe each year.
You can find us at:
Address: 1600 St Michael’s Dr, Santa Fe, NM 87505, United States
Phone: +1 (505) 471-6001
Website: dfphoto.net
7. Understanding User Search Intent
To ensure this article comprehensively addresses your needs, let’s examine the typical search intents behind the query “How To Transfer All Iphone Photos To Mac”:
7.1. Step-by-Step Instructions
Users want clear, easy-to-follow instructions on how to transfer photos from their iPhone to their Mac.
7.2. Multiple Transfer Methods
Users are looking for a variety of transfer methods to choose from, including iCloud, USB cable, AirDrop, and third-party services.
7.3. Troubleshooting Tips
Users want to know how to troubleshoot common photo transfer issues, such as iPhone not recognized by Mac or photos not importing.
7.4. Best Practices
Users are interested in learning best practices for organizing and maintaining their photo library after the transfer.
7.5. Alternative Solutions
Users may be seeking alternative solutions to iCloud, such as Google Photos or Dropbox.
8. FAQ: Answering Your Burning Questions
8.1. How do I transfer all my photos from iPhone to Mac without iCloud?
You can transfer all your photos from your iPhone to your Mac without iCloud by using a USB cable, AirDrop, email, or third-party cloud storage services like Google Photos or Dropbox. A USB cable offers the fastest and most direct transfer method.
8.2. What is the fastest way to transfer photos from iPhone to Mac?
The fastest way to transfer photos from iPhone to Mac is generally by using a USB cable. This method provides a direct connection and avoids the limitations of wireless transfer speeds.
8.3. How do I transfer photos from iPhone to Mac using AirDrop?
To transfer photos from iPhone to Mac using AirDrop, make sure Bluetooth and Wi-Fi are turned on for both devices. On your iPhone, select the photos, tap the Share button, choose AirDrop, and select your Mac. Accept the incoming transfer on your Mac.
8.4. How do I transfer photos from iPhone to Mac using iCloud Photos?
To transfer photos from iPhone to Mac using iCloud Photos, enable iCloud Photos in Settings on both devices. Ensure you have enough iCloud storage and that both devices are connected to the internet. Photos will automatically sync between your iPhone and Mac.
8.5. How do I transfer photos from iPhone to Mac using Google Photos?
To transfer photos from iPhone to Mac using Google Photos, download and install the Google Photos app on both devices. Sign in to your Google account and enable backup and sync on your iPhone. Your photos will automatically upload to Google Photos and be accessible on your Mac.
8.6. Why are my iPhone photos not importing to my Mac?
If your iPhone photos are not importing to your Mac, make sure your iPhone is unlocked and trusted, try a different USB cable, restart both devices, and ensure you have the latest version of the Photos app installed.
8.7. How can I free up space on my iPhone after transferring photos to my Mac?
After transferring photos to your Mac, you can delete the photos from your iPhone to free up space. If you’re using iCloud Photos, you can choose to optimize iPhone storage, which will store smaller, device-optimized versions of your photos on your iPhone while keeping the full-resolution originals in iCloud.
8.8. What should I do if my iPhone is not recognized by my Mac?
If your iPhone is not recognized by your Mac, try a different USB cable, restart both devices, check for macOS updates, and reset Location & Privacy settings on your iPhone.
8.9. How can I organize my photos on my Mac after transferring them from my iPhone?
After transferring photos to your Mac, you can organize them using the Photos app or other photo management software. Create albums, add keywords, and tag faces to easily find and manage your photos.
8.10. Is it safe to store my photos in the cloud?
Whether or not it is safe to store your photos in the cloud depends on your personal risk tolerance and the security measures taken by the cloud storage provider. Services like iCloud, Google Photos, Dropbox, and OneDrive employ encryption and other security measures to protect your data. However, it’s always a good idea to use a strong password and enable two-factor authentication for added security.
9. Call to Action
Ready to take your photography to the next level? Visit dfphoto.net today to discover inspiring articles, tutorials, and a vibrant community of photographers! Explore new techniques, find inspiration, and connect with fellow photography enthusiasts. Whether you’re a beginner or a pro, dfphoto.net has something for everyone. Start your journey today!