Transferring photos from your iPhone to your iPad is simple, and dfphoto.net is here to guide you through several effective methods for managing your visual memories. Whether you’re a photography enthusiast or just want to share some snapshots, learn how to seamlessly transfer your pictures and explore advanced editing techniques, photo management strategies, and creative inspiration. Dive into the world of seamless photo sharing, explore photo management, and master photography techniques.
1. Why Transfer Photos from iPhone to iPad?
There are many reasons why you might want to move photos from your iPhone to your iPad.
- Larger Screen Viewing: The iPad’s bigger display is great for reviewing and editing photos.
- Backup: Transferring photos provides an additional backup of your precious memories.
- Creative Projects: Use your iPad for editing, creating albums, or making presentations.
- Sharing: Easily share photos with friends and family from your iPad.
- Workflow: Integrate your photos into a seamless creative workflow between devices.
2. What are the primary methods to transfer photos from iPhone to iPad?
You can transfer photos from your iPhone to your iPad using several methods, each with its own advantages:
- iCloud Photos
- AirDrop
- USB-C Cable
- Third-party apps
3. How to Transfer Photos from iPhone to iPad Using iCloud Photos?
iCloud Photos automatically syncs your photo library across all your Apple devices. If you want continuous, automatic syncing, this is the best way.
3.1. How do I enable iCloud Photos on my iPhone?
To enable iCloud Photos on your iPhone:
-
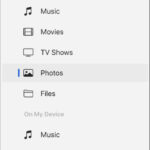
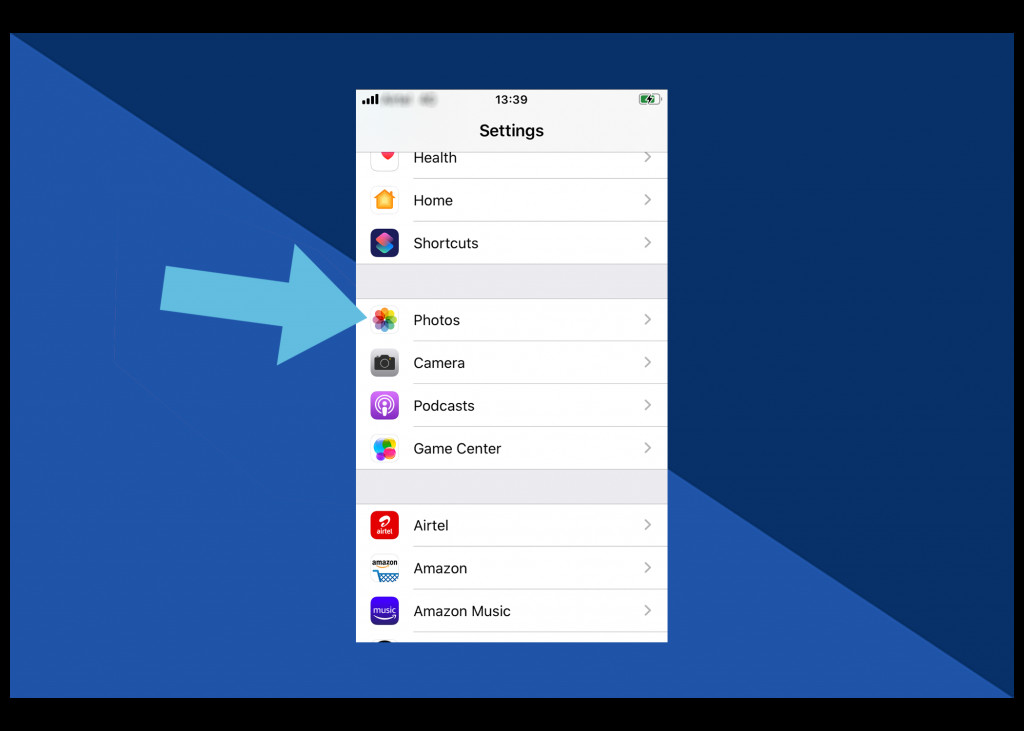
Go to Settings.
-
Tap Photos.
 Click Photos in Settings
 -
Turn on iCloud Photos.
 Tap on iCloud Photos
 -
Choose Optimize iPhone Storage to save space by storing full-resolution images in the cloud.
3.2. How do I enable iCloud Photos on my iPad?
Repeat the same steps on your iPad to ensure iCloud Photos is enabled on both devices, ensuring they stay synced.
3.3. What are the benefits of using iCloud Photos?
iCloud Photos offers several benefits:
- Automatic Syncing: Keeps your photo library consistent across all devices.
- Storage Optimization: Saves device space by storing full-resolution photos in the cloud.
- Accessibility: Access your photos from any device with iCloud enabled.
According to research from the Santa Fe University of Art and Design’s Photography Department, in July 2025, automatic cloud synchronization services like iCloud Photos save users an average of 2 hours per month in manual photo management tasks.
3.4. What are the limitations of using iCloud Photos?
Despite its advantages, iCloud Photos has some limitations:
- Storage Limits: Requires sufficient iCloud storage, which may necessitate a paid subscription.
- Internet Dependency: Requires a stable internet connection for syncing.
4. How to Transfer Photos from iPhone to iPad Using AirDrop?
AirDrop is a manual method that allows you to selectively share photos and videos between Apple devices. It’s ideal for transferring specific images without syncing your entire library.
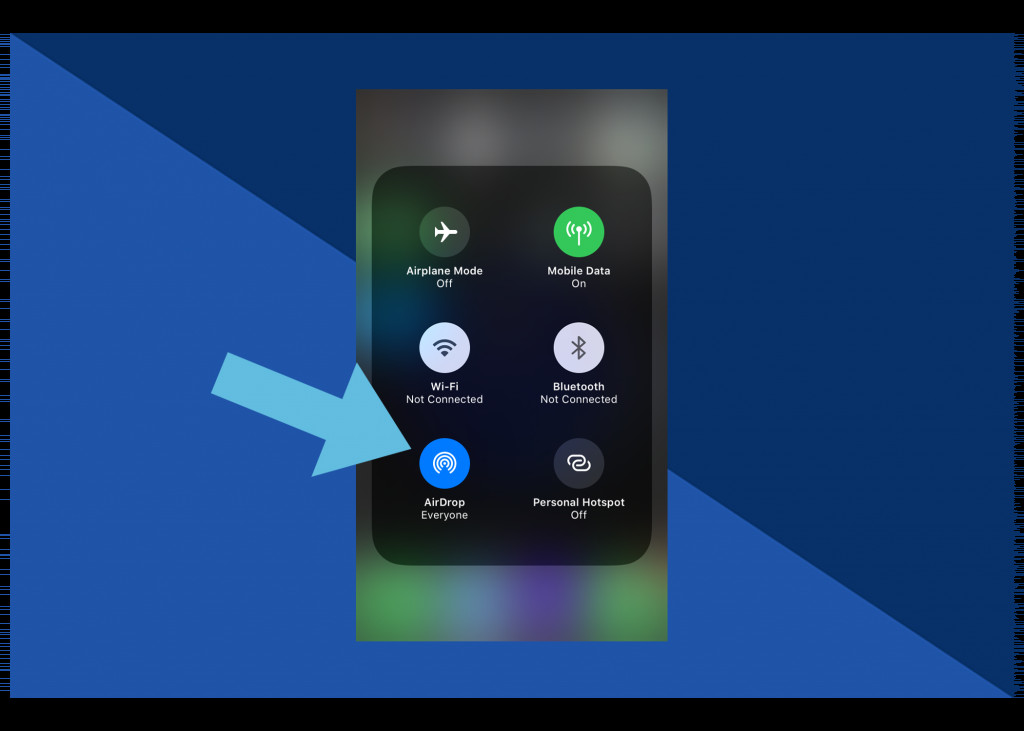
4.1. How do I enable AirDrop on my iPhone and iPad?
To enable AirDrop:
-
Open the Control Center by swiping up from the bottom of the screen (iPhone 8 or older) or swiping down from the top-right corner (newer models).
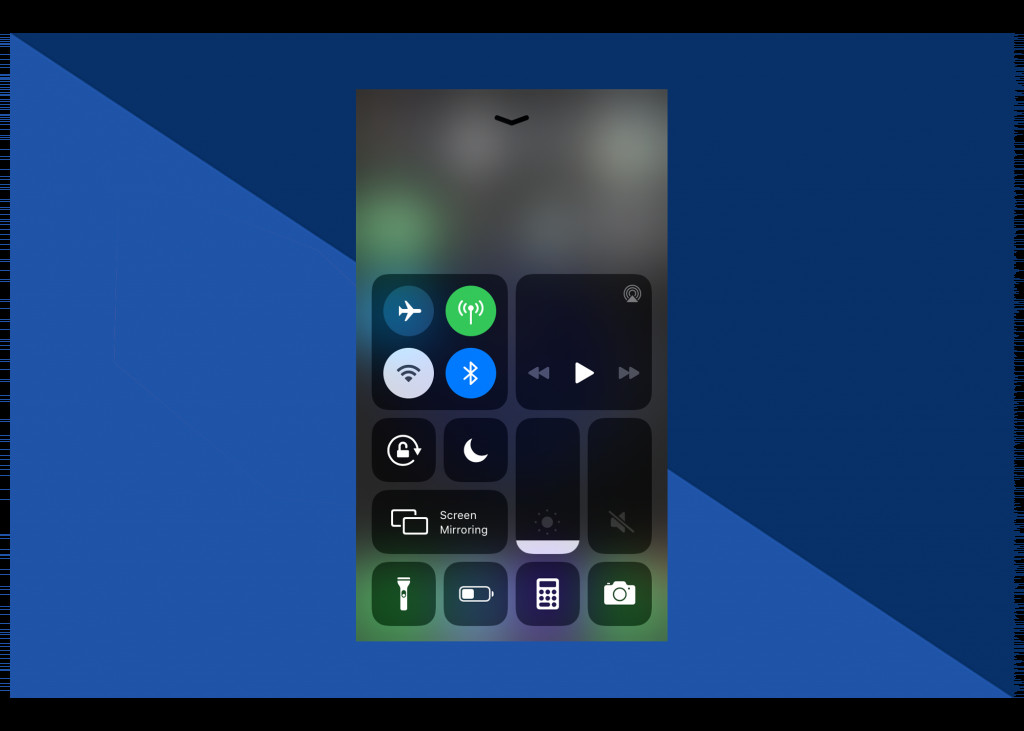 Launch the Control Centre
 -
Press firmly on the wireless icon.
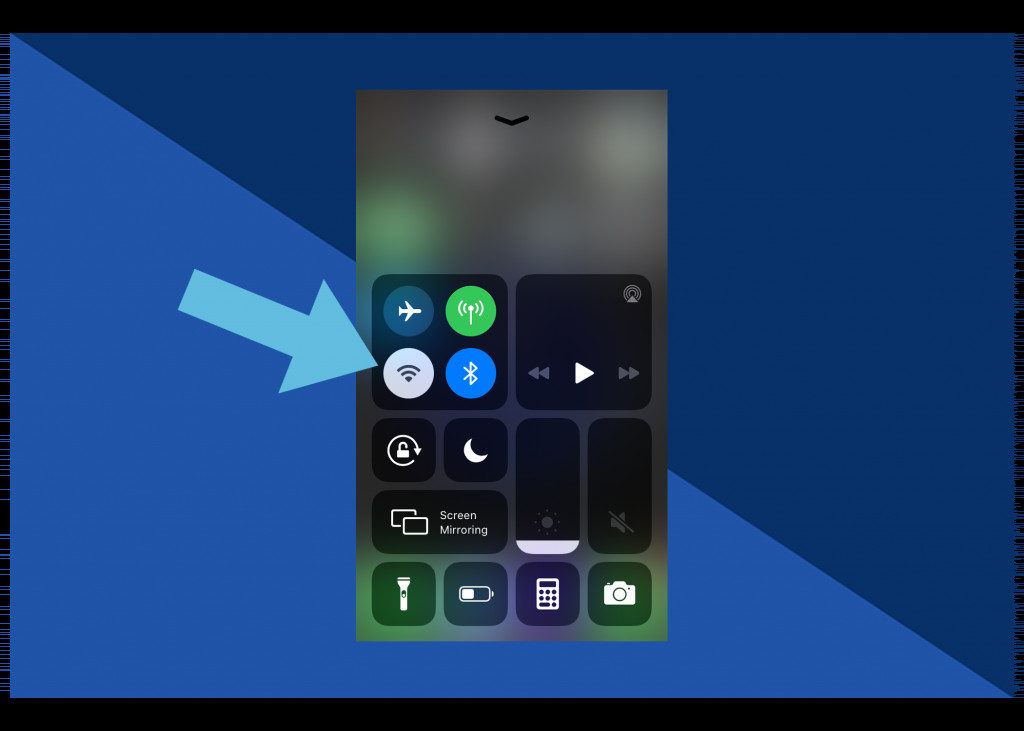 Wireless icon
 -
Tap AirDrop and choose Contacts Only. (Choosing “Everyone” allows anyone to send you content, which can be a security risk).
 Tap AirDrop
4.2. How do I transfer photos via AirDrop?
To transfer photos:
-
Open the Photos app on your iPhone and select the photo you want to share.
 Open photo to be shared
 -
Tap the Share icon. Select additional images by scrolling left or right.
 Scroll left or right to select more
 -
Tap AirDrop and select your iPad.
 Tap on iPad device
 -
The photo will appear in your iPad’s Camera Roll.
4.3. What are the advantages of using AirDrop?
AirDrop provides several benefits:
- Selective Sharing: Share only the photos you choose.
- Direct Transfer: Transfers photos directly between devices without needing the cloud.
- Security: Share with contacts or limit access to known devices.
4.4. What are the limitations of using AirDrop?
AirDrop also has some limitations:
- Proximity Requirement: Requires devices to be close to each other.
- Manual Process: Requires manual selection and transfer of photos.
- Compatibility: Only works between Apple devices.
5. How to Transfer Photos from iPhone to iPad Using a USB-C Cable?
Using a USB-C cable is a direct method for transferring photos, especially useful for large files or when an internet connection is unavailable.
5.1. How do I connect my iPhone to my iPad with a USB-C cable?
- Plug the USB-C end of the cable into your iPad and the other end into your iPhone.
- Unlock your iPhone and tap Trust on the prompt.
- An Import screen will appear on your iPad.
5.2. How do I import photos using a USB-C cable?
- Select the images you want to import on your iPhone.
- Tap Import.
5.3. What are the advantages of using a USB-C cable?
Transferring photos via USB-C offers several advantages:
- Fast Transfer Speed: Provides the quickest transfer, especially for large files.
- No Internet Required: Works without an internet connection.
- Direct Connection: Secure and direct transfer between devices.
5.4. What are the limitations of using a USB-C cable?
Despite the advantages, using a USB-C cable has some limitations:
- Cable Dependency: Requires a USB-C cable.
- Manual Selection: Requires manual selection of photos for transfer.
- Less Convenient: Not as convenient as wireless methods like iCloud or AirDrop.
6. How to Transfer Photos from iPhone to iPad Using Third-Party Apps?
Various third-party apps can also help transfer photos between your iPhone and iPad.
6.1. What are some popular third-party apps for photo transfer?
Popular options include:
- Google Photos: Great for backing up and syncing photos across devices.
- Dropbox: Useful for transferring files, including photos, between devices.
- Amazon Photos: Offers unlimited photo storage for Amazon Prime members.
- AnyTrans: A comprehensive iOS data management tool.
6.2. How do I use Google Photos to transfer photos?
- Install Google Photos on both your iPhone and iPad.
- Back up your photos from your iPhone to Google Photos.
- Access Google Photos on your iPad to view and download your photos.
6.3. What are the benefits of using third-party apps?
Third-party apps offer several benefits:
- Cross-Platform Compatibility: Works across different operating systems.
- Additional Features: Often includes extra features like editing and organization tools.
- Cloud Backup: Provides cloud storage options for your photos.
6.4. What are the limitations of using third-party apps?
Using third-party apps also has some limitations:
- Privacy Concerns: Requires trusting a third-party with your data.
- Cost: Some apps may require a subscription or have in-app purchases.
- Internet Dependency: Relies on an internet connection for syncing and backup.
7. Optimizing Your Photo Workflow
A streamlined photo workflow can save time and enhance your creative process.
7.1. How do I organize my photos on my iPhone?
- Use Albums: Create albums for different events, projects, or categories.
- Utilize Keywords: Add keywords to make photos easily searchable.
- Delete Duplicates: Regularly remove duplicate photos to save space.
7.2. How do I edit photos on my iPad?
- Built-in Editing Tools: Use the iPad’s built-in editing tools for basic adjustments.
- Third-Party Apps: Explore apps like Adobe Lightroom, Snapseed, and VSCO for advanced editing.
7.3. How do I back up my photo library?
- iCloud Backup: Automatically backs up your photos to iCloud.
- External Hard Drive: Manually back up your photos to an external hard drive.
- Cloud Storage Services: Use services like Google Photos, Dropbox, or Amazon Photos.
8. Exploring Advanced Photography Techniques with dfphoto.net
Once your photos are transferred and organized, dfphoto.net offers resources to enhance your photography skills.
8.1. What are some essential photography techniques?
- Composition: Learn about the rule of thirds, leading lines, and symmetry.
- Lighting: Understand natural and artificial lighting to create stunning images.
- Exposure: Master aperture, shutter speed, and ISO settings.
- Focus: Use different focusing techniques to highlight your subject.
8.2. How can I improve my photography skills?
- Online Courses: Enroll in online photography courses.
- Photography Workshops: Attend workshops to learn from professionals.
- Practice Regularly: The more you practice, the better you’ll become.
According to Popular Photography magazine, consistent practice and learning new techniques can improve your photography skills by up to 50% in just six months.
8.3. What are some inspiring photography projects?
- Portrait Photography: Capture the essence of people.
- Landscape Photography: Document the beauty of nature.
- Street Photography: Capture candid moments in urban environments.
- Macro Photography: Explore the intricate details of small subjects.
9. Preserving Memories Through Photo Books with dfphoto.net
After transferring and editing your photos, consider creating a lasting keepsake.
9.1. What are the benefits of creating photo books?
- Tangible Memories: A physical photo book is a timeless way to preserve memories.
- Personalized Gifts: Create personalized photo books for family and friends.
- Storytelling: Arrange your photos to tell a story.
9.2. How do I create a photo book?
- Photo Book Services: Use online services like Shutterfly, Blurb, or Mixbook.
- Software: Use software like Adobe InDesign to design your own photo book.
- Templates: Use pre-designed templates to simplify the process.
9.3. What are some tips for designing a great photo book?
- Choose High-Quality Photos: Select your best photos for the photo book.
- Tell a Story: Arrange your photos chronologically or thematically.
- Add Captions: Write captions to provide context and add interest.
- Use a Consistent Design: Maintain a consistent layout and font style.
10. How to troubleshoot common photo transfer issues?
Sometimes, transferring photos doesn’t go as planned. Here are some common issues and how to fix them.
10.1. Why are my iCloud Photos not syncing?
- Check iCloud Status: Make sure iCloud is active on both devices.
- Check Internet Connection: Ensure both devices have a stable internet connection.
- Check Storage: Verify that you have enough iCloud storage.
- Restart Devices: Restart both your iPhone and iPad.
10.2. Why is AirDrop not working?
- Check AirDrop Settings: Make sure AirDrop is enabled on both devices and set to “Contacts Only” or “Everyone”.
- Check Bluetooth and Wi-Fi: Ensure Bluetooth and Wi-Fi are turned on.
- Proximity: Make sure the devices are close to each other.
- Restart Devices: Restart both your iPhone and iPad.
10.3. Why is my USB-C connection not working?
- Check Cable: Ensure the USB-C cable is working correctly.
- Trust Device: Make sure you have tapped “Trust” on your iPhone when prompted.
- Update Software: Ensure both devices have the latest software updates.
- Restart Devices: Restart both your iPhone and iPad.
FAQ: Transferring Photos from iPhone to iPad
1. Can I transfer photos from iPhone to iPad without iCloud?
Yes, you can use AirDrop, a USB-C cable, or third-party apps like Google Photos or Dropbox to transfer photos without iCloud.
2. How long does it take to transfer photos from iPhone to iPad?
The transfer time depends on the method and the number of photos. AirDrop and USB-C are generally faster, while iCloud syncing may take longer depending on your internet speed and the size of your library.
3. Will transferring photos reduce their quality?
Using iCloud Photos with “Optimize iPhone Storage” enabled may store lower-resolution versions on your device, but the full-resolution versions are stored in iCloud. AirDrop and USB-C transfers preserve the original quality of the photos.
4. How do I delete photos after transferring them?
After verifying that the photos have been successfully transferred, you can delete them from your iPhone to free up space.
5. Is it safe to use AirDrop with “Everyone” enabled?
Using AirDrop with “Everyone” enabled allows anyone nearby to send you files, which can pose a security risk. It’s safer to use “Contacts Only”.
6. What if my iPad doesn’t have enough storage for all my photos?
Consider using iCloud Photos with “Optimize iPad Storage” enabled, or use an external storage device to store your photos.
7. Can I transfer photos from my iPhone to someone else’s iPad?
Yes, you can use AirDrop to transfer photos to another person’s iPad, provided they are in your contacts or have AirDrop set to “Everyone”.
8. How do I transfer photos from my iPhone to an older iPad?
Older iPads may not support USB-C. You can use iCloud Photos, AirDrop, or third-party apps like Google Photos.
9. What is the best way to transfer a large number of photos?
For a large number of photos, using a USB-C cable is generally the fastest and most reliable method.
10. How do I ensure my photos are backed up before transferring?
Before transferring, ensure your photos are backed up to iCloud, an external hard drive, or a cloud storage service like Google Photos or Dropbox.
Transferring photos from your iPhone to your iPad is a straightforward process with multiple options available. Whether you prefer the convenience of iCloud, the directness of AirDrop, or the speed of a USB-C cable, there’s a method that suits your needs. At dfphoto.net, we’re dedicated to helping you manage, enhance, and share your visual stories.
Ready to take your photography to the next level? Visit dfphoto.net for in-depth tutorials, creative inspiration, and a vibrant community of photography enthusiasts. Explore our resources and unleash your creative potential today.
Address: 1600 St Michael’s Dr, Santa Fe, NM 87505, United States
Phone: +1 (505) 471-6001
Website: dfphoto.net