Timestamping photos on your iPhone is a fantastic way to keep your memories organized and easily searchable. At dfphoto.net, we understand the importance of photo management, and we’re here to guide you through the process of adding timestamps to your iPhone photos, making them easier to sort, archive, and share. Whether you’re a professional photographer or just a casual snapper, mastering this skill will significantly improve your photographic workflow. This guide covers manual methods, app solutions, and even leveraging iOS Shortcuts for automated timestamping, empowering you with essential photo management skills, organizational techniques, and time-saving photography tips.
1. What is Timestamping and Why Should I Timestamp My iPhone Photos?
Timestamping is the process of embedding the date and time a photo was taken directly onto the image. It’s useful for several reasons:
- Organization: Timestamps allow you to easily sort and locate photos, especially when dealing with large archives.
- Documentation: For professional photographers or those documenting events, timestamps provide crucial context and verification.
- Memory Jogging: Seeing the date and time can bring back specific memories associated with the photo.
- Legal Purposes: In some cases, timestamps can serve as evidence, verifying when and where a photo was taken.
2. Can I Manually Add a Timestamp to Photos on My iPhone?
While the iPhone doesn’t have a built-in feature to directly overlay timestamps onto photos within the Photos app, you can achieve this using third-party apps or by creating a custom shortcut. Here are a couple of options:
- Using Third-Party Apps: Numerous apps in the App Store allow you to add timestamps. These apps typically offer customization options for the timestamp’s appearance, such as font, size, color, and placement.
- Creating a Custom Shortcut: The Shortcuts app on iOS can be used to create a workflow that automatically adds a timestamp to selected photos. This is a more advanced method but offers greater flexibility.
3. What Are the Best Apps to Timestamp Photos on iPhone?
Several apps are available in the App Store that make timestamping photos on your iPhone simple. Here are a few of the best, considering user ratings, features, and ease of use:
| App Name | Key Features | Price |
|---|---|---|
| Timestamp Camera Free | Adds date, time, GPS coordinates, and custom notes. | Free (with ads) |
| Auto Stamper | Batch processing, customizable timestamp formats, location stamping. | Paid |
| Timestamp It | Simple interface, various timestamp styles, easy sharing. | Free / Paid |
| PhotoMarks | Watermarks, resize, rename, and add text (including timestamps) in batch. | Paid |
| Batch Watermark | Specifically designed for batch processing, adding text, and logos. | Paid |
4. How Do I Use Timestamp Camera Free?
Timestamp Camera Free is a popular choice due to its simplicity and the fact that it’s free to use (with ads). Here’s how to use it:
- Download and Install: Find “Timestamp Camera Free” in the App Store and install it.
- Grant Permissions: Open the app and grant it access to your camera and photo library.
- Customize Settings: In the app’s settings, you can customize the timestamp format, font, size, color, and position. You can also add location data if desired.
- Take a Photo or Select from Library: You can either take a new photo directly within the app, or select an existing photo from your library.
- Save the Timestamped Photo: The app will automatically add the timestamp to the photo and save it to your camera roll.
5. What Are the Steps to Create an iOS Shortcut for Timestamping Photos?
For those who prefer a more automated and customizable solution, creating an iOS Shortcut is an excellent option. Here’s a detailed guide:
- Open the Shortcuts App: The Shortcuts app is pre-installed on most iPhones. If you can’t find it, download it from the App Store.
- Create a New Shortcut: Tap the “+” button in the top right corner to create a new shortcut.
- Name Your Shortcut: Tap “New Shortcut” at the top, then select “Rename” and give your shortcut a descriptive name like “Timestamp Photo”.
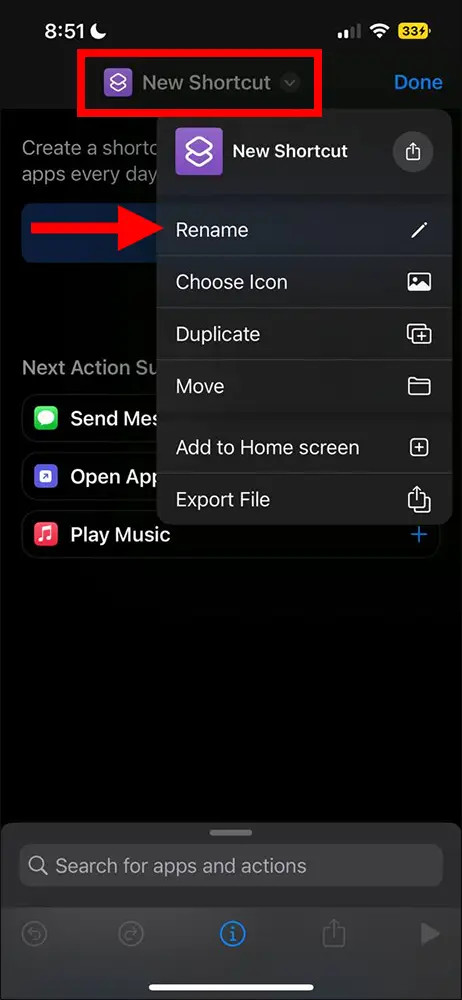 screenshot of Shortcuts app (iOS). Renaming shortcut.
- Add the “Select Photos” Action:
- Tap “Add Action”.
- In the search bar, type “Select Photos” and add it to your shortcut.
- Tap the down arrow on the “Select Photos” action and uncheck “Videos” to ensure only photos are processed.
- Add the “Get Details of Images” Action:
- Tap “Add Action”.
- Search for “Get Details of Images” and add it.
- Tap the “Detail” variable and select “Date Taken” from the list.
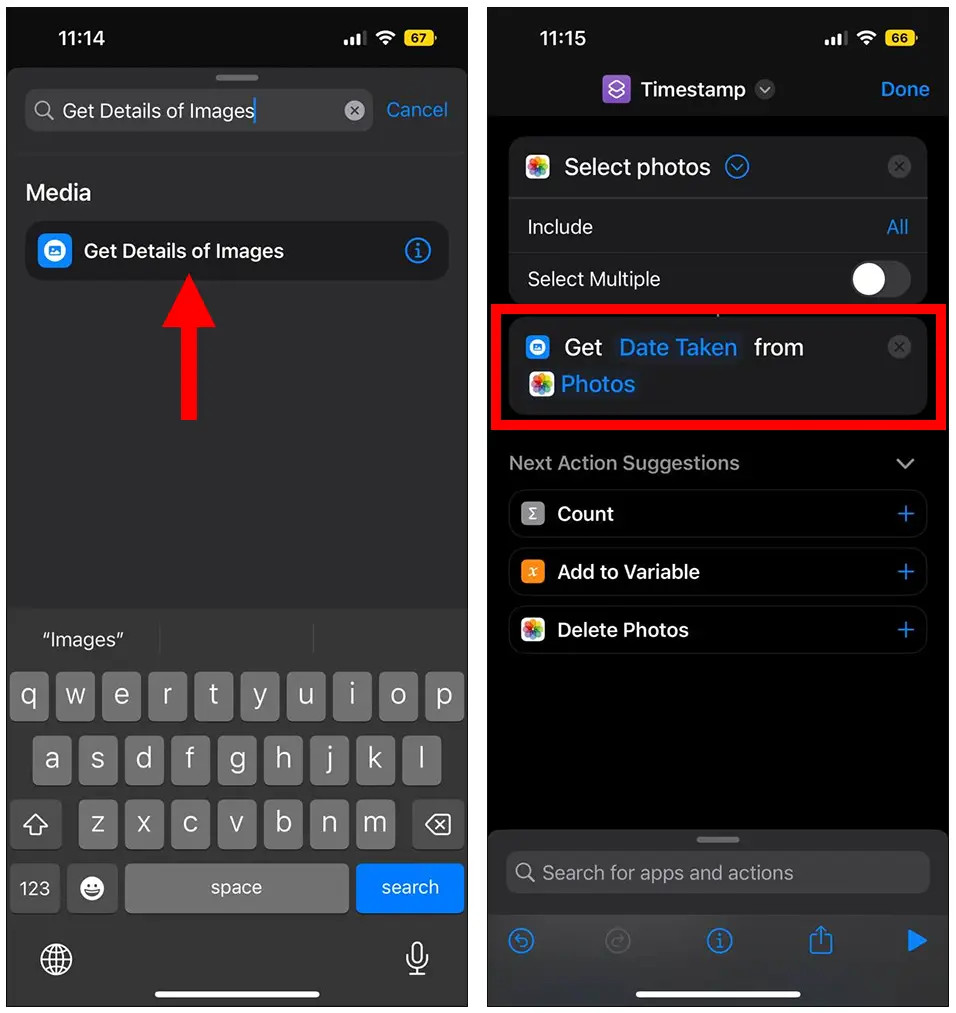 screenshot of Shortcuts app (iOS). Get details of images.
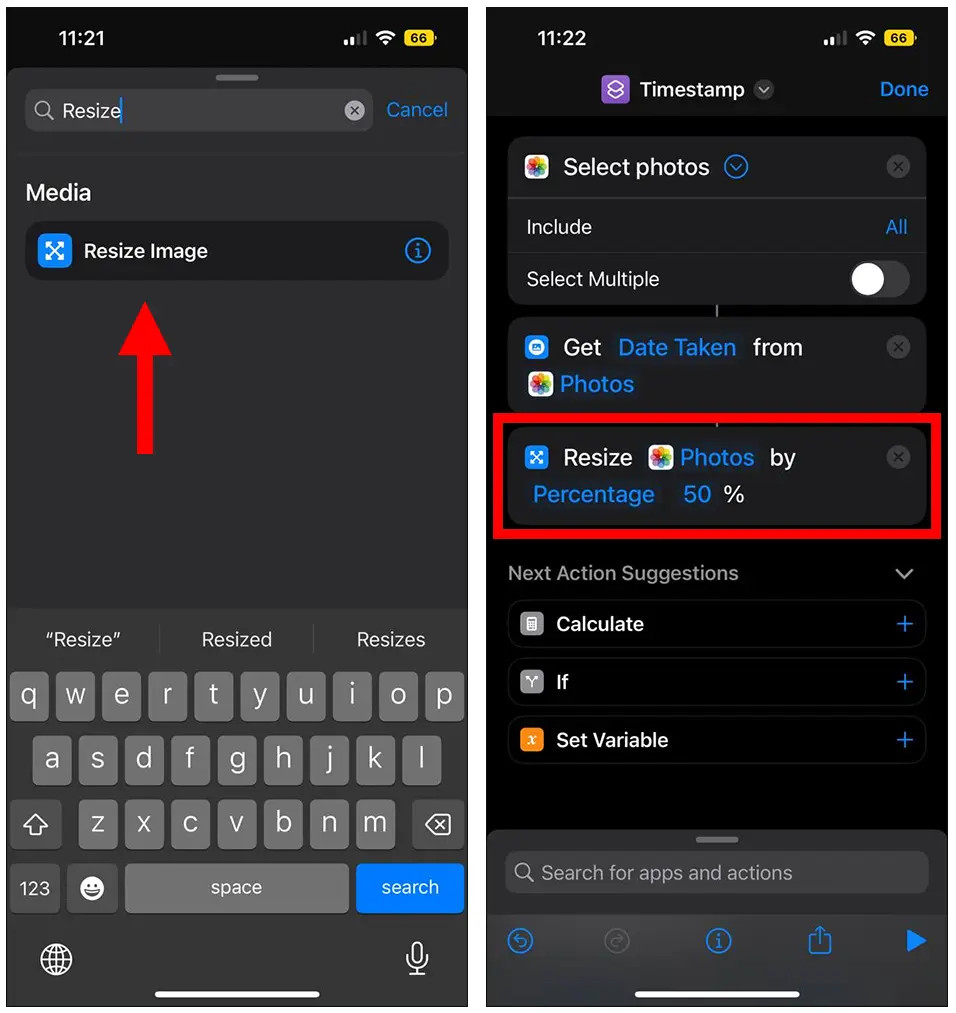
- Add the “Resize Image” Action:
- Tap “Add Action”.
- Search for “Resize Image” and add it.
- Ensure “Image” is set to “Photos”.
- Specify a resize percentage (e.g., 50%) to avoid errors. This step is crucial for the shortcut to function reliably.
 screenshot of Shortcuts app (iOS). Adding resize image action.
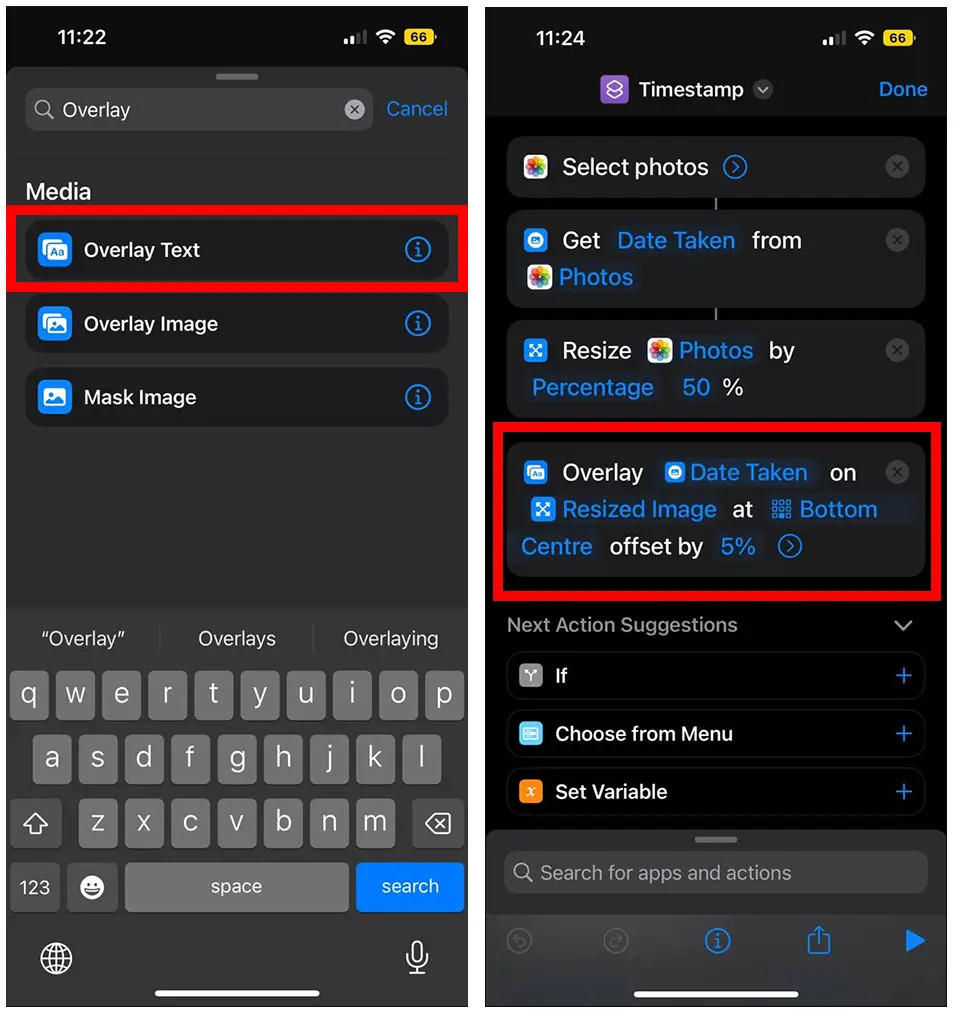
- Add the “Overlay Text” Action:
- Tap “Add Action”.
- Search for “Overlay Text” and add it.
- Tap the “Text” variable and set it to “Date Taken”.
- Adjust the position (e.g., “Top Center”) and offset (e.g., 5%).
- Tap the down arrow to customize the font, size, color, and alignment.
 screenshot of Shortcuts app (iOS). Adding overlay text action.
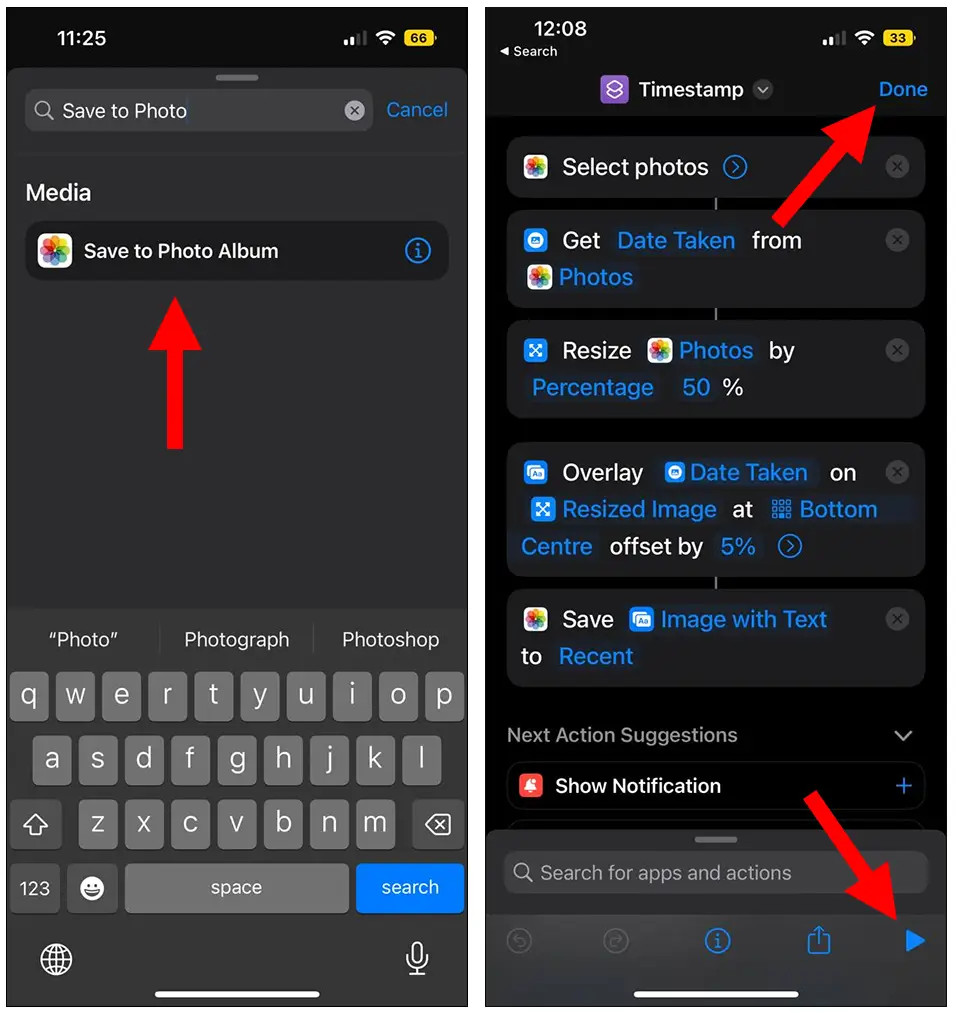
- Add the “Save to Photo Album” Action:
- Tap “Add Action”.
- Search for “Save to Photo Album” and add it.
- This will save the timestamped photo to your recent photos album.
 screenshot of Shortcuts app (iOS). Adding save to photo album action.
- Test and Save:
- Tap the Play icon at the bottom right to test the shortcut.
- Tap “Done” in the top right corner to save the shortcut.
6. Can I Customize the Timestamp Format in the iOS Shortcut?
Yes, the iOS Shortcut method offers a high degree of customization for the timestamp format. Here’s how:
-
Edit the “Overlay Text” Action: Open your “Timestamp Photo” shortcut in the Shortcuts app and locate the “Overlay Text” action.
-
Replace “Date Taken” with Custom Formatting: Instead of directly using the “Date Taken” variable, you can use the “Format Date” action to customize the date and time format. Here’s how:
- Add a “Format Date” Action: Before the “Overlay Text” action, add a “Format Date” action.
- Set the Date: In the “Format Date” action, set the “Date” input to “Date Taken” (the output from the “Get Details of Images” action).
- Choose a Format: Tap on “Date Format” and “Time Format” to select pre-defined formats, or choose “Custom” to create your own.
-
Use Custom Format Codes: When using “Custom,” you can use the following format codes:
yyyy: Year (e.g., 2024)yy: Year (e.g., 24)MMMM: Month (e.g., July)MMM: Month (e.g., Jul)MM: Month (e.g., 07)dd: Day (e.g., 04)HH: Hour (24-hour format, e.g., 14)hh: Hour (12-hour format, e.g., 02)mm: Minute (e.g., 30)ss: Second (e.g., 45)a: AM/PM
-
Example: To display the timestamp as “July 04, 2024 02:30 PM,” use the custom format
MMMM dd, yyyy hh:mm a. -
Update “Overlay Text” Action: In the “Overlay Text” action, set the “Text” variable to the output of the “Format Date” action (usually named “Formatted Date”).
7. How Can I Add GPS Coordinates to the Timestamp?
Adding GPS coordinates to the timestamp can be incredibly useful for documenting the location where a photo was taken. Here’s how to integrate GPS data into your timestamp using iOS Shortcuts:
-
Add “Get Location” Action:
- After the “Select Photos” action, add a “Get Location” action. This action retrieves the current location of your device. If you want to use the location embedded in the photo’s metadata, you can use the “Get Details of Images” action and select “Location” instead.
-
Format the Location Data:
- Add a “Text” action to format the GPS coordinates into a readable string.
- In the “Text” action, enter the following text, replacing “Current Location” with the output from the “Get Location” action:
Latitude: (Current Location:Latitude), Longitude: (Current Location:Longitude) -
Combine Date and Location:
- If you are already formatting the date, add another “Text” action to combine the formatted date and the location string. For example:
(Formatted Date) - (Text) -
Update “Overlay Text” Action:
- In the “Overlay Text” action, set the “Text” variable to the output of the combined text (date and location).
8. How Can I Process Multiple Photos at Once with the Shortcut?
One of the advantages of using iOS Shortcuts is the ability to process multiple photos in batch. Here’s how to modify your shortcut to handle multiple images:
- Ensure “Select Photos” Allows Multiple Selection:
- In the “Select Photos” action, make sure the “Select Multiple” option is enabled. This allows you to pick more than one photo at a time.
- Use “Repeat with Each” Action:
- Add a “Repeat with Each” action after the “Select Photos” action. This action will loop through each selected photo.
- Drag all subsequent actions (from “Get Details of Images” to “Save to Photo Album”) inside the “Repeat with Each” block.
- Update Input Variables:
- Wherever you previously used “Selected Photo,” replace it with “Repeat Item.” “Repeat Item” refers to the current photo being processed in the loop.
- Test with Multiple Photos:
- Run the shortcut and select multiple photos to ensure it processes each one correctly.
9. How to Customize the Appearance of the Timestamp Overlay?
Customizing the appearance of the timestamp overlay can make it more readable and visually appealing. Here are some tips:
- Font: Experiment with different fonts to find one that complements your photos. The “Overlay Text” action in Shortcuts allows you to choose from a variety of fonts.
- Font Size: Adjust the font size to ensure the timestamp is legible without being intrusive.
- Color: Choose a color that contrasts well with the background of your photos. White and black are common choices, but you can also use other colors for a more unique look.
- Position: Experiment with different positions for the timestamp, such as the top left, top right, bottom left, or bottom right corner. Consider the composition of your photos and choose a position that doesn’t obstruct important elements.
- Background: Add a background behind the timestamp to improve readability, especially if your photos have varying brightness levels. You can achieve this by using a slightly opaque rectangle shape behind the text.
- Outline: Add an outline around the text to make it stand out even more. A thin black or white outline can work well, depending on the text color.
10. What Are Some Common Issues and How to Troubleshoot Them?
While creating and using timestamping shortcuts, you might encounter some issues. Here’s how to troubleshoot them:
- “There was a problem running the shortcut”:
- This error often occurs when the shortcut tries to process images that are too large. Adding the “Resize Image” action and scaling down the images can resolve this issue.
- Timestamp is not displaying correctly:
- Double-check the formatting codes in the “Format Date” action. Ensure they are entered correctly and match your desired format.
- Location data is not accurate:
- Make sure location services are enabled for the Shortcuts app. Go to Settings > Privacy > Location Services and ensure “Shortcuts” is set to “While Using the App.”
- Photos are not saving to the correct album:
- In the “Save to Photo Album” action, you can specify a specific album to save the photos to. If no album is specified, they will be saved to the “Recents” album by default.
- Shortcut is running slowly:
- Processing multiple photos can take time. To speed up the process, try reducing the image size in the “Resize Image” action or simplifying the shortcut by removing unnecessary actions.
Timestamping your photos on your iPhone doesn’t have to be a chore. Whether you choose a dedicated app or create a custom shortcut, the ability to add dates and times to your images can significantly improve your organization and workflow. Explore dfphoto.net for more photography tips, tricks, and in-depth guides to help you master your craft. Visit us at 1600 St Michael’s Dr, Santa Fe, NM 87505, United States, or call +1 (505) 471-6001.
FAQ Section
1. Why is timestamping important for photographers?
Timestamping helps photographers organize and locate photos easily, provides context for documentation, and aids in memory recall.
2. Can I add timestamps to existing photos on my iPhone?
Yes, using third-party apps or custom iOS Shortcuts, you can add timestamps to photos already in your photo library.
3. Is there a built-in timestamp feature on the iPhone?
No, the iPhone does not have a built-in feature to directly add timestamps to photos within the Photos app.
4. What is the best app for timestamping photos on iPhone?
Apps like Timestamp Camera Free, Auto Stamper, and Timestamp It are popular choices for their ease of use and customization options.
5. How do I create a timestamp shortcut on my iPhone?
You can create a custom shortcut using the Shortcuts app by adding actions like “Select Photos,” “Get Details of Images,” “Overlay Text,” and “Save to Photo Album.”
6. Can I customize the format of the timestamp in the shortcut?
Yes, you can customize the timestamp format using the “Format Date” action in the Shortcuts app, allowing you to specify the date and time format.
7. How can I add GPS coordinates to the timestamp using a shortcut?
Include the “Get Location” action to retrieve GPS data, format it using a “Text” action, and combine it with the date in the “Overlay Text” action.
8. Can I process multiple photos at once using a timestamp shortcut?
Yes, enable “Select Multiple” in the “Select Photos” action and use the “Repeat with Each” action to process multiple photos in batch.
9. What should I do if the shortcut shows an error message?
Ensure that location services are enabled, and try reducing the image size, or make sure you have granted all permissions required for the Shortcut to work properly.
10. How can I improve the readability of the timestamp overlay?
Customize the font, size, color, and position of the timestamp in the “Overlay Text” action, and consider adding a background or outline to make it stand out.