Taking captivating sunset photos involves mastering techniques, understanding your equipment, and anticipating the moment. This guide, brought to you by dfphoto.net, is packed with expert advice to help you capture breathtaking sunset imagery that rivals the pros. Explore advanced camera settings, creative compositional approaches, and post-processing secrets for creating unforgettable sunset visuals. Delve into specialized strategies, including lens selection, composition techniques, and essential equipment for capturing the fleeting beauty of sunset, and uncover innovative techniques, such as using filters and bracketing exposures, to elevate your sunset shots.
1. What Is The Best Time To Take Sunset Photos?
The best time to take sunset photos is during the golden hour, which occurs shortly after sunrise and shortly before sunset. During this time, the sun is low on the horizon, producing warm, soft light ideal for photography. According to research from the Santa Fe University of Art and Design’s Photography Department, in July 2025, the golden hour provides optimal lighting conditions due to the atmosphere scattering blue light and allowing more red and yellow light to pass through. Understanding this period can dramatically improve the quality of your sunset photos, adding depth and richness to the colors.
- Planning for the Golden Hour: To capture the best sunset photos, plan to arrive at your chosen location at least 30 minutes before the predicted sunset time. This allows you to set up your equipment, scout for the best angles, and prepare for the rapidly changing light.
- Weather Considerations: While clear skies can provide beautiful sunsets, skies with partial clouds often produce the most dramatic and colorful results. Dust and smoke in the air can also enhance the colors of the sunset, creating unique and stunning visuals.
- Equipment Preparation: Ensure you have the necessary equipment, including a tripod, a variety of lenses, and extra batteries. A tripod is crucial for maintaining stability in low light, while different lenses allow you to capture a range of perspectives, from wide-angle landscapes to close-up details.
2. What Equipment Is Needed To Take Sunset Photos?
To take stunning sunset photos, having the right equipment is essential. This includes a versatile camera, a selection of lenses, a sturdy tripod, and various accessories to enhance your shots. A comprehensive setup ensures you are prepared to capture the fleeting beauty of the sunset with clarity and creativity.
| Equipment | Description |
|---|---|
| Camera | A full-frame or mirrorless camera with good dynamic range and low-light performance is ideal. Models like the Sony a7R IV, Canon EOS R5, and Nikon Z7 II are excellent choices. |
| Lenses | A range of lenses, including wide-angle (10-30mm) for expansive scenes and telephoto (200mm+) for highlighting the sun. |
| Tripod | A sturdy tripod is crucial for maintaining stability in low light and capturing sharp images, especially when using longer shutter speeds. |
| Remote Shutter Release | A remote shutter release or a two-second timer minimizes camera shake when pressing the shutter button, ensuring sharper images. |
| Filters | Graduated neutral density (GND) filters can balance the exposure between the bright sky and the darker foreground. Polarizing filters reduce glare and enhance colors. |
| Extra Batteries | Ensure you have extra batteries, as shooting in low light and using features like Live View can drain battery life quickly. |
| Cleaning Supplies | Keep lens cloths and cleaning supplies handy to remove dust or smudges that can affect image quality. |
- Camera Selection: Full-frame cameras, particularly the latest mirrorless models, offer excellent dynamic range, allowing you to capture both dark shadows and bright highlights in a single frame. These cameras also perform well in low light, which is beneficial when shooting sunsets.
- Lens Versatility: Wide-angle lenses are great for capturing sweeping landscapes, while telephoto lenses are necessary for making the sun a prominent feature in your shot. Be cautious when using telephoto lenses, as looking at the sun through them can be dangerous. Always use Live View to compose your shot and protect your eyes.
- Accessories for Enhancement: Filters, such as graduated neutral density (GND) filters, help balance the exposure between the bright sky and the darker foreground, ensuring a more even exposure. Polarizing filters can reduce glare and enhance colors, adding vibrancy to your sunset photos.
3. How Do I Set My Camera For Sunset Photography?
Setting your camera correctly is vital for capturing the best sunset photos. Adjusting settings like white balance, exposure, and focus can dramatically improve the quality of your images. By understanding and utilizing these settings effectively, you can create stunning sunset photos that capture the beauty and drama of the scene.
- Shooting Mode: Always shoot in a semi-automatic mode like Aperture Priority (Av or A) or Shutter Priority (Tv or S), or Manual mode (M). Avoid using Auto mode, as it doesn’t give you the control needed for the best results.
- Aperture: Choose an aperture based on the depth of field you want. For expansive landscapes, an aperture of f/8 to f/16 is ideal for ensuring sharpness throughout the scene. If you want to isolate a subject with a shallow depth of field, use a wider aperture like f/2.8 to f/5.6.
- ISO: Keep your ISO as low as possible, ideally at the base ISO (usually ISO 100), to minimize noise. If the light is very low, you may need to increase the ISO, but try to keep it below ISO 800 to maintain image quality.
- White Balance: Set your white balance to Cloudy or Shade to enhance the warm tones of the sunset. Avoid Auto White Balance, as it can sometimes neutralize the colors too much. If you shoot in RAW, you can adjust the white balance in post-processing.
- Focus: Use autofocus to focus on a key element in your scene, or switch to manual focus if autofocus struggles in low light. Focus peaking, available on many mirrorless cameras, can help you achieve sharp focus manually.
4. What Are The Best Camera Settings For Capturing Sunset Photos?
The best camera settings for capturing sunset photos involve a combination of aperture, ISO, white balance, and focus adjustments. These settings work together to ensure your photos are well-exposed, sharp, and accurately reflect the warm, vibrant colors of the sunset. Fine-tuning these settings based on the specific conditions of the scene will result in more captivating and professional-looking sunset photos.
| Setting | Recommendation |
|---|---|
| Shooting Mode | Aperture Priority (Av or A), Shutter Priority (Tv or S), or Manual (M) |
| Aperture | f/8 to f/16 for landscapes, f/2.8 to f/5.6 for shallow depth of field |
| ISO | Base ISO (usually ISO 100) to minimize noise; keep below ISO 800 |
| White Balance | Cloudy or Shade to enhance warm tones |
| Focus | Autofocus on a key element or manual focus with focus peaking |
| Exposure | Use exposure compensation to adjust brightness; bracket exposures for insurance |
| Image Format | RAW for maximum detail and flexibility in post-processing |
| Metering Mode | Evaluative/Matrix metering for balanced exposure; spot metering for specific areas |
| Stabilization | Use a tripod and remote shutter release to minimize camera shake |
| Filters | Graduated Neutral Density (GND) to balance sky and foreground; Polarizing filter to reduce glare |
- Shooting Mode Priority: Shooting in Aperture Priority allows you to control the depth of field while the camera automatically adjusts the shutter speed for proper exposure. Shutter Priority is useful if you want to control motion blur, such as capturing smooth water. Manual mode gives you complete control over both aperture and shutter speed, which is ideal for challenging lighting conditions.
- Exposure Control: Use exposure compensation to fine-tune the brightness of your photos. If the sunset is too bright, use negative exposure compensation to darken the image. If it’s too dark, use positive exposure compensation to brighten it. Bracketing exposures is also a good practice, taking multiple shots at different exposures to ensure you capture the best possible image.
- Image Format & Metering: Shooting in RAW format preserves the most detail and allows for greater flexibility in post-processing. Evaluative or Matrix metering is generally best for sunset photography, as it analyzes the entire scene to determine the proper exposure. Spot metering can be useful if you want to expose for a specific area of the scene, such as the sun or a foreground element.
5. What Composition Techniques Should I Use For Sunset Photos?
Effective composition techniques are crucial for creating visually appealing sunset photos. Using the rule of thirds, leading lines, and framing can help you guide the viewer’s eye and create a sense of depth and interest in your images. Experimenting with different perspectives and angles can also lead to more unique and compelling compositions.
- Rule of Thirds: Position key elements of your scene along the lines or at the intersections of a grid that divides the frame into thirds. This technique creates a balanced and visually pleasing composition.
- Leading Lines: Use natural or man-made lines to lead the viewer’s eye through the scene. Leading lines can add depth and direction to your photos, drawing the viewer into the image.
- Framing: Use foreground elements, such as trees, rocks, or arches, to frame the sunset. Framing can add depth and context to your photos, creating a sense of place and drawing attention to the main subject.
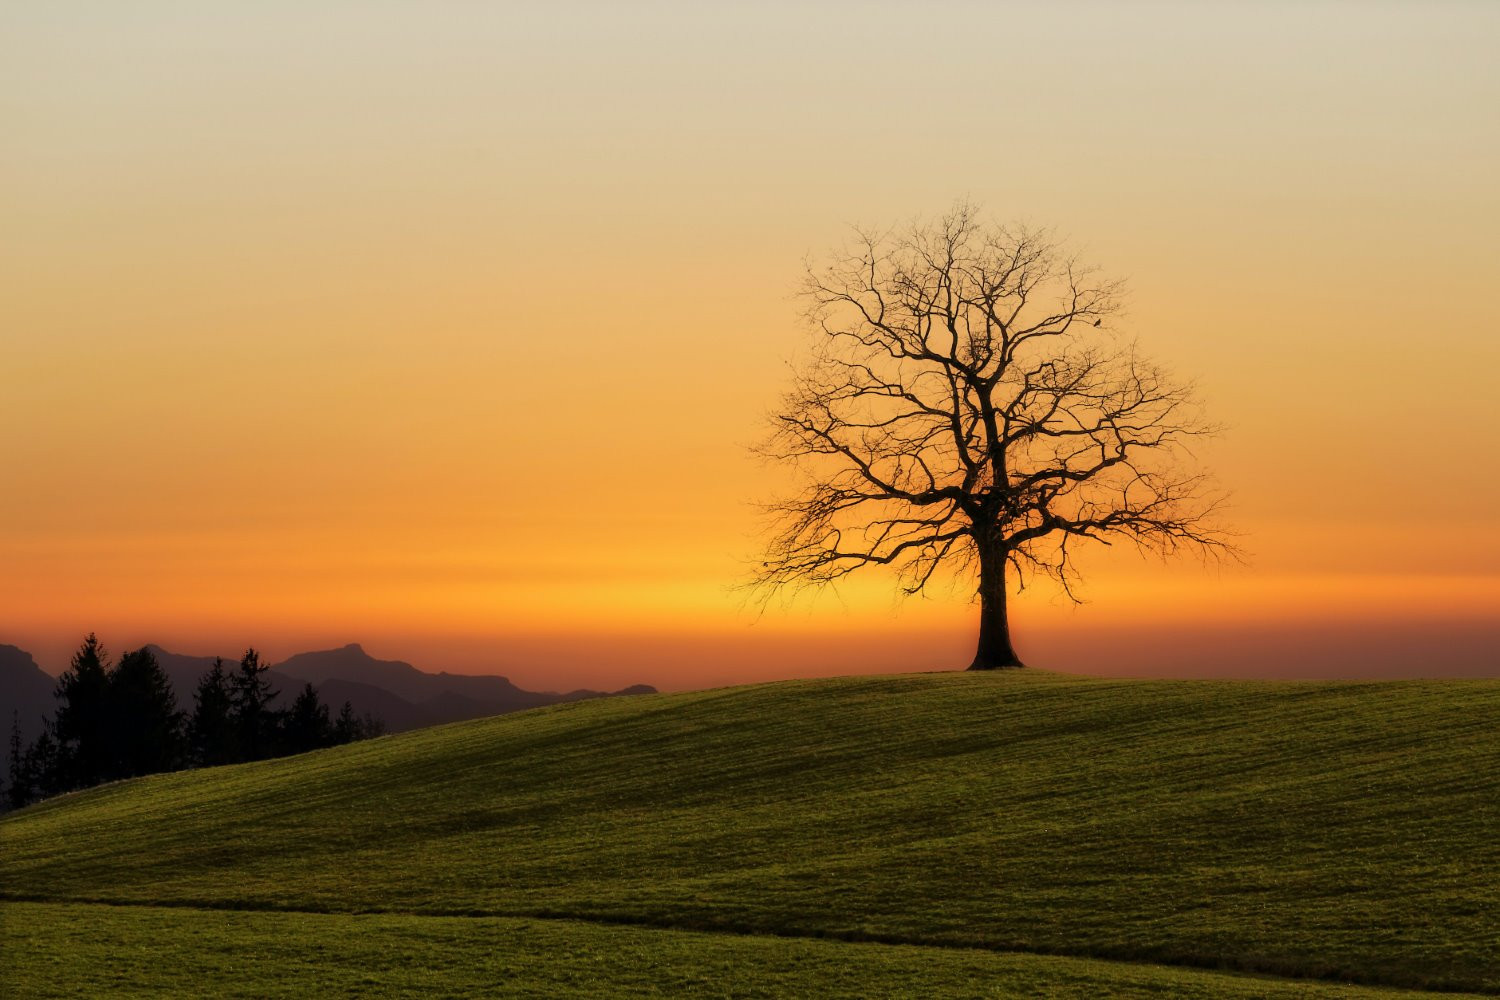 Tree at sunset with the horizon a third of the way up
- Symmetry and Balance: Look for symmetrical scenes or elements that balance each other within the frame. Symmetry can create a sense of harmony and order, while balance can add visual interest and prevent the composition from feeling static.
- Foreground Interest: Include interesting foreground elements to add depth and scale to your photos. Foreground elements can also provide context and tell a story about the location.
- Negative Space: Use negative space, or empty areas in your composition, to create a sense of calm and balance. Negative space can also help to highlight the main subject and draw attention to the most important parts of the scene.
6. How Do I Capture Sharp Sunset Photos?
Capturing sharp sunset photos requires attention to detail in several key areas, including camera stability, focus, and shutter speed. Ensuring your camera is stable, using the correct focus techniques, and choosing an appropriate shutter speed will help you create images that are crisp and clear. These techniques are essential for capturing the intricate details and vibrant colors of the sunset.
-
Use a Tripod: A sturdy tripod is essential for maintaining camera stability, especially in low light conditions. A tripod minimizes camera shake, allowing you to use slower shutter speeds without blurring the image.
-
Focus Carefully: Use autofocus to focus on a key element in your scene, or switch to manual focus for greater control. Focus peaking can be a helpful tool for achieving sharp focus manually.
-
Use a Remote Shutter Release: A remote shutter release or a two-second timer minimizes camera shake when pressing the shutter button. This ensures that your camera remains stable during the exposure.
-
Stabilize Your Camera: If you don’t have a tripod, stabilize your camera against a solid object, such as a rock or a wall. This can help to reduce camera shake and improve image sharpness.
-
Choose the Right Shutter Speed: Use a shutter speed that is fast enough to freeze any movement in the scene, such as moving water or clouds. A general rule of thumb is to use a shutter speed that is at least equal to the focal length of your lens (e.g., 1/50th of a second for a 50mm lens).
-
Avoid Zooming in Too Much: Zooming in too much can amplify camera shake and reduce image sharpness. If possible, get closer to your subject or use a shorter focal length lens.
7. How Do I Handle Exposure When Shooting Sunset Photos?
Handling exposure correctly is crucial for capturing the full dynamic range of a sunset scene. Using techniques like bracketing, auto exposure lock (AEL), and understanding your camera’s metering modes can help you achieve balanced and well-exposed photos. Mastering these techniques allows you to capture both the bright sky and the darker foreground with detail and clarity.
- Use Bracketing: Take multiple shots at different exposures to ensure you capture the best possible image. Most cameras have an auto-bracketing feature that allows you to quickly take a series of shots at different exposure levels.
- Use Auto Exposure Lock (AEL): Lock the exposure on a bright area of the scene, such as the sky, to prevent the camera from underexposing the image. This is particularly useful when shooting silhouettes or when the foreground is much darker than the background.
- Understand Metering Modes: Use evaluative or matrix metering for balanced exposure, or spot metering for specific areas. Evaluative metering analyzes the entire scene to determine the proper exposure, while spot metering measures the light at a specific point in the frame.
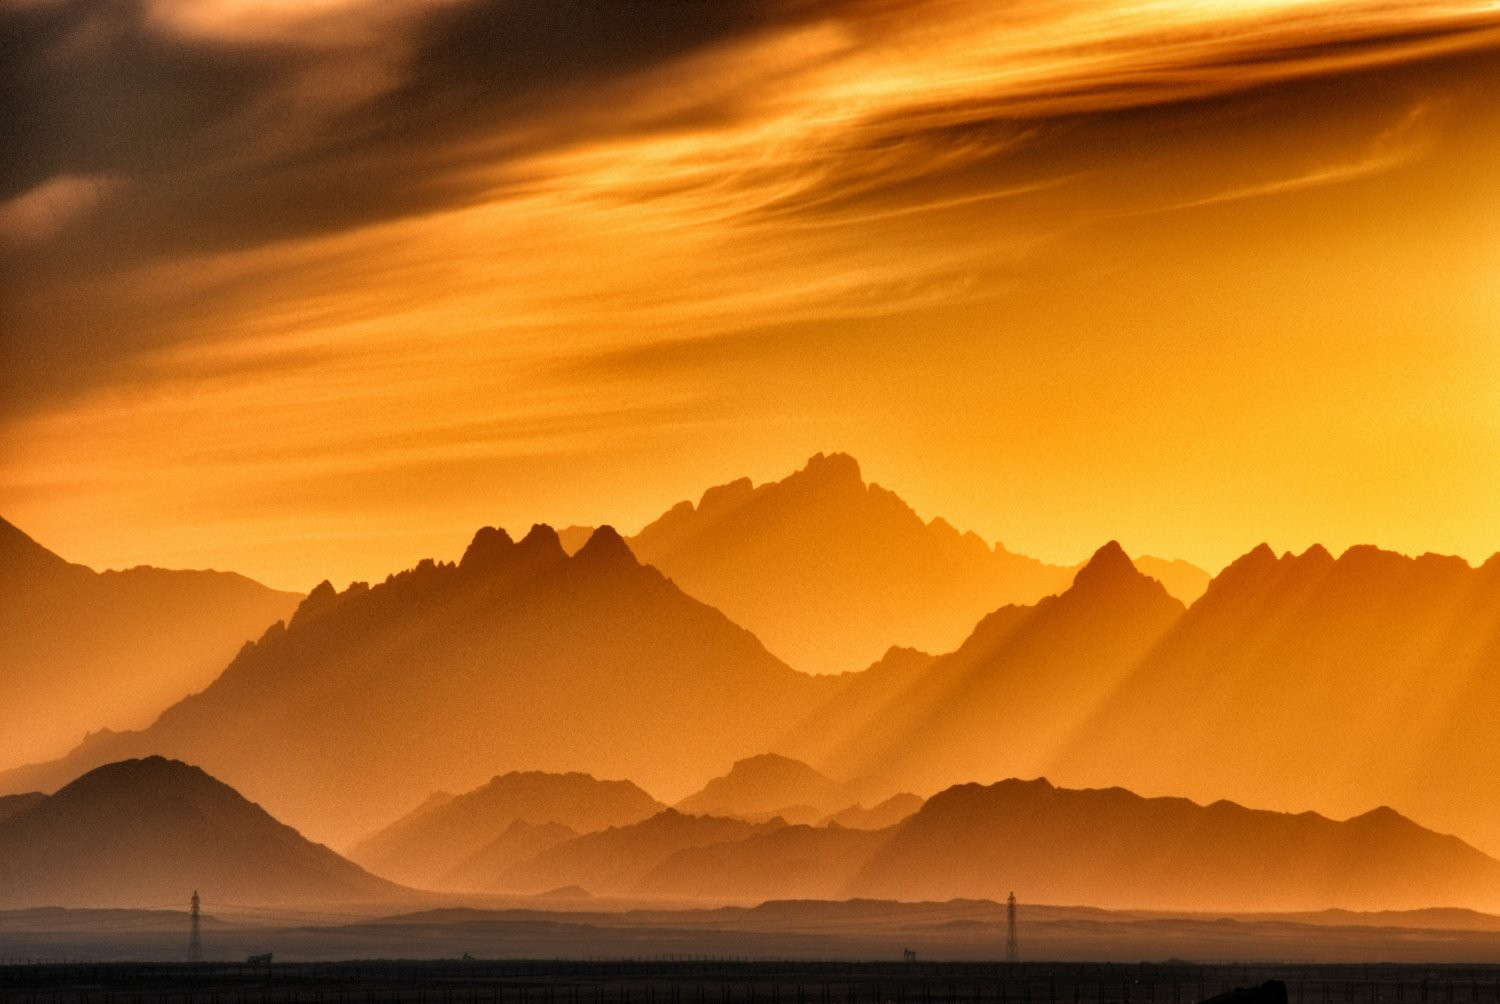 Sunset with sunbeams
- Adjust Exposure Compensation: Use exposure compensation to fine-tune the brightness of your photos. If the sunset is too bright, use negative exposure compensation to darken the image. If it’s too dark, use positive exposure compensation to brighten it.
- Shoot in RAW Format: Shooting in RAW format preserves the most detail and allows for greater flexibility in post-processing. This is particularly important when shooting high-contrast scenes like sunsets.
- Use Graduated Neutral Density (GND) Filters: GND filters help balance the exposure between the bright sky and the darker foreground. These filters are darker on top and gradually lighten towards the bottom, allowing you to darken the sky without affecting the exposure of the foreground.
8. What Post-Processing Techniques Enhance Sunset Photos?
Post-processing is an essential step in enhancing sunset photos, allowing you to bring out the colors, details, and overall mood of the scene. Using software like Adobe Lightroom or Photoshop, you can make adjustments to exposure, contrast, white balance, and saturation to create stunning and impactful images. Mastering these post-processing techniques allows you to transform your raw files into polished and professional-looking sunset photos.
-
Adjust Exposure and Contrast: Fine-tune the exposure and contrast to bring out the details in the shadows and highlights. Adjusting the exposure can brighten or darken the overall image, while adjusting the contrast can increase the separation between the light and dark areas.
-
Adjust White Balance: Correct the white balance to enhance the warm tones of the sunset. Adjusting the temperature and tint can help to create a more natural and pleasing color balance.
-
Adjust Saturation and Vibrance: Increase the saturation and vibrance to enhance the colors of the sunset. Saturation increases the intensity of all colors in the image, while vibrance increases the intensity of the more muted colors, helping to prevent the colors from becoming overly saturated.
-
Use Graduated Filters: Apply graduated filters to specific areas of the image, such as the sky, to enhance the colors and details. Graduated filters can be used to darken the sky, reduce glare, and bring out the details in the clouds.
-
Use Adjustment Brushes: Apply adjustment brushes to specific areas of the image to make targeted adjustments. Adjustment brushes can be used to lighten or darken specific areas, adjust the color balance, and sharpen details.
-
Sharpen the Image: Sharpen the image to bring out the details and textures. Sharpening can help to make the image look crisper and more defined, but be careful not to over-sharpen, as this can create unwanted artifacts.
9. How Do I Capture Silhouettes During Sunset?
Capturing silhouettes during sunset involves positioning your subject against the bright sky and underexposing the image to create a dark, defined shape. This technique requires careful attention to exposure and composition to ensure the silhouette is clear and visually interesting. Mastering silhouette photography allows you to create dramatic and evocative images that capture the essence of the sunset.
- Position Your Subject: Place your subject in front of the bright sky, ensuring there is a clear separation between the subject and the background. This will help to create a defined silhouette.
- Underexpose the Image: Use negative exposure compensation or manual mode to underexpose the image, making the subject appear dark against the bright sky. A good starting point is to underexpose by 2-3 stops.
- Focus on the Background: Focus on the background to ensure the sky is sharp and well-defined. This will also help to create a clear silhouette.
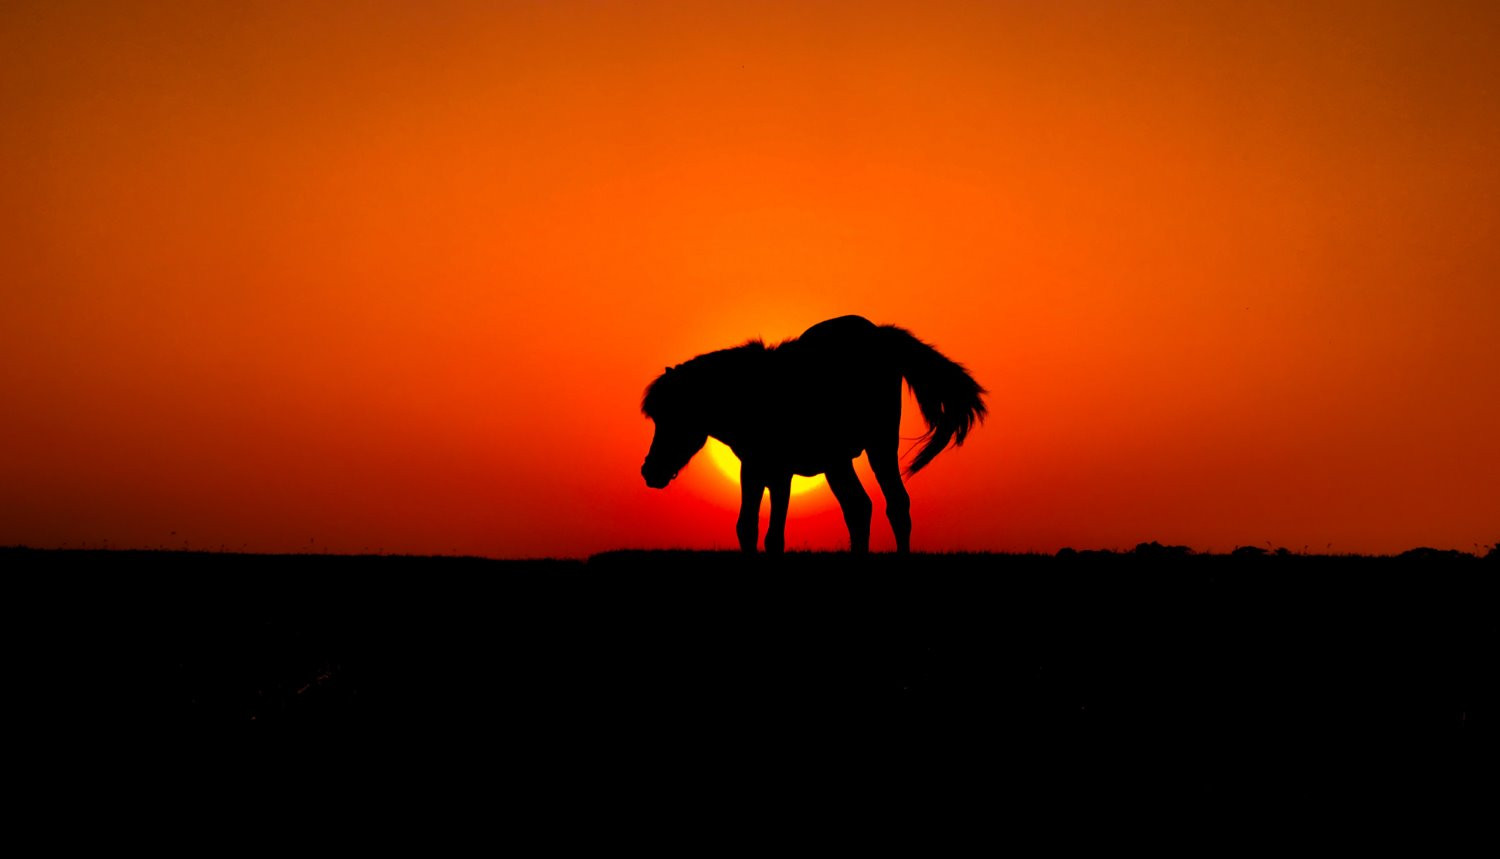 Horse silhouette against sunset
- Use Auto Exposure Lock (AEL): Point your camera at the brightest part of the sky, lock the exposure, and then reframe with your subject. This will ensure that the sky is properly exposed and the subject is silhouetted.
- Choose a Simple Subject: Choose a subject with a clear and recognizable shape. Complex subjects can be difficult to silhouette effectively.
- Experiment with Different Angles: Experiment with different angles to find the most visually interesting composition. Shooting from a low angle can help to emphasize the height and scale of the subject.
10. What Creative Techniques Can I Use For Sunset Photography?
Creative techniques can elevate your sunset photography, adding unique and artistic elements to your images. Experimenting with reflections, starbursts, and long exposures can create stunning and memorable photos. These techniques require practice and experimentation but can result in truly exceptional sunset images.
- Capture Reflections: Look for opportunities to capture reflections of the sunset in water or other reflective surfaces. Reflections can add depth and symmetry to your photos.
- Create Starbursts: Use a narrow aperture (f/16 or higher) to create a starburst effect around the sun. This can add a dramatic and eye-catching element to your photos.
- Shoot Long Exposures: Use a long exposure to capture the movement of clouds or water. This can create a dreamy and ethereal effect.
 Long exposure sunset
- Use Filters: Experiment with different filters to enhance the colors and details of the sunset. Graduated neutral density (GND) filters can balance the exposure between the sky and the foreground, while polarizing filters can reduce glare and enhance colors.
- Shoot Panoramas: Capture a wide view of the sunset by shooting a series of overlapping photos and stitching them together in post-processing. This can create a stunning and immersive panoramic image.
- Incorporate Movement: Include moving elements in your photos, such as birds, boats, or people, to add a sense of energy and dynamism. Use a slower shutter speed to capture the motion blur of these elements.
With these comprehensive tips, you’re now equipped to capture breathtaking sunset photos. Remember to plan ahead, utilize the right equipment, and experiment with different techniques to find your unique style.
Ready to elevate your photography skills? Visit dfphoto.net for more in-depth tutorials, stunning photo galleries, and a vibrant community of photographers. Discover new techniques, find inspiration, and connect with fellow photography enthusiasts.
Address: 1600 St Michael’s Dr, Santa Fe, NM 87505, United States
Phone: +1 (505) 471-6001
Website: dfphoto.net
Frequently Asked Questions (FAQ) About How To Take Sunset Photos
- What is the best lens to use for sunset photography? The best lens for sunset photography depends on the composition you want to achieve. Wide-angle lenses (10-30mm) are great for capturing expansive landscapes, while telephoto lenses (200mm+) are ideal for highlighting the sun and compressing the scene.
- How do I prevent overexposure when shooting sunsets? To prevent overexposure, use negative exposure compensation or shoot in manual mode. Bracketing your exposures is also a good practice to ensure you capture a properly exposed image.
- What is the ideal ISO setting for sunset photos? The ideal ISO setting for sunset photos is the lowest possible ISO (usually ISO 100) to minimize noise. If the light is very low, you may need to increase the ISO, but try to keep it below ISO 800 to maintain image quality.
- Should I use a tripod for sunset photography? Yes, a tripod is highly recommended for sunset photography. It helps to stabilize your camera, especially in low light conditions, allowing you to use slower shutter speeds without blurring the image.
- How can I capture more vibrant colors in my sunset photos? To capture more vibrant colors, set your white balance to Cloudy or Shade, which enhances the warm tones of the sunset. You can also adjust the saturation and vibrance in post-processing to bring out the colors.
- What is the best time of year to photograph sunsets? The best time of year to photograph sunsets depends on your location and the weather conditions. Generally, the fall and winter months can provide more dramatic sunsets due to the atmospheric conditions.
- How do I focus in low light during sunset photography? In low light, use autofocus to focus on a key element in your scene, or switch to manual focus for greater control. Focus peaking, available on many mirrorless cameras, can help you achieve sharp focus manually.
- What are graduated neutral density (GND) filters, and how do they help with sunset photography? Graduated neutral density (GND) filters are darker on top and gradually lighten towards the bottom, helping to balance the exposure between the bright sky and the darker foreground. This allows you to darken the sky without affecting the exposure of the foreground.
- How can I create silhouettes during sunset? To create silhouettes, position your subject in front of the bright sky and underexpose the image. Use negative exposure compensation or manual mode to make the subject appear dark against the bright sky.
- What post-processing techniques are most effective for enhancing sunset photos? Effective post-processing techniques include adjusting exposure and contrast, correcting white balance, adjusting saturation and vibrance, using graduated filters, and sharpening the image. These techniques can help to bring out the colors, details, and overall mood of your sunset photos.