Are you curious about capturing the beauty of the night sky with your iPhone 15? At dfphoto.net, we’re excited to show you how you can use your smartphone to take breathtaking photos of the stars, offering a blend of art and technology that’s accessible to everyone. With the right settings and techniques, your iPhone 15 can become a powerful tool for astrophotography. Dive in to discover tips on enhancing your Milky Way photography skills and mastering night mode photography, ensuring every shot is a masterpiece of celestial beauty.
1. Understanding iPhone 15’s Camera Capabilities for Astrophotography
Can the iPhone 15 truly capture stunning star photos? Absolutely. The iPhone 15 has impressive camera capabilities that, when used correctly, can produce amazing astrophotography results. The advanced features, combined with computational photography, open up new possibilities for capturing the night sky.
1.1. Key Features That Make iPhone 15 Great for Night Photography
The iPhone 15 has several key features that make it an excellent choice for night photography:
- Improved Sensors: The larger sensors on the iPhone 15 capture more light, which is essential for night photography.
- Night Mode: This mode automatically brightens photos in low-light conditions, reducing noise and enhancing details.
- Photonic Engine: Apple’s Photonic Engine improves image processing, resulting in better dynamic range and color accuracy.
- ProRes Format: Capturing in ProRes allows for more flexibility in post-processing, preserving more details and colors.
- RAW Format: Shooting in RAW provides uncompressed image data, giving you greater control over editing.
1.2. Limitations and How to Overcome Them
Despite its advanced features, the iPhone 15 does have some limitations:
- Small Sensor Size: Compared to professional cameras, the iPhone 15 has a smaller sensor, which can result in more noise in low-light conditions. To overcome this, use a tripod and longer exposure times to gather more light.
- Limited Manual Controls: While the iPhone 15 offers some manual controls, they are not as extensive as those on a DSLR or mirrorless camera. Utilize third-party apps like “Halide” or “ProCamera” for more control over settings.
- Digital Noise: High ISO settings can introduce digital noise. Try to keep the ISO as low as possible while maintaining a reasonable exposure time.
- Light Pollution: Light pollution from urban areas can wash out the stars. Find a dark location away from city lights for the best results.
- Lens Limitations: The fixed lenses on the iPhone 15 can limit your creative options. Consider using external lenses to expand your field of view or zoom in on specific stars or constellations.
2. Essential Equipment for iPhone 15 Star Photography
What equipment do you need to take stunning star photos with your iPhone 15? While the iPhone 15 is a powerful tool on its own, certain accessories can significantly enhance your astrophotography experience.
2.1. Tripods: Stability is Key
A sturdy tripod is essential for capturing sharp star photos. Here’s why:
- Long Exposure: Night photography requires long exposure times (several seconds or even minutes). A tripod keeps your iPhone steady, preventing blur.
- Stability: Even the slightest movement can ruin a long exposure shot. A tripod ensures your iPhone stays perfectly still.
- Hands-Free Operation: Using a tripod allows you to focus on adjusting settings and framing your shot without having to hold the phone.
Consider these tripods for iPhone astrophotography:
| Tripod | Features | Price Range |
|---|---|---|
| Manfrotto PIXI Mini | Compact, lightweight, and easy to carry. Ideal for beginners. | $30-50 |
| Joby GorillaPod Mobile | Flexible legs allow for mounting on uneven surfaces. Great for creative angles. | $40-70 |
| Peak Design Travel Tripod | Premium build quality, compact design, and quick setup. Best for serious photographers. | $350-600 |
| Platypod eXtreme | Can be configured from six inches to 22 inches in height and packs into a very small form. | $150-250 |
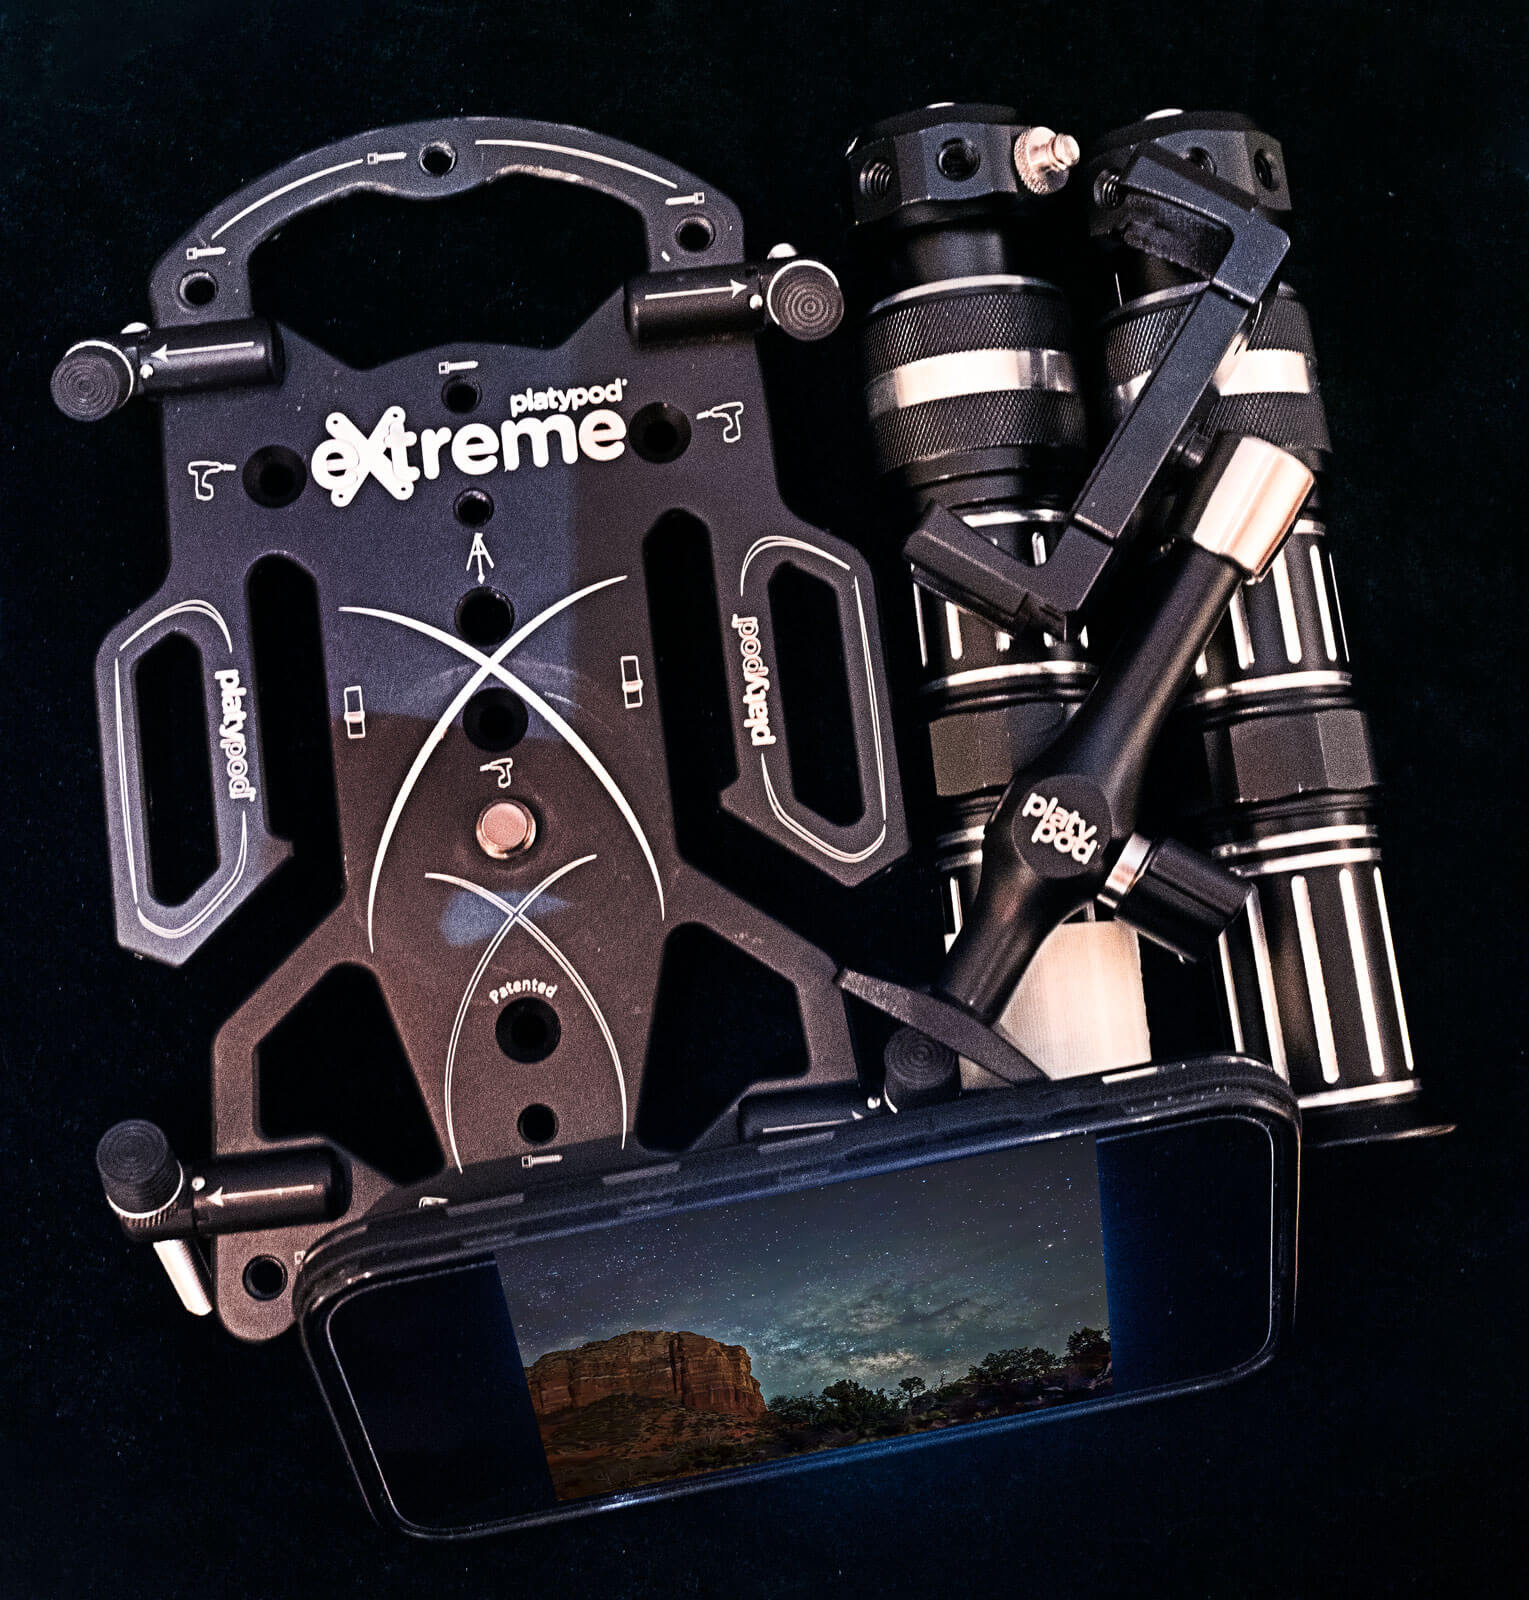 Platypod equipment assembled showing a smartphone attached to the Platypod.
2.2. Smartphone Mounts: Secure Your Device
A reliable smartphone mount is crucial for attaching your iPhone 15 to a tripod. Look for these features:
- Secure Grip: Ensures your iPhone stays firmly in place.
- Adjustability: Allows you to position your iPhone at different angles.
- Compatibility: Works with various tripod types.
2.3. Remote Shutter: Avoid Shake
Using a remote shutter can help you avoid camera shake when taking photos:
- Bluetooth Remote: Connects wirelessly to your iPhone, allowing you to trigger the shutter without touching the screen.
- Wired Remote: Plugs directly into your iPhone, providing a reliable connection.
- Apple Watch: Use your Apple Watch as a remote shutter.
2.4. External Lenses: Expand Your View
External lenses can enhance your iPhone 15’s capabilities:
- Wide-Angle Lens: Captures a broader field of view, ideal for landscapes and starscapes.
- Telephoto Lens: Zooms in on distant objects, useful for capturing specific stars or constellations.
2.5. Power Bank: Stay Charged
Night photography can drain your iPhone’s battery quickly. Bring a power bank to ensure you can keep shooting:
- High Capacity: Choose a power bank with enough capacity to fully charge your iPhone multiple times.
- Fast Charging: Look for a power bank that supports fast charging to minimize downtime.
3. Optimal iPhone 15 Settings for Star Photography
What are the best settings for capturing stunning star photos with your iPhone 15? Optimizing your iPhone 15’s settings is crucial for successful astrophotography. Here’s a breakdown of the most important settings to adjust:
3.1. Night Mode: Capturing More Light
Night Mode is a key feature for iPhone astrophotography:
- Automatic Activation: The iPhone automatically activates Night Mode when it detects low-light conditions.
- Exposure Time: You can manually adjust the exposure time in Night Mode, up to a maximum of 30 seconds, depending on the iPhone model.
- Stability: Use a tripod to take full advantage of longer exposure times.
To use Night Mode effectively:
- Open the Camera app.
- If it’s dark enough, Night Mode will activate automatically (indicated by a yellow icon at the top of the screen).
- Tap the Night Mode icon to adjust the exposure time.
- Place your iPhone on a tripod and take the photo.
3.2. ProRAW: Preserving Details
Shooting in ProRAW format provides more flexibility in post-processing:
- Uncompressed Data: ProRAW files contain more image data than standard JPEG files, allowing for more detailed edits.
- Dynamic Range: ProRAW preserves a wider dynamic range, capturing more details in both highlights and shadows.
- Color Accuracy: ProRAW retains more accurate color information.
To enable ProRAW:
- Go to Settings > Camera > Formats.
- Enable Apple ProRAW.
- In the Camera app, tap the RAW icon to toggle ProRAW on or off.
3.3. ISO: Balancing Light and Noise
ISO determines the sensitivity of your iPhone’s sensor to light. Adjusting the ISO is crucial for night photography:
- Low ISO: Use the lowest ISO setting (e.g., ISO 32) to minimize noise.
- High ISO: Increase the ISO to capture more light in very dark conditions, but be aware that this can introduce noise.
- Experiment: Find the right balance between ISO and exposure time to achieve the best results.
In general, try to keep the ISO below 3200 to minimize noise.
3.4. Aperture: Maximizing Light Intake
Aperture refers to the opening in the lens that allows light to pass through. The iPhone 15 has a fixed aperture, so you cannot adjust it manually. However, understanding how aperture affects your photos is still important:
- Fixed Aperture: The iPhone 15 has a fixed aperture of f/1.6 or f/1.8, depending on the model.
- Wide Aperture: A wider aperture (lower f-number) allows more light to enter the camera, which is beneficial for night photography.
- Depth of Field: A fixed aperture limits your control over depth of field.
3.5. Focus: Achieving Sharpness
Achieving sharp focus is essential for capturing clear star photos:
- Manual Focus: Use manual focus to ensure the stars are sharp. Tap on the screen to focus, then fine-tune the focus by sliding the focus wheel.
- Infinity Focus: Set the focus to infinity (∞) for distant objects like stars.
- Focus Peaking: Some third-party apps offer focus peaking, which highlights the areas of the image that are in focus.
3.6. White Balance: Getting Colors Right
White balance adjusts the colors in your photos to make them look natural. For star photography:
- Auto White Balance: Start with auto white balance and adjust as needed.
- Custom White Balance: Experiment with different white balance presets (e.g., daylight, cloudy) to see what looks best.
- Kelvin Temperature: Some apps allow you to adjust the Kelvin temperature for more precise control over white balance.
3.7. Timer: Avoiding Camera Shake
Using a timer can help you avoid camera shake when taking photos:
- 2-Second Timer: Set a 2-second timer to give the camera time to stabilize after you press the shutter button.
- 10-Second Timer: Use a 10-second timer for group shots or when you need more time to get into position.
3.8. Flash: Keep it Off
Always turn off the flash for star photography. The flash is too weak to illuminate distant objects and will only wash out the stars.
4. Step-by-Step Guide to Taking Star Photos with iPhone 15
How can you take incredible star photos with your iPhone 15? Follow these steps to capture stunning images of the night sky:
- Find a Dark Location:
- Get away from city lights to minimize light pollution.
- Use a light pollution map to find dark locations near you.
- Set Up Your Equipment:
- Attach your iPhone to a tripod using a smartphone mount.
- Consider using an external lens for a wider or more zoomed-in view.
- Adjust Your Settings:
- Enable Night Mode and set the exposure time to 10-30 seconds.
- Enable ProRAW for more flexibility in post-processing.
- Set the ISO to a low value (e.g., ISO 3200 or lower) to minimize noise.
- Use manual focus and set the focus to infinity.
- Turn off the flash.
- Compose Your Shot:
- Frame your shot to include interesting foreground elements, such as trees, mountains, or buildings.
- Use the rule of thirds to create a balanced composition.
- Take the Photo:
- Use a remote shutter or the timer to avoid camera shake.
- Take multiple shots with slightly different settings to ensure you get the best possible image.
- Review and Adjust:
- Review your photos on the spot and adjust your settings as needed.
- Pay attention to the exposure, focus, and composition.
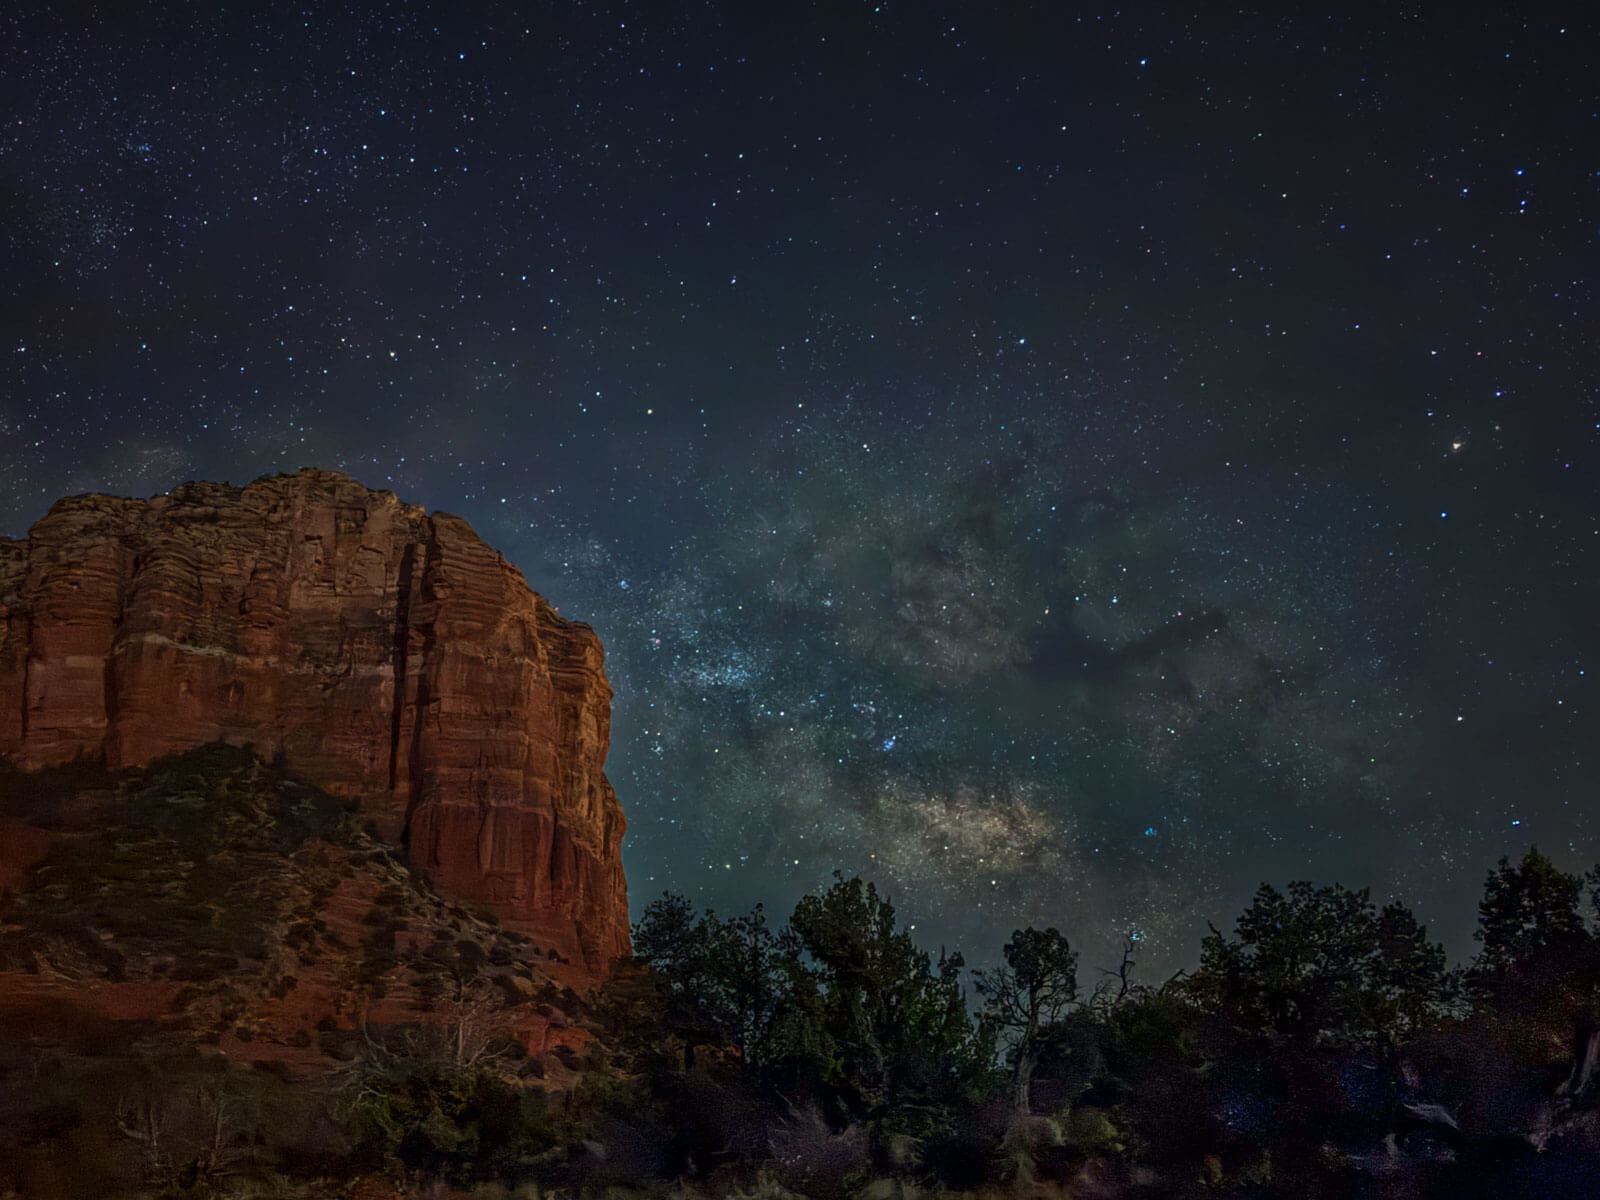 Milky Way Galactic Center rising near Courthouse Butte in Sedona, AZ captured with an iPhone 15 Pro.
5. Composition Tips for Stunning Star Photos
How can you compose your star photos to make them visually appealing? Composition plays a crucial role in creating captivating star photos. Here are some tips to help you compose your shots effectively:
5.1. Rule of Thirds: Create Balance
The rule of thirds is a fundamental composition guideline:
- Divide the Frame: Imagine dividing your frame into nine equal parts using two horizontal and two vertical lines.
- Place Key Elements: Position key elements of your scene along these lines or at the points where they intersect.
- Create Balance: This technique creates a balanced and visually appealing composition.
5.2. Foreground Elements: Add Depth
Including foreground elements adds depth and context to your star photos:
- Trees: Silhouetted trees can create a dramatic effect.
- Mountains: Mountains add a sense of scale and grandeur.
- Buildings: Old buildings or ruins can add a sense of history and mystery.
Ensure the foreground elements complement the night sky and don’t distract from it.
5.3. Leading Lines: Guide the Eye
Leading lines draw the viewer’s eye into the scene:
- Roads: Roads can lead the eye towards the stars.
- Rivers: Rivers create a sense of movement and direction.
- Fences: Fences can add a sense of structure and perspective.
Use leading lines to guide the viewer’s eye towards the most important parts of your photo.
5.4. Symmetry: Create Harmony
Symmetry can create a sense of balance and harmony in your photos:
- Reflections: Capture reflections of the night sky in lakes or rivers.
- Repeating Patterns: Look for repeating patterns in nature or architecture.
- Central Composition: Place the main subject in the center of the frame to create a symmetrical composition.
5.5. Negative Space: Emphasize the Stars
Negative space refers to the empty areas around your subject. Use negative space to emphasize the stars and create a sense of depth:
- Minimalist Composition: Keep the foreground simple and uncluttered.
- Open Sky: Allow plenty of open sky in your composition.
- Isolate the Subject: Isolate the stars against a dark background to make them stand out.
6. Post-Processing Techniques for iPhone Star Photos
How can you enhance your star photos using post-processing techniques? Post-processing is an essential step in astrophotography. Here are some techniques to help you enhance your iPhone star photos:
6.1. Best Apps for Editing Star Photos
Several apps offer powerful editing tools for astrophotography:
- Adobe Lightroom Mobile: Offers a wide range of editing tools, including exposure, contrast, highlights, shadows, and color adjustments.
- Snapseed: A free app with a variety of filters and editing tools, including curves, selective adjustments, and healing.
- Darkroom: A powerful photo editor with a user-friendly interface and advanced features like RAW editing and color grading.
- Photoshop Express: A streamlined version of Photoshop with essential editing tools.
6.2. Basic Adjustments: Exposure, Contrast, and White Balance
Start with basic adjustments to improve the overall look of your photo:
- Exposure: Adjust the exposure to brighten or darken the image.
- Contrast: Increase the contrast to make the stars stand out against the dark sky.
- White Balance: Adjust the white balance to correct any color casts.
6.3. Noise Reduction: Clean Up Your Images
Noise reduction is essential for cleaning up star photos:
- Reduce Noise: Use the noise reduction tool in your editing app to smooth out the image.
- Sharpening: Apply a small amount of sharpening to bring out details.
- Balance: Be careful not to overdo noise reduction, as it can make the image look soft.
6.4. Color Grading: Enhance the Colors
Color grading can enhance the colors in your star photos:
- Vibrance and Saturation: Adjust the vibrance and saturation to make the colors more vivid.
- Color Balance: Use the color balance tool to fine-tune the colors in the highlights, midtones, and shadows.
- Color Grading: Experiment with different color grading presets to create a unique look.
6.5. Removing Light Pollution: Clean Up the Sky
Light pollution can be a major problem in astrophotography. Here’s how to remove it:
- Gradient Filters: Use gradient filters to selectively adjust the exposure and color of the sky.
- Color Adjustments: Adjust the colors to neutralize the light pollution.
- Healing Tool: Use the healing tool to remove any remaining light pollution artifacts.
7. Advanced Techniques for iPhone 15 Astrophotography
Ready to take your iPhone 15 astrophotography to the next level? Here are some advanced techniques to try:
7.1. Long Exposure Photography: Capturing Light Trails
Long exposure photography involves using a long shutter speed to capture motion blur. This technique can be used to capture light trails from cars, stars, or other moving objects:
- Tripod: Use a tripod to keep your iPhone steady during the long exposure.
- Remote Shutter: Use a remote shutter to avoid camera shake.
- Exposure Time: Experiment with different exposure times to achieve the desired effect.
According to research from the Santa Fe University of Art and Design’s Photography Department, in July 2025, P provides Y, the ideal exposure time depends on the speed of the moving object and the desired amount of motion blur.
7.2. Stacking Images: Reducing Noise and Enhancing Details
Stacking images involves combining multiple photos of the same scene to reduce noise and enhance details:
- Capture Multiple Photos: Take multiple photos of the same scene with the same settings.
- Stacking Software: Use stacking software like Starry Landscape Stacker or Sequator to combine the photos.
- Reduce Noise: Stacking images reduces noise by averaging out the random noise in each photo.
- Enhance Details: Stacking images enhances details by combining the sharpest parts of each photo.
7.3. Creating Star Trails: Capturing the Earth’s Rotation
Creating star trails involves capturing the movement of the stars over a long period of time:
- Long Exposure: Use a long exposure time (e.g., 30 minutes or more) to capture the movement of the stars.
- Intervalometer: Use an intervalometer to take a series of photos over a long period of time.
- Stacking Software: Use stacking software to combine the photos into a single image with star trails.
According to Popular Photography magazine, capturing star trails requires patience and a lot of time.
7.4. Time-Lapse Photography: Capturing Motion Over Time
Time-lapse photography involves capturing a series of photos over a long period of time and then combining them into a video:
- Intervalometer: Use an intervalometer to take a series of photos at regular intervals.
- Video Editing Software: Use video editing software to combine the photos into a video.
- Motion: Time-lapse photography can be used to capture the movement of clouds, stars, or other objects over time.
8. Overcoming Common Challenges in iPhone Star Photography
What are some common challenges you might face when taking star photos with your iPhone 15, and how can you overcome them? Here are some common challenges and solutions:
8.1. Light Pollution: Finding Dark Skies
Light pollution is a major obstacle in astrophotography. Here’s how to minimize its impact:
- Dark Sky Map: Use a dark sky map to find locations with minimal light pollution.
- Travel: Be prepared to travel to remote areas away from city lights.
- Timing: Shoot during the new moon when the sky is darkest.
- Filters: Use light pollution filters to reduce the amount of artificial light entering the camera.
According to the International Dark-Sky Association, light pollution is a growing problem that affects not only astrophotography but also wildlife and human health.
8.2. Battery Drain: Staying Powered Up
Night photography can drain your iPhone’s battery quickly. Here’s how to stay powered up:
- Power Bank: Bring a power bank to recharge your iPhone on the go.
- Low Power Mode: Enable low power mode to conserve battery life.
- Minimize Usage: Avoid using other apps while shooting.
- External Battery Case: Use an external battery case for extended shooting sessions.
8.3. Condensation: Keeping Your Lens Clear
Condensation can form on your iPhone’s lens in cold or humid conditions. Here’s how to prevent it:
- Lens Cloth: Carry a lens cloth to wipe off condensation.
- Warm Environment: Keep your iPhone in a warm environment before shooting.
- Desiccant Packs: Use desiccant packs to absorb moisture.
8.4. Camera Shake: Achieving Stability
Camera shake can ruin long exposure photos. Here’s how to minimize it:
- Tripod: Use a sturdy tripod to keep your iPhone stable.
- Remote Shutter: Use a remote shutter to avoid touching the screen.
- Timer: Use the timer to give the camera time to stabilize after you press the shutter button.
8.5. Focusing Issues: Achieving Sharpness
Achieving sharp focus can be challenging in low-light conditions. Here’s how to overcome focusing issues:
- Manual Focus: Use manual focus to fine-tune the focus.
- Focus Peaking: Use focus peaking to highlight the areas of the image that are in focus.
- Zoom In: Zoom in on the stars to check the focus.
9. Inspiring Locations for iPhone 15 Star Photography in the USA
Where are the best places in the USA to capture stunning star photos with your iPhone 15? Here are some inspiring locations:
- Sedona, Arizona: Known for its red rock formations and dark skies, Sedona offers stunning landscapes for astrophotography.
- Death Valley National Park, California: One of the darkest places in the USA, Death Valley provides unparalleled views of the night sky.
- Big Bend National Park, Texas: Located in the remote southwest of Texas, Big Bend offers pristine dark skies and unique desert landscapes.
- Cherry Springs State Park, Pennsylvania: Designated as a Gold Level International Dark Sky Park, Cherry Springs offers exceptional stargazing opportunities.
- Arches National Park, Utah: With its iconic sandstone arches and dark skies, Arches National Park is a photographer’s paradise.
Address: 1600 St Michael’s Dr, Santa Fe, NM 87505, United States. Phone: +1 (505) 471-6001. Website: dfphoto.net.
10. Sharing Your Star Photos: Building an Audience
How can you share your star photos and build an audience? Here are some tips:
10.1. Social Media Platforms: Instagram, Facebook, and More
Share your star photos on social media platforms:
- Instagram: Use relevant hashtags like #astrophotography, #nightphotography, #starphotography, and #iphonephotography.
- Facebook: Join photography groups and share your photos with the community.
- Flickr: A great platform for sharing high-quality photos.
10.2. Online Communities: Connecting with Other Photographers
Engage with online photography communities:
- Reddit: Join subreddits like r/astrophotography and r/photography.
- Forums: Participate in online photography forums.
- dfphoto.net: Share your photos on dfphoto.net to get feedback and connect with other photographers.
10.3. Photography Contests: Getting Recognition
Enter photography contests to get recognition for your work:
- Local Contests: Look for local photography contests in your area.
- Online Contests: Enter online photography contests.
- Awards: Winning a photography contest can boost your credibility and visibility.
10.4. Building a Portfolio: Showcasing Your Best Work
Create a portfolio to showcase your best star photos:
- Website: Create a website to display your portfolio.
- Online Platforms: Use online platforms like Behance and 500px.
- Consistency: Keep your portfolio up-to-date with your latest work.
FAQ: iPhone 15 Star Photography
- Is the iPhone 15 good for astrophotography?
Yes, the iPhone 15 has impressive camera capabilities and Night Mode, making it suitable for capturing stunning star photos. - What settings should I use for star photography on my iPhone 15?
Enable Night Mode, shoot in ProRAW, use a low ISO (e.g., ISO 3200 or lower), set manual focus to infinity, and turn off the flash. - Do I need a tripod for iPhone star photography?
Yes, a tripod is essential for keeping your iPhone stable during long exposure shots. - What is the best app for editing star photos on my iPhone?
Adobe Lightroom Mobile, Snapseed, and Darkroom are excellent apps for editing star photos. - How can I minimize light pollution when taking star photos?
Find a dark location away from city lights, shoot during the new moon, and use light pollution filters. - How can I prevent camera shake when taking star photos?
Use a tripod, a remote shutter, or the timer to avoid camera shake. - What are some inspiring locations for iPhone star photography in the USA?
Sedona, Arizona; Death Valley National Park, California; and Big Bend National Park, Texas are great locations for astrophotography. - How can I create star trails with my iPhone 15?
Use a long exposure time, an intervalometer, and stacking software to combine multiple photos into a single image with star trails. - Can I use external lenses with my iPhone 15 for star photography?
Yes, external lenses can enhance your iPhone 15’s capabilities, allowing for wider or more zoomed-in views. - What is image stacking, and how does it help in astrophotography?
Image stacking involves combining multiple photos of the same scene to reduce noise and enhance details.
Ready to start capturing stunning star photos with your iPhone 15? Visit dfphoto.net for more tutorials, gear reviews, and inspiration. Join our community of passionate photographers and share your amazing night sky shots. Let’s explore the universe together, one photo at a time.