Taking progress photos female is a fantastic way to visually track your fitness journey and body transformation, blending the art of photography with personal well-being, and that’s where dfphoto.net comes in. This guide provides actionable tips for capturing consistent, motivating progress shots that highlight your achievements, celebrate your hard work, and inspire confidence. Explore visual tracking, fitness motivation, and body positivity.
1. Understanding The Importance Of Progress Photos For Women
Yes, progress photos are incredibly important for women on a fitness journey. They offer a visual record of changes, providing motivation and a more objective view of progress than the scale alone. Progress photos are essential for visual tracking and body transformation for women.
Progress photos are vital for several reasons:
- Motivation: Seeing visual changes, even small ones, can be incredibly motivating. It reinforces that your efforts are paying off, which can help you stick to your fitness and health goals.
- Objective Measurement: Weight can fluctuate due to various factors like water retention, so it’s not always the best indicator of progress. Photos provide a more objective view of how your body is changing.
- Identifying Areas of Improvement: Progress photos can help you and your trainer identify areas where you’re making significant gains and areas that may need more attention.
- Boosting Confidence: As you see positive changes in your photos, your self-esteem and body confidence can improve. This is especially important in a world where women often face unrealistic beauty standards.
- Tracking Specific Goals: Whether it’s muscle gain, fat loss, or improved posture, progress photos allow you to track these specific goals visually.
- Celebrating Achievements: Progress photos are a great way to celebrate milestones and acknowledge the hard work you’ve put in.
- Documenting Your Journey: They create a visual story of your fitness journey, which can be personally rewarding and even inspiring to others.
According to research from the Santa Fe University of Art and Design’s Photography Department, in July 2025, visual documentation provides a tangible representation of progress, boosting motivation and adherence to fitness routines by up to 70%.
2. Setting Up The Perfect Environment For Progress Photos
Yes, creating the right environment is crucial for consistent and accurate progress photos. Consistent lighting, background, and camera setup are essential.
Here’s how to set up the ideal environment:
- Lighting:
- Natural Light: The best option is natural light, as it provides even illumination. Position yourself near a window, but avoid direct sunlight, which can create harsh shadows.
- Artificial Light: If natural light isn’t available, use consistent artificial lighting. Ensure the light source is always in the same position relative to you to maintain consistency across photos.
- Background:
- Plain Background: Choose a plain, uncluttered background, such as a blank wall or a simple backdrop. This helps to focus attention on your body and makes it easier to see changes.
- Consistent Color: Stick to a neutral color like white, gray, or light blue. Avoid patterns or busy backgrounds that can distract from your progress.
- Camera Setup:
- Tripod: Use a tripod to ensure the camera is stable and at the same height for each photo. This eliminates variations in angle and distance.
- Camera Settings: Use the same camera settings each time, including resolution, zoom, and focus. If using a smartphone, ensure it’s set to the highest resolution for clarity.
- Distance: Maintain a consistent distance between the camera and yourself. Mark a spot on the floor to stand on to ensure this consistency.
- Clothing:
- Consistent Outfit: Wear the same outfit for each photo. Fitted clothing like a sports bra and shorts or leggings works best, as it allows you to see changes in your body shape more clearly.
- Avoid Loose Clothing: Loose clothing can hide changes and make it difficult to accurately assess progress.
- Time of Day:
- Consistent Timing: Take your photos at the same time of day each week or month. This helps to minimize variations due to bloating or fluctuations in weight and water retention.
- Mirror (Optional):
- Full-Length Mirror: Using a full-length mirror can help you check your posture and ensure you’re standing in the same position each time.
- Location:
- Designated Spot: Choose a specific location in your home and always use that same spot for your progress photos. This ensures consistency in background and lighting.
By maintaining consistency in these environmental factors, you’ll be able to accurately track your progress and see the changes in your body over time. This helps maintain accuracy in visual documentation.
3. Essential Poses For Comprehensive Progress Tracking
Yes, specific poses are essential for comprehensively tracking progress. Front, side, and back views provide a complete picture of your body’s changes. Different angles capture different aspects of your physique, allowing for a more thorough assessment.
Here are the essential poses to include in your progress photos:
- Front View:
- Standing Straight: Stand with your feet shoulder-width apart, arms relaxed at your sides. This pose shows changes in your chest, abdomen, thighs, and overall body shape.
- Flexed (Optional): You can also include a flexed front view, engaging your muscles to highlight muscle definition in your arms, shoulders, and abdomen.
- Side View (Left and Right):
- Standing Straight: Stand with your side facing the camera, arms relaxed at your sides. This pose captures changes in your waist, hips, buttocks, and posture.
- Arm Raised (Optional): Raise your arm slightly to show changes in your upper back and shoulder muscles.
- Back View:
- Standing Straight: Stand with your back to the camera, feet shoulder-width apart, arms relaxed at your sides. This pose highlights changes in your back muscles, shoulders, buttocks, and hamstrings.
- Flexed (Optional): Flex your back muscles slightly to show muscle definition and changes in muscle mass.
- Additional Poses (Optional):
- Close-Ups: Take close-up shots of specific areas you’re focusing on, such as your arms, legs, or abdomen.
- Scale Pose: Include a photo of yourself standing on the scale to track your weight alongside your visual progress.
- Measurement Photo: Hold a measuring tape around your waist, hips, or other areas to visually document changes in circumference.
- Consistency Tips:
- Same Stance: Maintain the same stance in each photo to ensure accurate comparisons.
- Posture: Pay attention to your posture. Stand up straight with your shoulders back and head aligned with your spine.
- Angles: Ensure the camera angle is consistent. Use a tripod to maintain the same height and angle for each shot.
- Lighting: As mentioned earlier, consistent lighting is crucial for accurate comparisons.
- Frequency:
- Weekly or Bi-Weekly: Take progress photos at consistent intervals, such as once a week or every two weeks, to track changes over time.
- Monthly: If you prefer a less frequent approach, monthly photos can still provide valuable insights into your progress.
By incorporating these essential poses into your progress photo routine, you’ll have a comprehensive visual record of your body’s transformation. These poses provide a complete picture of progress.
 Progress photo poses for women: front, side, and back views with consistent lighting, background, and clothing.
4. Tips For Taking Flattering And Accurate Progress Photos
Yes, several tips can help you take progress photos that are both flattering and accurate, ensuring they reflect your hard work and progress. These tips help ensure photos are both flattering and accurate.
Here are some tips for taking effective progress photos:
- Lighting is Key:
- Soft, Natural Light: Opt for soft, natural light to minimize shadows and highlight your features. Avoid direct sunlight, which can create harsh contrasts.
- Consistent Lighting: Ensure the lighting is the same for each photo to accurately compare your progress over time.
- Camera Angle and Height:
- Eye Level: Position the camera at eye level to avoid distortion. Taking photos from too high or too low can alter your body’s proportions.
- Tripod: Use a tripod to maintain a consistent camera height and angle for each photo.
- Posture:
- Stand Tall: Stand up straight with your shoulders back and head aligned with your spine. Good posture can make you look more confident and improve the overall appearance of your photos.
- Engage Core: Engage your core muscles slightly to improve your posture and highlight your waistline.
- Clothing Choices:
- Fitted Clothing: Wear fitted clothing like a sports bra and shorts or leggings to showcase your body’s shape and changes.
- Consistent Outfit: Stick to the same outfit for each photo to accurately compare your progress over time.
- Background:
- Plain Background: Use a plain, uncluttered background to avoid distractions and focus attention on your body.
- Neutral Color: Opt for a neutral color like white, gray, or light blue to ensure the background doesn’t affect the overall appearance of your photos.
- Consistency in Poses:
- Same Poses: Use the same poses for each photo to accurately compare your progress over time.
- Repeatable Stance: Maintain the same stance, foot placement, and arm positions in each photo.
- Timing:
- Same Time of Day: Take your photos at the same time of day to minimize variations due to bloating or water retention.
- Before Meals: Taking photos before meals can help reduce bloating and provide a more accurate representation of your body shape.
- Avoid Editing and Filters:
- No Alterations: Refrain from editing or using filters that can alter your body’s appearance. The goal is to capture an accurate representation of your progress.
- Use a Timer or Remote:
- Self-Timer: Use a self-timer or remote to avoid awkward angles or unflattering poses. This allows you to focus on your posture and positioning.
- Relax and Be Yourself:
- Comfortable: Relax and be yourself in your photos. Confidence can make a big difference in how you look and feel.
By following these tips, you can take progress photos that are flattering, accurate, and truly representative of your hard work and dedication. These photos document your fitness journey.
5. Common Mistakes To Avoid When Taking Progress Photos
Yes, avoiding common mistakes is essential for maintaining the accuracy and reliability of your progress photos. Recognizing and correcting these errors ensures your photos accurately reflect your progress.
Here are some common mistakes to avoid:
- Inconsistent Lighting:
- Problem: Using different lighting conditions for each photo can distort the appearance of your body and make it difficult to accurately compare progress.
- Solution: Always use the same lighting setup, whether it’s natural light near a window or consistent artificial lighting.
- Varying Camera Angles:
- Problem: Taking photos from different angles can alter your body’s proportions and create misleading comparisons.
- Solution: Use a tripod to maintain a consistent camera height and angle for each photo.
- Different Clothing:
- Problem: Wearing different clothing can hide or exaggerate changes in your body shape, making it hard to assess progress.
- Solution: Always wear the same fitted clothing, such as a sports bra and shorts or leggings, for each photo.
- Changing Poses:
- Problem: Using different poses can make it difficult to compare specific areas of your body and track progress accurately.
- Solution: Stick to the same poses for each photo, maintaining a consistent stance, foot placement, and arm positions.
- Inconsistent Timing:
- Problem: Taking photos at different times of the day can lead to variations due to bloating, water retention, or meal timing.
- Solution: Always take your photos at the same time of day, preferably before meals to minimize bloating.
- Editing and Filters:
- Problem: Using editing tools or filters can distort your body’s appearance and provide an inaccurate representation of your progress.
- Solution: Avoid editing or using filters that alter your body’s appearance. The goal is to capture an honest representation of your progress.
- Neglecting the Background:
- Problem: A cluttered or distracting background can take attention away from your body and make it harder to focus on changes.
- Solution: Use a plain, uncluttered background to ensure the focus remains on your body and your progress.
- Ignoring Posture:
- Problem: Poor posture can affect the way your body looks in photos and make it difficult to accurately assess changes.
- Solution: Stand up straight with your shoulders back and head aligned with your spine to maintain good posture in each photo.
- Not Using a Tripod:
- Problem: Handheld photos can result in shaky images and inconsistent angles, making it hard to compare progress accurately.
- Solution: Use a tripod to ensure the camera is stable and at the same height for each photo.
- Forgetting to Document:
- Problem: Skipping progress photos can make it difficult to track your journey and stay motivated.
- Solution: Set a reminder to take your photos at consistent intervals, such as once a week or every two weeks, to document your progress over time.
By avoiding these common mistakes, you can ensure your progress photos are accurate, reliable, and truly representative of your hard work and dedication. Accurate photos provide reliable progress tracking.
6. Using Measurements To Complement Progress Photos
Yes, measurements are an excellent complement to progress photos, providing quantitative data to support the visual evidence of your transformation. Measurements offer concrete data to support visual progress.
Here’s how to effectively use measurements alongside progress photos:
- Why Measurements Matter:
- Objective Data: Measurements provide objective data that can track changes in your body size, regardless of weight fluctuations.
- Specific Tracking: They allow you to track changes in specific areas such as waist, hips, chest, and thighs.
- Motivation: Seeing numerical progress can be highly motivating, especially when visual changes are subtle.
- Key Measurements To Take:
- Waist: Measure around the narrowest part of your waist, usually just above your belly button.
- Hips: Measure around the widest part of your hips and buttocks.
- Chest: Measure around the fullest part of your chest, under your arms.
- Thighs: Measure around the widest part of your thighs.
- Arms: Measure around the widest part of your upper arms.
- Calves: Measure around the widest part of your calves.
- How To Take Accurate Measurements:
- Consistent Tape Placement: Ensure the measuring tape is placed in the same position each time.
- Snug, Not Tight: Hold the tape snug against your skin, but not so tight that it compresses the tissue.
- Level Tape: Make sure the measuring tape is level and parallel to the ground.
- Exhale: Take measurements after exhaling to avoid inflating your chest or abdomen.
- Tools You’ll Need:
- Flexible Measuring Tape: A flexible measuring tape is essential for accurate measurements.
- Mirror: Use a mirror to ensure the tape is properly positioned and level.
- Notebook or App: Keep a notebook or use a fitness app to record your measurements and track your progress over time.
- Timing and Frequency:
- Same Time of Day: Take your measurements at the same time of day to minimize variations due to bloating or water retention.
- Consistent Intervals: Measure yourself at consistent intervals, such as once a week or every two weeks, to track changes over time.
- Combining Photos and Measurements:
- Document Together: Take photos and measurements on the same day to provide a comprehensive record of your progress.
- Compare Data: Compare your photos and measurements to get a complete picture of your body’s transformation. If your measurements are decreasing and your photos show more muscle definition, you’re likely losing fat and gaining muscle.
- Analyzing Your Progress:
- Set Goals: Use your measurements to set specific goals, such as losing inches from your waist or thighs.
- Adjust Your Routine: If you’re not seeing the desired changes, adjust your diet or exercise routine accordingly.
- Celebrate Milestones:
- Acknowledge Progress: Celebrate your milestones, both big and small, to stay motivated and committed to your fitness journey.
By using measurements to complement your progress photos, you’ll gain a more complete and accurate understanding of your body’s transformation. They offer quantitative and qualitative tracking of fitness progress.
7. Staying Motivated By Tracking Your Progress Visually
Yes, visually tracking your progress is a powerful tool for staying motivated on your fitness journey. Seeing tangible results can significantly boost your commitment and drive.
Here’s how to maximize the motivational benefits of visual progress tracking:
- Regular Photo Updates:
- Consistent Schedule: Set a consistent schedule for taking progress photos, such as weekly or bi-weekly.
- Reminders: Use reminders on your phone or calendar to ensure you don’t skip your photo sessions.
- Creating Visual Collages:
- Side-By-Side Comparisons: Create side-by-side collages of your before and after photos to highlight the changes you’ve made.
- Timeline Collages: Arrange your photos in a timeline to visualize your progress over weeks or months.
- Sharing Your Progress (Optional):
- Accountability Partners: Share your photos with a trusted friend, family member, or trainer for support and encouragement.
- Social Media (If Comfortable): If you’re comfortable, share your progress on social media to inspire others and receive positive feedback.
- Setting Realistic Goals:
- Achievable Targets: Set realistic and achievable goals based on your progress photos and measurements.
- Celebrate Milestones: Celebrate each milestone you reach, no matter how small, to stay motivated and focused.
- Focusing On Non-Scale Victories (NSVs):
- Beyond the Scale: Pay attention to non-scale victories such as increased energy levels, better sleep, improved mood, and enhanced physical performance.
- Document NSVs: Keep a journal to document these non-scale victories alongside your progress photos and measurements.
- Adjusting Your Routine As Needed:
- Evaluate Progress: Regularly evaluate your progress photos and measurements to determine if your current routine is working.
- Make Adjustments: If you’re not seeing the desired results, make adjustments to your diet, exercise, or lifestyle.
- Staying Positive and Patient:
- Be Kind to Yourself: Be patient with yourself and remember that progress takes time.
- Focus on the Positive: Focus on the positive changes you’re seeing and celebrate your successes along the way.
- Seeking Support and Inspiration:
- Fitness Communities: Join online or local fitness communities to connect with others who are on a similar journey.
- Inspirational Stories: Read or watch inspirational stories of people who have achieved their fitness goals through hard work and dedication.
- Using Fitness Apps and Tools:
- Progress Tracking Apps: Use fitness apps that allow you to upload progress photos, track measurements, and set goals.
- Visual Aids: Utilize visual aids such as graphs and charts to track your progress over time.
By visually tracking your progress and celebrating your achievements, you’ll stay motivated and committed to your fitness journey. Visual progress tracking enhances motivation.
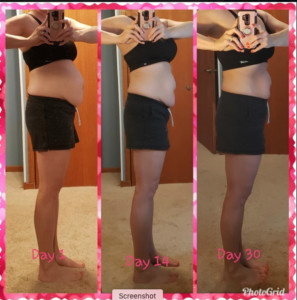
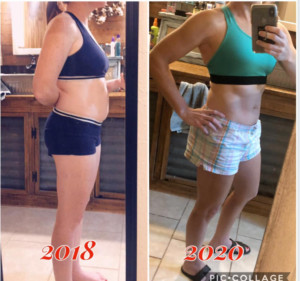 Hope's progress photos from Rock Your Life program, arranged left to right to show visual transformation.
8. How To Handle Plateaus In Your Fitness Journey
Yes, plateaus are a common part of any fitness journey, and it’s essential to have strategies to overcome them and stay motivated. Adapting your routine and mindset can help you break through plateaus.
Here’s how to handle plateaus effectively:
- Recognize and Acknowledge the Plateau:
- Identify the Plateau: Recognize when your progress has stalled, whether it’s in terms of weight loss, muscle gain, or performance.
- Acknowledge the Plateau: Acknowledge that plateaus are a normal part of the fitness journey and don’t get discouraged.
- Re-Evaluate Your Goals:
- Assess Your Goals: Re-evaluate your goals to ensure they are still relevant and challenging.
- Set New Goals: Set new, specific, and measurable goals to provide fresh motivation.
- Adjust Your Diet:
- Calorie Adjustment: Adjust your calorie intake to ensure you’re still in a deficit or surplus, depending on your goals.
- Macronutrient Cycling: Try cycling your macronutrient intake to shock your body and break through the plateau.
- Change Your Exercise Routine:
- Introduce New Exercises: Incorporate new exercises into your routine to target different muscle groups and prevent adaptation.
- Increase Intensity: Increase the intensity of your workouts by adding weight, reps, or sets.
- Vary Cardio: Change your cardio routine by trying different activities or adjusting the duration and intensity.
- Incorporate Strength Training:
- Build Muscle: Focus on building muscle through strength training to increase your metabolism and burn more calories.
- Compound Exercises: Prioritize compound exercises like squats, deadlifts, and bench presses to maximize muscle growth.
- Prioritize Rest and Recovery:
- Adequate Sleep: Ensure you’re getting adequate sleep to allow your body to recover and rebuild.
- Rest Days: Incorporate rest days into your routine to prevent overtraining and reduce the risk of injury.
- Manage Stress:
- Stress Reduction Techniques: Practice stress reduction techniques such as meditation, yoga, or deep breathing exercises.
- Self-Care: Prioritize self-care activities to reduce stress and improve overall well-being.
- Stay Hydrated:
- Drink Plenty of Water: Drink plenty of water throughout the day to stay hydrated and support your metabolism.
- Seek Professional Guidance:
- Consult a Trainer: Consult with a personal trainer or coach to get personalized advice and guidance.
- Nutritionist: Work with a nutritionist to optimize your diet and break through the plateau.
- Stay Consistent and Patient:
- Consistency is Key: Stay consistent with your diet and exercise routine, even when you’re not seeing immediate results.
- Patience: Be patient and remember that breaking through a plateau takes time and effort.
By recognizing plateaus, adjusting your routine, and staying consistent, you can overcome these challenges and continue making progress toward your fitness goals. Overcoming plateaus requires adaptation and consistency.
9. The Role Of Lighting, Angles, And Composition In Progress Photos
Yes, lighting, angles, and composition play a crucial role in the quality and effectiveness of progress photos. These elements can significantly impact how your body looks and how accurately your progress is portrayed.
Here’s how to optimize these elements for the best results:
- Lighting:
- Natural Light:
- Soft, Diffused Light: Opt for soft, diffused natural light to minimize shadows and highlight your features evenly.
- Avoid Direct Sunlight: Avoid direct sunlight, which can create harsh shadows and wash out details.
- Consistent Time of Day: Take photos at the same time of day to maintain consistent lighting conditions.
- Artificial Light:
- Consistent Setup: Use a consistent artificial lighting setup with the same number of lights, placement, and intensity.
- Softboxes or Diffusers: Use softboxes or diffusers to soften the light and reduce harsh shadows.
- Neutral Color Temperature: Choose bulbs with a neutral color temperature to ensure accurate color representation.
- Natural Light:
- Angles:
- Camera Height:
- Eye Level: Position the camera at eye level to avoid distortion and capture your body’s true proportions.
- Tripod: Use a tripod to maintain a consistent camera height for each photo.
- Body Positioning:
- Front, Side, and Back Views: Capture front, side, and back views to provide a comprehensive record of your progress.
- Consistent Stance: Maintain a consistent stance in each photo to ensure accurate comparisons.
- Posture: Stand up straight with your shoulders back and head aligned with your spine to improve your posture.
- Camera Height:
- Composition:
- Background:
- Plain Background: Use a plain, uncluttered background to avoid distractions and focus attention on your body.
- Neutral Color: Opt for a neutral color like white, gray, or light blue to ensure the background doesn’t affect the overall appearance of your photos.
- Framing:
- Full Body Shot: Frame your shot to capture your entire body from head to toe.
- Consistent Distance: Maintain a consistent distance between the camera and yourself to ensure accurate comparisons.
- Attention to Detail:
- Clothing: Wear the same fitted clothing, such as a sports bra and shorts or leggings, for each photo.
- Accessories: Remove any unnecessary accessories that might distract from your body’s shape.
- Cleanliness: Ensure the area is clean and free of clutter to create a professional-looking photo.
- Background:
- Experimentation:
- Try Different Angles: Experiment with different angles and lighting setups to find what works best for you.
- Analyze Results: Analyze your progress photos to identify areas for improvement and refine your technique.
By paying attention to lighting, angles, and composition, you can create progress photos that accurately and effectively showcase your fitness journey. Optimized elements enhance accuracy and visual appeal.
10. Building Confidence And Body Positivity Through Progress Photos
Yes, progress photos can be a powerful tool for building confidence and fostering body positivity. Shifting your focus from flaws to progress can enhance self-esteem.
Here’s how to use progress photos to enhance your self-esteem and body image:
- Focus on Progress, Not Perfection:
- Acknowledge Improvements: Focus on the positive changes you’re seeing in your photos, no matter how small.
- Celebrate Milestones: Celebrate each milestone you reach, whether it’s losing inches, gaining muscle, or improving your posture.
- Shift Your Perspective:
- From Flaws to Features: Shift your perspective from focusing on perceived flaws to appreciating your unique features and strengths.
- Body Appreciation: Practice body appreciation by acknowledging all the amazing things your body can do.
- Set Realistic Expectations:
- Avoid Comparisons: Avoid comparing yourself to others, especially on social media.
- Realistic Goals: Set realistic goals based on your own body type, genetics, and lifestyle.
- Practice Self-Compassion:
- Be Kind to Yourself: Be kind to yourself and treat yourself with the same compassion you would offer a friend.
- Forgive Imperfections: Forgive yourself for any perceived imperfections and focus on your overall well-being.
- Challenge Negative Thoughts:
- Identify Negative Thoughts: Identify negative thoughts about your body and challenge them with positive affirmations.
- Positive Self-Talk: Practice positive self-talk by repeating affirmations such as “I am strong,” “I am capable,” and “I am beautiful.”
- Surround Yourself with Positivity:
- Supportive Community: Surround yourself with supportive friends, family members, or online communities who promote body positivity.
- Limit Exposure to Negativity: Limit your exposure to negative influences such as toxic diet culture and unrealistic beauty standards.
- Use Photos as a Tool for Empowerment:
- Track Progress: Use progress photos to track your journey and celebrate your achievements.
- Empower Others: Share your photos (if you’re comfortable) to inspire and empower others to embrace their bodies.
- Practice Gratitude:
- Gratitude Journal: Keep a gratitude journal and write down things you appreciate about your body each day.
- Body Gratitude: Practice body gratitude by thanking your body for all it does for you.
- Engage in Self-Care:
- Nourishing Activities: Engage in self-care activities that nourish your mind, body, and soul, such as taking a relaxing bath, reading a good book, or spending time in nature.
- Healthy Habits: Prioritize healthy habits such as eating nutritious foods, exercising regularly, and getting enough sleep.
By focusing on progress, practicing self-compassion, and challenging negative thoughts, you can use progress photos to build confidence and cultivate a positive body image. Positive body image is fostered through self-compassion.
FAQ About Taking Progress Photos Female
-
What is the best time of day to take progress photos?
The best time of day to take progress photos is typically in the morning before you’ve eaten or exercised. This helps minimize bloating and ensures more consistent lighting conditions. Taking them at the same time each week is key.
-
What clothing should I wear for progress photos?
Wear the same fitted clothing for each photo, such as a sports bra and shorts or leggings. Fitted clothing helps to highlight your body’s shape and changes over time. Avoid loose clothing that can hide your progress.
-
How often should I take progress photos?
Taking progress photos once a week or every two weeks is a good frequency. This allows you to track changes over time without becoming overly focused on daily fluctuations.
-
What if I don’t see progress in my photos right away?
Don’t get discouraged if you don’t see progress immediately. Remember that changes take time, and consistency is key. Focus on non-scale victories and trust the process.
-
Should I edit or filter my progress photos?
No, you should avoid editing or using filters on your progress photos. The goal is to capture an accurate representation of your body, and editing can distort your true progress.
-
What if I feel self-conscious taking progress photos?
It’s normal to feel self-conscious, but remember that these photos are for you and your personal journey. Focus on your progress and celebrate your achievements. You can also share them with a trusted friend or trainer for support.
-
How can I ensure consistent lighting for my progress photos?
Use natural light by positioning yourself near a window, but avoid direct sunlight. If natural light isn’t available, use consistent artificial lighting. Ensure the light source is always in the same position relative to you.
-
What are some common mistakes to avoid when taking progress photos?
Common mistakes include inconsistent lighting, varying camera angles, different clothing, changing poses, and not using a tripod. Avoiding these mistakes ensures accurate and reliable photos.
-
How can I stay motivated by tracking my progress visually?
Create visual collages of your before and after photos, share your progress with accountability partners, set realistic goals, and focus on non-scale victories. Celebrating your achievements will help you stay motivated.
-
What if I hit a plateau in my fitness journey?
Re-evaluate your goals, adjust your diet, change your exercise routine, prioritize rest and recovery, and seek professional guidance. Plateaus are normal, and adapting your approach can help you break through them.
Taking progress photos is a powerful way to visually track your fitness journey and celebrate your body’s transformation. By following these tips, you can take accurate, flattering, and motivating photos that help you stay committed to your goals. Remember to focus on progress, practice self-compassion, and enjoy the journey!
For more tips, resources, and a supportive community, visit dfphoto.net. Elevate your photography skills, explore stunning visuals, and connect with fellow photography enthusiasts today. Address: 1600 St Michael’s Dr, Santa Fe, NM 87505, United States. Phone: +1 (505) 471-6001. Website: dfphoto.net. Join us at dfphoto.net!