The iPhone has revolutionized photography, placing a powerful camera in almost everyone’s pocket. While the latest iPhones boast incredible camera technology, capturing truly professional-looking photos requires more than just pointing and shooting. Understanding key photography principles and utilizing your iPhone’s features effectively can elevate your mobile photography from snapshots to stunning, portfolio-worthy images.
This guide delves into essential techniques to help you master iPhone photography and achieve professional results, regardless of your experience level. We’ll explore practical tips, from composition rules to camera settings, empowering you to unlock the full potential of your iPhone camera.
1. Master the Rule of Thirds for Compelling Compositions
 A ladybug centered at the intersection of rule of thirds grid lines, demonstrating balanced composition.
The rule of thirds is a fundamental composition guideline that has been used by artists for centuries. Imagine dividing your iPhone screen into a 3×3 grid. The rule suggests that placing key elements of your photo along these grid lines, or at their intersections, creates more visually appealing and balanced images.
Instead of always centering your subject, try positioning it off-center, aligning it with one of the vertical or horizontal lines, or at the points where they cross. This technique creates visual interest, leads the viewer’s eye through the image, and makes your photos look more dynamic and professional.
To easily apply this rule, activate the grid overlay in your iPhone camera settings. Navigate to Settings, tap on Camera, and toggle the “Grid” switch to on. This will display the rule of thirds grid directly on your viewfinder, helping you compose your shots effectively.
2. Explore Unique Angles and Viewpoints for Original iPhone Photography
 A low-angle shot of a pig taken with iPhone 13, showcasing an unusual perspective.
Stepping away from eye-level photography can dramatically transform your iPhone photos and add a professional touch. Most casual photos are taken from a standing position, resulting in predictable perspectives. To make your images stand out, actively seek out unusual angles and viewpoints.
Experiment with shooting from high above, looking down on your subject to create a sense of scale or pattern. Conversely, get down low, close to the ground, to capture a worm’s-eye view and emphasize the subject’s size or create a more intimate perspective. These unexpected angles reveal details and symmetries often missed at eye level, injecting originality and artistic flair into your iPhone photography.
Changing your viewpoint can be as simple as crouching down, climbing to a higher vantage point, or simply tilting your phone. By consciously seeking different perspectives, you’ll discover fresh ways to frame familiar subjects and capture more captivating photos.
3. Create Depth and Dimension in Your iPhone Images
Creating a sense of depth is crucial for transforming flat, ordinary iPhone photos into visually engaging, professional-looking images. Depth adds dimension and draws the viewer into the scene, making the photo feel more immersive and realistic.
One effective technique is to utilize foreground and background elements. Position your main subject with interesting elements in the foreground and a blurred background (or vice versa). This separation creates layers and visual depth, guiding the eye through the image.
Your iPhone automatically focuses on what it perceives as the main subject. However, you can manually control focus by tapping on the screen. To lock focus and exposure, tap and hold on your desired focus point until “AE/AF LOCK” appears. This allows you to recompose your shot while maintaining the locked focus and exposure settings.
Leading lines are another powerful tool for creating depth. Lines like roads, fences, or rivers can draw the viewer’s eye into the photo and create a sense of perspective and distance, adding a professional, structured feel to your compositions.
4. Harness Natural Light and Avoid Harsh Flash for Flattering iPhone Photos
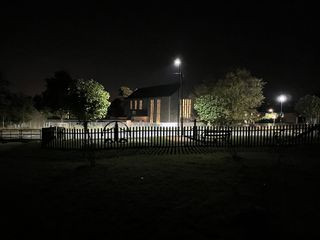 A nighttime photo captured on iPhone 13 without flash, demonstrating low-light capabilities.
Light is the essence of photography, and understanding how to use it effectively is key to taking professional iPhone photos. The built-in flash on your iPhone often produces harsh, unflattering light that can wash out colors and create unwanted shadows.
Whenever possible, prioritize natural light. Soft, diffused light, such as daylight on an overcast day or light filtering through a window, is much more flattering and creates a more natural and professional look. Golden hour – the period shortly after sunrise and before sunset – offers warm, soft light that is ideal for photography.
In low-light situations, instead of resorting to flash, explore available ambient light sources. Streetlights, lamps, or even candlelight can provide enough illumination while maintaining a more natural atmosphere. Modern iPhones are equipped with impressive low-light capabilities, often eliminating the need for flash altogether. Experiment with Night mode for improved low-light performance, but be mindful that excessive use can sometimes lead to unnatural-looking brightness.
5. Eliminate Blur and Achieve Sharpness in Your iPhone Photography
Camera shake is a common culprit for blurry photos, especially when shooting with a lightweight iPhone. Even slight movements can introduce blur, particularly in low light or when using slower shutter speeds. Achieving sharp, professional photos requires minimizing camera shake.
Utilize your iPhone’s timer function, not just for selfies, but for any shot where stability is paramount. Set the timer, place your iPhone on a stable surface or use a tripod, and let the timer count down. This eliminates the need to physically press the shutter button, preventing camera shake.
For handheld shooting, especially in well-lit conditions, hold your iPhone firmly with both hands, tucking your elbows in for added stability. Using the volume buttons as a shutter release can also offer more stability than tapping the on-screen button.
For video recording or when shooting in challenging conditions, consider using an iPhone gimbal. Gimbals provide motorized stabilization, ensuring smooth, professional-looking footage and sharp photos even when you’re moving.
6. Take Control with Manual Exposure Adjustment on Your iPhone
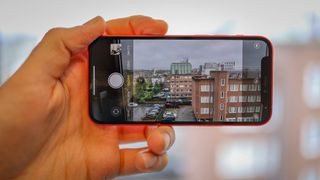 A person testing the camera of iPhone 12 mini, highlighting manual control in iPhone photography.
While iPhone’s automatic settings are convenient, they don’t always deliver the desired professional results. Automatic exposure can sometimes overexpose highlights or underexpose shadows, losing detail in crucial areas of your image. Taking manual control of exposure allows for greater creative control and refined results.
You don’t need to switch to a dedicated “manual mode” to adjust exposure on your iPhone. Simply tap on the area of the screen you want to be properly exposed. A small sun icon will appear next to the focus box. Swipe up on the sun icon to increase exposure (brighten the image) or swipe down to decrease exposure (darken the image).
Learning to manually adjust exposure helps you prevent blown-out highlights in bright scenes or overly dark shadows in dimly lit environments. It allows you to fine-tune your image’s brightness and achieve a more balanced and professional look, optimizing detail in both bright and dark areas.
7. Utilize Portrait Mode for Stunning iPhone Portraits with Depth of Field
 A photo of a park bench with a landscape background taken with iPhone 13 demonstrating HDR.
For capturing professional-looking portraits with your iPhone, Portrait mode is an invaluable tool. It simulates the shallow depth of field achieved with professional cameras and lenses, blurring the background and making your subject stand out sharply.
Portrait mode creates a beautiful bokeh effect, drawing attention to your subject and adding a professional, artistic touch to your portraits. Simply select “Portrait” mode in your iPhone camera app, frame your subject, and let the iPhone’s sophisticated software work its magic.
The iPhone 15 and later models even feature automatic portrait mode detection, intelligently switching to portrait mode when it recognizes a person in the frame. Experiment with different Portrait mode settings, such as studio light, contour light, or natural light, to achieve various portrait styles.
8. Employ HDR for High-Contrast Scenes to Capture Detail in Both Highlights and Shadows
HDR (High Dynamic Range) is a powerful iPhone feature that excels in scenes with a wide range of light and shadow, often referred to as high-contrast scenes. Without HDR, these scenes can result in photos where either the bright areas are overexposed (blown out) or the dark areas are underexposed (lacking detail).
HDR mode on your iPhone captures multiple images at different exposures and intelligently merges them into a single photo. This process retains detail in both the brightest highlights and the darkest shadows, resulting in a more balanced and detailed image, closer to how your eyes perceive the scene.
While you can manually toggle HDR on or off, setting it to “Auto HDR” is generally recommended. Your iPhone will then automatically engage HDR when it detects a high-contrast scene, ensuring optimal image quality without you having to constantly adjust settings. Avoid using HDR in all situations, as it can sometimes flatten the dynamic range unnecessarily in scenes with even lighting.
9. Capture Action and Motion with Burst Mode on Your iPhone
For capturing fast-moving subjects or fleeting moments, Burst mode is your go-to iPhone photography feature. Burst mode rapidly captures a series of photos in quick succession, increasing your chances of capturing the perfect shot, especially when photographing action, sports, or unpredictable subjects.
To activate Burst mode, simply press and hold the shutter button (or the volume up button if enabled in settings). Your iPhone will continuously take photos as long as you hold the button down. A counter will display at the bottom of the screen indicating the number of photos taken in the burst.
After capturing a burst, you can review the series of images and select the best shots, deleting any unwanted frames. Burst mode is invaluable for capturing moments where timing is crucial and ensuring you don’t miss the decisive action.
10. Enhance Your iPhone Photos with Post-Processing and Editing
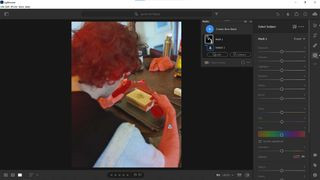 A screenshot of subject selection feature in Lightroom Mobile, demonstrating advanced photo editing capabilities.
Post-processing is an essential step in achieving professional-looking iPhone photos. While your iPhone camera captures excellent images, editing can further enhance them, correct minor imperfections, and refine your creative vision.
Numerous powerful and user-friendly photo editing apps are available for iPhone, ranging from free options like Snapseed to professional-grade software like Adobe Lightroom Mobile. These apps offer a wide array of editing tools, including adjustments for exposure, contrast, color, sharpness, and more.
Editing allows you to fine-tune your photos, bringing out details, enhancing colors, and achieving your desired aesthetic. Experiment with different editing techniques to develop your personal style and elevate your iPhone photography to a professional level. Consider exploring more advanced editing software as you become more serious about mobile photography to unlock even greater creative potential.
