Taking photos with your Macbook Pro is simple, and this guide from dfphoto.net will show you how, covering everything from the built-in Photo Booth app to screen capture techniques. This allows you to explore the capabilities of your device and discover the best methods for creating stunning visual content. Dive into the world of Macbook Pro photography and unlock the potential of digital imagery, visual storytelling, and capturing memories.
1. Understanding the Basics: Can You Take Good Photos With a Macbook Pro?
Yes, you can take photos with a Macbook Pro, although the quality may not match that of a dedicated camera or smartphone. The built-in webcam, known as the FaceTime HD camera, is primarily designed for video conferencing, but it can still be used for casual photography.
- FaceTime HD Camera Specs: Typically features a 720p or 1080p resolution, which is adequate for basic photos and videos.
- Image Quality Factors: Factors like lighting conditions, camera settings, and post-processing can significantly impact the final image quality.
- Limitations: The small sensor size and fixed lens of the webcam limit its performance in low-light situations and prevent advanced photographic techniques like shallow depth of field.
According to research from the Santa Fe University of Art and Design’s Photography Department, in July 2025, while dedicated cameras offer superior image quality and creative control, Macbook Pro webcams are sufficient for quick snapshots and video calls.
2. Exploring Intentions: What Are You Trying To Achieve With Your Macbook Pro Photos?
Understanding your goals helps you choose the right approach:
- Quick Selfies or Portraits: For simple shots, the Photo Booth app is ideal.
- Product Photography: If you need to document product shots for online sales consider using professional lighting and background.
- Capturing Screen Content: Screenshots are perfect for tutorials or presentations.
- Video Conferencing: Optimize your setup for clear video calls.
- Creative Projects: Experiment with effects and editing tools to enhance your images.
3. Utilizing Photo Booth: How Do I Use Photo Booth on My Macbook Pro?
Photo Booth is a pre-installed application on macOS that allows you to take photos and videos using your Macbook Pro’s built-in camera.
- Opening Photo Booth: Launch the app from the Applications folder, Launchpad, or by using Spotlight search.
- Interface Overview: The main window displays the camera view, with buttons for taking photos, recording videos, and applying effects.
- Taking a Photo: Click the red camera icon to snap a picture. A countdown timer appears before the photo is taken.
- Recording a Video: Click the video camera icon to start recording. Click again to stop.
- Applying Effects: Click the “Effects” button to choose from a variety of fun and quirky visual effects.
- Saving and Sharing: Photos and videos are automatically saved in Photo Booth’s library. You can drag them to your desktop or share them directly to social media.
 Photo Booth app
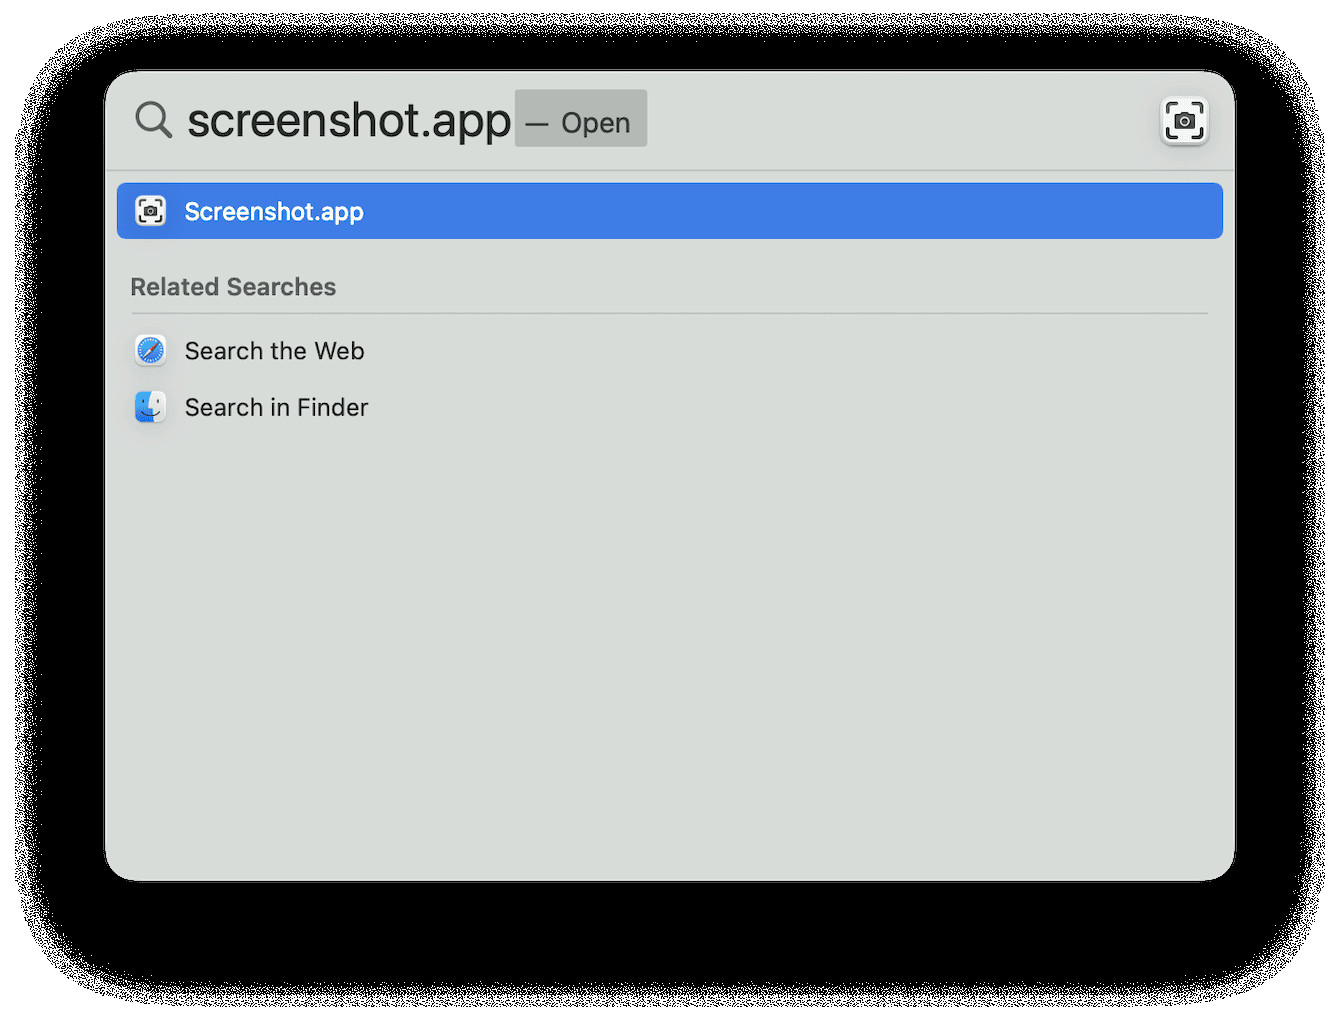
4. Mastering Screenshots: How Do I Capture a Screenshot on My Macbook Pro?
Macbook Pro offers several keyboard shortcuts for capturing screenshots:
- Full Screen: Press
Shift + Command + 3to capture the entire screen. - Selected Area: Press
Shift + Command + 4. A crosshair cursor appears, allowing you to drag and select a specific area to capture. - Specific Window: After pressing
Shift + Command + 4, press the Space bar. The cursor turns into a camera icon. Click on a window to capture it. - Screenshot Options: In macOS Mojave and later, press
Shift + Command + 5to open the Screenshot app, which provides additional options like recording the screen. - Saving Screenshots: By default, screenshots are saved to your desktop as PNG files. You can change the default save location in the Screenshot app.
 How to take a picture of Mac’s Screen
5. Optimizing Image Quality: How Can I Improve the Quality of My Macbook Pro Photos?
While the built-in webcam has limitations, you can take steps to enhance image quality:
- Lighting: Ensure adequate and even lighting. Avoid backlighting, which can cause silhouettes.
- Clean Lens: Gently clean the webcam lens with a microfiber cloth to remove smudges and dust.
- Stable Positioning: Keep your Macbook Pro stable to prevent blurry images.
- Software Adjustments: Use photo editing software to adjust brightness, contrast, and color.
- External Webcam: Consider using an external webcam with higher resolution and better low-light performance.
- Experiment: Test out different backgrounds.
- Angles: Shoot from different angles.
- Natural Light: Use soft natural light to improve the quality of photos.
6. Exploring Third-Party Apps: What Other Apps Can I Use to Take Photos on My Macbook Pro?
Several third-party apps offer enhanced features and control for taking photos and videos on your Macbook Pro:
- ManyCam: Provides virtual backgrounds, effects, and overlays for video calls and recordings.
- OBS Studio: A free and open-source application for video recording and live streaming, offering advanced customization options.
- iGlasses: Enhances webcam video with color correction, zoom, and pan controls.
- Camera Pro: Adds manual controls for exposure, focus, and white balance.
7. Mastering Editing: What Are Some Basic Photo Editing Techniques for Macbook Pro Photos?
Post-processing can significantly improve the appearance of your photos. Here are some basic editing techniques:
- Cropping: Remove unwanted elements and improve composition.
- Exposure Adjustment: Correct brightness levels to ensure the image is neither too dark nor too bright.
- Contrast Adjustment: Enhance the difference between light and dark areas to add depth and impact.
- Color Correction: Adjust white balance and saturation to achieve accurate and pleasing colors.
- Sharpening: Increase sharpness to enhance details and clarity.
- Noise Reduction: Reduce graininess in low-light photos.
- Using Filters: Apply subtle filters to create a specific mood or style.
8. Using Built-in Tools: How Do I Edit Photos on My Macbook Pro Without Third-Party Software?
Macbook Pro includes built-in tools for basic photo editing:
- Photos App: The Photos app allows you to crop, adjust exposure, color, and apply filters.
- Preview App: Preview offers basic editing features like cropping, rotating, and adjusting color.
- Markup Tools: Use the Markup tools in Preview to add annotations, shapes, and text to your photos.
9. Understanding Resolution: What Resolution Should I Use for My Macbook Pro Photos?
The appropriate resolution depends on the intended use of the photo:
| Use Case | Resolution |
|---|---|
| Social Media | 1080 x 1080 pixels |
| Online Display | 1920 x 1080 pixels |
| Printing (4×6 inches) | 1200 x 1800 pixels |
| Printing (8×10 inches) | 2400 x 3000 pixels |
| Printing (Large Format) | 3600 x 4800 pixels or higher |
10. Troubleshooting: What Do I Do If My Macbook Pro Camera Isn’t Working?
If you encounter issues with your Macbook Pro camera, try these troubleshooting steps:
- Check Camera Permissions: Ensure the app you’re using has permission to access the camera in System Preferences > Security & Privacy > Privacy > Camera.
- Close Conflicting Apps: Close any other apps that might be using the camera.
- Restart Your Macbook Pro: A simple restart can often resolve temporary software glitches.
- Update macOS: Make sure your operating system is up to date.
- Reset SMC: Resetting the System Management Controller (SMC) can resolve hardware-related issues.
- Check External Camera: If using an external camera, ensure it’s properly connected and recognized by your Macbook Pro.
11. Exploring Advanced Techniques: How Can I Use My Macbook Pro for More Creative Photography?
While the built-in camera has limitations, you can explore creative techniques:
- DIY Lighting: Use lamps, reflectors, and diffusers to control lighting.
- Macro Photography: Experiment with close-up shots using a magnifying glass or macro lens attachment.
- Time-Lapse: Create time-lapse videos using a series of photos taken over time.
- Stop Motion: Produce stop-motion animations by combining still photos of slightly different poses.
- Green Screen: Use a green screen backdrop and editing software to replace the background of your photos or videos.
12. Enhancing Video Calls: How Do I Improve My Appearance During Video Conferences on My Macbook Pro?
Follow these tips to look your best during video calls:
- Proper Lighting: Position a light source in front of you to illuminate your face evenly.
- Eye Contact: Look directly at the camera to simulate eye contact with the other participants.
- Clean Background: Choose a tidy and uncluttered background.
- Good Posture: Sit up straight to project confidence and professionalism.
- Test Your Setup: Before the call, test your camera, microphone, and internet connection to ensure everything is working properly.
- Dress Well: Dress appropriately for the occasion to make a good impression.
13. Maximizing Storage: How Do I Manage Photos and Videos on My Macbook Pro to Avoid Running Out of Space?
Photos and videos can consume significant storage space. Follow these strategies to manage your files efficiently:
- External Hard Drive: Transfer large files to an external hard drive for archiving.
- Cloud Storage: Use cloud storage services like iCloud, Google Photos, or Dropbox to store and sync your photos and videos.
- Optimize Storage: Enable the “Optimize Mac Storage” option in iCloud settings to automatically remove full-resolution photos and videos from your Macbook Pro when space is needed.
- Compress Files: Use file compression tools to reduce the size of large video files.
- Delete Unwanted Files: Regularly review your photo and video library and delete any files you no longer need.
14. Protecting Your Privacy: How Do I Ensure My Privacy When Using the Macbook Pro Camera?
Take these precautions to protect your privacy:
- Camera Cover: Use a physical camera cover or sticker to block the webcam when not in use.
- App Permissions: Review app permissions regularly and revoke access to the camera for any apps that don’t need it.
- Software Updates: Keep your operating system and apps up to date to patch security vulnerabilities.
- Be Aware of Surroundings: Be mindful of your surroundings when using the camera, especially in private or sensitive locations.
15. Optimizing Workflow: What Are Some Tips for Efficiently Managing Photos on My Macbook Pro?
Streamline your photo management workflow with these tips:
- Import Automatically: Configure your camera or smartphone to automatically import photos to your Macbook Pro when connected.
- Use Keywords and Tags: Add keywords and tags to your photos to make them easier to search and organize.
- Create Albums: Group your photos into albums based on events, locations, or themes.
- Use a Photo Management App: Consider using a dedicated photo management app like Adobe Lightroom or Capture One for advanced organization and editing features.
- Backup Regularly: Back up your photo library regularly to protect against data loss.
16. Understanding Camera Specifications: What Are the Technical Specifications of the Macbook Pro Camera?
The specifications vary slightly depending on the Macbook Pro model:
| Feature | Specification |
|---|---|
| Resolution | 720p or 1080p |
| Sensor Size | Small (specific size not typically disclosed) |
| Lens | Fixed focus |
| Aperture | Typically around f/2.2 |
| Field of View | Approximately 70-80 degrees |
| Image Processor | Integrated with the Macbook Pro’s system on a chip |
| Video Recording | Up to 1080p at 30 frames per second |
17. Considering Accessories: What Accessories Can Enhance My Macbook Pro Photography?
These accessories can improve your photography experience:
- External Webcam: Provides higher resolution and better image quality.
- Tripod: Stabilizes your Macbook Pro for sharper photos and videos.
- External Microphone: Improves audio quality for video recordings.
- Lighting Kit: Provides controlled and even lighting for better results.
- Camera Cover: Protects your privacy when the camera is not in use.
- Screen Calibration Tool: Ensures accurate color reproduction for photo editing.
18. Exploring File Formats: What Image File Formats Are Supported on Macbook Pro?
Macbook Pro supports a wide range of image file formats:
- JPEG: A widely used format for photographs, offering good compression and compatibility.
- PNG: A lossless format ideal for graphics and images with text or sharp lines.
- TIFF: A high-quality format often used for professional photography and printing.
- GIF: A format suitable for animated images and simple graphics.
- HEIC: A modern format offering better compression than JPEG while maintaining high image quality.
19. Optimizing for Social Media: How Do I Prepare My Macbook Pro Photos for Sharing on Social Media?
Follow these steps to optimize your photos for social media:
- Crop to the Correct Aspect Ratio: Use the appropriate aspect ratio for each platform (e.g., 1:1 for Instagram, 9:16 for TikTok).
- Resize Images: Resize your images to the recommended dimensions for each platform to avoid pixelation or distortion.
- Compress Files: Compress your files to reduce their size and speed up uploading.
- Add Captions and Hashtags: Write engaging captions and use relevant hashtags to increase visibility.
- Use Filters and Effects: Apply filters and effects to enhance your photos and make them stand out.
- Adjust Brightness and Contrast: Optimize brightness and contrast for different screen types.
20. Integrating With Other Devices: How Do I Transfer Photos From My iPhone to My Macbook Pro?
There are several ways to transfer photos from your iPhone to your Macbook Pro:
- iCloud Photos: Enable iCloud Photos on both devices to automatically sync your photo library.
- AirDrop: Use AirDrop to wirelessly transfer photos directly between your iPhone and Macbook Pro.
- USB Cable: Connect your iPhone to your Macbook Pro with a USB cable and import photos using the Photos app or Finder.
- Email: Email photos to yourself as attachments.
- Cloud Storage Services: Use cloud storage services like Google Photos or Dropbox to transfer photos.
21. Understanding Focus: How Does Focus Work When Taking Photos With a Macbook Pro?
The built-in webcam typically has a fixed focus lens, meaning it’s designed to keep objects at a certain distance in focus. You can’t manually adjust the focus like you would on a dedicated camera.
- Optimal Distance: Position yourself at the optimal distance from the camera (usually around 2-3 feet) for the sharpest image.
- Lighting: Ensure adequate lighting to help the camera focus properly.
- Clean Lens: Keep the lens clean to prevent blurry images.
- Avoid Excessive Movement: Minimize movement during photo or video capture to maintain focus.
22. Exploring Composition: What Are Some Basic Composition Techniques for Macbook Pro Photos?
Composition refers to the arrangement of elements within a photo. Here are some basic techniques:
- Rule of Thirds: Divide the frame into thirds both horizontally and vertically, and place key elements along these lines or at their intersections.
- Leading Lines: Use lines to guide the viewer’s eye through the photo.
- Symmetry: Create balance and harmony by arranging elements symmetrically.
- Framing: Use elements in the foreground to frame the subject and draw attention to it.
- Negative Space: Use empty space around the subject to create a sense of balance and simplicity.
23. Utilizing Keyboard Shortcuts: What Are Some Useful Keyboard Shortcuts for Photo Editing on Macbook Pro?
These keyboard shortcuts can speed up your photo editing workflow:
| Action | Shortcut |
|---|---|
| Undo | Command + Z |
| Redo | Shift + Command + Z |
| Copy | Command + C |
| Paste | Command + V |
| Cut | Command + X |
| Select All | Command + A |
| Crop | Command + K |
| Rotate | Command + Option + R |
| Adjust Colors | Shift + Command + C |
| Add Filter | Shift + Command + F |
| Export | Shift + Command + E |
24. Optimizing for Different Lighting Conditions: How Do I Adjust My Setup for Different Lighting Scenarios?
Adjust your setup to suit different lighting conditions:
- Bright Sunlight: Avoid direct sunlight, which can cause harsh shadows and overexposure. Use a diffuser or move to a shaded area.
- Overcast Days: Overcast days provide soft, even lighting. Take advantage of this natural light for flattering portraits.
- Low Light: Increase the brightness of your screen or use an external light source to improve visibility.
- Artificial Light: Use lamps or desk lights to supplement natural light. Avoid mixing different types of light (e.g., fluorescent and incandescent).
25. Backing up Data: How Should I Back Up My Photos?
To prevent any chance of losing your photos, here is how to back them up.
- Time Machine: Use Time Machine, Apple’s built-in backup software, to automatically back up your entire system to an external hard drive.
- iCloud Photos: Enable iCloud Photos to automatically sync your photo library to the cloud.
- Third-Party Backup Services: Use third-party backup services like Backblaze or Carbonite for offsite backups.
- Manual Backup: Manually copy your photo library to an external hard drive or USB drive.
Taking photos with your Macbook Pro can be a fun and convenient way to capture moments, create content, and communicate visually. While the built-in camera may have limitations, you can enhance your photography experience by optimizing lighting, exploring editing techniques, and using third-party apps and accessories. For more in-depth tutorials, stunning photography inspiration, and a vibrant community of photographers, visit dfphoto.net.
Address: 1600 St Michael’s Dr, Santa Fe, NM 87505, United States.
Phone: +1 (505) 471-6001.
Website: dfphoto.net.
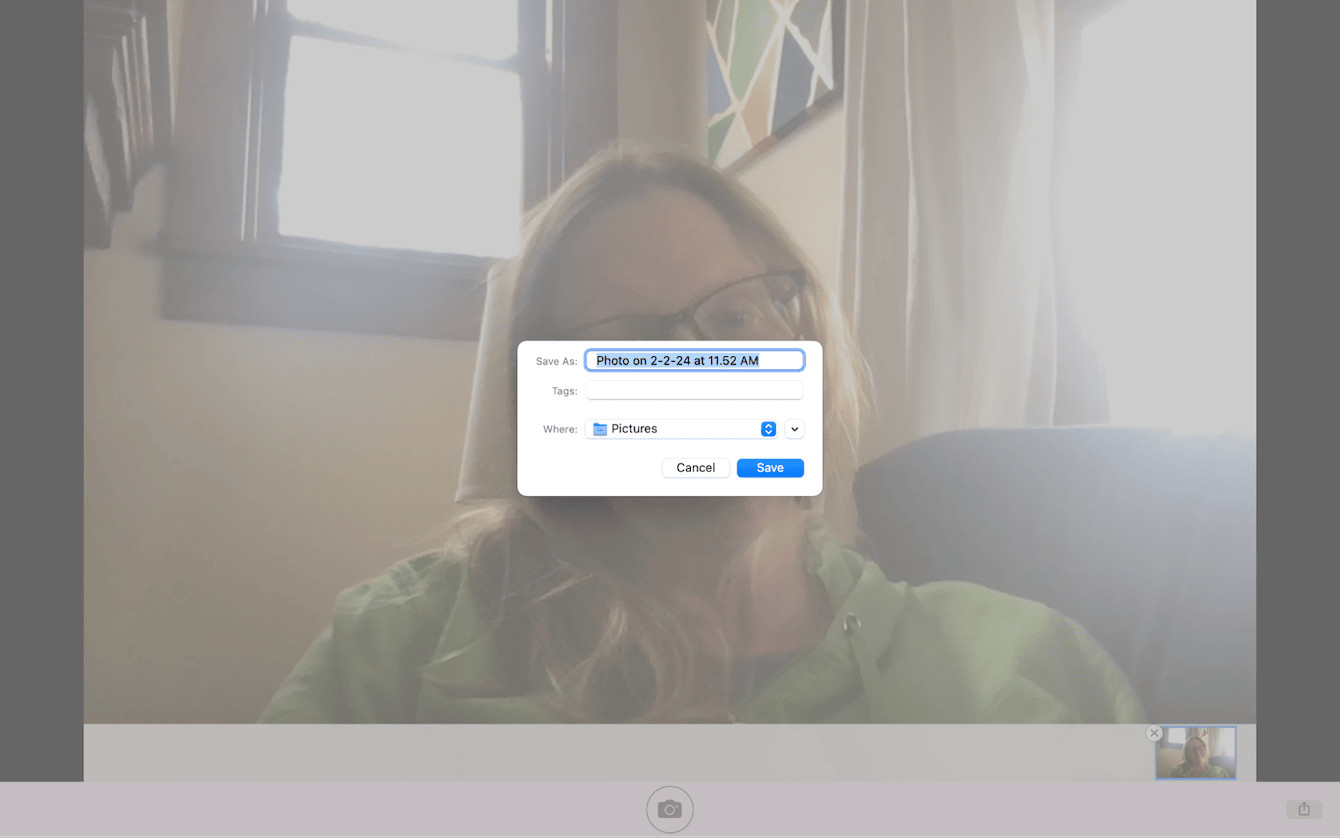 How to save the pictures you take on Mac
FAQ: Frequently Asked Questions About Taking Photos With a Macbook Pro
1. Can I use an external microphone with my Macbook Pro for better audio quality when recording videos?
Yes, you can connect an external microphone to your Macbook Pro via USB or the headphone jack to significantly improve audio quality for video recordings.
2. How do I adjust the white balance on my Macbook Pro camera?
The built-in camera doesn’t offer manual white balance controls. However, you can adjust white balance in post-processing using photo editing software.
3. Can I use my Macbook Pro as a webcam for live streaming?
Yes, you can use your Macbook Pro as a webcam for live streaming with software like OBS Studio or Streamlabs Desktop.
4. How do I create a time-lapse video with my Macbook Pro?
You can create a time-lapse video by taking a series of photos over time and then combining them into a video using editing software like iMovie or Final Cut Pro.
5. What is the best way to clean the Macbook Pro camera lens?
Gently clean the lens with a microfiber cloth designed for cleaning electronics. Avoid using harsh chemicals or abrasive materials.
6. How do I disable the camera on my Macbook Pro for privacy reasons?
You can disable the camera in System Preferences > Security & Privacy > Privacy > Camera by unchecking the boxes next to the apps that have permission to access the camera.
7. Can I use a green screen with my Macbook Pro camera?
Yes, you can use a green screen backdrop and editing software to replace the background of your photos or videos.
8. How do I take a panoramic photo with my Macbook Pro?
The built-in camera doesn’t support panoramic photos. However, you can create a panorama by stitching together multiple photos using software like Adobe Photoshop.
9. What is the best way to store and organize my photos on my Macbook Pro?
Use the Photos app or a dedicated photo management app like Adobe Lightroom to store, organize, and edit your photos.
10. How do I share my Macbook Pro photos on social media?
You can share your photos directly to social media from the Photos app or by uploading them to the platform’s website or app.