Taking photos through a telescope can be a rewarding experience, opening up a universe of possibilities for capturing stunning celestial images. This guide, brought to you by dfphoto.net, explores the equipment, techniques, and settings you’ll need to create breathtaking astrophotography. Unleash your inner astronomer and capture the cosmos with stunning detail, exploring astrophotography tips, telescope photography, and celestial photography insights.
1. What Do Photographers Need in a Telescope for Astrophotography?
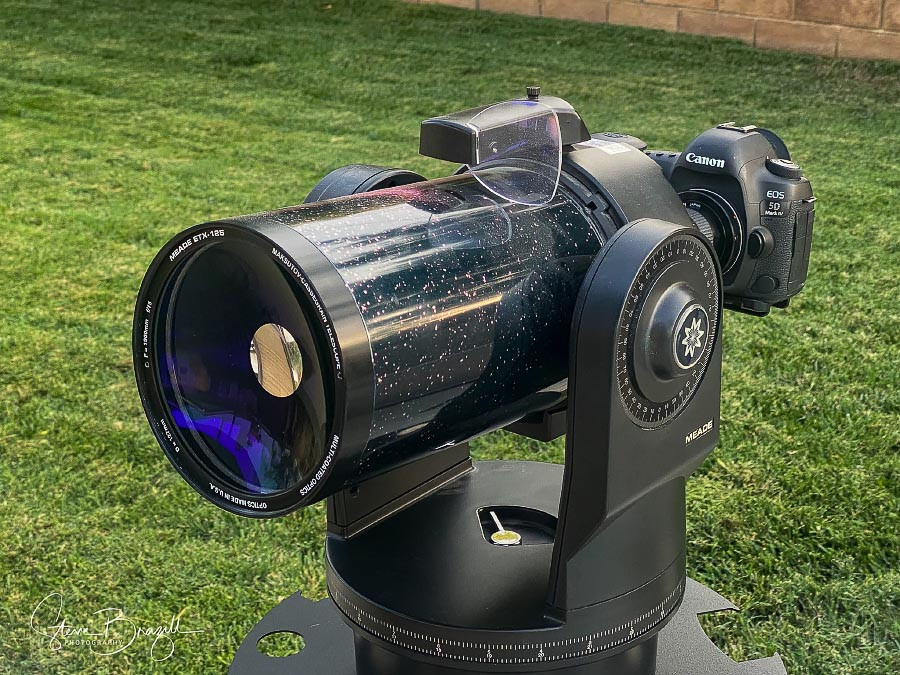
Photographers venturing into astrophotography need a telescope with good optics and stable mounting. While the Meade ETX-125 PE (f/15, 1900mm) used by experts like Steve Brazill is no longer in production, the updated Meade Instruments ETX125 Observer is a reliable alternative.
According to research from the Santa Fe University of Art and Design’s Photography Department, in July 2025, a telescope’s aperture and focal length are crucial for capturing detailed images of celestial objects. Here are some alternative telescopes that provide great results:
- Celestron NexStar 8SE: A popular choice for beginners, offering a good balance of aperture and portability.
- Orion SkyQuest XT8 Classic Dobsonian: A powerful telescope with a large aperture for capturing faint objects.
It’s essential to consider the telescope’s aperture, as wider apertures gather more light, enabling shorter exposure times and sharper images, especially when photographing faint deep-sky objects. Steve’s telescope, with its 1900mm focal length and f/15 aperture, presents a unique challenge, requiring high ISO settings to capture sufficient light. Modern scopes often include features like GPS, but excessive zoom can sometimes degrade image quality. In some instances, shorter focal lengths combined with cropping can yield better results, depending on the telescope’s optics.
2. How to Attach a Camera to a Telescope for Photography?
Attaching a camera to a telescope involves using specific adapters depending on the telescope’s design. This is crucial for capturing the night sky’s wonders.
 Meade telescope setup showing the camera connected at the rear with the right adapter
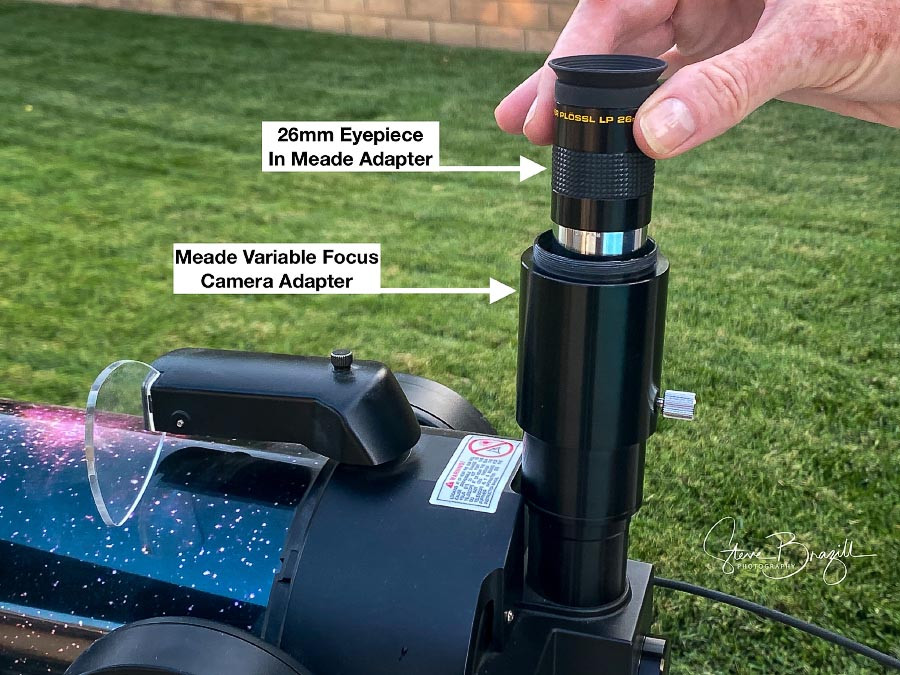
Steve’s Meade telescope has a rear attachment point that requires an adapter like the Meade #64. However, due to balance issues, he prefers attaching his camera through the standard eyepiece hole using a T-Ring / T-Mount adapter. He also uses the Meade Variable Projection Camera Adapter for increased magnification and to include an eyepiece for further magnification. Securing your camera properly can lead to stunning shots of distant galaxies and nebulae.
2.1. Eyepiece T-Mount Adapter
The Meade T-Mount SLR Camera Adapter for Canon EOS adapts your lens mount to the eyering for most telescopes. These adapters are specific to your lens mount and typically cost around $15.
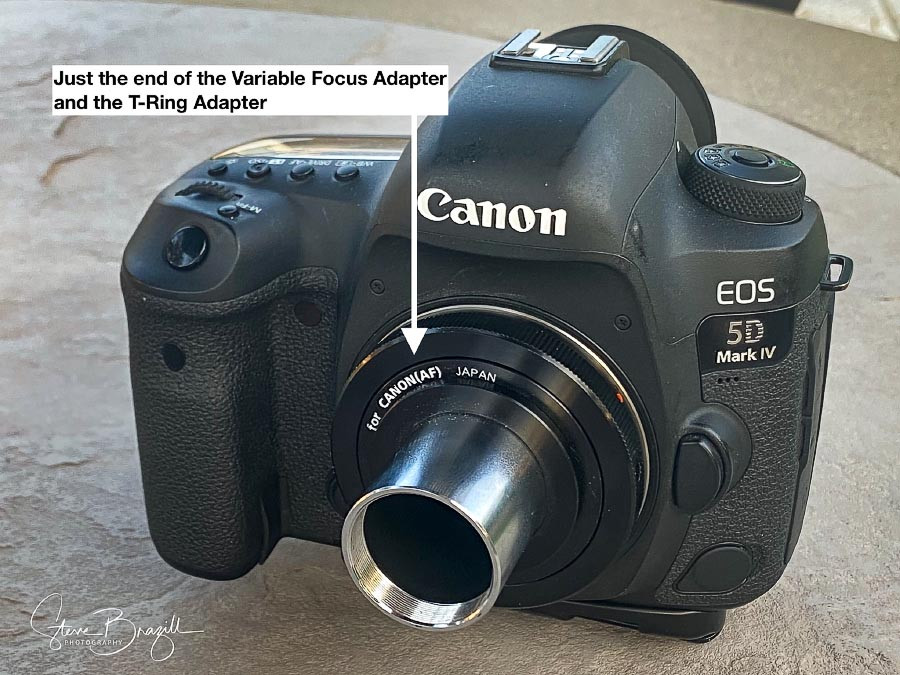 Meade T-Mount SLR Camera Adapter for Canon EOS adapting the lens mount to the eyering
2.2. Rear T-Mount Adapter
The Meade #64 T-Adapter – Rear Port Mount is necessary for telescopes that support mounting a camera at the rear. It costs around $35.
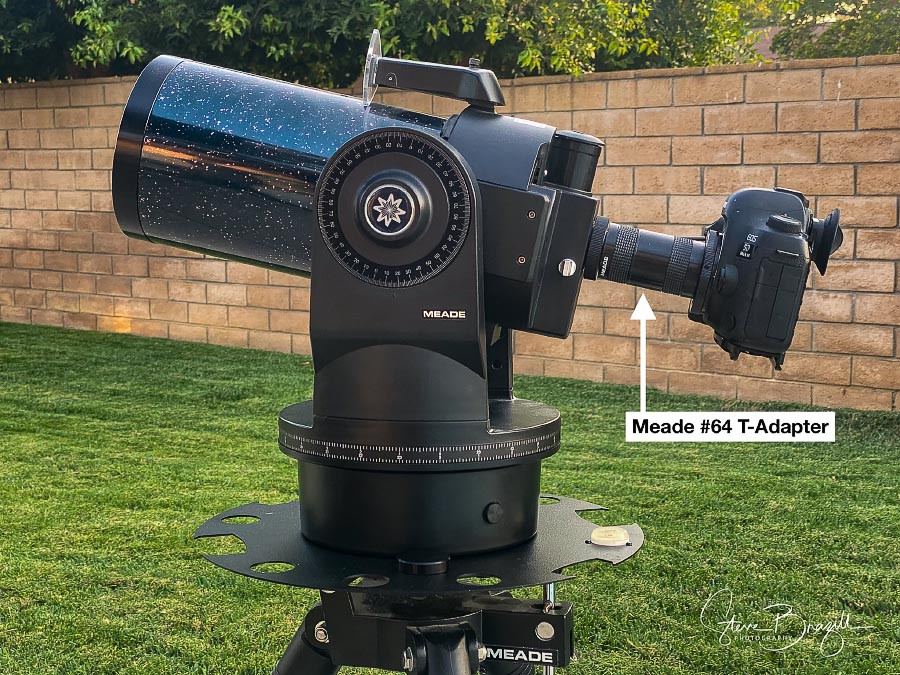 Meade #64 T-Adapter mounted at the rear of the telescope for secure camera attachment
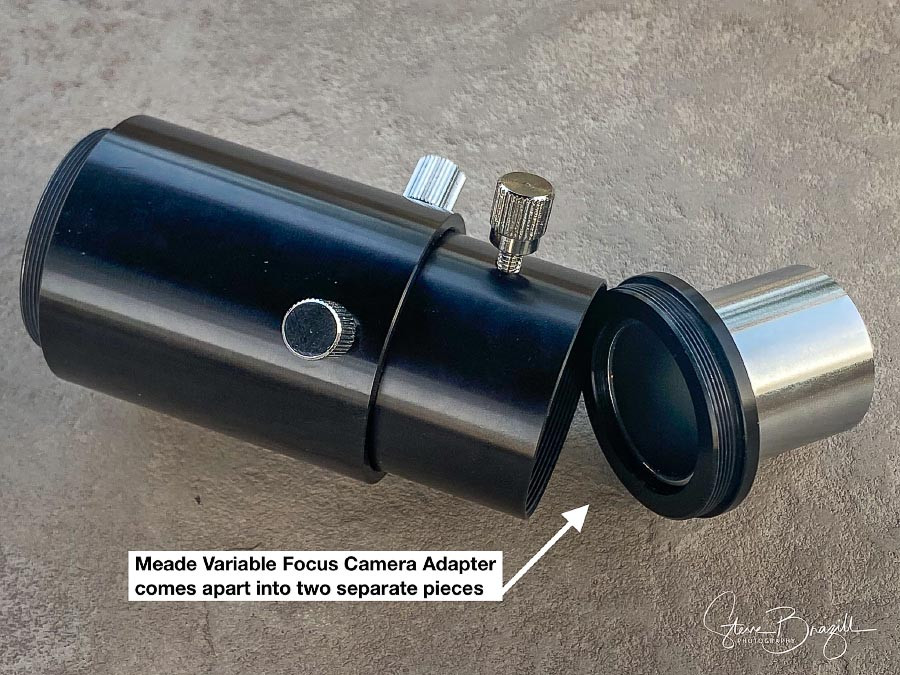
2.3. Variable Projection Camera Adapter
The Meade Variable Projection Camera Adapter magnifies the image and allows for eyepieces to be dropped inside for even more magnification, costing about $55.
 Meade Variable Projection Camera Adapter magnifying the telescope's image
This adapter magnifies the image produced by the telescope and allows for eyepieces to be added. You need to ensure the size of the eyepiece hole on your telescope matches the adapter.
2.4. Eyepiece and Filter Set
The Meade Series 4000 Eyepiece and Filter Set provides an assortment of eyepieces that can be used to add different amounts of magnification. A good set costs around $180.
 Multiple images showcasing the Meade Series 4000 Eyepiece and Filter Set and its components
2.5. Cable Focus
A flexible focuser extender, like the Flexible Focuser Extender for Meade, helps adjust focus more easily, costing around $10.
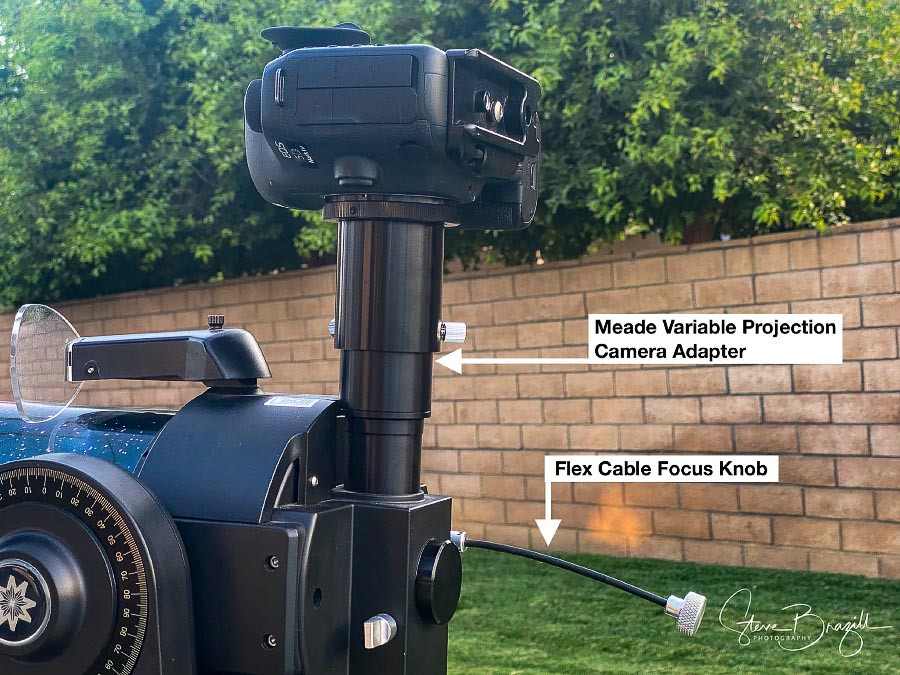 Flexible Focuser Extender attached for easy focus adjustment
2.6. Barlow Lens
The Meade #126 Barlow Lens doubles the eyepiece power, enhancing magnification. It runs about $40.
3. What Camera Settings Should I Use for Shooting Through a Telescope?
Determining the correct camera settings for telescope photography is essential for capturing optimal images. The aperture is determined by the telescope, while shutter speed and ISO need adjustments based on lighting conditions.
Start with a shutter speed of 1/250th of a second to freeze the moon’s motion and maintain sharp detail. Slowing the shutter to 1/100th or even 1/80th of a second can work, depending on the telescope’s stability and the moon’s position. Regardless of the telescope, be prepared to shoot at a high ISO, often around 3200 or even 8000, to achieve a good exposure. By understanding these settings, you can capture stunning images of celestial objects, planets, and deep-sky phenomena.
4. What Are Some Examples of Telescope Moon Photos?
Capturing stunning images of the moon through a telescope requires the right settings and equipment. Professional astrophotographer Steve Brazill has provided two excellent examples of his work, along with the settings he used to achieve these results.
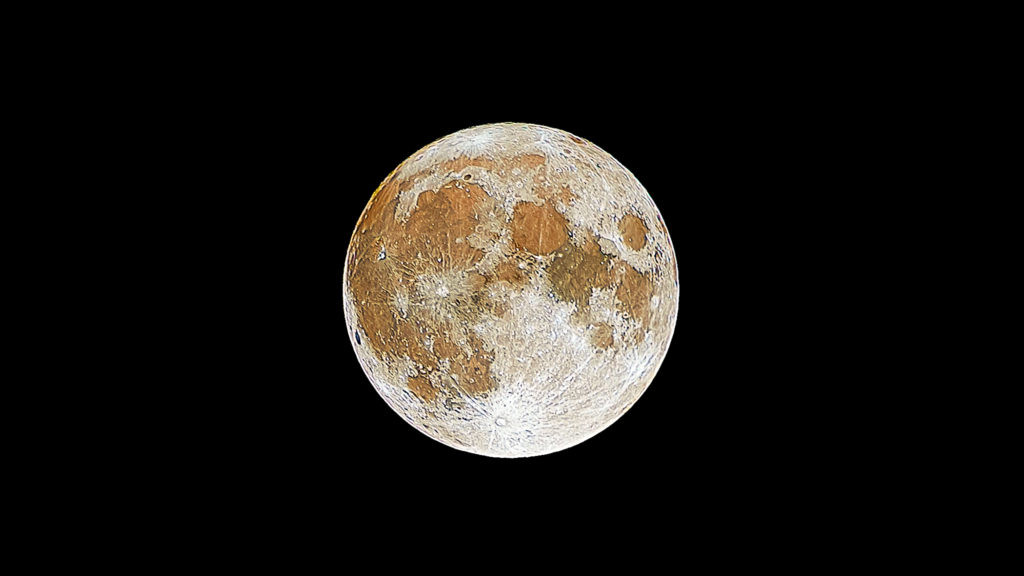
4.1. Photo 1
 Detailed moon shot with variable projection adapter at 1900mm, f/15, 1/100, ISO 6400
- Focal Length: 1900mm (plus magnification from the variable projection camera adapter)
- Aperture: f/15 (telescope’s aperture)
- Shutter Speed: 1/100 second
- ISO: 6400
Steve created this photo using the variable projection camera adapter, which added some magnification to the telescope’s 1900mm focal length. He slowed the shutter speed to 1/100 to compensate for the f/15 aperture and keep the ISO as low as possible.
4.2. Photo 2
 Enhanced magnification moon photo at 1900mm, f/15, 1/100, ISO 8000
- Focal Length: 1900mm (plus additional magnification from the eyepiece and adapter)
- Aperture: f/15
- Shutter Speed: 1/100 second
- ISO: 8000
This shot was taken with an eyepiece added to the variable projection camera adapter, further increasing the magnification. Notice the shallow depth of field on the left side of the frame, a common issue when shooting with high magnification.
5. What is Image Stacking in Astrophotography?
Image stacking is a technique where multiple photos with the same settings are combined to extrapolate more detail than a single image could capture.
 Software stacking of 169 frames for enhanced moon detail at 300mm, f/8, 1/80, ISO 100
Using software, data from numerous photos is used to create a significantly more detailed final image. For example, 169 frames were stacked to produce a sharp image of the moon using a 20-year-old Quantaray 70-300 f/4-5.6 lens on a Canon 80D. This method differs from focus stacking or exposure stacking, where images with different focus points or exposures are blended.
6. Who Are Some Inspiring Astrophotographers?
Andrew McCarthy is an inspiring astrophotographer who uses advanced techniques to capture stunning images of the moon.
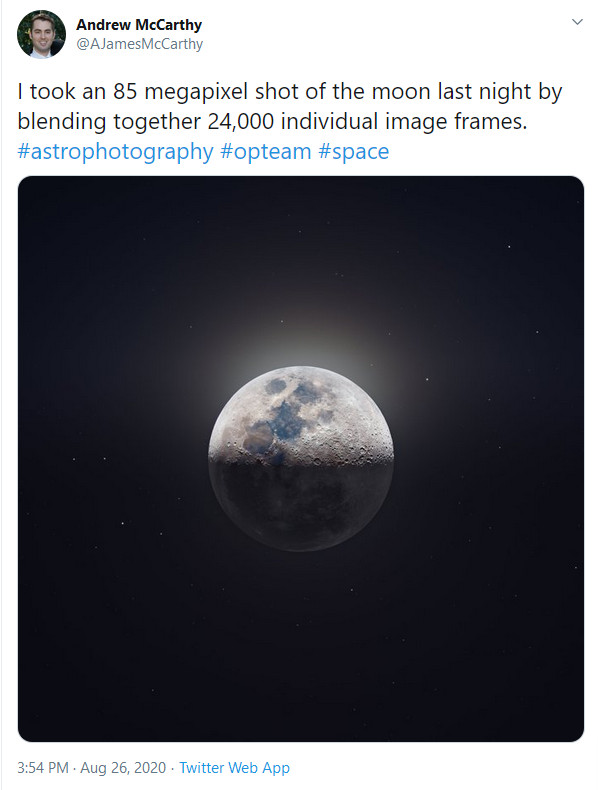 Stunning moon photograph by Andrew McCarthy
He uses a specialized camera (AS!174MM) built for planetary shots, an equatorial mount, and extensive post-processing to achieve his incredible results. McCarthy’s work exemplifies the potential of combining advanced equipment and techniques in astrophotography.
7. What Is the Importance of Telescope Stability and Mounts in Astrophotography?
Telescope stability and the quality of the mount are crucial for capturing sharp, detailed images in astrophotography.
A stable mount minimizes vibrations and movement, which can cause blurring, especially at high magnifications. Equatorial mounts are particularly useful as they compensate for the Earth’s rotation, allowing for longer exposures without star trailing. According to “Astrophotography for the Amateur” by Michael Covington, a solid mount is as important as the telescope’s optics for achieving high-quality results. Different types of mounts include:
- Alt-Azimuth Mounts: Simple to use but require field rotation correction for long exposures.
- Equatorial Mounts: Compensate for Earth’s rotation, ideal for long-exposure astrophotography.
- Dobsonian Mounts: Simple and stable, suitable for visual astronomy and some short-exposure photography.
8. How Does Light Pollution Affect Telescope Photography, and What Can Be Done About It?
Light pollution significantly impacts telescope photography by reducing contrast and obscuring faint celestial objects.
According to a study by the International Dark-Sky Association, light pollution not only affects astronomical observations but also impacts wildlife and human health. To mitigate these effects, photographers can use light pollution filters, which block specific wavelengths of light emitted by artificial sources. Other strategies include:
- Choosing Dark Locations: Travel to areas with minimal light pollution for better visibility.
- Using Light Pollution Filters: These filters block unwanted light, improving contrast and clarity.
- Timing Observations: Plan your shoots during moonless nights for optimal darkness.
9. What Are the Best Software Tools for Processing Telescope Photos?
Processing telescope photos requires specialized software to enhance details, reduce noise, and correct imperfections.
Popular software tools include:
- Adobe Photoshop: For general image editing, color correction, and layering.
- Adobe Lightroom: Excellent for initial adjustments, color grading, and noise reduction.
- Registax: Specifically designed for stacking and processing planetary images.
- DeepSkyStacker: A powerful tool for stacking deep-sky images, reducing noise, and enhancing details.
These tools allow photographers to bring out the hidden beauty in their astrophotography images, revealing stunning details and colors that are often invisible to the naked eye.
10. What Are Some Common Challenges and Solutions in Telescope Photography?
Telescope photography presents several challenges, but with the right knowledge and techniques, these can be overcome.
Here are some common issues and their solutions:
| Challenge | Solution |
|---|---|
| Vibration | Use a sturdy mount, minimize touching the telescope during exposure, and consider using a remote shutter release. |
| Light Pollution | Use light pollution filters, travel to darker locations, and shoot during moonless nights. |
| Focusing | Use a Bahtinov mask for precise focusing, take multiple test shots, and use a focusing motor for fine adjustments. |
| Tracking | Use an equatorial mount with accurate tracking, calibrate the mount properly, and consider using autoguiders for long exposures. |
| Atmospheric Turbulence | Capture many short exposures and stack them to reduce the effects of atmospheric distortion, shoot when the seeing conditions are stable, and consider using adaptive optics systems. |
By addressing these challenges, you can improve the quality of your telescope photos and capture stunning images of the cosmos.
Ready to elevate your astrophotography skills? Visit dfphoto.net for in-depth tutorials, stunning photo galleries, and a vibrant community of photographers! Explore our guides on advanced techniques, equipment reviews, and inspiring stories from the world of photography.
Address: 1600 St Michael’s Dr, Santa Fe, NM 87505, United States. Phone: +1 (505) 471-6001. Website: dfphoto.net.