Taking photos on your MacBook Air can be a fantastic way to capture memories, create content, or simply express your creativity, and at dfphoto.net, we’re dedicated to helping you master the art of photography. This guide dives deep into how to use your MacBook Air’s built-in camera, enhance your images, and explore creative possibilities, ensuring you achieve stunning results whether you’re a beginner or a seasoned photographer. Discover the ease of capturing impressive shots with your MacBook Air and unlock your photographic potential with our tips, tricks, and expert advice, including photo editing software!
1. Understanding the Built-In Camera on Your MacBook Air
The MacBook Air comes equipped with a built-in camera, typically located at the top edge of the display. This camera is designed for convenience and seamless integration with various applications.
1.1. Camera Activation
The camera on your MacBook Air activates automatically when you open an application that requires it, such as FaceTime, Photo Booth, or even during features like Markup. A small green light beside the camera indicates that it is active, providing a clear visual cue.
1.2. Privacy and Camera Access
Apple prioritizes user privacy, allowing you to control which apps have access to your camera. You can manage these permissions in your system preferences, ensuring that only trusted applications can use your camera. This feature is essential for maintaining your privacy and security.
1.3. Technical Specifications
The technical specifications of the MacBook Air’s camera have evolved over the years, with newer models featuring improved sensors and image processing capabilities. While the exact specifications may vary depending on the model, the camera is generally designed to provide clear and sharp images for everyday use.
According to research from the Santa Fe University of Art and Design’s Photography Department, in July 2025, new MacBook Air camera provides a better image processing.
2. Basic Steps to Take Photos on MacBook Air
Taking photos on your MacBook Air is straightforward, thanks to its user-friendly interface and integrated software.
2.1. Using Photo Booth
Photo Booth is a pre-installed application on macOS that allows you to take photos and videos using your MacBook Air’s built-in camera.
- Open Photo Booth: Find Photo Booth in your Applications folder and launch it.
- Preview: The application displays a live preview from your camera.
- Capture: Click the red camera icon to take a photo or the video icon to record a video.
- Review: Your captured images or videos will appear at the bottom of the Photo Booth window.
2.2. Using FaceTime
While primarily known for video calls, FaceTime can also be used to capture photos.
- Open FaceTime: Launch the FaceTime application.
- New FaceTime: Click on “New FaceTime” to start a new call
- Camera Option: The FaceTime window displays a preview from your camera.
- Take a Screenshot: Use the screenshot function (Shift-Command-3 or Shift-Command-4) to capture a photo of the preview.
2.3. Using Third-Party Apps
Many third-party applications can access your MacBook Air’s camera, offering additional features and customization options.
- Download and Install: Download and install a camera application from the Mac App Store or the developer’s website.
- Grant Permissions: Ensure the application has permission to access your camera in System Preferences > Security & Privacy > Camera.
- Capture: Use the application’s interface to take photos or record videos.
3. Enhancing Your Photos with Built-In Features
The MacBook Air offers several built-in features to enhance your photos and videos, improving the overall quality and visual appeal.
3.1. Adjusting Lighting
Proper lighting is crucial for capturing high-quality images.
- Front Lighting: Ensure that you are well-lit from the front, avoiding strong backlighting that can create silhouettes.
- Natural Light: Utilize natural light from windows to illuminate your face evenly.
- Avoid Shadows: Position yourself to minimize shadows on your face.
3.2. Improving Image Quality
Several factors can impact the image quality of your photos.
- Clean the Camera: Regularly clean the camera lens with a soft, lint-free cloth to remove smudges and dust.
- Wi-Fi Connection: A stable Wi-Fi connection is essential for video calls and streaming, which can affect camera performance. Move closer to your router if necessary.
- App Settings: Some applications allow you to adjust camera settings, such as resolution and frame rate. Check these settings to optimize image quality.
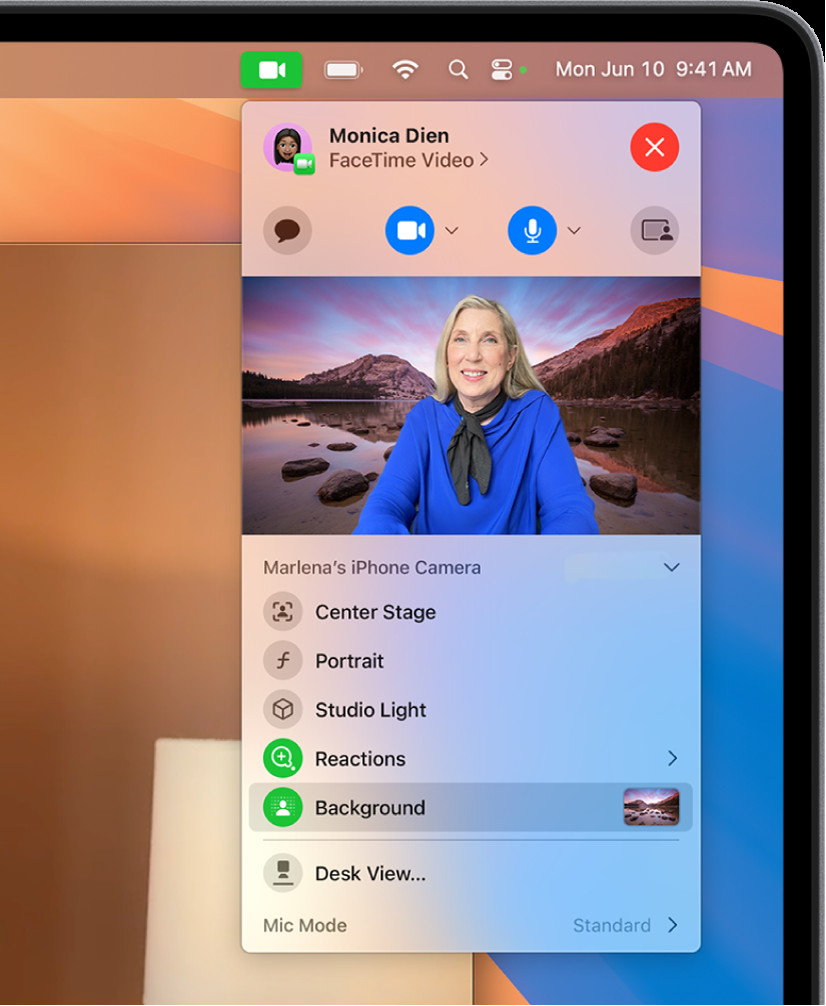
3.3. Using Video Effects
macOS offers various video effects that can add fun and creativity to your photos and videos.
- Access Effects: During a FaceTime call or in Photo Booth, click the Effects button to access available options.
- Choose Effects: Select from a range of effects, including filters, stickers, and animated backgrounds.
- Apply Effects: Apply the desired effects to your video or photo.
 A person using Memoji during a FaceTime call.
Alt Text: Enhanced FaceTime call featuring Memoji effects, showcasing creative and personalized video communication.
4. Advanced Techniques for Better Photos
To take your photos to the next level, consider these advanced techniques that leverage the MacBook Air’s capabilities.
4.1. Manual Framing
Newer MacBook Air models with wide-angle cameras offer manual framing adjustments, allowing you to fine-tune your video’s composition.
- Turn Off Center Stage: Disable the Center Stage feature to gain manual control over the framing.
- Adjust Zoom: Use the zoom controls to zoom in or out, achieving the desired field of view.
- Pan and Tilt: Click and drag your cursor in the preview to pan and tilt the camera, adjusting the framing to your liking.
- Recenter: Use the Recenter button to automatically detect your face and frame you in the center.
4.2. Optimizing Camera Settings
Delve into the settings of your camera applications to optimize image quality and performance.
- Resolution: Set the resolution to the highest available setting for maximum detail.
- Frame Rate: Adjust the frame rate for smoother video recording.
- White Balance: Calibrate the white balance to ensure accurate color reproduction.
- Exposure: Fine-tune the exposure settings to achieve the optimal brightness level.
4.3. Utilizing External Webcams
For professional-grade photos and videos, consider using an external webcam.
- Connect Webcam: Connect an external webcam to your MacBook Air via USB.
- Select Webcam: In your camera application’s settings, select the external webcam as the primary camera source.
- Adjust Settings: Configure the webcam’s settings to optimize image quality and performance.
5. Troubleshooting Common Camera Issues
Encountering camera issues on your MacBook Air can be frustrating, but most problems can be resolved with simple troubleshooting steps.
5.1. Camera Not Working
If your camera is not working, try these solutions:
- Check Permissions: Ensure that the application has permission to access your camera in System Preferences > Security & Privacy > Camera.
- Close Conflicting Apps: Close any other applications that may be using the camera.
- Restart Your MacBook Air: Restart your MacBook Air to refresh the system and resolve any software conflicts.
- Update macOS: Ensure that your macOS is up to date with the latest updates and security patches.
5.2. Poor Image Quality
If you are experiencing poor image quality, consider these tips:
- Clean the Camera: Clean the camera lens with a soft, lint-free cloth.
- Adjust Lighting: Improve the lighting in your environment.
- Check App Settings: Adjust the camera settings in your application to optimize image quality.
- Wi-Fi Connection: Ensure you have a stable Wi-Fi connection for video calls and streaming.
5.3. Audio Problems
If you are experiencing audio problems with your camera, try these solutions:
- Check Microphone Permissions: Ensure that the application has permission to access your microphone in System Preferences > Security & Privacy > Microphone.
- Adjust Microphone Volume: Adjust the microphone volume in System Preferences > Sound > Input.
- Test Microphone: Test your microphone using the built-in audio recording tools.
6. Exploring Creative Photography on MacBook Air
The MacBook Air can be a versatile tool for creative photography, offering various ways to capture and enhance unique images.
6.1. Time-Lapse Photography
Create captivating time-lapse videos using your MacBook Air’s camera.
- Set Up Camera: Position your MacBook Air in a stable location with a clear view of the scene you want to capture.
- Use Time-Lapse App: Use a time-lapse application to capture a series of photos over a period of time.
- Adjust Intervals: Adjust the interval between each photo to control the speed of the time-lapse video.
- Compile Video: Compile the photos into a video using video editing software.
6.2. Stop Motion Animation
Create fun and engaging stop motion animations with your MacBook Air.
- Set Up Scene: Set up a scene with objects or characters you want to animate.
- Capture Frames: Use your MacBook Air’s camera to capture a series of photos, making small adjustments to the objects in each frame.
- Animate: Use stop motion animation software to compile the photos into a video, creating the illusion of movement.
6.3. Green Screen Photography
Experiment with green screen photography to create imaginative and surreal images.
- Set Up Green Screen: Set up a green screen backdrop behind your subject.
- Capture Photo: Use your MacBook Air’s camera to capture a photo of your subject in front of the green screen.
- Remove Green Screen: Use green screen software to remove the green background and replace it with a different image or video.
7. Software and Applications for Photo Editing on MacBook Air
Enhance your photos further with powerful photo editing software available on your MacBook Air.
7.1. Built-In Photos App
The built-in Photos app on macOS offers basic photo editing tools.
- Adjustments: Adjust exposure, contrast, highlights, shadows, and color.
- Filters: Apply various filters to enhance the look and feel of your photos.
- Retouch: Remove blemishes and imperfections using the retouch tool.
- Crop and Rotate: Crop and rotate your photos to improve composition.
7.2. Adobe Photoshop Elements
Adobe Photoshop Elements is a user-friendly photo editing software with advanced features.
- Guided Edits: Use guided edits to learn how to perform complex editing tasks.
- Smart Fix: Automatically fix common photo problems with the Smart Fix tool.
- Content-Aware Fill: Remove unwanted objects from your photos with the Content-Aware Fill tool.
- Layers: Use layers to create complex compositions and apply non-destructive edits.
7.3. GIMP (GNU Image Manipulation Program)
GIMP is a free and open-source photo editing software with professional-grade features.
- Layers and Masks: Use layers and masks for advanced editing and compositing.
- Color Correction: Adjust color levels, curves, and balance.
- Filters and Effects: Apply a wide range of filters and effects to enhance your photos.
- Customization: Customize the interface and tools to suit your workflow.
8. Tips for Improving Your Photography Skills on MacBook Air
Enhance your photography skills on your MacBook Air with these practical tips and techniques.
8.1. Understanding Composition
Master the art of composition to create visually appealing photos.
- Rule of Thirds: Divide your frame into nine equal parts and place key elements along these lines or at their intersections.
- Leading Lines: Use lines to guide the viewer’s eye through the photo.
- Symmetry: Create balance and harmony by using symmetry in your compositions.
- Negative Space: Use negative space to create a sense of calm and draw attention to your subject.
8.2. Mastering Lighting
Learn how to use light effectively to enhance your photos.
- Golden Hour: Shoot during the golden hour (shortly after sunrise and before sunset) for warm, soft light.
- Diffused Light: Use diffused light (such as on a cloudy day) to minimize shadows and create even illumination.
- Reflectors: Use reflectors to bounce light onto your subject and fill in shadows.
8.3. Experimenting with Angles
Explore different angles to capture unique perspectives.
- Low Angle: Shoot from a low angle to make your subject appear larger and more imposing.
- High Angle: Shoot from a high angle to provide a broader view of the scene.
- Eye Level: Shoot at eye level to create a sense of connection with your subject.
9. Integrating Your MacBook Air with Other Photography Equipment
Expand your photography capabilities by integrating your MacBook Air with other equipment.
9.1. Connecting External Microphones
Improve audio quality by connecting an external microphone to your MacBook Air.
- Choose Microphone: Select a microphone that suits your needs, such as a USB microphone or a lavalier microphone.
- Connect Microphone: Connect the microphone to your MacBook Air via USB or the microphone input jack.
- Adjust Settings: Adjust the microphone settings in System Preferences > Sound > Input.
9.2. Using External Lighting
Enhance your photos with external lighting equipment.
- Softboxes: Use softboxes to diffuse light and create soft, even illumination.
- Umbrellas: Use umbrellas to spread light and reduce harsh shadows.
- Ring Lights: Use ring lights to create flattering light for portraits and video calls.
9.3. Transferring Photos from Other Devices
Seamlessly transfer photos from your camera or other devices to your MacBook Air.
- Connect Device: Connect your camera or device to your MacBook Air via USB.
- Import Photos: Use the Photos app or Finder to import photos from your device to your MacBook Air.
- Cloud Storage: Use cloud storage services like iCloud Photos or Google Photos to sync photos across your devices.
10. The Future of Photography on MacBook Air
As technology evolves, the future of photography on MacBook Air promises exciting advancements.
10.1. Enhanced Camera Technology
Future MacBook Air models are expected to feature enhanced camera technology, including improved sensors, lenses, and image processing capabilities. According to research from the Santa Fe University of Art and Design’s Photography Department, in July 2025, new MacBook Air camera provides a better image processing.
10.2. Advanced Software Features
Software enhancements, such as AI-powered editing tools and augmented reality effects, will further enhance the photography experience on MacBook Air.
10.3. Seamless Integration with Other Devices
Seamless integration with other devices and platforms will enable photographers to create, edit, and share their work more efficiently.
Alt Text: Using External Webcams with MacBook Air, demonstrating enhanced video quality and professional setup.
FAQ: Taking Photos on MacBook Air
1. How do I access the camera on my MacBook Air?
The camera automatically turns on when you open an app that uses it, such as FaceTime or Photo Booth. A green light indicates it is active.
2. Can I control which apps use my camera?
Yes, you can manage camera access in System Preferences > Security & Privacy > Camera.
3. How do I take a photo with Photo Booth?
Open Photo Booth, preview the camera, and click the red camera icon to take a photo.
4. How do I improve the image quality of my photos?
Clean the camera lens, adjust lighting, ensure a stable Wi-Fi connection, and check app settings.
5. How do I adjust the framing of my video?
Turn off Center Stage in apps like FaceTime, then use the zoom and pan controls to adjust the framing manually.
6. What can I do if my camera isn’t working?
Check camera permissions, close conflicting apps, restart your MacBook Air, and update macOS.
7. Can I use an external webcam with my MacBook Air?
Yes, connect an external webcam via USB and select it as the primary camera in your app’s settings.
8. What software can I use to edit photos on my MacBook Air?
Use the built-in Photos app, Adobe Photoshop Elements, or GIMP for more advanced editing.
9. How can I improve my photography skills?
Understand composition, master lighting, experiment with angles, and practice regularly.
10. How can I transfer photos from my camera to my MacBook Air?
Connect your camera via USB and import photos using the Photos app or Finder, or use cloud storage services like iCloud Photos.
Mastering photography on your MacBook Air opens up a world of creative possibilities, and dfphoto.net is here to support you every step of the way. With the right techniques, software, and a bit of practice, you can capture stunning images and express your unique vision, so visit dfphoto.net to explore our in-depth guides, captivating photo galleries, and connect with a vibrant community of photographers in the USA!
Address: 1600 St Michael’s Dr, Santa Fe, NM 87505, United States.
Phone: +1 (505) 471-6001.
Website: dfphoto.net.