Taking photos of stars on iPhone can be challenging, but with the right techniques and tools, you can capture stunning images of the night sky. At dfphoto.net, we help you unlock the secrets to astrophotography with your iPhone, guiding you through every step from setting up your shot to mastering post-processing. Explore the universe of possibilities using your iPhone’s camera and elevate your night sky photography with our curated tips.
1. Understanding iPhone Night Photography
iPhone night photography has evolved significantly, especially with the introduction of features like Night mode. This technology, available on newer iPhone models, allows you to capture more light and detail in low-light conditions, making it ideal for photographing the stars. According to research from the Santa Fe University of Art and Design’s Photography Department, in July 2025, Night mode provides a significant improvement in image clarity and color accuracy for nighttime shots.
- What is Night Mode? Night mode is an iPhone feature that automatically activates in low-light environments. It uses a combination of longer exposure times and image processing to brighten the image and reduce noise.
- Which iPhones Have Night Mode? Night mode is available on iPhone 11 and later models, including the iPhone 11 Pro, iPhone 11 Pro Max, iPhone 12 series, iPhone 13 series, iPhone 14 series and iPhone 15 series.
- How to Use Night Mode: To use Night mode, simply open the Camera app in a dark environment. The Night mode icon (a moon symbol) will appear in the top left corner of the screen. Tap the icon to activate Night mode. The iPhone will automatically determine the exposure time, but you can adjust it manually by tapping the Night mode icon and using the slider above the shutter button.
- Benefits of Using Night Mode: Night mode allows you to capture brighter, more detailed photos in low-light conditions. It reduces noise and improves color accuracy, resulting in stunning night sky photos.
2. Essential Equipment for iPhone Star Photography
While the iPhone is a powerful tool for photography, certain accessories can enhance your ability to capture the night sky. A tripod is essential for keeping your iPhone steady during long exposures, and a remote shutter release can prevent camera shake.
- Why Use a Tripod? A tripod keeps your iPhone stable during long exposures, which are necessary for capturing faint stars and details in the night sky. Without a tripod, your photos will likely be blurry due to camera shake.
- Choosing the Right Tripod: Look for a lightweight, portable tripod that is easy to carry and set up. A tripod with adjustable legs is ideal for uneven terrain.
- What is a Remote Shutter Release? A remote shutter release allows you to trigger the iPhone’s shutter without touching the device, preventing camera shake.
- Types of Remote Shutter Releases: You can use a wired remote shutter release or a Bluetooth remote shutter release. Bluetooth remotes are more convenient, as they don’t require a cable.
3. Mastering Manual Settings on Your iPhone
While Night mode is helpful, understanding manual settings can give you more control over your iPhone star photography. Apps like ProCamera and Camera+ allow you to adjust settings like ISO, shutter speed, and white balance, enabling you to fine-tune your images.
- Why Use Manual Settings? Manual settings allow you to adjust the iPhone’s camera settings to optimize them for the specific conditions of the night sky. This can result in sharper, more detailed photos.
- What is ISO? ISO measures the sensitivity of the camera’s sensor to light. A higher ISO allows you to capture more light, but it can also introduce noise into the image.
- Setting the ISO for Star Photography: Start with a low ISO (e.g., 100 or 200) and gradually increase it until you can see the stars in the viewfinder. Be careful not to increase the ISO too much, as this will introduce noise.
- What is Shutter Speed? Shutter speed is the length of time the camera’s shutter is open, exposing the sensor to light. A longer shutter speed allows you to capture more light, but it can also result in motion blur if the iPhone is not stable.
- Setting the Shutter Speed for Star Photography: Start with a slow shutter speed (e.g., 1 second) and gradually increase it until you can capture the stars. Be sure to use a tripod to keep the iPhone steady.
- What is White Balance? White balance adjusts the colors in the image to make them appear more natural.
- Setting the White Balance for Star Photography: Experiment with different white balance settings to see which one looks best. The “Auto” setting often works well, but you can also try settings like “Daylight” or “Cloudy.”
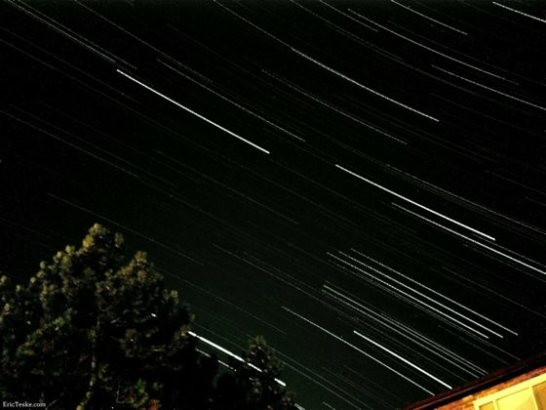
4. Capturing Star Trails with Your iPhone
Star trails are created by capturing the movement of stars across the sky over a long period of time. This can be achieved by using a long exposure or by stacking multiple shorter exposures together.
- How to Capture Star Trails: To capture star trails, you need to use a long exposure. This can be done using the iPhone’s built-in camera app or a third-party app like NightCap.
 iPhone Night Sky Photography With Alt Long Exposure
- Using NightCap for Star Trails: NightCap is an iPhone app that allows you to take long exposures. To use NightCap for star trails, set the app to “Star Trails” mode and place your iPhone on a tripod. The app will automatically take a series of long exposures and stack them together to create the star trail effect.
- Stacking Multiple Exposures for Star Trails: Another way to create star trails is to take a series of shorter exposures and stack them together using software like StarStaX. This method gives you more control over the final image, but it requires more processing.
5. Focusing Techniques for Sharp Star Photos
Achieving sharp focus is crucial for capturing detailed star photos. Since the iPhone’s autofocus may struggle in low light, manual focusing is often the best option.
- How to Focus Manually: To focus manually, tap the screen in the Camera app to bring up the focus slider. Then, drag the slider until the stars appear sharp in the viewfinder.
- Using Focus Peaking: Some third-party camera apps offer a feature called focus peaking, which highlights the areas of the image that are in focus. This can be helpful for achieving accurate focus in low light.
6. Avoiding Common Mistakes in iPhone Astrophotography
Several common mistakes can hinder your iPhone astrophotography efforts. Avoiding these pitfalls can significantly improve your results.
- Camera Shake: Camera shake is one of the biggest challenges in night photography. To avoid camera shake, use a tripod and a remote shutter release.
- Light Pollution: Light pollution can wash out the stars and make it difficult to capture a clear image of the night sky. To minimize light pollution, find a location away from city lights.
- Incorrect Exposure: Using the wrong exposure settings can result in photos that are too dark or too bright. Experiment with different ISO, shutter speed, and aperture settings to find the optimal exposure for your situation.
- Dirty Lens: A dirty lens can cause blurry or distorted images. Clean your iPhone’s lens regularly with a soft, lint-free cloth.
7. Best iPhone Apps for Night Sky Photography
Several apps can enhance your iPhone’s capabilities for night sky photography. These apps offer features like manual controls, long exposure modes, and advanced image processing.
- NightCap: NightCap is an iPhone app specifically designed for night photography. It offers features like manual controls, long exposure modes, and star trail mode.
- ProCamera: ProCamera is a professional-grade camera app that gives you complete control over your iPhone’s camera settings. It offers features like manual focus, ISO, shutter speed, and white balance.
- Camera+: Camera+ is another popular camera app that offers a wide range of features, including manual controls, RAW capture, and advanced editing tools.
8. Post-Processing Your iPhone Star Photos
Post-processing is an essential step in creating stunning iPhone star photos. Apps like Snapseed and Adobe Lightroom Mobile allow you to enhance your images by adjusting brightness, contrast, color, and sharpness.
- Why Post-Process Your Photos? Post-processing allows you to enhance the colors, contrast, and details in your photos, resulting in a more visually appealing final product.
- Snapseed: Snapseed is a free photo editing app that offers a wide range of tools, including brightness, contrast, saturation, and sharpness adjustments.
- Adobe Lightroom Mobile: Adobe Lightroom Mobile is a professional-grade photo editing app that offers more advanced features than Snapseed. It allows you to adjust individual colors, remove noise, and correct lens distortion.
9. Finding the Best Locations for Stargazing in the USA
The location you choose can greatly impact the quality of your night sky photos. Areas with minimal light pollution and clear skies are ideal for stargazing and astrophotography.
- Cherry Springs State Park, Pennsylvania: This park is designated as a Dark Sky Park by the International Dark-Sky Association, offering exceptionally dark skies for stargazing.
- Death Valley National Park, California: Death Valley’s remote location and low humidity make it an excellent spot for viewing the Milky Way and other celestial objects.
- Big Bend National Park, Texas: With its vast expanse and minimal light pollution, Big Bend offers some of the darkest skies in the United States.
- Santa Fe, New Mexico: Known for its clear skies and high altitude, Santa Fe provides excellent conditions for stargazing.
10. Understanding Light Pollution and Its Impact
Light pollution is a major obstacle for astrophotographers. Understanding its effects and how to minimize them can significantly improve your photos.
- What is Light Pollution? Light pollution is the excessive or misdirected artificial light. It can wash out the stars and make it difficult to see the night sky.
- How Does Light Pollution Affect Astrophotography? Light pollution reduces the contrast between the stars and the sky, making it harder to capture faint objects. It can also introduce unwanted colors into your photos.
- Minimizing Light Pollution: To minimize light pollution, find a location away from city lights. You can also use a light pollution filter on your iPhone’s lens to block out some of the artificial light.
11. Composition Tips for Stunning Star Photos
Composition is key to creating visually appealing star photos. Consider incorporating foreground elements, such as trees, mountains, or buildings, to add depth and interest to your images.
- Rule of Thirds: The rule of thirds is a compositional guideline that suggests dividing the image into thirds, both horizontally and vertically, and placing the main subject at one of the intersections.
- Leading Lines: Leading lines are lines that draw the viewer’s eye into the image. They can be roads, rivers, or even rows of trees.
- Foreground Elements: Adding foreground elements to your star photos can add depth and interest to the image. Consider incorporating trees, mountains, or buildings into your compositions.
12. Understanding Atmospheric Conditions
Atmospheric conditions can greatly impact the clarity of the night sky. Factors like humidity, clouds, and atmospheric turbulence can affect the visibility of stars.
- Humidity: High humidity can scatter light and reduce the clarity of the night sky.
- Clouds: Clouds can block the stars and make it impossible to capture a clear image of the night sky.
- Atmospheric Turbulence: Atmospheric turbulence can cause the stars to twinkle, which can make it difficult to achieve sharp focus.
13. Using Filters for iPhone Astrophotography
Filters can be used to enhance your iPhone’s ability to capture the night sky. Light pollution filters can block out artificial light, while star filters can create a more dramatic effect.
- Light Pollution Filters: Light pollution filters block out artificial light, making it easier to capture faint stars.
- Star Filters: Star filters create a starburst effect around bright stars, adding a dramatic touch to your photos.
14. Capturing the Milky Way with Your iPhone
The Milky Way is a stunning sight that can be captured with your iPhone. To capture the Milky Way, you need to find a location with dark skies and a clear view of the horizon.
- Finding a Dark Sky Location: To capture the Milky Way, you need to find a location with minimal light pollution.
- Planning Your Shot: Use a stargazing app like SkyView Lite to find out when and where the Milky Way will be visible.
- Camera Settings: Use a slow shutter speed (e.g., 30 seconds), a wide aperture (e.g., f/1.8), and a high ISO (e.g., 3200).
- Post-Processing: In post-processing, adjust the brightness, contrast, and saturation to bring out the details in the Milky Way.
15. Sharing Your iPhone Star Photos
Once you’ve captured your stunning iPhone star photos, you’ll want to share them with the world. Social media platforms like Instagram and Facebook are great places to showcase your work.
- Instagram: Instagram is a popular platform for sharing photos. Use relevant hashtags like #astrophotography, #nightphotography, and #iphonephotography to reach a wider audience.
- Facebook: Facebook is another great platform for sharing your photos. Join photography groups and share your work with other photographers.
16. Astrophotography Projects to Try with Your iPhone
Looking for some inspiration? Here are a few astrophotography projects you can try with your iPhone.
- Time-Lapse Videos: Create a time-lapse video of the night sky by taking a series of photos over a long period of time and stringing them together.
- Panoramic Star Photos: Capture a wide-angle view of the night sky by taking a series of overlapping photos and stitching them together.
- Constellation Photography: Capture photos of your favorite constellations by using a stargazing app to locate them in the night sky.
17. iPhone Camera Settings for Different Night Sky Objects
Different night sky objects require different camera settings. Here are some general guidelines for capturing various celestial objects.
| Object | Shutter Speed | ISO | Aperture |
|---|---|---|---|
| Stars | 1-30 seconds | 800-3200 | f/1.8-f/2.8 |
| Moon | 1/250 second | 100-200 | f/2.8 |
| Milky Way | 20-30 seconds | 3200-6400 | f/1.8-f/2.8 |
| Star Trails | Long exposure | 100-400 | f/2.8 |
18. How to Track Satellites and the International Space Station with Your iPhone
With the right apps, you can use your iPhone to track satellites and the International Space Station (ISS) as they pass overhead.
- Satellite Tracking Apps: Apps like SkyView Lite and ISS Detector can help you locate satellites and the ISS in the night sky.
- Planning Your Shot: Use a satellite tracking app to find out when and where the ISS or other satellites will be visible.
- Camera Settings: Use a fast shutter speed (e.g., 1/250 second) and a high ISO (e.g., 3200) to capture the satellites as they move across the sky.
19. Understanding RAW Image Format and Its Benefits
RAW image format captures all the data recorded by your iPhone’s camera sensor, giving you more flexibility in post-processing.
- What is RAW Image Format? RAW image format is an uncompressed image format that contains all the data recorded by the camera’s sensor.
- Benefits of Using RAW Image Format: RAW images provide more detail and dynamic range than JPEG images, making them ideal for astrophotography. They also give you more flexibility in post-processing, allowing you to adjust the exposure, white balance, and other settings without losing image quality.
- How to Capture RAW Images on Your iPhone: Some third-party camera apps, like ProCamera and Camera+, allow you to capture RAW images.
20. Join a Photography Community
Joining a photography community can provide you with inspiration, feedback, and support. You can find photography communities online or in your local area.
- Online Photography Communities: Online photography communities like Flickr and 500px are great places to share your photos, get feedback, and connect with other photographers.
- Local Photography Clubs: Local photography clubs offer opportunities to meet other photographers in your area, attend workshops, and participate in photo competitions.
FAQ: Taking Photos of Stars on iPhone
- Is it possible to take pictures of stars with an iPhone? Yes, it is possible to take pictures of stars with an iPhone, especially with newer models that have improved low-light capabilities. Using features like Night mode and manual settings can help you capture stunning images of the night sky.
- What equipment do I need to photograph stars with my iPhone? The basic equipment you need is an iPhone with a good camera, a tripod to keep your phone steady, and potentially a remote shutter release to avoid camera shake. Apps that offer manual control over camera settings are also beneficial.
- What are the best iPhone settings for capturing stars? The best settings include using a slow shutter speed (e.g., 1-30 seconds), a high ISO (e.g., 800-3200), and a wide aperture (e.g., f/1.8-f/2.8). Adjust these based on the specific conditions and the object you’re trying to photograph.
- How do I focus my iPhone to take pictures of stars? Since autofocus struggles in low light, manual focus is best. Tap the screen to bring up the focus slider and adjust until the stars appear sharp. Some apps offer focus peaking, which highlights areas in focus.
- How can I minimize light pollution when photographing stars? To minimize light pollution, find a location away from city lights. Use apps that show dark sky locations. Light pollution filters can also help reduce the impact of artificial light.
- What is the best app for iPhone astrophotography? Several apps enhance iPhone astrophotography. NightCap is designed specifically for night photography, while ProCamera and Camera+ offer extensive manual controls and RAW capture.
- How do I capture star trails with my iPhone? Star trails can be captured by taking very long exposures or stacking multiple shorter exposures. Use NightCap’s star trail mode or stack images in post-processing software like StarStaX.
- What post-processing techniques should I use for iPhone star photos? Post-processing is crucial. Use apps like Snapseed and Adobe Lightroom Mobile to adjust brightness, contrast, color, and sharpness. RAW format images provide more flexibility during editing.
- Can I capture the Milky Way with my iPhone? Yes, capturing the Milky Way requires a dark sky location, a clear view of the horizon, and the right camera settings: slow shutter speed, wide aperture, and high ISO. Post-processing is essential to bring out the details.
- How do I track satellites with my iPhone? Use satellite tracking apps like SkyView Lite and ISS Detector to find out when and where satellites or the ISS will be visible. Use a fast shutter speed and high ISO to capture them as they move.
Visit dfphoto.net today to learn more about iPhone photography and discover how to capture stunning images of the night sky. Explore our tutorials, browse our gallery for inspiration, and join our community of passionate photographers. Address: 1600 St Michael’s Dr, Santa Fe, NM 87505, United States. Phone: +1 (505) 471-6001. Website: dfphoto.net.