The allure of the Northern Lights, or Aurora Borealis, is undeniable. Witnessing the sky dance with vibrant colors is a bucket-list experience for many. You might think capturing this celestial phenomenon requires professional equipment, but surprisingly, your iPhone is more capable than you might imagine. With the right settings and a few key accessories, you can capture breathtaking photos of the Northern Lights using just your iPhone. This guide will walk you through everything you need to know to photograph the Aurora Borealis with your iPhone, making it easier than ever to preserve your memories of this incredible spectacle.
Essential iPhone Settings for Aurora Photography
Setting up your iPhone correctly is crucial for capturing the Northern Lights. While it might seem technical, the process is quite straightforward. The most important feature you’ll need to understand and utilize is Night Mode.
Mastering Night Mode
Night Mode on your iPhone is a game-changer for low-light photography, and it’s absolutely essential for capturing the Aurora. This feature automatically activates in dark environments, allowing your iPhone camera sensor to stay open longer, gathering more light and detail. This process is known as long exposure photography. The exposure time, which determines how long the camera sensor is exposed to light, is key to capturing the faint glow of the Northern Lights.
By default, iPhone’s Night Mode automatically adjusts the exposure time between 1 and 3 seconds depending on the darkness. However, for capturing the Northern Lights, we need to maximize this exposure time. Here’s how to manually set Night Mode to its maximum setting:
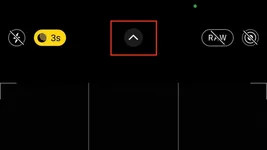
- Reveal the Settings Menu: In your iPhone’s camera app, tap the arrow at the top of the screen to reveal a hidden settings menu at the bottom.
- Access Night Mode Settings: Look for the Night Mode icon (it resembles a crescent moon) within the settings menu and tap it.
- Adjust Exposure Time: A slider will appear above the settings menu, allowing you to adjust the Night Mode exposure time.
- Maximize Exposure: Slide the Night Mode slider all the way to the right to “Max”.
 Accessing Night Mode settings on iPhone camera app
 Locating the Night Mode icon in the settings menu
 Adjusting Night Mode exposure time using the slider
 Setting Night Mode to Max for optimal Northern Lights photography
When set to “Max”, Night Mode will attempt a 10-second exposure if it detects any movement, such as hand shake. However, when using a tripod, the “Max” value extends to an ideal 30 seconds. This longer exposure is crucial for capturing the faint details and colors of the Aurora Borealis. While a 10-second exposure might capture something, the image quality will be significantly better with a 30-second exposure. Aim for that maximum 30-second Night Mode exposure for the best possible Northern Lights photos. In cases of exceptionally bright Aurora displays, the “Max” value might automatically adjust to slightly less than 30 seconds, like 27 or 22 seconds.
Even with a tripod, consider your environment. Vibrations can affect the exposure time. Avoid placing your tripod on unstable surfaces or locations prone to movement, such as a car hood with the engine running. Windy conditions can also introduce unwanted motion blur, making it challenging to achieve a full 30-second exposure.
Fine-Tuning Exposure Adjustment
In certain situations, you might encounter overexposed photos even with Night Mode. This can happen in environments with reflective surfaces like snow-covered landscapes, which are common in Northern Lights viewing locations during winter. The snow reflects ambient light, and Night Mode’s long exposure can amplify this brightness, resulting in photos that are too bright and lack detail. This is where Exposure Adjustment comes into play.
Exposure Adjustment allows you to fine-tune the overall brightness of your photos. It might seem counterintuitive since Night Mode is about capturing light in the dark, but Exposure Adjustment helps prevent overexposure and preserve details in bright areas of your night photos.
To access Exposure Adjustment, open the same hidden settings menu in your camera app (by tapping the top arrow). Look for the Exposure Adjustment icon – it’s a circle with a “+” and “-” symbol inside. Tap this icon, and a slider will appear. To reduce brightness, slide the exposure slider to the left, into the negative values. The current Exposure Adjustment value will be displayed at the top of your screen, next to the Night Mode indicator. Experiment with different negative values to find what works best for your specific scene. A good starting point is -0.7.
 Accessing Exposure Adjustment settings in iPhone camera app
 Locating the Exposure Adjustment icon in the settings menu
 Adjusting Exposure using the slider to reduce brightness
There’s no single “best” Exposure Adjustment value; it depends entirely on your surroundings. Experiment with different negative values and review your photos to see what yields the best results. Remember to reset Exposure Adjustment back to 0 when you no longer need it, especially for daytime photography.
Preserving Your Preferred Settings
To avoid having to readjust Night Mode and Exposure Adjustment every time you open the camera app, you can tell your iPhone to preserve these settings. This is especially useful for Night Mode, as you’ll likely want it enabled for all your Aurora photography sessions.
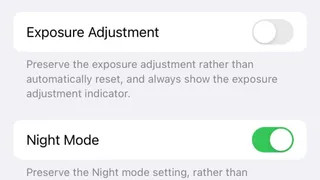
To preserve camera settings, navigate to Settings > Camera > Preserve Settings. Here, you’ll find toggles for Exposure Adjustment and Night Mode.
 iPhone Preserve Camera Settings menu in Settings app
Consider preserving Night Mode as it automatically disengages in well-lit conditions, like during the day. This ensures you don’t accidentally forget to turn it on when you need it for night photography. However, use caution when preserving Exposure Adjustment. If you leave a negative Exposure Adjustment value enabled, you might inadvertently take underexposed photos during the day without realizing it. It’s often better to manually adjust Exposure Adjustment as needed for specific shooting scenarios.
Choosing the Right iPhone for Northern Lights Photography
You’ll need an iPhone model from iPhone 11 onwards to access Night Mode and photograph the Northern Lights. Night Mode is not available on older iPhone models.
While iPhone 11 can capture the Aurora, newer iPhone models, particularly iPhone 13 and later, offer significant improvements in image quality, especially in low light. Despite claims that iPhone camera improvements are incremental, real-world tests show noticeable differences. Comparing photos taken with iPhone 11 Pro, 12 Pro, and 13 Pro clearly demonstrates the advancements in image clarity, reduced noise, and overall low-light performance in newer models.
 iPhone 11 Pro Northern Lights Photo Sample
 iPhone 12 Pro Northern Lights Photo Sample
 iPhone 13 Pro Northern Lights Photo Sample
From left to right: iPhone 11 Pro, iPhone 12 Pro, iPhone 13 Pro Northern Lights photo samples demonstrating improved quality with newer models.
While the intensity of the Northern Lights plays a significant role, the advancements in iPhone camera technology are evident. Newer iPhones capture more detail in the sky, stars, and surrounding landscapes, with reduced noise and improved clarity. iPhone 13 Pro and later models even excel at capturing details like the Milky Way, as seen in this unedited photo taken with iPhone 13 Pro:
 Milky Way photograph taken with iPhone 13 Pro, unedited, showcasing low light capabilities
iPhone 13 Pro and later models also offer improved video recording capabilities in low light, making it possible to capture decent videos of the Northern Lights, a feat less achievable with older models like the iPhone 12 Pro.
Must-Have Accessory: The Tripod
A tripod is an indispensable accessory for iPhone Northern Lights photography. Since Night Mode relies on long exposures, keeping your iPhone perfectly still for up to 30 seconds is impossible to achieve handheld. A tripod eliminates camera shake, resulting in sharp, clear photos of the Aurora.
The market offers a vast array of tripods, catering to various budgets and needs. When choosing a tripod for your iPhone Aurora photography, prioritize stability and portability. While there’s no single tripod recommendation, consider factors like build quality and budget. Avoid flimsy, low-quality tripods that might compromise stability, especially in windy conditions.
Personal experience highlights the importance of tripod durability, particularly in cold weather. Plastic components in some tripods can become brittle and prone to cracking in freezing temperatures.
Despite the crack, the tripod shown is still usable, but positioning becomes cumbersome, and it might shift during long exposures. Consider tripods with metal components for increased durability in cold climates.
For travelers seeking a balance of portability and functionality, the Joby tripod is a popular option. It’s compact and lightweight, making it easy to carry, although its plastic construction may limit its long-term durability in extreme cold. For casual travelers and amateur photographers, it provides a good balance of convenience and performance.
Powering Your iPhone in the Cold
Cold temperatures significantly impact iPhone battery life. Expect your battery to drain much faster than usual when photographing the Northern Lights in freezing conditions. To avoid a dead battery mid- Aurora display, carry a portable charger or power bank.
Additionally, keeping your iPhone warm can help prolong battery life. When not actively taking photos, store your iPhone in an inside pocket of your coat to insulate it from the cold air. This simple trick can make a noticeable difference in battery performance in freezing temperatures. Any portable power bank will work, ensuring you have backup power to capture the entire Aurora show.
With your iPhone settings optimized, a sturdy tripod, and a plan for keeping your battery alive, you’re well-equipped to capture stunning photos of the Northern Lights. The next step is to learn how to find and chase the Aurora to maximize your chances of witnessing and photographing this incredible natural wonder.
How To Chase The Northern Lights – Aurora Borealis
The Diary Of 24 Consecutive Days Of Northern Lights Chasing – Aurora Borealis
How To Stay Warm While Photo Shooting The Northern Lights – Aurora Borealis
Northern Lights Tour Suggestions
If you’re new to Northern Lights photography or prefer guided experiences, consider joining a Northern Lights photography tour. Get Your Guide offers a variety of Northern Lights tours to suit different budgets and locations. When selecting a tour, look for options with small groups, experienced photographers as guides, high ratings, and favorable cancellation policies for the best experience.