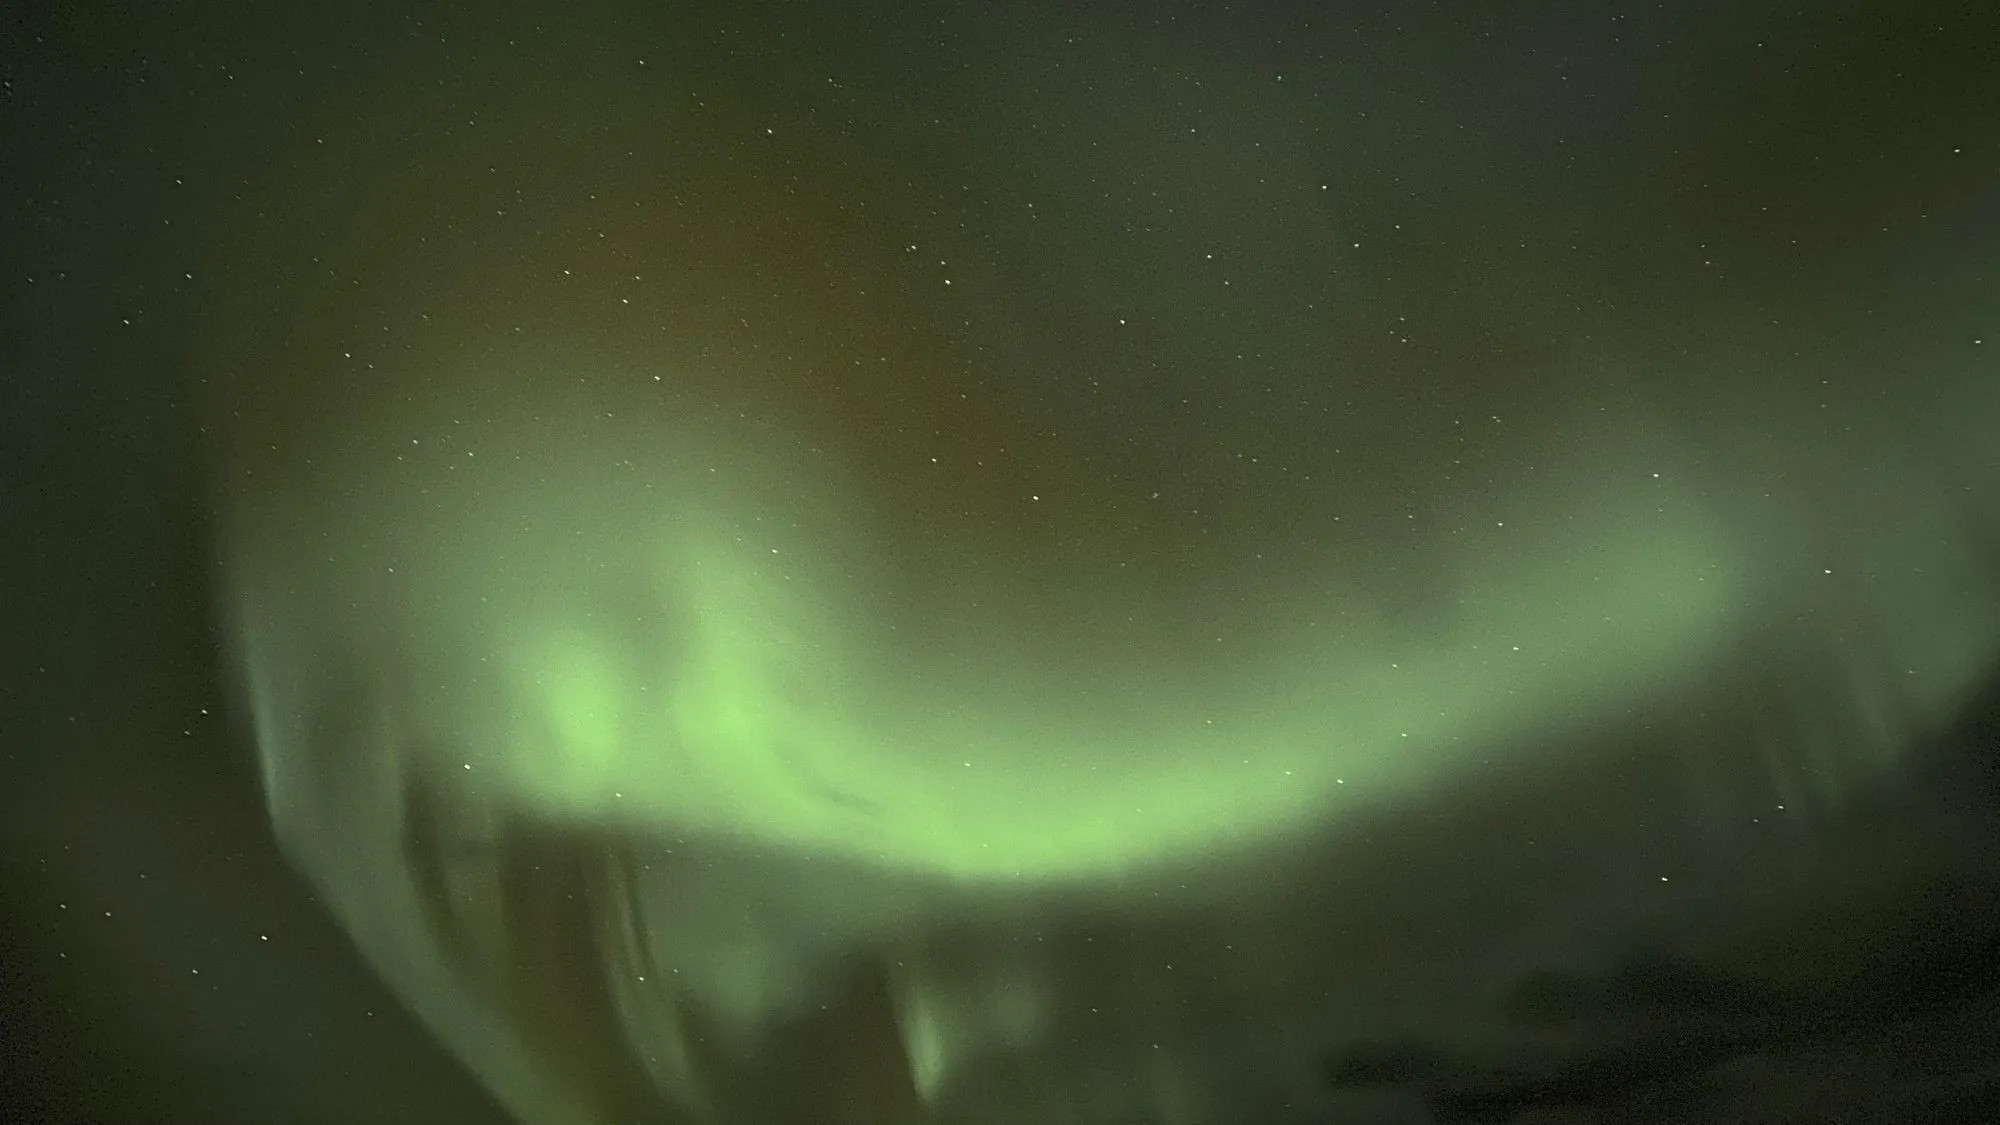
Witnessing the ethereal dance of the Northern Lights, or Aurora Borealis, is a dream for many. The vibrant colors painting the night sky are a spectacle unlike any other. You might be surprised to learn that capturing this magical phenomenon is now easier than ever, right from your pocket, using your iPhone. While professional cameras have long been the go-to for aurora photography, advancements in smartphone technology mean you can now take impressive Northern Lights photos with just your iPhone. This guide will walk you through the essential steps and settings to master iPhone Northern Lights photography, ensuring you capture those unforgettable moments.
iPhone Settings for Capturing the Aurora Borealis
Getting your iPhone ready to photograph the Northern Lights might seem daunting, but it’s surprisingly straightforward. The most crucial element is understanding and utilizing your iPhone’s Night Mode. Without it, capturing the faint, dancing lights of the aurora will be nearly impossible. Let’s dive into the necessary settings.
Mastering Night Mode
Night Mode is a game-changer for low-light photography on iPhones. It automatically activates in dark environments, indicated by a yellow moon icon appearing in the top left corner of your camera app. This mode essentially uses long exposure, keeping the camera sensor open longer to gather more light and detail. Think of it as your iPhone’s way of seeing in the dark. By default, Night Mode automatically selects an exposure time between 1 and 3 seconds, depending on the darkness. However, for the subtle glow of the Northern Lights, we need to push this exposure time to its maximum. Here’s how:
-
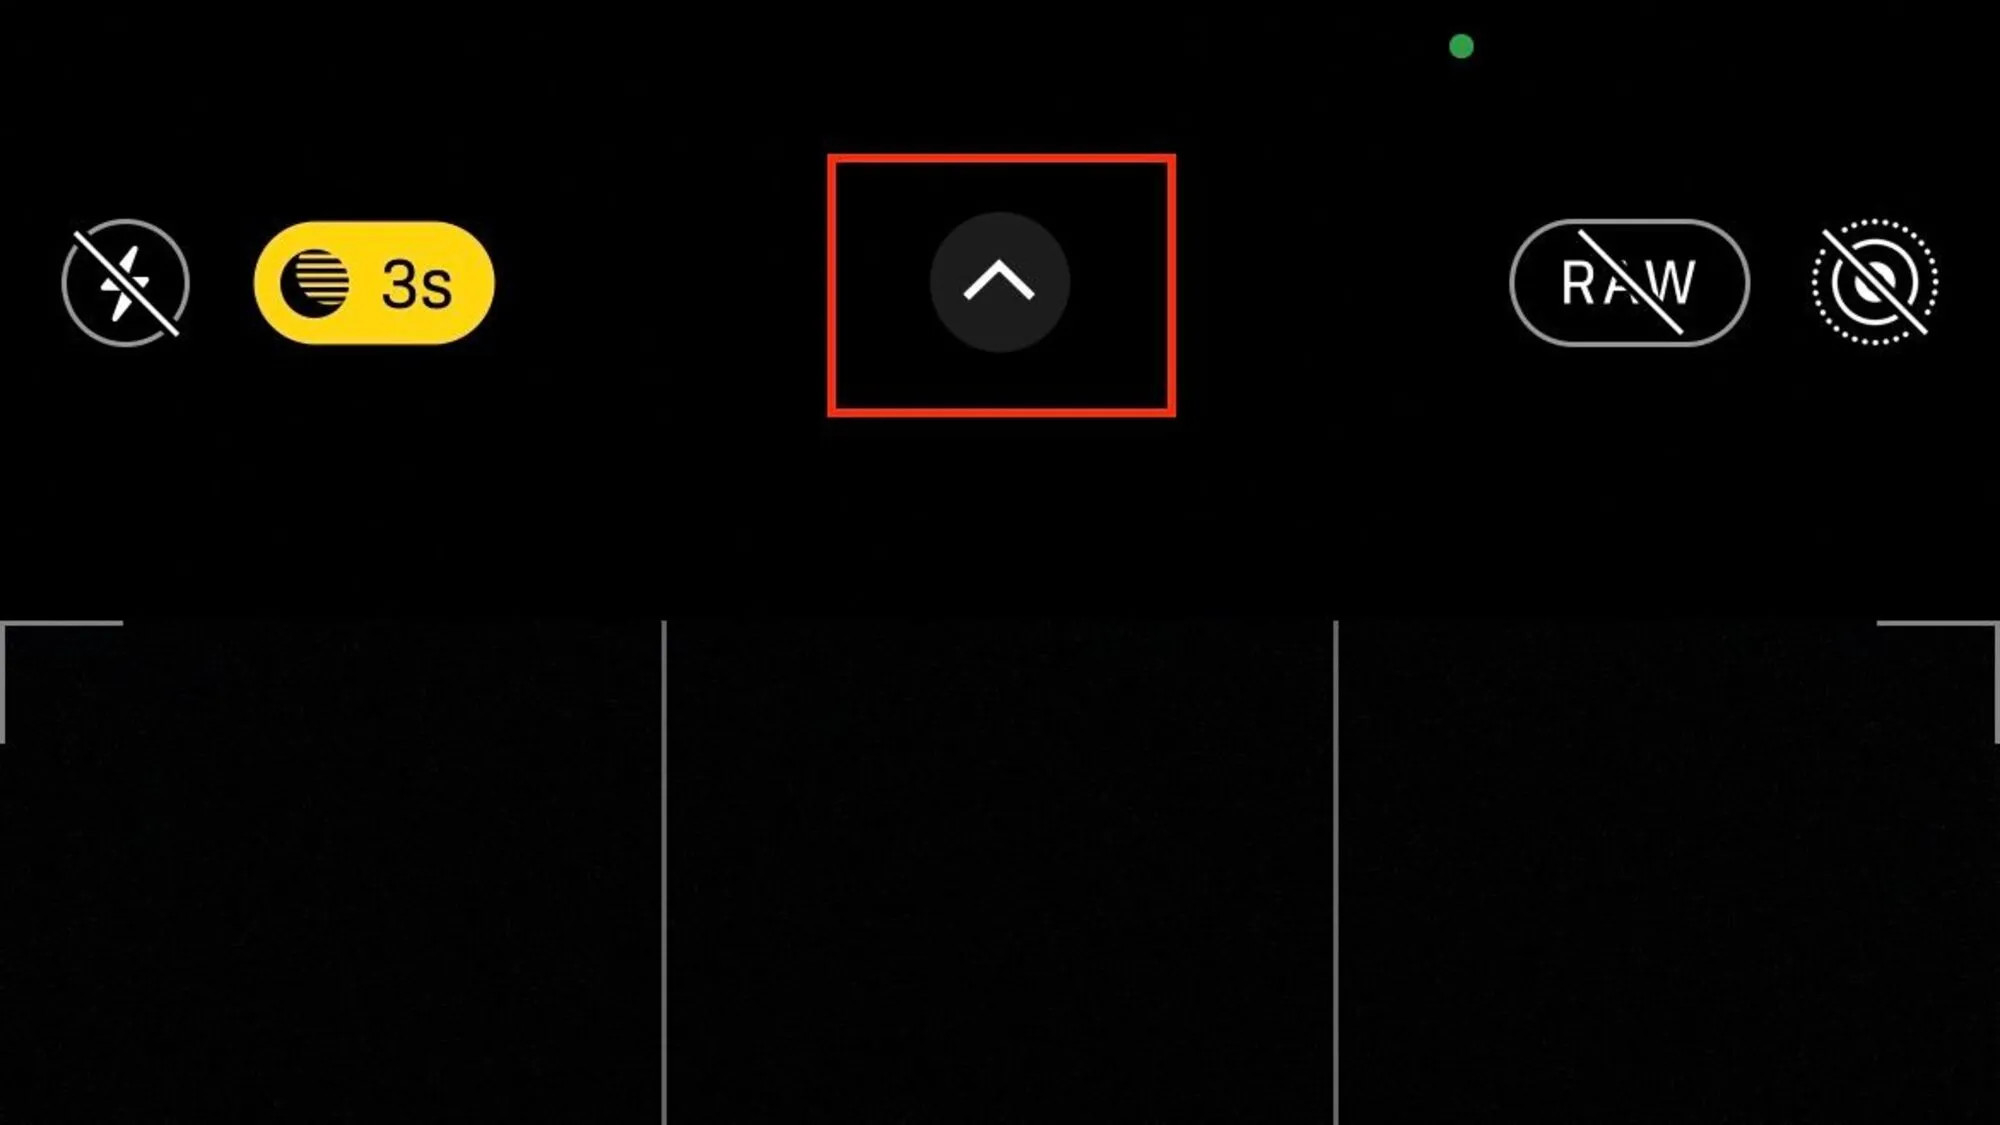
Reveal the Hidden Menu: Tap the small arrow at the top of your iPhone screen while in the camera app. This will reveal a hidden menu bar at the bottom.
-
Access Night Mode Settings: Locate the Night Mode icon (the yellow moon) in the menu bar and tap it.
-
Adjust Exposure Time: A slider will appear above the menu bar, allowing you to control the exposure duration.
-
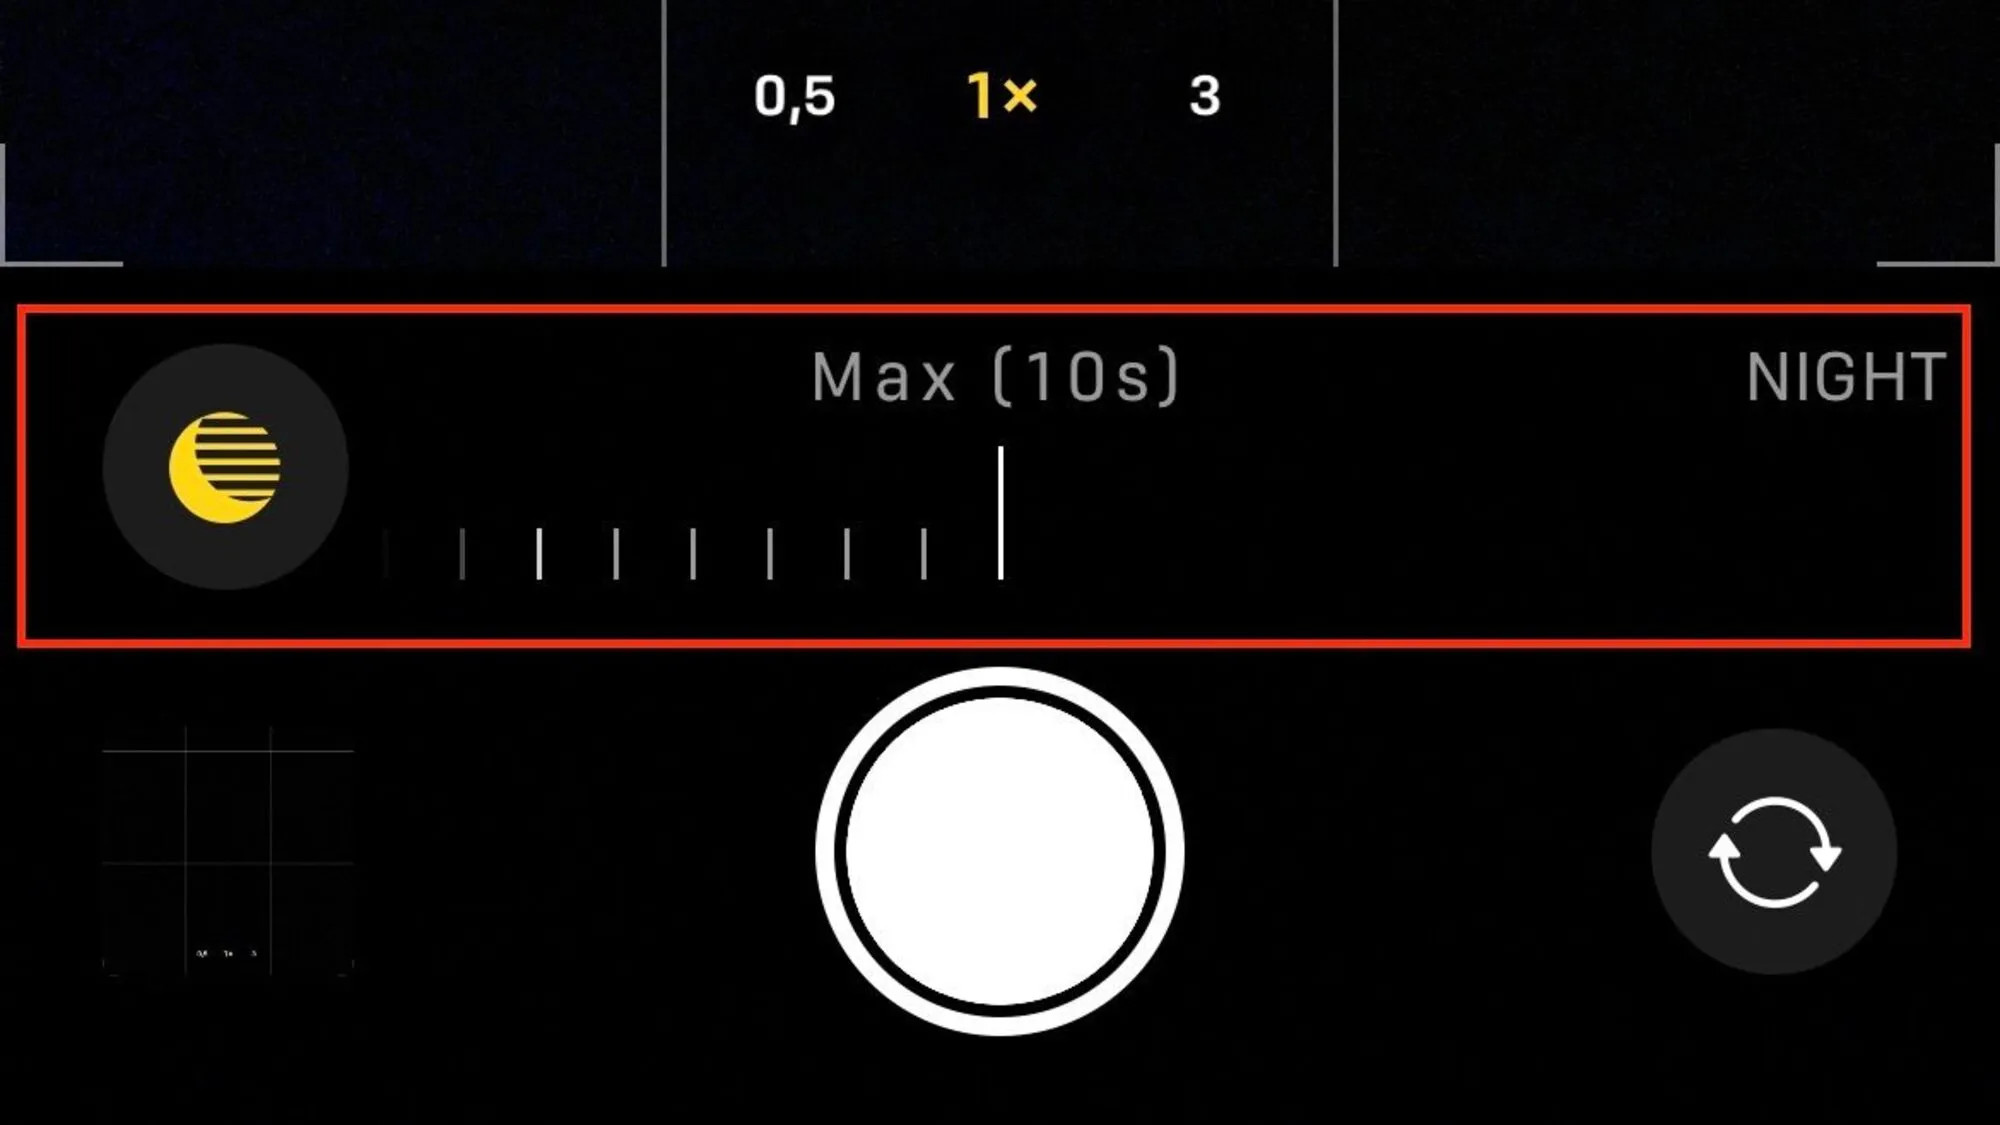
Maximize Exposure for Aurora: Slide the Night Mode slider all the way to the right, selecting “Max”.
 iPhone Night Mode settings showing the slider to adjust exposure time
 Hand holding an iPhone showing the Night Mode setting maximized in the camera app
Achieving 30-Second Exposures for Optimal Aurora Shots
Setting Night Mode to “Max” doesn’t automatically guarantee the longest possible exposure every time. If your iPhone detects movement, like shaky hands, it will limit the exposure to around 10 seconds to prevent blurry photos. However, when using a tripod, your iPhone can extend the exposure up to a crucial 30 seconds. This longer exposure is vital for capturing the subtle details and vibrant colors of the Northern Lights. While you might capture something at 10 seconds, the image quality will be significantly better with a 30-second exposure. For the best iPhone aurora photography, aim for that 30-second sweet spot.
Interestingly, when the Aurora Borealis is exceptionally bright, your iPhone might automatically reduce the maximum Night Mode exposure time, sometimes to 27 or even 22 seconds. This is because even shorter exposures can capture sufficient light in intense aurora displays.
Even with a tripod, the environment matters. Placing your tripod on a vibrating surface, like a car hood with the engine running, can trick your iPhone into using a shorter exposure. Windy conditions can also introduce subtle movements, preventing the 30-second exposure. Choose a stable, sheltered location for your tripod to ensure you achieve the longest possible exposure time and capture the clearest Northern Lights photos.
Fine-Tuning Brightness with Exposure Adjustment
While Night Mode is essential for brightening dark scenes, sometimes you might encounter situations where your photos become too bright, even at night. This often happens in snowy landscapes, where snow reflects a significant amount of light. In these scenarios, your Night Mode photos might appear overexposed, losing detail in the brighter areas. This is where Exposure Adjustment comes into play.
Despite the similar-sounding names, Night Mode (long exposure for capturing light in the dark) and Exposure Adjustment (fine-tuning brightness to prevent overexposure) serve different but complementary purposes.
To access Exposure Adjustment, use the same hidden menu you used for Night Mode (tap the top arrow). Look for the icon with a “+/-” symbol inside a circle. Tapping this will activate the Exposure Adjustment slider. To darken your image and reduce overexposure, slide the slider to the left, into the negative values. The current Exposure Adjustment value will be displayed at the top of your screen, next to the Night Mode indicator. Experiment with different negative values to find what works best for your specific lighting conditions. Starting with -0.7 is a good point to begin.
Remember, there’s no single “best” Exposure Adjustment value. It’s highly dependent on your surroundings and the brightness of the aurora. Experimentation is key to finding the optimal setting for your iPhone Northern Lights photos. If you choose to preserve this setting (explained below), remember to reset it to 0 when you no longer need it to avoid unintentionally dark photos in normal lighting conditions.
Preserving Your Preferred Camera Settings
For convenience, your iPhone allows you to preserve certain camera settings, including Night Mode and Exposure Adjustment. This can be helpful if you plan to frequently photograph the Northern Lights or other night scenes. To manage these settings, navigate to Settings > Camera > Preserve Settings.
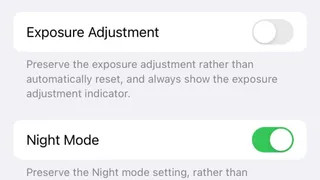 Screenshot of iPhone settings menu highlighting "Preserve Settings" under the Camera options
Preserving Night Mode can be useful as it automatically disengages in well-lit environments, like daytime. However, preserving Exposure Adjustment might be less practical. It’s easy to forget you’ve adjusted it, leading to unexpectedly dark photos in daylight. Since Exposure Adjustment is situational, it’s generally better to manually adjust it each time you need it rather than preserving the setting.
Which iPhone Models Excel at Northern Lights Photography?
To effectively capture the Northern Lights with your iPhone, you’ll need a model that supports Night Mode. This feature was introduced with the iPhone 11 and is available on all subsequent models. So, any iPhone from the iPhone 11 onwards will technically work.
However, while you can photograph the aurora with an iPhone 11, the image quality from newer models, like the iPhone 13 and later, is noticeably superior. Despite claims that iPhone cameras haven’t significantly improved over the years, real-world testing proves otherwise. We’ve personally photographed the Northern Lights using iPhone 11 Pro, 12 Pro, and 13 Pro, and the difference in image quality is undeniable, particularly in low light performance. Newer iPhones capture more detail, less noise, and richer colors, resulting in more stunning aurora photos.
 Comparison of Northern Lights photos taken with iPhone 11 Pro, iPhone 12 Pro, and iPhone 13 Pro from left to right
The intensity of the Northern Lights certainly plays a role in the final image, but the advancements in iPhone camera technology are evident. With the iPhone 13 Pro, we’ve even captured stunning, unedited photos of the Milky Way, showcasing its exceptional low-light capabilities.
Furthermore, the iPhone 13 Pro’s video capabilities are also enhanced, allowing for decent Northern Lights videos, a feat less achievable with earlier models like the iPhone 12 Pro.
The Indispensable Accessory: A Tripod
If you’re serious about capturing sharp, detailed photos of the Northern Lights with your iPhone, a tripod is not just an accessory – it’s a necessity. Night photography requires long exposures, and even the slightest hand movement during a multi-second exposure will result in blurry images. A tripod stabilizes your iPhone, allowing for those crucial 30-second exposures needed to capture the aurora’s magic.
The market offers a vast array of tripods, catering to different budgets and needs. When choosing a tripod for iPhone Northern Lights photography, prioritize stability and portability. While we can’t recommend a specific model due to varying personal preferences and tripod durability issues (even ours break!), consider these factors: budget, material quality, and portability.
We have been using Joby tripods for their compact size and travel-friendliness. However, we’ve experienced breakages, particularly in cold weather, suggesting that plastic components might be vulnerable in freezing temperatures.
Despite the crack, our Joby tripod is still functional but less reliable, making precise positioning challenging. For your next tripod purchase, especially for aurora photography in cold regions, consider models with metal components for increased durability in low temperatures.
Despite the durability concerns in extreme cold, we opted for another Joby tripod due to its portability and light weight, ideal for travel. For travelers and amateur photographers, the Joby tripod remains a convenient and versatile option. Check out the Joby Tripod here.
Powering Through the Cold: iPhone Battery Tips
Cold weather is notorious for draining iPhone batteries rapidly. When you’re out chasing the Northern Lights in freezing temperatures, battery life becomes a critical concern. Always carry a portable power bank to ensure your iPhone doesn’t die mid-aurora display. Additionally, a simple yet effective trick is to keep your iPhone warm by storing it in your inner coat pocket when not actively taking photos. This insulation can significantly prolong battery life in cold conditions.
While we’ve used an Asus power bank, any reliable power bank will do the job. Consider investing in a high-capacity power bank for extended aurora chasing sessions.
With your iPhone settings optimized and the right accessories, you’re well-prepared to capture breathtaking photos of the Northern Lights. The next step? Learning how to find and “chase” those elusive lights.
Learn How To Chase The Northern Lights – Aurora Borealis
Read about our 24 Consecutive Days Of Northern Lights Chasing – Aurora Borealis
Discover How To Stay Warm While Photo Shooting The Northern Lights – Aurora Borealis
If you’re feeling uncertain about photographing the Northern Lights independently, consider joining a guided tour. Numerous Northern Lights photography tours are available on platforms like Get Your Guide. When selecting a tour, prioritize small groups, experienced photographers, favorable ratings, and flexible cancellation policies for the best experience.