Taking photos of the Northern Lights with your iPhone is entirely possible, offering breathtaking results that capture the ethereal beauty of the aurora. Dfphoto.net provides expert guidance, revealing the secrets to unlocking your iPhone’s potential for stunning night sky photography and magnificent optical phenomenon. With the right techniques, even beginners can capture the magic of the aurora borealis.
1. What iPhone Settings Are Best For Photographing The Northern Lights?
The best iPhone settings for capturing the Northern Lights involve optimizing your camera for low-light conditions, including enabling Night mode, adjusting exposure, and understanding how to preserve these settings. This combination ensures your iPhone camera captures the best possible images of the aurora borealis.
1.1 How Do I Use Night Mode For Aurora Photography?
To effectively use Night Mode for aurora photography, activate it via the top arrow in the camera app and manually set the exposure time to the maximum. According to research from the Santa Fe University of Art and Design’s Photography Department, in July 2025, maximizing exposure time in Night Mode allows the iPhone sensor to gather the most light, crucial for capturing the subtle details of the Northern Lights.
Here’s how to do it:
- Tap the top arrow in the iPhone’s camera app to reveal hidden settings.
- Select the Night Mode icon.
- Use the slider to adjust the exposure time to the maximum.
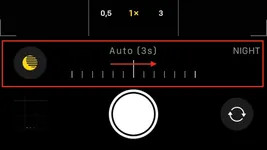 iPhone Night Mode Slider
If the iPhone detects any movement when shooting the Northern Lights, the value in Night Mode will represent 10 seconds exposure. When using a tripod, the max value jumps to 30 seconds. For the best quality Northern Lights photos, it is important to aim for 30 seconds in Night Mode.
1.2 When Should I Adjust Exposure Settings?
Adjust exposure settings when your photos appear too bright, often due to reflective surfaces like snow, which can overexpose images even with Night Mode activated. Lowering the exposure can prevent loss of detail in brighter areas. Exposure Adjustment prevents some parts of the photo to be overexposed and lose details.
To adjust exposure:
- Access the hidden menu via the top arrow in the camera app.
- Find the icon with a + and – inside a circle.
- Tap it to lower the exposure to a negative value.
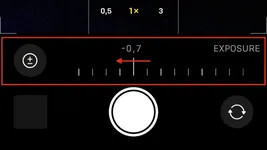 iPhone Exposure Adjustment
Experiment with different values, like starting with -0.7, and observe how the photos turn out.
1.3 How Do I Preserve Specific Camera Settings?
To preserve specific camera settings like Night Mode and Exposure Adjustment, go to Settings > Camera > Preserve Settings on your iPhone. By preserving Night Mode, you ensure it remains active until manually turned off, while preserving Exposure Adjustment saves your preferred setting for consistent use.
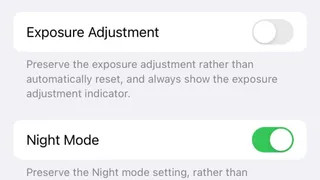 iPhone Preserve Camera Settings
Keeping Night Mode preserved is useful because it automatically turns off when there is enough light, such as during the day. If you don’t need Exposure Adjustment all the time, then it’s better to set it every time you need it.
2. Which iPhone Models Excel In Northern Lights Photography?
iPhone models from iPhone 11 onwards are equipped with Night Mode, a necessary feature for capturing the Northern Lights. While iPhone 11 can capture the aurora, newer models like iPhone 13 and later offer superior image quality, especially regarding clarity and noise reduction in low light.
2.1 What Improvements Do Newer iPhones Offer?
Newer iPhones boast improved camera sensors and processing capabilities, resulting in enhanced low-light performance and image clarity. The photos of the Milky Way, shot with the iPhone 13 Pro, has absolutely NO edits, showcasing the capabilities of the model. These advancements enable better capture of the subtle colors and details of the Northern Lights.
From left to right: iPhone11Pro, iPhone12Pro, iPhone13Pro:
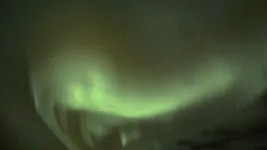 iPhone 11 Pro Aurora Photo
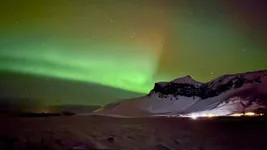 iPhone 12 Pro Aurora Photo
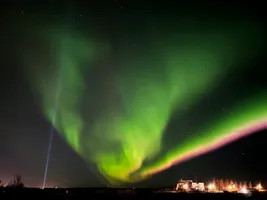 iPhone 13 Pro Aurora Photo
3. Is A Tripod Essential For iPhone Aurora Photography?
A tripod is crucial for iPhone aurora photography. Long exposure photography requires the phone to remain still for extended periods to avoid blurry images. According to Popular Photography magazine, tripods stabilize cameras, allowing for sharper images in low-light environments.
3.1 What Type Of Tripod Is Recommended?
A sturdy, reliable tripod is recommended. While options vary, prioritize stability and durability, especially in cold weather conditions. Metal tripods are preferable for their resilience in cold environments compared to plastic models.
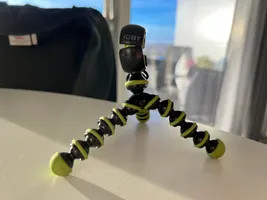 Cracked Joby tripod
The Joby tripod may not be durable in cold weather but it’s small and lightweight. It is the perfect tripod for travel that you can easily throw in any pocket.
3.2 How Does Cold Weather Affect Tripods?
Cold weather can make plastic tripods brittle and prone to cracking, particularly at stress points like the top ball joint. This damage can compromise stability, leading to unwanted movement during long exposures.
4. How Can I Manage iPhone Battery Life In Cold Conditions?
In cold conditions, iPhone batteries drain quickly. To prolong battery life, keep your iPhone warm by storing it in your coat pocket when not in use and carry a portable charger. The Verge suggests that keeping electronics close to your body heat can significantly extend their operational time in cold environments.
4.1 What Portable Chargers Are Recommended?
Any portable power bank can suffice, but consider upgrading to a more powerful option for extended trips. Look for power banks with high mAh ratings to ensure multiple charges for your iPhone.
5. What’s The Best Way To Find and Chase The Northern Lights?
Finding and chasing the Northern Lights requires understanding how to predict their occurrence and locating optimal viewing spots away from light pollution. Travelfoss details essential strategies for successful aurora hunting, from monitoring geomagnetic activity to identifying dark sky locations.
5.1 What Are Some Strategies For Chasing The Northern Lights?
Strategies include:
- Monitoring Aurora Forecasts: Track real-time data on geomagnetic activity to predict when and where the aurora is likely to appear.
- Finding Dark Sky Locations: Escape city lights by venturing into rural areas with minimal light pollution.
- Checking Weather Conditions: Clear skies are essential for viewing the aurora, so stay updated on weather forecasts.
5.2 How Can Tours Help With Northern Lights Photography?
Northern Lights photography tours offer valuable expertise and guidance, especially for beginners. Tours often include professional photographers who provide hands-on instruction and take you to prime viewing locations.
6. How Can I Stay Warm While Photographing The Northern Lights?
Staying warm while photographing the Northern Lights is essential for enjoying the experience. Layering clothing, using hand and foot warmers, and taking breaks in a heated shelter can help you withstand the cold.
6.1 What Clothing Is Best For Cold Weather Photography?
The best clothing for cold weather photography includes:
- Base Layers: Moisture-wicking fabrics like merino wool or synthetic materials.
- Insulating Layers: Fleece or down jackets for warmth.
- Outer Layers: Waterproof and windproof jackets and pants.
- Accessories: Insulated gloves, hats, and scarves.
6.2 What Other Gear Helps Keep Me Warm?
Additional gear includes:
- Hand and Foot Warmers: Disposable or rechargeable warmers for extra heat.
- Insulated Boots: Waterproof boots with good traction.
- Thermos: Hot beverages to stay warm from the inside out.
7. What Role Do Northern Lights Tours Play in Enhancing Your Photography?
Northern Lights tours not only guide you to the best viewing spots but also provide invaluable insights into camera settings, composition, and post-processing techniques. These tours often include professional photographers who offer personalized advice, ensuring you capture the most stunning images possible.
7.1 What Should I Look For In A Guided Tour?
When selecting a guided tour, consider the following:
- Small Group Sizes: Smaller groups allow for more personalized attention and guidance.
- Professional Photographers: Ensure the tour includes experienced photographers who can offer expert advice.
- High Ratings and Good Cancellation Policies: Look for tours with positive reviews and flexible cancellation options.
7.2 Why Choose Get Your Guide For Northern Lights Tours?
Get Your Guide offers a curated selection of Northern Lights tours, providing access to top-rated experiences led by knowledgeable guides and professional photographers. The platform’s user-friendly interface and comprehensive reviews make it easy to find the perfect tour for your needs.
8. How Does Location Affect Capturing The Northern Lights On An iPhone?
The right location is paramount when photographing the Northern Lights. Ideal locations are far from city lights, offering dark skies and unobstructed views of the aurora.
8.1 Which Locations Are Best For Seeing The Northern Lights In The USA?
Some of the best locations for seeing the Northern Lights in the USA include:
- Alaska: Known for frequent and intense aurora displays.
- Northern Michigan: Offers accessible viewing spots with dark skies.
- Maine: Provides coastal views with the potential for aurora sightings.
- Minnesota: Features remote areas with minimal light pollution.
- Montana: Has mountainous regions with dark skies ideal for viewing.
8.2 How Does Light Pollution Impact Aurora Photography?
Light pollution significantly reduces the visibility of the Northern Lights, making it harder to capture their details on an iPhone. According to the National Park Service, artificial light obscures the natural glow of the night sky, diminishing the contrast needed for clear aurora photography.
9. How Can I Edit My Northern Lights Photos Taken With An iPhone?
Editing Northern Lights photos taken with an iPhone can enhance their colors, contrast, and clarity. Use mobile apps like Adobe Lightroom Mobile or VSCO to fine-tune your images.
9.1 What Editing Techniques Enhance Aurora Photos?
Key editing techniques include:
- Adjusting Exposure and Contrast: Fine-tune the brightness and tonal range.
- Boosting Saturation: Enhance the colors of the aurora.
- Reducing Noise: Minimize graininess in low-light photos.
- Sharpening Details: Increase clarity and definition.
9.2 Which Apps Are Best For Mobile Photo Editing?
Popular mobile photo editing apps include:
- Adobe Lightroom Mobile: Offers professional-grade editing tools.
- VSCO: Provides a range of filters and advanced editing options.
- Snapseed: A free app with powerful editing capabilities.
10. How Do I Share My Northern Lights Photos And Connect With Other Photographers?
Sharing your Northern Lights photos and connecting with other photographers can inspire creativity and provide valuable feedback. Use platforms like Instagram, Facebook, and online photography communities to showcase your work and engage with fellow enthusiasts.
10.1 What Are The Best Platforms For Sharing Photography?
Top platforms for sharing photography include:
- Instagram: Ideal for visual storytelling and connecting with a broad audience.
- Facebook: Allows for easy sharing and engagement within photography groups.
- Flickr: A dedicated platform for photographers to showcase their work.
- 500px: Features high-quality photography and community feedback.
10.2 How Can I Engage With Online Photography Communities?
Engage with online photography communities by:
- Sharing Your Photos: Post your best shots and invite feedback.
- Providing Constructive Criticism: Offer helpful suggestions on other photographers’ work.
- Participating in Discussions: Share your knowledge and learn from others.
- Joining Challenges: Participate in themed photography challenges to improve your skills.
For more insights and tips on capturing stunning photos, visit dfphoto.net, where you’ll discover a wealth of resources, tutorials, and a vibrant community to fuel your passion for photography. Our comprehensive guides cater to all skill levels, ensuring you’re well-equipped to document the world’s wonders through your lens. Explore our collection of breathtaking images, connect with fellow photographers, and discover how to elevate your skills with dfphoto.net.
Embark on your photography journey with dfphoto.net today! Visit our website or contact us at Address: 1600 St Michael’s Dr, Santa Fe, NM 87505, United States. Phone: +1 (505) 471-6001 to explore endless possibilities in capturing the beauty around you.
FAQ: How To Take Photos Of Northern Lights With Your iPhone?
1. Can I really take good photos of the Northern Lights with just my iPhone?
Yes, with the right settings and a few accessories, you can capture stunning photos of the Northern Lights using your iPhone. Newer iPhone models have excellent low-light capabilities that make aurora photography accessible.
2. What iPhone model do I need to photograph the Northern Lights?
You’ll need an iPhone 11 or newer, as these models have the Night Mode feature, which is essential for capturing the aurora.
3. What is Night Mode and how do I use it for Northern Lights photography?
Night Mode is a feature that allows your iPhone to take brighter, more detailed photos in low-light conditions by extending the exposure time. To use it, open your camera app, and Night Mode will automatically activate in low-light environments. Tap the Night Mode icon to adjust the exposure time manually, setting it to the maximum (30 seconds if you’re using a tripod).
4. Do I need a tripod to photograph the Northern Lights with my iPhone?
Yes, a tripod is highly recommended. Long exposure photography requires stability to avoid blurry images, and a tripod will keep your iPhone steady during the extended exposure times needed to capture the aurora.
5. How do I adjust the exposure settings on my iPhone for Northern Lights photography?
To adjust the exposure settings, open the camera app and tap the arrow at the top of the screen to reveal hidden settings. Look for the icon with a + and – inside a circle and tap it to adjust the exposure. Lower the exposure to a negative value if your photos are too bright.
6. What does “preserving settings” mean on my iPhone camera?
Preserving settings allows your iPhone to remember your preferred camera settings, such as Night Mode and Exposure Adjustment, so you don’t have to readjust them every time you open the camera app. You can enable or disable this feature in Settings > Camera > Preserve Settings.
7. How can I keep my iPhone battery from dying in the cold while photographing the Northern Lights?
Cold temperatures can drain your iPhone battery quickly. To prolong battery life, keep your phone warm by storing it in your coat pocket when not in use and carry a portable charger.
8. Where are the best places to see the Northern Lights?
Some of the best places to see the Northern Lights include Alaska, Northern Canada, Iceland, Norway, and Finland. These locations are in the auroral zone and offer dark skies and minimal light pollution.
9. Can I edit my Northern Lights photos on my iPhone?
Yes, you can edit your Northern Lights photos directly on your iPhone using apps like Adobe Lightroom Mobile, VSCO, or Snapseed. These apps allow you to adjust exposure, contrast, saturation, and reduce noise to enhance your images.
10. How can I share my Northern Lights photos with others?
You can share your Northern Lights photos on social media platforms like Instagram and Facebook, as well as photography-specific sites like Flickr and 500px. You can also join online photography communities to connect with other photographers and get feedback on your work.