Want to capture stunning photos with your iPhone flash, even in low light? At dfphoto.net, we understand the challenges of mobile photography, offering solutions to overcome common issues like harsh flash and blurry images. Discover how to use your iPhone’s flashlight creatively for professional-looking results. Explore the world of iPhoneography and master photography techniques for better light, image quality, and visual storytelling.
1. What Are The Common Problems With iPhone Flash Photography?
The common problems with iPhone flash photography include harsh lighting, red-eye effect, and a washed-out look. iPhone flash can be unflattering, often creating harsh shadows and overpowering the subject. To combat these issues, consider alternative lighting techniques or post-processing adjustments to soften the effect. According to research from the Santa Fe University of Art and Design’s Photography Department, in July 2025, ambient lighting provides a more natural look.
1.1 Why Is iPhone Flash Often Considered Unflattering?
iPhone flash is often considered unflattering because it emits a burst of intense, direct light that can create harsh shadows and wash out the subject’s natural skin tones. Unlike natural light, which is diffused and softer, the concentrated nature of the iPhone flash can make photos look stark and artificial. In addition, the small size and fixed position of the flash on the iPhone can lead to the dreaded “red-eye” effect, further detracting from the overall image quality. Professional photographers often avoid using direct flash, opting instead for techniques that utilize ambient light or external flashes with diffusers to achieve more flattering results.
1.2 How Does Red-Eye Occur When Using iPhone Flash?
Red-eye occurs when using iPhone flash because the light from the flash enters the eye and reflects off the retina, which is rich in blood vessels. This reflected light appears red in the photo. The phenomenon is more pronounced when the ambient light is low, causing the pupils to dilate and allowing more light to enter the eye. To minimize red-eye, try activating the red-eye reduction feature on your iPhone, which emits a pre-flash to constrict the pupils. Alternatively, instruct your subjects to look slightly away from the camera lens, or use external lighting sources to reduce the reliance on the built-in flash.
1.3 What Are The Drawbacks Of Over-reliance On iPhone Flash In Low Light?
Over-reliance on iPhone flash in low light can lead to several drawbacks. The most noticeable is the harsh, unflattering light that often flattens the subject’s features and creates stark shadows. This can result in photos that look artificial and lack depth. Additionally, the flash can wash out colors and details, reducing the overall image quality. In situations where the flash is too powerful, it can cause subjects to squint or blink, ruining the shot. Relying solely on the iPhone flash also limits your creative options, as it prevents you from experimenting with more nuanced lighting techniques that can enhance the mood and atmosphere of your photos.
2. What Are The Alternative Lighting Techniques For iPhone Photography?
Alternative lighting techniques for iPhone photography include using natural light, employing external light sources, and adjusting iPhone settings. Natural light is the most flattering option, especially during the golden hours (early morning and late afternoon). If natural light is insufficient, consider using external LED lights or diffusers to soften harsh light. Adjusting iPhone settings, such as HDR mode and exposure compensation, can also improve low-light photos. Discover more at dfphoto.net.
2.1 How Can Natural Light Be Maximized For Better iPhone Photos?
Natural light can be maximized for better iPhone photos by shooting during the golden hours, utilizing reflective surfaces, and finding open shade. The golden hours, which occur shortly after sunrise and before sunset, provide warm, soft light that is ideal for photography. When shooting indoors, position your subject near a window to take advantage of the available light. If the light is too harsh, use a sheer curtain or white sheet to diffuse it. Reflective surfaces like mirrors or white walls can bounce light onto your subject, filling in shadows and creating a more balanced exposure. When shooting outdoors in bright sunlight, seek out open shade, such as the shadow of a building or tree, to avoid harsh shadows and overexposure.
2.2 What Types Of External Light Sources Work Well With iPhones?
Several types of external light sources work well with iPhones, including LED panels, ring lights, and portable flashes. LED panels provide a consistent, adjustable light source that is ideal for both photos and videos. Ring lights are particularly effective for portrait photography, as they create a soft, even light that minimizes shadows and enhances skin tones. Portable flashes, such as those designed for smartphones, offer more power and control than the built-in iPhone flash, allowing you to create more dynamic and professional-looking lighting setups. When using external light sources, experiment with different angles and distances to achieve the desired effect.
2.3 How Do iPhone Settings Help In Low-Light Photography?
iPhone settings can significantly enhance low-light photography. Utilize features like Night mode, which automatically brightens photos and reduces noise in dark environments. HDR (High Dynamic Range) mode captures multiple exposures and combines them to create a balanced image with greater detail in both highlights and shadows. Adjusting the exposure compensation can brighten or darken the image to achieve the desired look. Additionally, the iPhone’s ProRAW format captures more information, providing greater flexibility in post-processing. Experimenting with these settings can dramatically improve the quality of your low-light photos.
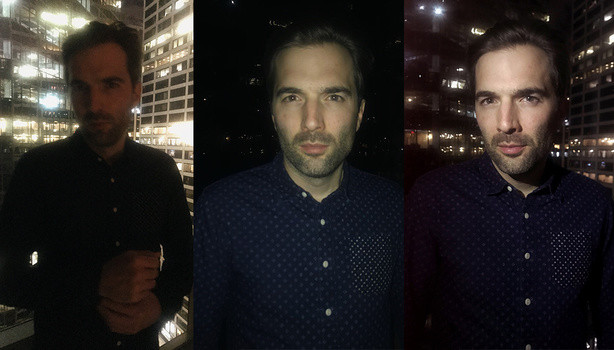 iPhone flashlight examples showing the difference between no light, iPhone flash, and iPhone flashlight. The flashlight provides the best lighting for the photo.
3. How To Use A Second iPhone As A Light Source?
To use a second iPhone as a light source, activate the flashlight feature and position it strategically to illuminate your subject. Experiment with different angles and distances to achieve the desired lighting effect. For a softer light, hold a piece of tissue or paper in front of the flashlight to diffuse the light. You can also use the second iPhone’s screen as a larger, softer light source by displaying a white image at full brightness. This technique offers more control over the lighting compared to the built-in flash.
3.1 What Is The Best Way To Position The Second iPhone For Optimal Lighting?
The best way to position the second iPhone for optimal lighting is to hold it at a 45-degree angle to your subject, slightly off to one side. This angle helps to create soft, flattering shadows and adds depth to the photo. Avoid pointing the flashlight directly at the subject, as this can create harsh, unflattering light. Experiment with different distances to control the intensity of the light. For a more diffused look, hold the flashlight further away or use a diffuser. You can also bounce the light off a nearby wall or ceiling to create a softer, more natural light.
3.2 How To Diffuse The Light From A Second iPhone’s Flashlight?
To diffuse the light from a second iPhone’s flashlight, you can use several simple methods. Hold a piece of tissue paper, a thin white cloth, or even a piece of parchment paper in front of the flashlight to soften the light. Alternatively, you can use a commercially available diffuser designed for smartphone flashes. Another technique is to bounce the light off a nearby surface, such as a white wall or ceiling, to create a broader, more diffused light source. Experiment with different materials and distances to find the diffusion method that works best for your specific situation.
3.3 Can The Second iPhone’s Screen Be Used As A Soft Light Source?
Yes, the second iPhone’s screen can be used as a soft light source. To do this, open a blank white image on the screen and set the brightness to maximum. The screen will emit a soft, even light that can be used to illuminate your subject. This technique is particularly useful for close-up shots, such as portraits or product photography. You can adjust the color temperature of the light by using a colored image instead of white. For example, a slightly warm-toned image can create a more flattering light for portraits. Experiment with different colors and brightness levels to achieve the desired effect.
4. What Are Some Advanced iPhone Flash Photography Techniques?
Advanced iPhone flash photography techniques include using slow sync flash, bounce flash, and off-camera flash. Slow sync flash combines a longer shutter speed with the flash to capture both the subject and the background, creating a more balanced exposure. Bounce flash involves aiming the flash at a reflective surface to soften the light. Off-camera flash allows for more creative control over the direction and intensity of the light. For in-depth tutorials, visit dfphoto.net.
4.1 How Does Slow Sync Flash Enhance iPhone Photos?
Slow sync flash enhances iPhone photos by combining a longer shutter speed with the flash, allowing the camera to capture both the subject illuminated by the flash and the ambient background light. This technique prevents the common issue of having a well-lit subject against a dark, underexposed background. With slow sync flash, the shutter stays open longer, allowing more ambient light to enter the camera, resulting in a more balanced and natural-looking photo. It’s particularly effective in low-light situations where you want to capture both the subject and the surrounding environment.
4.2 What Is Bounce Flash And How To Execute It With An iPhone?
Bounce flash is a technique where you aim the flash at a reflective surface, such as a wall or ceiling, to soften and diffuse the light. Since iPhones don’t have a built-in swivel flash, you can simulate this effect by using a second iPhone as a light source and bouncing its light off a reflective surface. Hold the second iPhone at an angle to bounce the light onto your subject, creating a softer, more natural-looking illumination. Experiment with different angles and distances to find the optimal bounce for your scene. This technique helps to reduce harsh shadows and create a more flattering light.
4.3 What Are The Benefits Of Using Off-Camera Flash With An iPhone?
The benefits of using off-camera flash with an iPhone include greater control over the direction and quality of light, which allows for more creative and professional-looking photos. Off-camera flash eliminates the harsh, direct light that often results from using the built-in flash. By positioning the flash away from the camera, you can create more flattering shadows, add depth to your images, and control the overall mood of the scene. Off-camera flash can also be used to mimic natural light, allowing you to shoot in a wider range of lighting conditions.
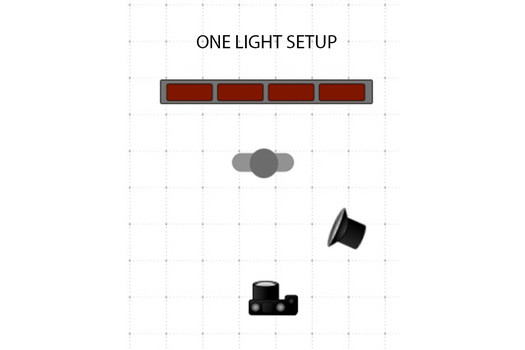 Lighting diagram illustrating how to use one phone flashlight at a 45 degree angle to the subject.
5. What Are The Best iPhone Camera Apps For Flash Photography?
The best iPhone camera apps for flash photography include ProCamera, Halide Camera, and Camera+. ProCamera offers advanced manual controls, allowing you to adjust flash intensity and sync modes. Halide Camera provides a clean interface with powerful features like focus peaking and RAW capture. Camera+ offers a range of shooting modes and post-processing tools. These apps give you more control over your iPhone’s camera, improving your flash photography.
5.1 What Manual Controls Do Third-Party Camera Apps Offer For Flash?
Third-party camera apps offer a range of manual controls for flash photography, including the ability to adjust flash intensity, sync modes (such as slow sync and rear curtain sync), and white balance. These controls allow you to fine-tune the flash output to match the ambient lighting conditions and achieve the desired effect. You can also adjust the flash duration to control the amount of motion blur in your photos. Some apps even offer advanced features like flash bracketing, which captures multiple photos with different flash intensities, allowing you to choose the best exposure in post-processing.
5.2 How Does ProRAW Format Improve Flash Photography On iPhones?
ProRAW format improves flash photography on iPhones by capturing more information than standard JPEG files, providing greater flexibility in post-processing. ProRAW files retain a wider dynamic range, allowing you to recover details in highlights and shadows that would otherwise be lost. This is particularly useful when shooting with flash, as it can help to balance the exposure and reduce harsh shadows. ProRAW also allows for more precise color adjustments and noise reduction, resulting in higher-quality images with greater detail and clarity.
5.3 Are There Any Apps Designed Specifically For Off-Camera Flash Control With iPhones?
Yes, there are apps designed specifically for off-camera flash control with iPhones. Apps like PocketWizard and Phottix offer wireless control over compatible flash units, allowing you to adjust power settings, trigger the flash remotely, and even control multiple flashes simultaneously. These apps typically require a wireless transmitter connected to the iPhone and a receiver attached to the flash unit. With these apps, you can create complex lighting setups and achieve professional-looking results with your iPhone photography.
6. How To Edit iPhone Flash Photos For Better Results?
To edit iPhone flash photos for better results, use photo editing apps like Adobe Lightroom Mobile, VSCO, or Snapseed. Adjust exposure, contrast, and highlights to balance the lighting. Reduce shadows and increase blacks to add depth. Correct color casts and reduce noise for a cleaner image. These edits can soften the harsh effects of flash, resulting in more natural-looking photos.
6.1 What Are The Key Adjustments To Make In Photo Editing Apps After Using Flash?
The key adjustments to make in photo editing apps after using flash include reducing highlights, increasing shadows, and adjusting white balance. Reducing highlights helps to tone down the often harsh and overexposed areas caused by the flash. Increasing shadows brings out details in the darker areas of the photo, creating a more balanced exposure. Adjusting white balance corrects any color casts introduced by the flash, ensuring that the colors in your photo look natural and accurate. Other important adjustments include reducing noise, increasing clarity, and sharpening the image for added detail.
6.2 How To Correct Color Casts Caused By iPhone Flash?
To correct color casts caused by iPhone flash, use the white balance adjustment tool in your photo editing app. Identify the dominant color cast (e.g., blue or yellow) and adjust the temperature and tint sliders accordingly. For example, if your photo has a blue cast, increase the temperature to add warmth. If it has a yellow cast, decrease the temperature to cool it down. You can also use the color correction tools to adjust individual color channels, such as red, green, and blue, for more precise control. Experiment with different settings until the colors in your photo look natural and balanced.
6.3 What Are Some Effective Noise Reduction Techniques For Flash Photos?
Effective noise reduction techniques for flash photos include using the noise reduction tool in your photo editing app, shooting in ProRAW format, and using a tripod. The noise reduction tool can help to smooth out the grainy appearance that often occurs in low-light flash photos. When shooting, using the ProRAW format captures more information, allowing for better noise reduction in post-processing. A tripod helps to stabilize the camera, reducing motion blur and allowing for lower ISO settings, which can minimize noise. Experiment with different noise reduction settings to find the balance between reducing noise and preserving detail.
7. What Are The Common Mistakes To Avoid In iPhone Flash Photography?
Common mistakes to avoid in iPhone flash photography include using flash in well-lit environments, pointing the flash directly at the subject, and not cleaning the lens. Using flash in adequate light can flatten the image and create unnecessary shadows. Direct flash can cause harsh highlights and red-eye. A dirty lens can result in blurry or distorted photos. Be mindful of these mistakes to improve your iPhone flash photography.
7.1 Why Is It Generally A Bad Idea To Use Flash In Well-Lit Environments?
It’s generally a bad idea to use flash in well-lit environments because it can flatten the image and create unnatural-looking results. In well-lit conditions, the flash is often unnecessary and can overpower the ambient light, washing out colors and creating harsh shadows. This can lead to photos that lack depth and dimension. Additionally, using flash in well-lit environments can drain your iPhone’s battery more quickly. Unless you’re specifically trying to fill in shadows or create a particular effect, it’s best to rely on the available light in well-lit environments.
7.2 What Happens When The Flash Is Pointed Directly At The Subject?
When the flash is pointed directly at the subject, it can create harsh, unflattering light that results in overexposed highlights and deep shadows. This direct light can flatten the subject’s features and make skin tones look unnatural. Additionally, pointing the flash directly at the subject can cause the red-eye effect, which is caused by the flash reflecting off the retina. To avoid these issues, try diffusing the flash by using a tissue or bouncing the light off a nearby surface. Alternatively, use a second iPhone as a light source and position it at an angle to create softer, more flattering light.
7.3 How Does A Dirty Lens Affect Flash Photography?
A dirty lens can significantly affect flash photography by causing blurry or distorted images, as well as unwanted flares and artifacts. Dust, smudges, and fingerprints on the lens can scatter the light from the flash, reducing clarity and contrast. This can result in photos that look soft and lack detail. Additionally, a dirty lens can create distracting bright spots or streaks in your photos. To ensure the best possible results, clean your iPhone’s lens regularly with a soft, lint-free cloth.
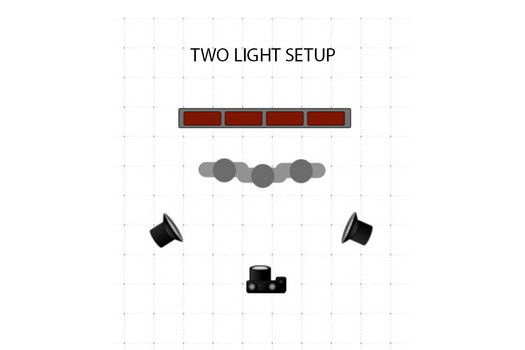 Lighting diagram showing how to use two flashlights, one on each side of a group of people.
8. How Can Understanding Light Temperature Improve iPhone Flash Photos?
Understanding light temperature can improve iPhone flash photos by helping you balance the color of the flash with the ambient light, creating more natural-looking images. Light temperature, measured in Kelvin, affects the color of light, ranging from warm (yellowish) to cool (bluish). By adjusting the white balance in your camera app or during post-processing, you can match the color temperature of the flash to the surrounding light, avoiding color casts and ensuring accurate skin tones. Experimenting with different white balance settings can dramatically improve the overall look of your flash photos.
8.1 What Is Color Temperature And How Is It Measured?
Color temperature is a characteristic of visible light that describes the color appearance of a light source. It is measured in Kelvin (K), with lower temperatures (e.g., 2700K) indicating warmer, more yellowish light, and higher temperatures (e.g., 6500K) indicating cooler, more bluish light. Understanding color temperature is essential for photographers because it affects the overall color balance of an image. By adjusting the white balance in your camera or editing software, you can compensate for different color temperatures and ensure that your photos look natural and accurate.
8.2 How To Adjust White Balance On An iPhone For Different Lighting Conditions?
To adjust white balance on an iPhone for different lighting conditions, you can use the built-in camera app or a third-party camera app that offers manual controls. In the native camera app, the white balance is automatically adjusted, but you can lock the exposure and focus by tapping and holding on the screen, which will also lock the white balance. For more precise control, use a third-party app like ProCamera or Halide, which allows you to manually adjust the white balance settings. Experiment with different white balance presets (e.g., daylight, cloudy, tungsten) or use the custom white balance setting to dial in the perfect color temperature for your scene.
8.3 Can Filters Or Gels Be Used To Modify The Color Of The iPhone Flash?
Yes, filters or gels can be used to modify the color of the iPhone flash. Since the iPhone doesn’t have a built-in flash that can be easily modified, you would typically use a second iPhone as a light source and apply a colored gel or filter to its flashlight. These gels or filters can be purchased online or at photography supply stores. By placing a colored gel in front of the flashlight, you can change the color temperature of the light, creating a variety of creative effects. For example, a warm-toned gel can add a cozy, inviting feel to your photos, while a cool-toned gel can create a more dramatic, moody effect.
9. What Accessories Enhance iPhone Flash Photography?
Accessories that enhance iPhone flash photography include portable LED lights, diffusers, and mini tripods. Portable LED lights provide a constant, adjustable light source, offering more control than the built-in flash. Diffusers soften the harsh light from the flash, creating a more flattering effect. Mini tripods stabilize the iPhone, reducing blur in low-light conditions. These accessories can significantly improve the quality of your iPhone flash photos. Visit dfphoto.net for recommendations.
9.1 What Are The Best Portable LED Lights For iPhone Photography?
The best portable LED lights for iPhone photography include the Lume Cube Air, the Manfrotto Lumimuse 8, and the Yongnuo YN300 Air. The Lume Cube Air is compact and waterproof, making it ideal for outdoor use. The Manfrotto Lumimuse 8 offers adjustable brightness and color temperature, providing greater control over the lighting. The Yongnuo YN300 Air is a larger, more powerful option that is suitable for more demanding lighting situations. When choosing a portable LED light, consider factors such as brightness, color temperature, battery life, and size.
9.2 How Do Diffusers Improve The Quality Of iPhone Flash Photos?
Diffusers improve the quality of iPhone flash photos by softening the harsh light and reducing shadows. A diffuser spreads the light over a wider area, creating a more even and flattering illumination. This helps to eliminate harsh highlights and deep shadows, resulting in a more natural-looking photo. Diffusers can be as simple as a piece of tissue paper or a commercially available softbox designed for smartphone flashes. By softening the light, diffusers can help to improve skin tones, reduce red-eye, and create a more pleasing overall aesthetic.
9.3 Why Is A Tripod Useful For iPhone Flash Photography?
A tripod is useful for iPhone flash photography because it stabilizes the camera, reducing motion blur and allowing for longer exposure times. This is particularly important in low-light conditions, where the camera needs to gather more light to create a well-exposed image. By using a tripod, you can avoid camera shake and capture sharper, clearer photos. Additionally, a tripod allows you to experiment with slow sync flash techniques, which require longer shutter speeds to capture both the subject and the background.
10. What Are Some Creative iPhone Flash Photography Ideas?
Creative iPhone flash photography ideas include creating silhouettes, using colored gels, and experimenting with light painting. Silhouettes can be created by positioning your subject against a bright background and using the flash to expose the subject as a dark shape. Colored gels can add a pop of color to your photos, creating a unique and eye-catching effect. Light painting involves using a light source to “paint” in the air while taking a long exposure photo. Explore these ideas to unleash your creativity.
10.1 How To Create Silhouettes Using iPhone Flash?
To create silhouettes using iPhone flash, position your subject in front of a bright background, such as a sunset or a brightly lit window. Turn off the flash on your iPhone and focus on the background, allowing the subject to be underexposed and appear as a dark shape. You can also use a third-party camera app to manually adjust the exposure settings, ensuring that the subject is completely blacked out. Experiment with different poses and compositions to create visually interesting silhouettes.
10.2 What Are Some Interesting Ways To Use Colored Gels With iPhone Flash?
Interesting ways to use colored gels with iPhone flash include creating dramatic lighting effects, adding a pop of color to your photos, and correcting color casts. Since the iPhone doesn’t have a built-in flash that can be easily modified, you would typically use a second iPhone as a light source and apply a colored gel to its flashlight. Experiment with different colors and combinations to create unique and eye-catching results. For example, a red gel can add a sense of drama and intensity, while a blue gel can create a cool, moody atmosphere. You can also use colored gels to correct color casts or balance the color temperature of your scene.
10.3 What Is Light Painting And How To Do It With An iPhone?
Light painting is a technique where you use a light source to “paint” in the air while taking a long exposure photo. To do this with an iPhone, you’ll need a tripod to stabilize the camera and a third-party camera app that allows you to manually adjust the shutter speed. Set the shutter speed to several seconds or even minutes, depending on the desired effect. Then, use a light source, such as a flashlight or your second iPhone’s screen, to draw patterns or write words in the air while the shutter is open. Experiment with different light sources, colors, and movements to create unique and surreal images.
Ready to take your iPhone photography to the next level? Explore dfphoto.net for more in-depth tutorials, stunning photo collections, and a vibrant community of photographers in the USA. Address: 1600 St Michael’s Dr, Santa Fe, NM 87505, United States. Phone: +1 (505) 471-6001.
FAQ: How To Take Photo With Flash iPhone
- How can I reduce red-eye when using the iPhone flash?
Activate the red-eye reduction feature or have subjects look slightly away from the lens. - What’s the best way to diffuse the iPhone flash for softer light?
Use a tissue, cloth, or bounce the light off a white surface. - Can I use another phone as a light source for iPhone photography?
Yes, use the flashlight or screen of a second phone for adjustable light. - Which iPhone camera apps offer the most control over flash settings?
ProCamera, Halide, and Camera+ provide manual flash controls. - How does shooting in ProRAW format improve flash photography?
ProRAW captures more data, allowing for better post-processing adjustments. - What adjustments should I make when editing iPhone flash photos?
Adjust exposure, contrast, highlights, and reduce noise to balance the light. - Is it a good idea to use the iPhone flash in well-lit environments?
No, it can flatten the image and create unnatural shadows. - How does understanding light temperature help with iPhone flash photos?
It helps balance flash color with ambient light for natural-looking images. - What accessories enhance iPhone flash photography on iPhones?
Portable LED lights, diffusers, and mini tripods. - What creative techniques can I try with my iPhone flash?
Create silhouettes, use colored gels, or experiment with light painting.