Mastering How To Take Photo With Background Blur can transform your photography, adding depth and drawing focus to your subject. At dfphoto.net, we’re excited to guide you through simple yet effective methods to achieve that stunning bokeh effect, enhancing your creative vision. Dive into depth of field, aperture settings, and subject placement, unlocking beautiful portraits and captivating imagery with elements such as subject isolation, aesthetic quality and mood setting.
1. What Exactly Is Background Blur and Why Is It Important?
Background blur, often called bokeh, is the aesthetic quality of the blur in the out-of-focus areas of a photograph. It is important because it helps to isolate the subject, create a sense of depth, and add a pleasing aesthetic to the image.
Bokeh can be achieved through various techniques. A study from the Santa Fe University of Art and Design’s Photography Department highlights that using a wide aperture (low f-number) is a key method for creating a shallow depth of field, which results in a blurred background. According to research from the Santa Fe University of Art and Design’s Photography Department, in July 2025, a shallow depth of field isolates the subject, drawing the viewer’s eye and enhancing the overall impact of the image. The quality of bokeh can vary based on the lens design, aperture shape, and other factors. Understanding how these elements interact allows photographers to create stunning and visually appealing images.
2. What Gear Do You Need to Create Background Blur?
To create that dreamy background blur, you’ll need the right equipment. Here’s a breakdown:
- Camera: A DSLR or mirrorless camera is ideal. These cameras offer more control over settings and typically have larger sensors, which help achieve a shallower depth of field.
- Lens: The lens is key. Look for one with a wide maximum aperture, such as f/1.8, f/2.0, or f/2.8. The lower the f-number, the more light the lens lets in, and the shallower the depth of field you can achieve.
Here’s a more detailed look at lenses:
| Lens Type | Aperture | Use Case |
|---|---|---|
| 50mm f/1.8 | f/1.8 | Great for portraits, general photography. Affordable and widely available. |
| 85mm f/1.8 | f/1.8 | Excellent for portraits, providing a flattering perspective. |
| 35mm f/2.0 | f/2.0 | Versatile lens for street photography, landscapes, and environmental portraits. |
| Telephoto Lens | f/2.8 or wider | Ideal for wildlife, sports, and capturing subjects from a distance. |
| Kit Lens (18-55) | f/3.5 – f/5.6 | Good for those starting out. |
Keep in mind that while the equipment is important, mastering the techniques is what truly makes the difference.
3. How Does Aperture Affect Background Blur?
Aperture is the size of the opening in your lens that lets light into the camera. It’s measured in f-stops (e.g., f/1.8, f/2.8, f/4). The lower the f-stop number, the wider the aperture, and the shallower the depth of field.
With a wide aperture (like f/1.8), only a small portion of the image will be in focus, while the background is blurred. This is perfect for isolating your subject and creating that dreamy bokeh effect.
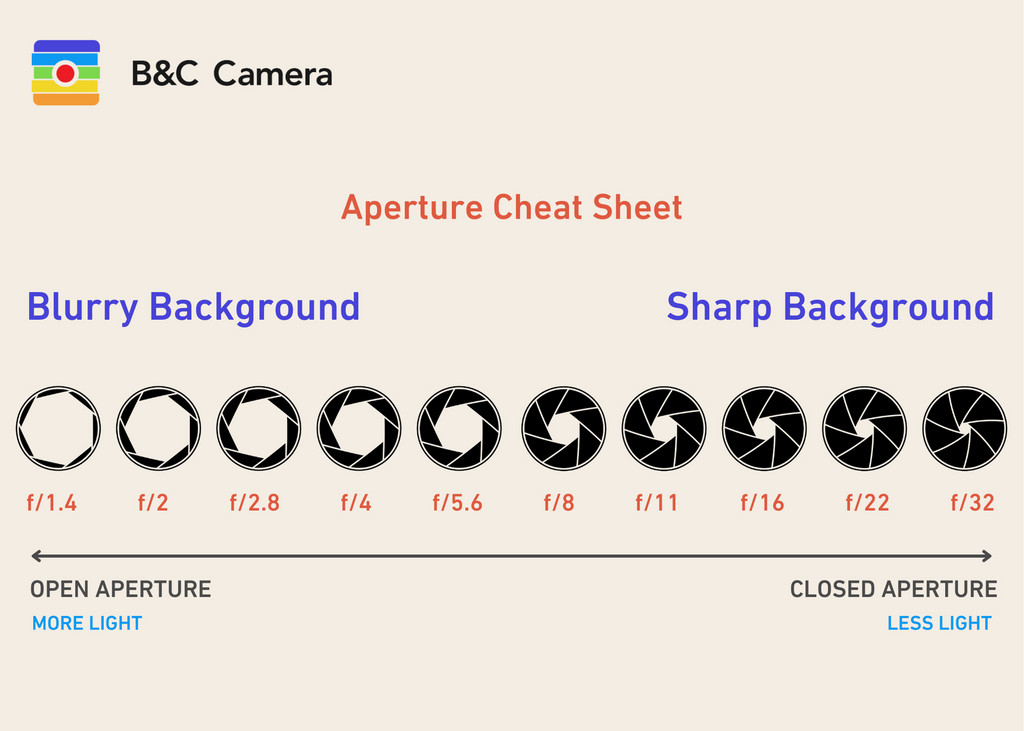 Aperture guide showing the effect of different apertures on background blur
Here’s a simple guide to understanding aperture and its effect:
| Aperture | Depth of Field | Use Case |
|---|---|---|
| f/1.4 | Very shallow | Ideal for isolating a single subject in portraits or creating a dreamy, artistic effect. |
| f/2.0 | Shallow | Great for portraits where you want to separate the subject from the background while still maintaining some context. |
| f/2.8 | Moderate | Useful for group shots or portraits where you want to keep the subject’s face sharp while blurring the background. |
| f/4.0 | More depth | Suitable for landscape or architectural photography where you want more of the scene in focus. |
| f/5.6 | Wide | When you want to capture the entire scene in focus, such as landscapes, group photos, or architectural details. |
| f/8 | Maximum | Used in landscape, architectural, and product photography when maximum sharpness is needed. |
| f/11 | Peak Sharpness | Typically used to maximize image sharpness, often used in combination with focus stacking techniques to ensure sharpness from near to far. |
Remember to balance your aperture settings with other factors like shutter speed and ISO to achieve the perfect exposure.
4. How Does Subject Placement Help in Achieving Background Blur?
Subject placement is crucial. The further your subject is from the background, the more blurred the background will appear.
Think of it this way:
- Close to the Background: If your subject is standing right in front of a wall, it’ll be harder to blur the background, even with a wide aperture.
- Far from the Background: When your subject is several feet away from the background, you’ll achieve a much more pronounced blur.
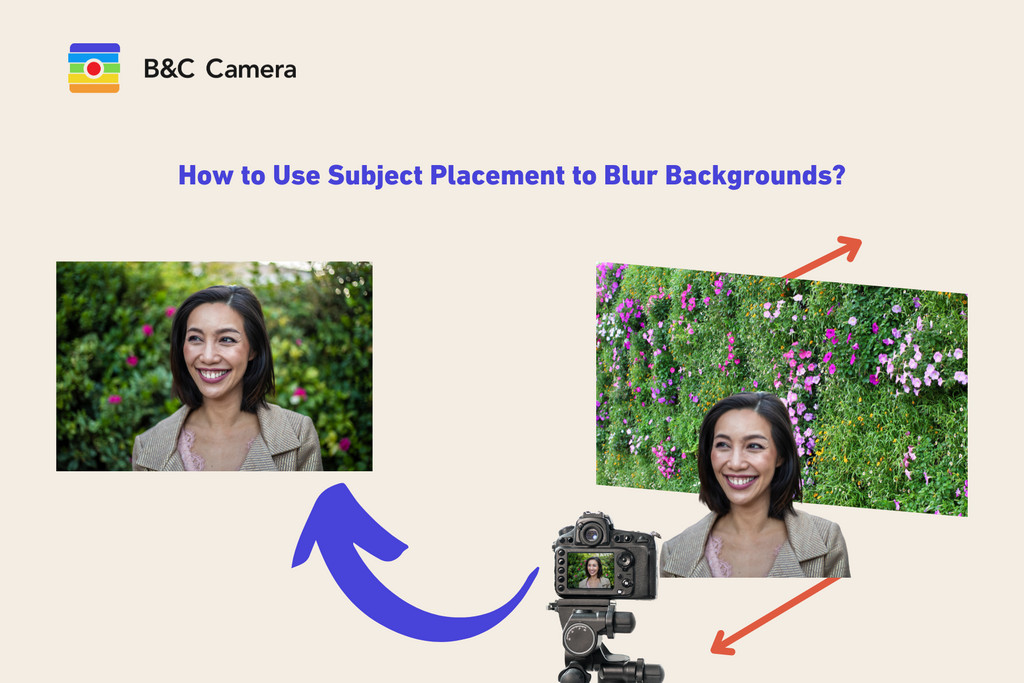 Subject placement showing how distance affects background blur
Consider these subject placement techniques:
| Technique | Description | Benefit |
|---|---|---|
| Distance from Subject | Place your subject as far away from the background as possible. | Enhances background blur, creating a stronger sense of depth. |
| Angle of View | Change the angle at which you are shooting to alter the background’s visibility. | Allows you to minimize distractions or include specific elements to enhance the composition. |
| Foreground Elements | Incorporate elements in the foreground to add depth and interest. | Adds layers to your image, making it more visually appealing and drawing the viewer’s eye. |
| Framing | Use natural elements like trees or arches to frame your subject. | Focuses attention on the subject and creates a more dynamic and engaging composition. |
| Leading Lines | Utilize lines in the scene to guide the viewer’s eye towards the subject. | Adds structure to your photograph and enhances the sense of movement and depth. |
| Symmetry | Use symmetry to create a balanced and harmonious composition. | Adds a sense of order and visual appeal, making the photograph more pleasing to the eye. |
Experiment with different placements to see what works best for your composition!
5. What Are the Best Camera Settings for Background Blur?
Here are the camera settings you should prioritize to achieve a blurred background:
- Aperture Priority Mode (A or Av): This mode allows you to set the aperture while the camera automatically adjusts the shutter speed and ISO for proper exposure.
- Wide Aperture: Choose the widest aperture your lens allows (e.g., f/1.8, f/2.8).
- ISO: Keep your ISO as low as possible to avoid noise. Increase it only if necessary to maintain a proper shutter speed.
- Shutter Speed: Ensure your shutter speed is fast enough to prevent motion blur. A good rule of thumb is to keep it at least 1/focal length (e.g., 1/50th of a second for a 50mm lens).
- Focus Mode: Use single-point autofocus to ensure your subject is sharp.
Here’s a quick settings checklist:
| Setting | Recommendation | Why |
|---|---|---|
| Shooting Mode | Aperture Priority (Av or A) or Manual (M) | Gives you control over aperture while allowing the camera to handle other settings. |
| Aperture | Widest possible (e.g., f/1.4, f/1.8, f/2.8) | Creates a shallow depth of field, blurring the background. |
| ISO | Lowest possible (typically ISO 100-400) | Minimizes noise and maintains image quality. |
| Shutter Speed | Fast enough to prevent motion blur (e.g., 1/100s or faster) | Ensures sharp, clear images, especially when shooting handheld. |
| White Balance | Auto (AWB) or custom setting based on lighting conditions | Ensures accurate colors and prevents color casts. |
| Focus Mode | Single-point AF (AF-S or One-Shot) | Allows you to precisely focus on your subject. |
| Metering Mode | Evaluative/Matrix Metering | Measures light across the entire scene and helps achieve balanced exposure. |
Practice makes perfect, so don’t be afraid to experiment with these settings to find what works best for you!
6. What Are Some Extra Tips for Achieving Dreamy Bokeh?
To take your background blur game to the next level, consider these extra tips:
- Use a Telephoto Lens: Telephoto lenses compress the background, making the blur more pronounced.
- Add Light Elements: Introduce light sources like Christmas lights or fairy lights in the background to create beautiful bokeh circles.
- Shoot During Golden Hour: The soft, warm light during the golden hour (shortly after sunrise and before sunset) enhances the bokeh effect.
- Experiment with Different Lenses: Each lens has its own unique bokeh characteristics. Experiment to find the ones you love.
- Clean Your Lens: Ensure your lens is clean to avoid any unwanted artifacts in your bokeh.
Here’s a table with creative bokeh techniques:
| Technique | Description | Impact |
|---|---|---|
| Bokeh Overlays | Add transparent bokeh images in post-processing to enhance or change the bokeh in your photo. | Adds depth and complexity to the bokeh, allowing for creative control. |
| DIY Bokeh Shapes | Cut out shapes from cardboard and attach them to your lens to create custom bokeh shapes. | Turns out-of-focus lights into stars, hearts, or other fun shapes. |
| Lens Flare | Intentionally include lens flare in your shot by positioning the sun or other bright light source in the frame. | Adds a dreamy, ethereal quality to your images. |
| Motion Blur | Combine bokeh with motion blur by using a slower shutter speed while keeping your subject sharp. | Creates a dynamic, visually striking effect, conveying movement and energy. |
| Color Accents | Use colored gels on your light sources to create a bokeh that matches or complements the colors in your scene. | Adds a pop of color and enhances the overall mood and atmosphere of your image. |
Incorporating these tips will help you create truly stunning images with beautifully blurred backgrounds.
7. How Can Light Sources Enhance Background Blur?
Adding light sources can dramatically enhance your background blur, turning simple out-of-focus areas into magical bokeh. Here’s how:
- Christmas Lights: String up some colorful Christmas lights in the background and use a wide aperture to create glowing bokeh circles.
- City Lights: Utilize the bright lights of a city skyline at night for a vibrant bokeh effect.
- Sparklers: Have someone wave a sparkler in the background while using a slow shutter speed and a wide aperture to capture the light trails.
- Candles: Use candles to create a soft and warm bokeh effect.
- Street Lamps: Use street lamps for a unique and moody bokeh effect.
- Fairy Lights: Fairy lights can create a magical and dreamy bokeh effect, especially when combined with a wide aperture.
- Fireworks: Capture the colorful bursts of fireworks for a festive and celebratory bokeh effect.
Here is a summary of various lighting options and their impact:
| Light Source | Description | Bokeh Effect |
|---|---|---|
| Christmas Lights | Small, colorful lights strung together. | Creates soft, circular bokeh balls with vibrant colors. |
| City Lights | Bright lights from buildings, street lamps, and traffic. | Offers a mix of sharp and diffused light points, creating a dynamic and urban bokeh aesthetic. |
| Sparklers | Handheld fireworks that emit bright, flickering sparks. | Produces long, streaking light trails with a magical and whimsical feel. |
| Candles | Soft, warm light from a burning candle. | Generates soft, warm bokeh with a gentle, romantic glow. |
| Street Lamps | Bright, often yellowish light from street-mounted lamps. | Can create moody, atmospheric bokeh with defined light orbs. |
| Fairy Lights | Small, delicate lights often used for decoration. | Creates a whimsical and dreamy bokeh effect with a soft, ethereal glow. |
| Fireworks | Explosive aerial displays of light and color. | Offers vibrant, explosive bokeh with dazzling patterns and bursts of color. |
By experimenting with different light sources, you can create a wide range of bokeh effects that add depth, interest, and visual appeal to your photographs.
8. How Does the Time of Day Affect Background Blur?
The time of day significantly influences the quality of your background blur.
- Golden Hour: Shooting during the golden hour provides warm, soft light that enhances the bokeh effect. The angle of the sun during this time creates a beautiful, diffused glow.
- Blue Hour: The blue hour offers a cooler, more subdued light, which can create a different but equally stunning bokeh effect, especially with city lights.
- Midday: Shooting at midday can be challenging due to the harsh, direct sunlight. However, if you find shade or use a diffuser, you can still achieve a blurred background.
Here’s a comparison of different times of day:
| Time of Day | Lighting Conditions | Bokeh Characteristics |
|---|---|---|
| Golden Hour | Warm, soft light; low sun angle | Soft, warm bokeh with a gentle, diffused glow; enhances skin tones and adds a romantic feel. |
| Blue Hour | Cool, subdued light; twilight | Cool-toned bokeh with a soft, ethereal quality; enhances city lights and creates a dreamy atmosphere. |
| Midday | Harsh, direct sunlight; high contrast | Can be challenging due to harsh shadows; use shade or a diffuser to soften the light. |
| Overcast Day | Soft, diffused light; minimal shadows | Even, soft bokeh with a gentle, understated feel; ideal for capturing subtle details. |
| Nighttime | Low light; artificial light sources | Dramatic, vibrant bokeh with defined light points; enhances street lights and creates a dynamic feel. |
Consider the time of day when planning your shoot to take full advantage of the available light and create the desired bokeh effect.
9. Can You Achieve Background Blur with Phone Cameras?
Yes, you can absolutely achieve background blur with phone cameras, especially with the advancements in mobile photography technology. Here’s how:
- Portrait Mode: Most modern smartphones have a portrait mode that artificially blurs the background, mimicking the effect of a wide aperture lens.
- Dual-Lens Cameras: Phones with dual-lens cameras use depth information to create a more realistic background blur.
- Third-Party Apps: Several apps can help you achieve a blurred background effect.
- Wide Aperture Emulation: Newer phones are able to achieve wide aperture blur with advanced computational power.
Here is an overview:
| Phone Feature | Description | Bokeh Quality |
|---|---|---|
| Portrait Mode | Uses software to estimate depth and blur the background. | Can create a decent bokeh effect but may sometimes look artificial. |
| Dual-Lens Cameras | Uses two lenses to capture depth information, creating a more realistic background blur. | Produces a more natural-looking bokeh with better depth separation. |
| Third-Party Apps | Apps like Snapseed and VSCO offer tools to add or enhance background blur. | Varies depending on the app but can provide more control over the blur effect. |
| Wide Aperture Emulation | Phones compute and create more realistic bokeh. | Produces more realistic and pleasing bokeh. |
While phone cameras may not match the quality of a DSLR or mirrorless camera with a dedicated lens, they can still produce impressive results with a bit of creativity and the right techniques.
10. How Can Post-Processing Enhance Background Blur?
Post-processing can be a powerful tool for enhancing background blur. Here’s how:
- Selective Blur: Use software like Adobe Photoshop or Lightroom to selectively blur the background, refining the effect and ensuring it looks natural.
- Adding Bokeh Overlays: Add bokeh overlays to create more complex and visually appealing bokeh effects.
- Adjusting Depth of Field: Simulate a shallower depth of field by blurring the background more intensely.
- Sharpening the Subject: Sharpen your subject to further separate it from the blurred background.
Here’s a summary of post-processing techniques:
| Technique | Description | Benefit |
|---|---|---|
| Selective Blur | Use tools like the Gaussian Blur filter in Photoshop to selectively blur specific areas of the background. | Allows precise control over the amount and location of blur, creating a more natural-looking effect. |
| Bokeh Overlays | Add transparent bokeh images in post-processing to enhance or change the bokeh in your photo. | Adds depth and complexity to the bokeh, allowing for creative control. |
| Depth Map Adjustments | Use depth maps (if available) to adjust the amount of blur based on distance from the camera. | Creates a more realistic and nuanced bokeh effect. |
| Sharpening the Subject | Sharpen the subject to create a greater contrast between the sharp foreground and the blurred background. | Helps the subject stand out more and enhances the overall sense of depth in the image. |
| Color and Tone Adjustments | Adjust the colors and tones in the background to further enhance the bokeh effect. | Can create a more dreamy or atmospheric look, depending on the desired mood. |
Remember that post-processing should complement, not replace, good shooting techniques.
Ready to take your photography to the next level? At dfphoto.net, we provide a wealth of resources, including detailed tutorials, stunning photo galleries, and a vibrant community of photographers. Whether you’re looking to master aperture settings, explore new creative techniques, or find inspiration for your next project, dfphoto.net is your go-to destination. Visit us today at dfphoto.net and start your journey towards photographic excellence. You can also visit our address at 1600 St Michael’s Dr, Santa Fe, NM 87505, United States or call us on +1 (505) 471-6001
FAQ Section: How to Take Photo With Background Blur
Here are some frequently asked questions about achieving background blur in photography:
- What is the best aperture for creating background blur?
The best aperture for creating background blur is typically a wide aperture, such as f/1.4, f/1.8, or f/2.8. These wide apertures create a shallow depth of field, resulting in a blurred background and a sharp subject. - Do I need an expensive lens to achieve background blur?
No, you don’t necessarily need an expensive lens. While high-end lenses often offer wider apertures and superior image quality, you can achieve excellent background blur with more affordable lenses like a 50mm f/1.8. - How does focal length affect background blur?
Longer focal lengths (e.g., 85mm, 135mm) tend to produce more background blur than shorter focal lengths (e.g., 35mm, 50mm). This is because longer focal lengths compress the background, making it appear more blurred. - Can I achieve background blur with a kit lens?
Yes, you can achieve some background blur with a kit lens, but it may not be as pronounced as with a lens that has a wider aperture. To maximize the blur, use the longest focal length of the kit lens and get as close to your subject as possible. - How important is the distance between the subject and the background?
The distance between the subject and the background is crucial for achieving background blur. The farther your subject is from the background, the more blurred the background will appear. - What camera mode is best for creating background blur?
Aperture Priority mode (Av or A) is generally the best camera mode for creating background blur. This mode allows you to set the aperture while the camera automatically adjusts the shutter speed and ISO for proper exposure. - How can I create background blur in post-processing?
In post-processing, you can use software like Adobe Photoshop or Lightroom to selectively blur the background using tools like the Gaussian Blur filter. You can also add bokeh overlays to enhance the effect. - Is it possible to have too much background blur?
Yes, it is possible to have too much background blur. If the background is excessively blurred, it can become distracting or unnatural. It’s important to strike a balance that complements the subject and enhances the overall image. - Does the shape of the aperture blades affect the bokeh?
Yes, the shape of the aperture blades can affect the bokeh. Lenses with rounded aperture blades tend to produce smoother, more circular bokeh, while lenses with straight aperture blades may produce more polygonal bokeh. - Can I achieve background blur with my smartphone camera?
Yes, many modern smartphones have a Portrait mode that artificially blurs the background. While the effect may not be as natural as with a dedicated camera lens, it can still produce pleasing results.
Remember, the best way to master background blur is to practice and experiment with different settings and techniques. For more tips and tutorials, visit dfphoto.net!