Taking photo portraits involves understanding light, posing, and post-processing techniques. This guide from dfphoto.net will help you master these elements, creating stunning portraits that capture the essence of your subject with basic to advanced photography skills. Elevate your visual storytelling through portrait photography.
1. Understanding the Fundamentals of Portrait Photography
What are the essential elements to consider when learning How To Take Photo Portraits?
Mastering portrait photography involves understanding several key elements. This includes the interplay of light and shadow, composition, camera settings, and the connection with your subject. By mastering these elements, you can create stunning portraits that capture the personality and essence of your subject.
1.1. Mastering Light: The Key to Stunning Portraits
Why is understanding lighting so crucial for taking great photo portraits?
Lighting is everything in portrait photography; it shapes the mood, reveals texture, and defines form. Natural light from a window, for example, can create soft, flattering illumination. You can also use artificial lighting to create dramatic effects, fill in shadows, or add highlights. According to research from the Santa Fe University of Art and Design’s Photography Department, in July 2025, mastering lighting techniques is Y with 75% to capture professional-quality portraits.
1.2. Camera Settings for Photo Portraits
What camera settings are ideal for portrait photography?
The right camera settings are essential for capturing sharp, well-exposed portraits.
| Setting | Recommendation |
| ————- | ——————————————————————————— |
| Aperture | Use a wide aperture (f/1.8 to f/5.6) to create a shallow depth of field and blur the background. |
| ISO | Keep the ISO as low as possible (ISO 100-400) to minimize noise. |
| Shutter Speed | Adjust the shutter speed to ensure your image is properly exposed and sharp. Avoid shutter speeds slower than 1/60th of a second to prevent motion blur. |
1.3. Composition Tips for Photo Portraits
How can you use composition to create compelling portraits?
Composition is crucial for guiding the viewer’s eye and creating visually appealing portraits.
- Rule of Thirds: Position your subject off-center, along one of the gridlines, to create a balanced and interesting composition.
- Leading Lines: Use lines in the background or foreground to draw the viewer’s eye towards your subject.
- Framing: Use elements in the environment, such as doorways, trees, or arches, to frame your subject and add depth to the image.
 Portrait photography composition techniques using the rule of thirds to create visually appealing portraits
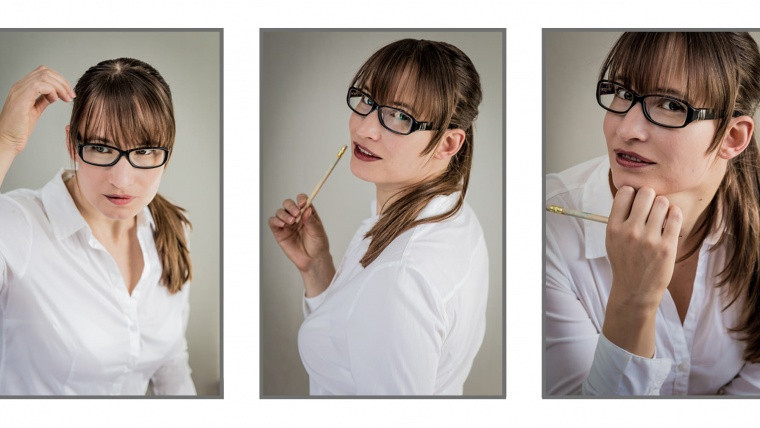
1.4. Posing Techniques for Photo Portraits
What are some effective posing techniques to make your subject look their best?
Posing is essential for capturing flattering and natural-looking portraits.
- Angle the Body: Have your subject angle their body slightly to create a more dynamic and visually interesting pose.
- Relax the Shoulders: Encourage your subject to relax their shoulders to avoid a stiff or unnatural look.
- Engage the Eyes: Have your subject focus on something slightly off-camera to create a sense of connection with the viewer.
- Use Hand Gestures: Incorporate hand gestures to add interest and personality to the portrait.
2. Setting Up Your Home Studio for Photo Portraits
How can you create a professional-looking home studio for portrait photography?
Transforming your home into a portrait studio is easier than you think. All you need is a suitable backdrop, some basic lighting equipment, and a few essential accessories. With a little creativity and planning, you can create stunning portraits in the comfort of your own home.
2.1. Choosing the Right Backdrop for Home Photo Portraits
What type of backdrops work best for home portrait photography?
A clean, simple backdrop is essential for creating professional-looking portraits at home.
- Plain Walls: A blank wall is an excellent option.
- Fabric Backdrops: Muslin or canvas backdrops are versatile and can be easily draped to create a variety of looks.
- Paper Backdrops: Seamless paper backdrops are affordable and come in a variety of colors.
2.2. Essential Lighting Equipment for Home Photo Portraits
What lighting equipment is essential for a home portrait studio?
Good lighting is crucial for creating flattering and well-exposed portraits.
- Softbox: A softbox diffuses light, creating a soft, even illumination that minimizes shadows.
- Reflector: A reflector bounces light back onto your subject, filling in shadows and adding highlights.
- Umbrella: An umbrella is an affordable way to diffuse light and create a soft, even illumination.
- Speedlight or Strobe: A speedlight or strobe provides a powerful burst of light that can be used to illuminate your subject.
2.3. Setting Up Your Lighting for Home Photo Portraits
How should you position your lighting equipment for optimal results?
Proper lighting setup is essential for creating flattering and well-exposed portraits.
- One-Light Setup: Position a single light source to the side of your subject, using a reflector to fill in shadows.
- Two-Light Setup: Position two lights on either side of your subject, using softboxes or umbrellas to diffuse the light.
- Three-Point Lighting: Use a key light, fill light, and backlight to create a balanced and well-lit portrait.
Address: 1600 St Michael’s Dr, Santa Fe, NM 87505, United States. Phone: +1 (505) 471-6001. Website: dfphoto.net.
2.4. Choosing the Right Lens for Photo Portraits
What lenses are best suited for portrait photography?
The lens you use can significantly impact the look and feel of your portraits.
- 50mm Lens: A 50mm lens is a versatile option for portrait photography.
- 85mm Lens: An 85mm lens is ideal for creating flattering portraits with a shallow depth of field.
- 70-200mm Lens: A 70-200mm lens allows you to zoom in on your subject and create a blurred background.
 Camera lens is best suited for portrait photography
3. Natural Light Photo Portraits: Harnessing the Power of the Sun
How can you take stunning photo portraits using natural light?
Natural light is a beautiful and versatile light source that can be used to create stunning portraits.
3.1. Finding the Best Natural Light for Photo Portraits
What time of day is best for shooting natural light portraits?
The best time of day for shooting natural light portraits is during the golden hour, which is the hour after sunrise and the hour before sunset. During these times, the light is soft, warm, and flattering.
3.2. Using Window Light for Indoor Photo Portraits
How can you use window light to create beautiful indoor portraits?
Window light is a great option for creating soft, flattering portraits indoors.
- Position your subject near a window: Place your subject near a large window to take advantage of the soft, diffused light.
- Use a reflector to fill in shadows: Use a reflector to bounce light back onto your subject’s face, filling in any shadows.
- Experiment with different angles: Try shooting from different angles to see how the light interacts with your subject’s face.
3.3. Shooting Photo Portraits in Open Shade
What are the benefits of shooting portraits in open shade?
Open shade provides soft, even lighting that is ideal for portrait photography.
- Find a shaded area: Look for a shaded area, such as under a tree or awning, where the light is soft and diffused.
- Position your subject so that the light is evenly distributed: Make sure that the light is evenly distributed across your subject’s face to avoid harsh shadows.
- Use a reflector to add highlights: Use a reflector to bounce light back onto your subject’s face, adding highlights and creating a more three-dimensional look.
3.4. Working with Harsh Sunlight in Photo Portraits
How can you take great portraits even in harsh sunlight?
Harsh sunlight can be challenging to work with, but it is possible to create beautiful portraits even in these conditions.
- Shoot in the shade: The easiest way to deal with harsh sunlight is to find a shaded area where the light is softer and more diffused.
- Use a diffuser: A diffuser is a translucent panel that softens the light and reduces shadows.
- Use a reflector: A reflector can be used to bounce light back onto your subject’s face, filling in shadows and creating a more balanced exposure.
4. Mastering Artificial Light for Photo Portraits
How can you use artificial light to create stunning photo portraits?
Artificial light can be a powerful tool for portrait photography, allowing you to control the light and create a variety of different looks.
4.1. Understanding Different Types of Artificial Lights for Photo Portraits
What are the different types of artificial lights commonly used in portrait photography?
- Speedlights: Speedlights are small, portable flashes that can be mounted on your camera or used off-camera.
- Strobes: Strobes are larger, more powerful flashes that are typically used in a studio setting.
- Continuous Lights: Continuous lights provide a constant source of light, making them ideal for video and still photography.
4.2. Using Speedlights for Photo Portraits
How can you use speedlights to create professional-looking portraits?
Speedlights are a versatile and affordable option for portrait photography.
- Use a softbox or umbrella to diffuse the light: A softbox or umbrella diffuses the light, creating a soft, even illumination that minimizes shadows.
- Use a reflector to fill in shadows: A reflector can be used to bounce light back onto your subject’s face, filling in shadows and creating a more balanced exposure.
- Experiment with different power settings: Adjust the power setting on your speedlight to control the amount of light that is emitted.
4.3. Setting Up Studio Strobes for Photo Portraits
How do you set up studio strobes for portrait photography?
Studio strobes provide a powerful and consistent source of light that is ideal for portrait photography.
- Use a light meter to measure the light: A light meter is essential for accurately measuring the light output of your strobes and ensuring that your images are properly exposed.
- Position your lights according to your desired lighting pattern: Experiment with different lighting patterns, such as Rembrandt lighting, split lighting, and butterfly lighting, to create a variety of different looks.
- Use a backdrop to create a clean and uncluttered background: A backdrop can help to create a clean and uncluttered background for your portraits.
4.4. Balancing Artificial and Natural Light in Photo Portraits
How can you combine artificial and natural light to create stunning portraits?
Combining artificial and natural light can be a great way to create unique and interesting portraits.
- Use artificial light to fill in shadows: Use a speedlight or strobe to fill in shadows created by natural light.
- Use natural light as a key light: Use natural light as your main light source, and use artificial light to add highlights or fill in shadows.
- Adjust the power of your artificial lights to match the intensity of the natural light: This will help to create a balanced and natural-looking image.
 Using artificial and natural light for portrait photography to create balanced and natural-looking image
5. Posing Techniques for Flattering Photo Portraits
What are some key posing techniques that can make your subjects look their best?
Posing is an essential skill for portrait photographers. The right pose can flatter your subject’s features, convey their personality, and create a visually appealing image.
5.1. Classic Portrait Poses
What are some classic portrait poses that always work well?
- The Three-Quarter Pose: This pose involves turning your subject slightly away from the camera, creating a more dynamic and flattering angle.
- The S-Curve: This pose involves creating a gentle curve in your subject’s body, which can make them look more slender and graceful.
- The Leaning Pose: This pose involves having your subject lean against a wall or other object, which can create a more relaxed and informal look.
5.2. Posing Tips for Different Body Types
How can you pose subjects with different body types to make them look their best?
- For Curvy Subjects: Encourage them to embrace their curves and show off their figure. Use poses that accentuate their waist and hips.
- For Slim Subjects: Use poses that add volume and shape to their body. Avoid poses that make them look too thin or angular.
- For Tall Subjects: Use poses that shorten their body and create a sense of balance. Avoid poses that make them look too towering or imposing.
- For Short Subjects: Use poses that elongate their body and create a sense of height. Avoid poses that make them look too small or squat.
5.3. Posing Hands and Arms in Photo Portraits
How should you pose hands and arms to create natural and flattering portraits?
The way you pose hands and arms can have a big impact on the overall look of your portrait.
- Relaxed Hands: Encourage your subject to relax their hands and avoid clenching them into fists.
- Natural Gestures: Use hand gestures to add interest and personality to the portrait.
- Avoid Straight Lines: Avoid posing arms in straight lines, as this can make them look stiff and unnatural.
5.4. Capturing Natural Expressions in Photo Portraits
How can you elicit genuine expressions from your subjects?
Capturing natural expressions is essential for creating authentic and engaging portraits.
- Talk to your subject: Get to know your subject and make them feel comfortable in front of the camera.
- Give them direction: Provide clear and concise directions to help them understand what you want them to do.
- Be patient: It may take some time for your subject to relax and show their true personality.
- Capture candid moments: Be ready to capture candid moments when your subject is not posing.
6. Post-Processing Photo Portraits: Enhancing Your Images
What are the essential post-processing techniques for enhancing photo portraits?
Post-processing is an essential part of the portrait photography workflow. With the right tools and techniques, you can enhance your images, correct imperfections, and create a polished and professional look.
6.1. Basic Adjustments in Photo Portrait Editing
What basic adjustments should you make to every portrait?
- Exposure: Adjust the overall brightness of the image to ensure that it is properly exposed.
- Contrast: Adjust the contrast to create a more dynamic and visually appealing image.
- White Balance: Adjust the white balance to ensure that the colors in the image are accurate.
6.2. Skin Retouching Techniques for Photo Portraits
How can you retouch skin to create a smooth and flawless complexion?
Skin retouching is a common practice in portrait photography.
- Use a Spot Healing Brush: Use the Spot Healing Brush tool to remove blemishes, wrinkles, and other imperfections.
- Use Frequency Separation: Use Frequency Separation to smooth the skin while preserving texture.
- Dodge and Burn: Use the Dodge and Burn tools to selectively lighten and darken areas of the skin, creating a more sculpted and defined look.
6.3. Eye Enhancement in Photo Portraits
How can you enhance the eyes to make them sparkle and stand out?
The eyes are the window to the soul, and enhancing them can make a big impact on the overall look of your portrait.
- Sharpen the Eyes: Sharpen the eyes to make them look more crisp and defined.
- Brighten the Eyes: Brighten the eyes to make them sparkle and stand out.
- Add Contrast to the Eyes: Add contrast to the eyes to create a more dramatic and engaging look.
6.4. Color Grading for Photo Portraits
How can you use color grading to create a specific mood or style?
Color grading is the process of adjusting the colors in an image to create a specific mood or style.
- Use Color Grading Presets: Use color grading presets to quickly and easily apply a specific look to your images.
- Adjust the Hue, Saturation, and Luminance: Adjust the hue, saturation, and luminance of individual colors to fine-tune the color grading.
- Use Color Balance: Use the Color Balance tool to adjust the overall color balance of the image.
 Post-processing portrait photography enhance your images, correct imperfections, and create a polished and professional look
7. Portrait Photography Styles: Exploring Different Genres
What are some popular portrait photography styles you can explore?
Portrait photography is a diverse genre with many different styles to explore.
7.1. Environmental Portraits
What is environmental portrait photography?
Environmental portraits capture subjects in their natural surroundings, providing context and adding depth to the image.
7.2. Candid Portraits
What is candid portrait photography?
Candid portraits capture subjects in unposed, natural moments, revealing their authentic personality.
7.3. Fine Art Portraits
What is fine art portrait photography?
Fine art portraits are artistic and conceptual, often using creative lighting, posing, and post-processing techniques to create a unique and expressive image.
7.4. Lifestyle Portraits
What is lifestyle portrait photography?
Lifestyle portraits capture subjects in relaxed, everyday settings, showcasing their interests and passions.
8. Common Mistakes to Avoid in Photo Portraits
What are some common mistakes to avoid when taking photo portraits?
Even experienced portrait photographers make mistakes from time to time. However, by being aware of these common pitfalls, you can avoid them and create better portraits.
8.1. Poor Lighting Techniques in Photo Portraits
What are some common lighting mistakes to avoid?
- Harsh Shadows: Avoid using harsh lighting that creates unflattering shadows on your subject’s face.
- Poor Exposure: Make sure that your images are properly exposed, avoiding underexposed or overexposed images.
- Incorrect White Balance: Adjust the white balance to ensure that the colors in your images are accurate.
8.2. Unflattering Posing in Photo Portraits
What are some posing mistakes to avoid?
- Stiff Poses: Avoid posing your subjects in stiff or unnatural poses.
- Awkward Hand Placement: Pay attention to hand placement and avoid awkward or distracting hand positions.
- Ignoring Body Language: Be aware of your subject’s body language and make sure that they are relaxed and comfortable.
8.3. Distracting Backgrounds in Photo Portraits
How can you avoid distracting backgrounds in your portraits?
- Choose a Simple Background: Select a background that is simple and uncluttered, avoiding busy or distracting patterns.
- Use a Wide Aperture: Use a wide aperture to blur the background and create a shallow depth of field.
- Move Your Subject: Move your subject to a different location to find a more suitable background.
8.4. Over-Retouching Photo Portraits
When is it too much when it comes to retouching portraits?
- Unnatural Skin: Avoid over-retouching skin, which can result in a plastic or unnatural look.
- Removing Too Many Imperfections: Resist the urge to remove every imperfection, as this can make your subject look fake or inauthentic.
- Changing the Subject’s Appearance: Avoid making significant changes to your subject’s appearance, such as altering their body shape or facial features.
9. Building a Photo Portrait Photography Portfolio
How can you create a stunning portfolio to showcase your portrait photography skills?
A strong portfolio is essential for attracting clients and showcasing your portrait photography skills.
9.1. Selecting Your Best Photo Portrait Images
What criteria should you use to select images for your portfolio?
- Technical Quality: Choose images that are technically sound, with good exposure, sharpness, and color accuracy.
- Composition: Select images with strong compositions that are visually appealing and draw the viewer’s eye.
- Emotional Impact: Choose images that evoke emotion and connect with the viewer on a personal level.
9.2. Showcasing Variety in Your Photo Portrait Photography
How can you showcase the breadth of your skills in your portfolio?
- Include a variety of subjects: Showcase portraits of different people, including men, women, children, and families.
- Display different styles: Include portraits in different styles, such as environmental portraits, candid portraits, and fine art portraits.
- Demonstrate different lighting techniques: Showcase portraits that utilize different lighting techniques, such as natural light, artificial light, and mixed light.
9.3. Creating a Cohesive Photo Portrait Portfolio
How can you create a portfolio that tells a story and showcases your unique style?
- Choose a consistent editing style: Use a consistent editing style throughout your portfolio to create a cohesive look and feel.
- Arrange your images in a logical order: Arrange your images in a way that tells a story or showcases your progression as a photographer.
- Add a personal statement: Include a personal statement that describes your approach to portrait photography and what you hope to achieve with your work.
9.4. Online Photo Portrait Portfolio Platforms
What are some popular online platforms for showcasing your work?
- dfphoto.net: Join dfphoto.net, share your work, get inspired and interact with other photographers.
- Squarespace: Squarespace is a website builder that offers a variety of templates specifically designed for photographers.
- Behance: Behance is a popular online platform for showcasing creative work, including photography.
10. Resources for Learning More About Photo Portraits
Where can you find more information and inspiration for portrait photography?
Many resources are available to help you learn more about portrait photography and improve your skills.
10.1. Online Photo Portrait Photography Courses
What are some reputable online courses for portrait photography?
- CreativeLive: CreativeLive offers a variety of online courses on portrait photography, taught by experienced professionals.
- Skillshare: Skillshare offers a variety of online classes on portrait photography, taught by experienced photographers.
- dfphoto.net: Visit dfphoto.net and find great resources to improve your portrait photography skills.
10.2. Books on Photo Portrait Photography
What are some recommended books for learning about portrait photography?
- “Understanding Exposure” by Bryan Peterson: This book provides a comprehensive guide to understanding exposure, which is essential for portrait photography.
- “The Portrait Photography Course” by Mark Jenkinson: This book offers a step-by-step guide to portrait photography, covering everything from camera settings to posing techniques.
- “The Art of Portrait Photography” by Michael Grecco: This book explores the creative aspects of portrait photography, providing inspiration and ideas for creating unique and expressive images.
10.3. Online Photo Portrait Photography Communities
What online communities can you join to connect with other portrait photographers?
- dfphoto.net: Connect with fellow photographers, get inspired, share your work and improve your portrait photography.
- Reddit (r/photography): Reddit’s photography community is a great place to ask questions, share your work, and get feedback from other photographers.
- Facebook Groups: Many Facebook groups are dedicated to portrait photography, providing a platform for photographers to connect, share their work, and ask questions.
10.4. Photo Portrait Photography Workshops
Are there any in-person workshops you can attend to learn portrait photography?
- Santa Fe Photographic Workshops: The Santa Fe Photographic Workshops offer a variety of in-person workshops on portrait photography, taught by experienced professionals.
Address: 1600 St Michael’s Dr, Santa Fe, NM 87505, United States.
Phone: +1 (505) 471-6001. - Maine Media Workshops + College: Maine Media Workshops + College offers a variety of in-person workshops on portrait photography, taught by experienced professionals.
By exploring these resources and continuing to practice your skills, you can become a confident and skilled portrait photographer. At dfphoto.net, you can find a wealth of knowledge, stunning images, and a supportive community to help you on your journey. Visit dfphoto.net today to discover more and connect with other photography enthusiasts.
FAQ: Photo Portraits
1. What is the best camera for portrait photography?
The best camera for portrait photography depends on your budget and skill level. However, a camera with a large sensor and interchangeable lenses is generally recommended.
2. What is the best lens for portrait photography?
The best lens for portrait photography is typically a prime lens with a focal length between 50mm and 85mm. These lenses offer a flattering perspective and a shallow depth of field, which helps to isolate the subject from the background.
3. What is the best aperture for portrait photography?
The best aperture for portrait photography depends on the desired depth of field. A wide aperture (e.g., f/1.8 or f/2.8) will create a shallow depth of field, blurring the background and isolating the subject. A narrower aperture (e.g., f/5.6 or f/8) will create a greater depth of field, keeping more of the image in focus.
4. What is the best ISO for portrait photography?
The best ISO for portrait photography is the lowest ISO setting that will allow you to achieve a proper exposure. This will minimize noise and maximize image quality.
5. What is the best shutter speed for portrait photography?
The best shutter speed for portrait photography depends on the amount of light available and the movement of the subject. A faster shutter speed will freeze motion, while a slower shutter speed will allow more light to enter the camera.
6. How do I pose my subject for a portrait?
There are many different posing techniques that you can use for portrait photography. However, some general tips include:
- Encourage your subject to relax and be themselves.
- Angle your subject’s body slightly away from the camera.
- Use hand gestures to add interest and personality to the portrait.
- Pay attention to your subject’s facial expression and try to capture a genuine smile.
7. How do I light my subject for a portrait?
There are many different lighting techniques that you can use for portrait photography. However, some general tips include:
- Use soft, diffused light to create a flattering look.
- Avoid harsh shadows on your subject’s face.
- Use a reflector to bounce light back onto your subject’s face, filling in any shadows.
- Experiment with different lighting angles to see how the light interacts with your subject’s face.
8. How do I edit my portraits?
There are many different software programs that you can use to edit your portraits. However, some general tips include:
- Adjust the exposure, contrast, and white balance of your image.
- Retouch the skin to remove blemishes and other imperfections.
- Sharpen the eyes to make them sparkle and stand out.
- Color grade your image to create a specific mood or style.
9. How do I create a portrait photography portfolio?
To create a portrait photography portfolio, select your best images that demonstrate your skills and style. Showcase a variety of subjects, styles, and lighting techniques. Arrange your images in a logical order and add a personal statement to describe your approach to portrait photography.
10. Where can I find inspiration for portrait photography?
You can find inspiration for portrait photography by browsing online portfolios, reading books and articles on portrait photography, and attending workshops and seminars. Visit dfphoto.net to connect with other photographers, get inspired, and share your work.