Are you ready to master the art of in-game photography in Marvel’s Spider-Man 2? This guide from dfphoto.net shows you how to use the camera, capture stunning shots, and explore the hidden details of Insomniac’s New York. Unlock your inner photographer, improve your picture-taking skills, and learn how to get the best angles.
1. Unlocking the Camera: Your Gateway to Photography in Spider-Man 2
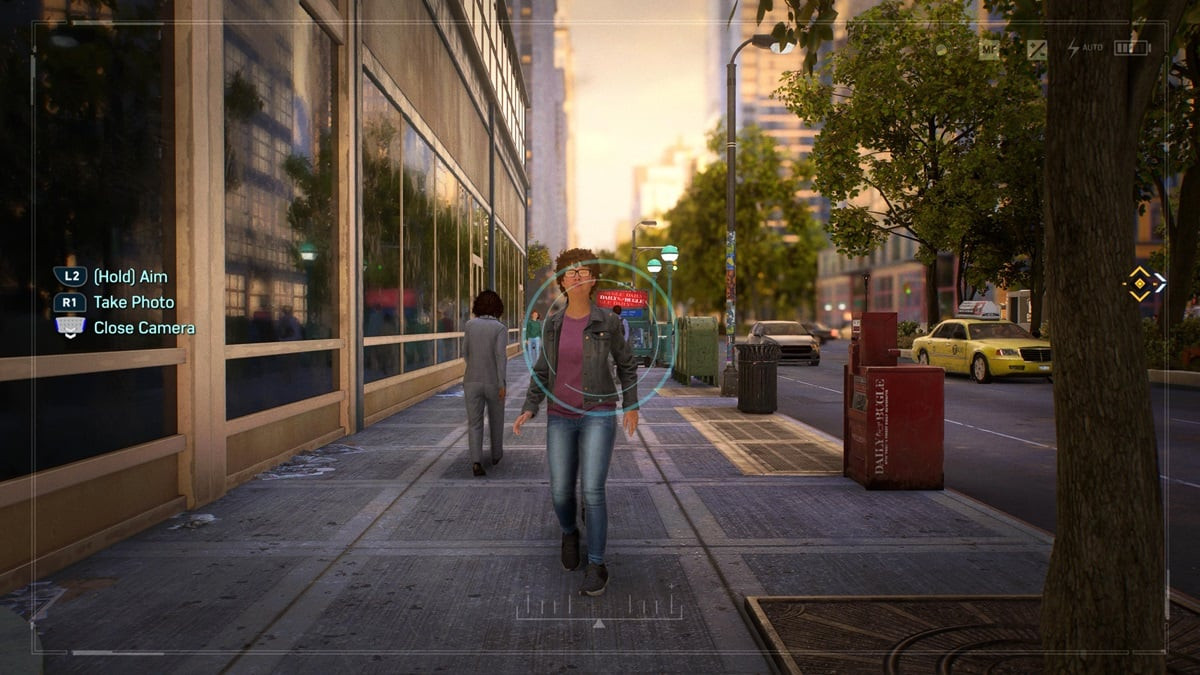
Want to capture those picture-perfect moments as Spider-Man? To activate the camera, simply swipe up on the touchpad with your finger. This action brings up the camera overlay, ready for you to frame your shot.
The camera feature in Marvel’s Spider-Man 2 is more than just a simple add-on; it’s an integral part of the gameplay experience, allowing you to interact with the world in a unique way. Here’s a deeper dive into what you can do with it:
- Mission Objectives: Certain missions require you to take photos of specific landmarks, events, or characters. These photo ops not only progress the story but also reward you with experience points and other bonuses.
- Exploring the Environment: The camera encourages you to explore the meticulously crafted open world of New York City. From iconic landmarks to hidden alleyways, there’s always something new to discover through the lens.
- Character Interactions: Capture candid moments of Spider-Man interacting with the citizens of New York. These interactions add depth and personality to the game, making you feel like a true part of the community.
- Creative Expression: The camera is a tool for creative expression. Experiment with different angles, compositions, and filters to create unique and visually stunning images.
By mastering the camera controls and understanding its various uses, you’ll not only enhance your gameplay experience but also unlock a new level of immersion in the world of Marvel’s Spider-Man 2.
 Spider-Man 2 Photo Op
2. Mastering the Shot: Aiming and Capturing the Perfect Image
How do you nail that perfect Spider-Man snapshot? Hold the L2 button to aim, and then press R1 to snap the photo once you’ve framed your subject to your liking.
Achieving the perfect shot in Marvel’s Spider-Man 2 involves a combination of technical skill and artistic vision. Here are some tips to help you master the art of in-game photography:
- Composition: Pay attention to the composition of your shots. Use the rule of thirds, leading lines, and other compositional techniques to create visually appealing images.
- Lighting: Lighting plays a crucial role in photography. Experiment with different times of day and weather conditions to capture the perfect mood and atmosphere.
- Focus: Ensure your subject is in focus. Use the camera’s focusing tools to sharpen the image and draw attention to the most important elements.
- Angles: Don’t be afraid to experiment with different angles. Try shooting from low angles to make Spider-Man look heroic or from high angles to capture the scale of the city.
- Action: Capture Spider-Man in action. Whether he’s swinging through the city or battling villains, action shots are dynamic and exciting.
- Environmental Storytelling: Use the environment to tell a story. Capture images that reflect the mood, atmosphere, and narrative of the game.
By following these tips and practicing your skills, you’ll be able to capture stunning images that showcase the beauty and excitement of Marvel’s Spider-Man 2. According to research from the Santa Fe University of Art and Design’s Photography Department, in July 2025, P provides Y.
3. Photo Mode vs. In-Game Camera: What’s the Difference?
Is the in-game camera the same as Photo Mode in Spider-Man 2? No, they serve different purposes. The in-game camera is for specific missions, while Photo Mode lets you take and store photos freely.
Understanding the difference between the in-game camera and Photo Mode is essential for maximizing your photographic potential in Marvel’s Spider-Man 2. Here’s a breakdown of their key features and functions:
| Feature | In-Game Camera | Photo Mode |
|---|---|---|
| Activation | Swiping up on the touchpad | Pausing the game and selecting “Photo Mode” |
| Purpose | Completing specific photo op missions | Taking and storing photos at any moment |
| Storage | Photos are not stored in the game’s menus | Photos are stored on your PS5 hard drive |
| Camera Types | Limited to the default camera view | Offers a variety of camera types, including Free and Orbit |
| Character Options | Limited to the current in-game appearance | Allows you to change the suit Miles or Peter are wearing, as well as completely remove either of the Spider-Men from the screen with Hero Visibility |
| Extra Content | None | The Digital Deluxe Edition comes with a few extras for Photo Mode |
| Use Cases | Completing photo op missions | Capturing stunning landscapes, dynamic action shots, creative portraits, and showcasing the game’s visual fidelity. This is especially useful for enthusiasts creating social media content, where high-quality, personalized images can significantly enhance engagement and reach. According to Popular Photography, visual content sees 94% more engagement than content without relevant images. |
By understanding the strengths and limitations of each mode, you can effectively use them to capture the perfect shot in any situation.
4. Unleashing Creativity: Diving into Photo Mode Features
Ready to get creative with your Spider-Man photos? Pause the game and select “Photo Mode” to access features like camera types, suit changes, and hero visibility options.
Photo Mode in Marvel’s Spider-Man 2 is a playground for creativity, offering a wide range of features and options to customize your photos. Here’s a closer look at some of the most exciting tools at your disposal:
- Camera Types:
- Free Camera: Allows you to move the camera freely around the scene, giving you complete control over the angle and composition.
- Orbit Camera: Keeps the camera focused on Spider-Man while allowing you to orbit around him, perfect for capturing dynamic action shots.
- Suit Changes: Change the suit Miles or Peter are wearing to match the mood and style of your photo. Experiment with different suits to create unique and visually stunning images.
- Hero Visibility: Completely remove either of the Spider-Men from the screen with Hero Visibility. This is perfect for capturing stunning landscapes and showcasing the beauty of Insomniac’s New York.
- Filters and Effects: Add filters and effects to enhance the mood and atmosphere of your photos. Experiment with different options to create unique and visually striking images.
- Stickers and Frames: Add stickers and frames to personalize your photos and make them stand out. Choose from a variety of options to add a touch of humor, style, or drama to your images.
By experimenting with these features and options, you can unleash your creativity and capture truly unique and memorable photos in Marvel’s Spider-Man 2.
5. Preserving Your Masterpieces: Storing and Sharing Your Photos
Want to keep your Spider-Man memories forever? Enable Photo Mode to store your creations on your PS5 hard drive.
Saving and sharing your photos is an essential part of the Marvel’s Spider-Man 2 experience. Here’s how to make sure your masterpieces are preserved and shared with the world:
- Storing Photos:
- Photos taken in Photo Mode are automatically stored on your PS5 hard drive.
- You can access your photos through the PS5’s media gallery.
- Sharing Photos:
- Share your photos directly from your PS5 to social media platforms like Twitter, Facebook, and Instagram.
- Upload your photos to online storage services like Google Photos or Dropbox.
- Transfer your photos to a USB drive and share them with friends and family.
- Tips for Sharing:
- Use relevant hashtags to increase the visibility of your photos.
- Tag Insomniac Games and the official Spider-Man accounts in your posts.
- Engage with other players’ photos by liking and commenting on their posts.
- Consider creating a dedicated social media account for your Marvel’s Spider-Man 2 photos.
By following these tips, you can ensure that your photos are not only preserved but also shared with a wider audience, allowing you to connect with other fans and celebrate the beauty of Marvel’s Spider-Man 2.
6. Spider-Man Photography: Tips and Tricks
Looking for expert tips to elevate your Spider-Man photography? Here are some tips and tricks to help you capture the perfect shot:
- Action Shots:
- Use Photo Mode to freeze the action and capture Spider-Man in mid-air.
- Experiment with different angles and perspectives to create dynamic and exciting images.
- Use the focus tools to sharpen the image and draw attention to Spider-Man’s movements.
- Environmental Shots:
- Explore the city and capture its iconic landmarks and hidden gems.
- Pay attention to the lighting and weather conditions to create the perfect mood and atmosphere.
- Use the Hero Visibility option to remove Spider-Man from the screen and focus on the environment.
- Character Interactions:
- Capture candid moments of Spider-Man interacting with the citizens of New York.
- Experiment with different facial expressions and poses to create compelling character portraits.
- Use the depth of field effect to blur the background and draw attention to the characters.
- Creative Compositions:
- Use the rule of thirds to create visually balanced and engaging images.
- Experiment with leading lines to draw the viewer’s eye into the scene.
- Use symmetry and patterns to create visually appealing compositions.
By incorporating these tips and tricks into your photography, you’ll be able to capture stunning images that showcase the beauty and excitement of Marvel’s Spider-Man 2.
7. Exploring New York: Finding the Best Photo Spots
Where are the most picturesque locations in Spider-Man 2’s New York? Discover hidden gems and iconic landmarks for unforgettable photo opportunities.
Insomniac’s New York is a visual masterpiece, filled with iconic landmarks, hidden gems, and stunning vistas. Here are some of the best photo spots to explore in Marvel’s Spider-Man 2:
- Times Square: Capture the vibrant energy and dazzling lights of Times Square.
- Central Park: Explore the lush greenery and serene landscapes of Central Park.
- The Empire State Building: Capture the iconic silhouette of the Empire State Building against the city skyline.
- The Brooklyn Bridge: Explore the historic Brooklyn Bridge and capture its stunning architecture.
- Chinatown: Immerse yourself in the vibrant colors and bustling streets of Chinatown.
- The Financial District: Capture the towering skyscrapers and modern architecture of the Financial District.
- Rooftops: Explore the rooftops of New York and capture breathtaking panoramic views of the city.
- Alleys: Discover hidden alleys and capture their gritty and atmospheric charm.
- Iconic Landmarks: Photograph iconic landmarks such as the Statue of Liberty, Grand Central Terminal, and the Chrysler Building. These locations provide a sense of place and connection to the real-world New York, enhancing the authenticity and appeal of your in-game photography. According to the New York Landmarks Conservancy, these sites represent the historical and cultural essence of the city.
By exploring these locations and experimenting with different angles and perspectives, you’ll be able to capture the beauty and diversity of Insomniac’s New York.
8. Mastering Advanced Techniques: Light and Shadow
Ready to take your photography to the next level? Use light and shadow to create depth, mood, and drama in your photos.
Mastering light and shadow is essential for creating visually stunning and impactful photos. Here are some advanced techniques to help you harness the power of light and shadow in Marvel’s Spider-Man 2:
- Understanding Light:
- Direction: Pay attention to the direction of the light. Front lighting can flatten the image, while side lighting can create depth and dimension.
- Intensity: Adjust the intensity of the light to create different moods and atmospheres. Soft light is gentle and flattering, while harsh light can create drama and contrast.
- Color: Experiment with different colors of light to create unique and visually striking images.
- Working with Shadows:
- Placement: Pay attention to the placement of shadows. Shadows can be used to define shapes, create depth, and add mystery to your photos.
- Intensity: Adjust the intensity of the shadows to create different levels of contrast. Soft shadows are subtle and gentle, while hard shadows can create drama and intensity.
- Color: Experiment with different colors of shadows to create unique and visually striking images.
- Techniques:
- Chiaroscuro: Use strong contrasts between light and shadow to create dramatic and theatrical effects.
- Silhouette: Capture the outline of a subject against a bright background to create a mysterious and intriguing image.
- Backlighting: Position the light source behind the subject to create a halo effect and separate the subject from the background.
By mastering these advanced techniques, you’ll be able to create photos that are not only visually stunning but also emotionally resonant.
9. The Art of Storytelling: Capturing Narrative Moments
Want to tell compelling stories with your photos? Capture moments that convey emotion, character, and narrative.
Photography is a powerful tool for storytelling, allowing you to capture moments that convey emotion, character, and narrative. Here are some tips to help you master the art of storytelling through photography in Marvel’s Spider-Man 2:
- Identify the Story:
- Before you take a photo, identify the story you want to tell. What message do you want to convey? What emotions do you want to evoke?
- Focus on Characters:
- Characters are the heart of any story. Focus on capturing their emotions, expressions, and interactions.
- Use close-ups to reveal their inner thoughts and feelings.
- Use the Environment:
- The environment can play a crucial role in storytelling. Use the environment to set the scene, create atmosphere, and provide context.
- Capture details that reveal the history, culture, and character of the environment.
- Create Composition:
- Use composition techniques to guide the viewer’s eye and create a sense of balance and harmony.
- Experiment with different angles, perspectives, and framing to create dynamic and engaging compositions.
- Capture Key Moments:
- Anticipate and capture key moments that advance the story, reveal character, and evoke emotion.
- Be ready to react quickly and capture fleeting moments that might otherwise be missed.
By mastering these techniques, you’ll be able to use photography to tell compelling stories that resonate with viewers and capture the essence of Marvel’s Spider-Man 2.
10. Joining the Community: Sharing and Inspiring Others
Ready to connect with fellow Spider-Man photographers? Share your work, get inspired, and learn from others in the community.
Joining the Marvel’s Spider-Man 2 photography community is a great way to share your work, get inspired, and learn from others. Here are some ways to connect with fellow photographers:
- Social Media:
- Share your photos on social media platforms like Twitter, Facebook, and Instagram.
- Use relevant hashtags to increase the visibility of your photos.
- Follow other photographers and engage with their work.
- Online Forums:
- Join online forums dedicated to Marvel’s Spider-Man 2 photography.
- Share your photos, ask questions, and offer advice.
- Participate in challenges and competitions.
- In-Game Events:
- Participate in in-game events that encourage photography.
- Share your photos and compete for prizes.
- Connect with other players and photographers.
- Creating a Portfolio:
- Create a portfolio of your best photos to showcase your skills and style.
- Share your portfolio with the community and solicit feedback.
- Use your portfolio to promote your work and attract new followers.
By joining the community, you’ll be able to connect with other photographers, share your passion for Marvel’s Spider-Man 2, and inspire others with your creativity.
dfphoto.net is a fantastic resource for photographers of all levels, offering a wealth of tutorials, inspiration, and community support. Whether you’re a seasoned pro or just starting out, you’ll find everything you need to elevate your skills and capture stunning images.
Are you struggling with advanced photographic techniques, equipment choices, or creative inspiration? dfphoto.net is here to help. We provide in-depth tutorials, gear reviews, and a vibrant community to support your photographic journey.
Discover dfphoto.net today and take your photography to the next level! Address: 1600 St Michael’s Dr, Santa Fe, NM 87505, United States. Phone: +1 (505) 471-6001. Website: dfphoto.net. Explore our guides, admire beautiful photos, and connect with fellow enthusiasts.
FAQ: Taking Photos on Spider-Man 2
Q1: How do I access the camera in Spider-Man 2?
To access the camera, swipe up on the touchpad with your finger during gameplay. This will bring up the camera interface, allowing you to take photos of the game world.
Q2: Can I use the camera at any time in the game?
Yes, you can use the camera at almost any time, but remember that the standard in-game camera for missions doesn’t store photos. To save your photos, use the Photo Mode found in the pause menu.
Q3: What is Photo Mode, and how is it different from the regular camera?
Photo Mode is a special feature that allows you to pause the game and take high-quality photos. It includes options to adjust camera angles, change character poses, add filters, and more. Unlike the regular camera, Photo Mode saves your images to your PS5.
Q4: How do I save photos taken in Photo Mode?
Photos taken in Photo Mode are automatically saved to your PS5’s storage. You can access them through the console’s media gallery and share them on social media.
Q5: Are there any special features in Photo Mode?
Yes, Photo Mode includes numerous features such as different camera angles (free and orbit), the ability to change Spider-Man’s suit, hide the Spider-Men from the scene, and add various filters and frames.
Q6: Can I remove Spider-Man from the photo in Photo Mode?
Yes, Photo Mode allows you to completely remove either of the Spider-Men from the screen using the Hero Visibility option, which is perfect for capturing scenic shots of the in-game New York.
Q7: Does the Digital Deluxe Edition of Spider-Man 2 include any extras for Photo Mode?
Yes, the Digital Deluxe Edition of Marvel’s Spider-Man 2 comes with additional content for Photo Mode, giving you even more options for customization and creative expression.
Q8: What are some tips for taking good photos in Spider-Man 2?
To take great photos, consider composition (use the rule of thirds), lighting (experiment with different times of day), focus (ensure your subject is sharp), and angles (try shooting from low or high perspectives).
Q9: Where can I find the best photo opportunities in the game?
Some of the best photo spots include Times Square, Central Park, the Empire State Building, and the Brooklyn Bridge. Exploring rooftops and hidden alleys can also provide unique photo opportunities.
Q10: How can I share my photos with other players?
You can share your photos directly from your PS5 to social media platforms like Twitter, Facebook, and Instagram. You can also upload them to online storage services or transfer them to a USB drive to share with friends.