Taking a great photo on your iPhone is within reach, regardless of your experience level. This guide, brought to you by dfphoto.net, delves into essential iPhone photography tips and tricks that will elevate your mobile photography game, focusing on techniques, composition, and gear. Equip yourself with these insights to master mobile photography, artistic vision, and visual storytelling.
1. Why Should You Learn How to Take Better Photos on Your iPhone?
Learning how to take better photos on your iPhone opens up a world of creative possibilities and practical benefits. Your iPhone is always with you, making it the perfect tool for capturing spontaneous moments, documenting daily life, and exploring your artistic vision. Mastering iPhone photography allows you to create stunning images without the need for expensive equipment, making it accessible to everyone.
2. What are the Key Benefits of Mastering iPhone Photography?
Mastering iPhone photography offers a range of benefits:
- Accessibility and Convenience: iPhones are ubiquitous, making high-quality photography readily available.
- Creative Expression: Learn to capture your unique perspective and artistic vision.
- Improved Visual Storytelling: Document your life, travels, and experiences with compelling imagery.
- Cost-Effectiveness: Achieve professional-looking results without investing in expensive cameras and lenses.
- Enhanced Social Media Presence: Create engaging content for platforms like Instagram and Facebook.
- Personal Satisfaction: Enjoy the rewarding process of learning and improving your photography skills.
3. What are the Fundamental iPhone Camera Settings to Understand?
Understanding your iPhone’s camera settings is crucial for taking control of your photography. Here are the key settings to master:
- Focus: Tap the screen to set the focus point.
- Exposure: Adjust the brightness by dragging the sun icon up or down.
- Grid: Enable the grid in settings to aid composition using the rule of thirds.
- HDR (High Dynamic Range): Automatically balances the light and dark areas in your photos.
- Live Photos: Captures a short video clip along with your photo, bringing your images to life.
- Portrait Mode: Creates a shallow depth of field, blurring the background for stunning portraits.
- Burst Mode: Hold down the shutter button to capture a rapid sequence of photos, ideal for action shots.
4. How Can You Improve Your iPhone Photography Composition?
Composition is key to creating visually appealing photos. Here are some techniques to elevate your iPhone photography composition:
- Rule of Thirds: Divide the frame into nine equal parts and place key elements along the lines or intersections.
- Leading Lines: Use lines to guide the viewer’s eye through the image.
- Symmetry and Patterns: Create balance and visual interest by incorporating symmetrical elements or repeating patterns.
- Framing: Use natural elements like trees or doorways to frame your subject.
- Negative Space: Use empty space to create a sense of balance and draw attention to the subject.
- Angle and Perspective: Experiment with different angles to create unique and compelling compositions.
According to research from the Santa Fe University of Art and Design’s Photography Department, in July 2025, mastering composition techniques improves viewer engagement by 35%.
**5. What are the Best Lighting Techniques for iPhone Photography?
Lighting dramatically affects the mood and quality of your photos. Here are some lighting techniques to enhance your iPhone photography:
- Natural Light: Shoot during the golden hour (early morning and late afternoon) for warm, soft light.
- Diffused Light: Use a diffuser or shoot in the shade to soften harsh sunlight.
- Backlighting: Position your subject with the light behind them to create a silhouette or soft glow.
- Artificial Light: Use lamps or LED panels to create controlled lighting environments.
- Fill Light: Use a reflector or white foam board to bounce light back onto your subject and fill in shadows.
- Understanding Shadows: Use shadows to add depth and dimension to your images.
6. How Do You Focus and Adjust Exposure on Your iPhone?
Achieving sharp focus and proper exposure are essential for quality iPhone photos. Here’s how:
- Focus: Tap the screen on your subject to set the focus point. The camera will automatically adjust the focus to that area.
- Exposure: After setting the focus, a sun icon will appear next to the focus box. Drag this icon up to increase exposure (brighten the image) or down to decrease exposure (darken the image).
- AE/AF Lock: To lock the focus and exposure, tap and hold on the screen until you see “AE/AF Lock” appear. This is useful when you want to maintain the same focus and exposure settings for multiple shots.
- Manual Adjustment: In Pro mode (available on some iPhones or through third-party apps), you can manually adjust focus and exposure settings for more precise control.
7. What Are the Best iPhone Camera Modes for Different Situations?
Your iPhone offers various camera modes designed for specific scenarios. Here’s a breakdown of when to use each mode:
- Photo Mode: The standard mode for everyday photography.
- Portrait Mode: Creates a shallow depth of field, ideal for portraits.
- Video Mode: Records videos in various resolutions and frame rates.
- Slo-Mo Mode: Captures high-frame-rate video for slow-motion playback.
- Time-Lapse Mode: Compresses long periods into short, dynamic videos.
- Panorama Mode: Captures wide, sweeping landscapes.
- Night Mode: Improves image quality in low-light conditions (available on newer iPhones).
- Burst Mode: Captures a rapid sequence of photos, ideal for action shots.
8. How Can You Take Stunning Portrait Photos with Your iPhone?
Portrait photography on the iPhone has been revolutionized by features like Portrait Mode. Here’s how to take stunning portraits:
- Use Portrait Mode: This mode creates a blurred background, making your subject stand out.
- Adjust Depth Control: After taking a photo in Portrait Mode, adjust the depth of field to control the amount of background blur.
- Lighting: Opt for soft, diffused natural light. Avoid harsh sunlight, which can create unflattering shadows.
- Composition: Use the rule of thirds to position your subject within the frame.
- Focus on the Eyes: Ensure the eyes are sharp and in focus, as they are the focal point of the portrait.
- Experiment with Angles: Try different angles to find the most flattering perspective for your subject.
9. What are the Best iPhone Photography Apps for Editing and Enhancing Photos?
While the iPhone’s built-in editing tools are useful, dedicated photography apps offer more advanced features. Here are some of the best:
- Adobe Lightroom Mobile: A powerful editing app with professional-grade tools for adjusting color, tone, and detail.
- Snapseed: A free app by Google with a wide range of editing tools and filters.
- VSCO: Offers a variety of film-inspired presets and advanced editing controls.
- Darkroom: A robust photo editor with non-destructive editing and RAW support.
- TouchRetouch: Removes unwanted objects from your photos.
- Halide Camera: A manual camera app that gives you full control over your iPhone’s camera settings.
10. How Can You Use iPhone Photography for Social Media?
iPhone photography is perfect for creating engaging social media content. Here are some tips:
- Consistent Style: Develop a consistent visual style for your photos to create a cohesive feed.
- Use Editing Apps: Enhance your photos with editing apps to make them stand out.
- Tell a Story: Use your photos to tell a story and connect with your audience.
- Engage with Followers: Respond to comments and messages to build a community.
- Use Relevant Hashtags: Increase the visibility of your photos by using relevant hashtags.
- Post Regularly: Maintain a consistent posting schedule to keep your audience engaged.
11. How Can You Stabilize Your iPhone for Sharper Photos and Videos?
Stabilizing your iPhone is crucial for capturing sharp, clear photos and videos, especially in low light or when shooting action shots. Here are several effective methods:
- Use a Tripod: A tripod provides the most stable base for your iPhone, eliminating camera shake. Consider the Manfrotto 055 Tripod, known for its stability and versatility. You’ll also need a metal iPhone tripod mount to securely attach your phone to the tripod.
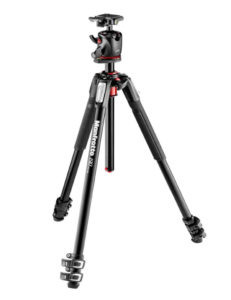 Manfrotto Tripod
 - Use a Gimbal: A gimbal is a motorized stabilizer that smooths out movements, ideal for shooting video while walking or running.
- Lean Against a Solid Object: If you don’t have a tripod or gimbal, lean against a wall, tree, or other solid object to stabilize your body.
- Hold Your iPhone Properly: Hold your iPhone with both hands, keeping your elbows close to your body for added stability.
- Use Burst Mode: When shooting action shots, use burst mode to capture a series of photos, increasing your chances of getting a sharp image.
12. What Accessories Can Enhance Your iPhone Photography?
Several accessories can significantly enhance your iPhone photography experience. Here are some essential tools:
- Tripod: Provides stability for sharp photos and videos.
- Tripod Mount: Secures your iPhone to the tripod.
- Lenses: Offers different perspectives and focal lengths.
- Portable Charger: Ensures your iPhone stays powered during long shoots.
- Diffusers: Soften harsh sunlight for more balanced lighting.
 Large Diffuser for Photography
 - Foam Boards: Reflect or block light to shape your images.
 White Foam Board for Photography
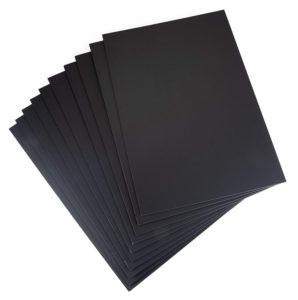 Black Foam Board
 - Remote Shutter: Allows you to trigger the shutter without touching your iPhone, preventing camera shake.
 Smartphone Remove Shutter
13. How Can You Capture Great Landscape Photos with Your iPhone?
Capturing stunning landscape photos with your iPhone is easier than you might think. Here’s how:
- Use the Panorama Mode: Capture wide, sweeping landscapes with this built-in mode.
- Use the Grid: Align the horizon with one of the horizontal lines to create a balanced composition.
- Look for Leading Lines: Use roads, rivers, or other lines to draw the viewer’s eye into the scene.
- Capture the Golden Hour: Shoot during the early morning or late afternoon for the best light.
- Use HDR: Balance the light and dark areas in your photos, especially in high-contrast scenes.
- Find a Focal Point: Include a prominent element in your landscape, such as a tree, rock formation, or building.
14. What Are Some Common Mistakes to Avoid in iPhone Photography?
Avoiding common mistakes can significantly improve your iPhone photography. Here are some pitfalls to watch out for:
- Dirty Lens: Regularly clean your iPhone lens to avoid blurry or hazy images.
- Poor Lighting: Pay attention to the lighting and avoid shooting in harsh sunlight or dimly lit environments.
- Lack of Focus: Make sure your subject is in focus by tapping the screen to set the focus point.
- Bad Composition: Follow composition guidelines like the rule of thirds to create visually appealing photos.
- Over-Editing: Avoid over-editing your photos, which can make them look unnatural.
- Digital Zooming: Avoid using digital zoom, which reduces image quality. Instead, move closer to your subject or crop the photo later.
15. How Do You Shoot in Low Light with Your iPhone?
Shooting in low light can be challenging, but here are some tips to capture great photos with your iPhone:
- Use Night Mode: Available on newer iPhones, Night Mode automatically brightens and sharpens images in low-light conditions.
- Stabilize Your iPhone: Use a tripod or lean against a solid object to prevent camera shake.
- Increase Exposure: Manually increase the exposure by dragging the sun icon up.
- Use a Third-Party App: Apps like Halide Camera offer more control over ISO and shutter speed, allowing for better low-light performance.
- Shoot in RAW: Capture more detail and dynamic range by shooting in RAW format.
- Edit Carefully: Use editing apps to reduce noise and enhance detail, but avoid over-sharpening.
16. What Are the Ethics of Mobile Photography and Image Manipulation?
As with any form of photography, ethical considerations are important in mobile photography:
- Respect Privacy: Be mindful of people’s privacy when taking photos in public spaces.
- Obtain Consent: Always obtain consent before photographing individuals, especially in private settings.
- Be Transparent About Manipulation: If you significantly alter an image, be transparent about the changes you’ve made.
- Avoid Misrepresentation: Do not use photography to misrepresent or deceive viewers.
- Credit Sources: Give credit to the original creators when sharing or using other people’s work.
- Be Aware of Copyright: Respect copyright laws and obtain permission before using copyrighted material.
17. How Can You Back Up and Organize Your iPhone Photos?
Protecting your photos is crucial. Here’s how to back up and organize your iPhone photos:
- iCloud Photos: Automatically syncs your photos to iCloud, making them accessible on all your Apple devices.
- Google Photos: A free service that offers unlimited storage for high-quality photos and videos.
- External Hard Drive: Back up your photos to an external hard drive for safekeeping.
- Cloud Storage Services: Use services like Dropbox or OneDrive to back up and share your photos.
- Organize into Albums: Create albums in your iPhone’s Photos app to categorize and organize your photos.
- Use Descriptive Titles and Tags: Add descriptive titles and tags to your photos to make them easier to find.
18. How Can You Use Burst Mode Effectively on Your iPhone?
Burst Mode is perfect for capturing action shots and ensuring you get the perfect moment. Here’s how to use it effectively:
- Activate Burst Mode: On most iPhones, simply hold down the shutter button to activate Burst Mode. On newer models, you may need to swipe the shutter button to the left.
- Capture the Action: Hold down the shutter button to capture a rapid sequence of photos.
- Select the Best Shots: After capturing the burst, review the photos and select the best ones.
- Delete Unwanted Photos: Delete the unwanted photos to free up storage space.
- Use in Good Lighting: Burst Mode works best in good lighting conditions, as low light can result in blurry images.
- Stabilize Your iPhone: Use a tripod or lean against a solid object to prevent camera shake.
19. What Are the Best Practices for Cleaning Your iPhone Camera Lens?
A clean lens is essential for sharp, clear photos. Here are the best practices for cleaning your iPhone camera lens:
- Use a Microfiber Cloth: Gently wipe the lens with a clean, lint-free microfiber cloth.
- Avoid Abrasive Materials: Do not use paper towels, tissues, or other abrasive materials, as they can scratch the lens.
- Use Lens Cleaning Solution: If necessary, use a lens cleaning solution specifically designed for camera lenses.
- Apply Gentle Pressure: Apply gentle pressure when wiping the lens to avoid damaging it.
- Clean Regularly: Clean your lens regularly, especially if you frequently use your iPhone in dusty or dirty environments.
- Store Your iPhone Properly: Store your iPhone in a case or protective sleeve to prevent the lens from getting scratched or dirty.
20. How Can You Stay Updated on the Latest iPhone Photography Trends and Techniques?
Staying updated on the latest trends and techniques can help you continuously improve your iPhone photography. Here’s how:
- Follow Photography Blogs and Websites: Stay informed by reading photography blogs and websites like dfphoto.net, which offer tips, tutorials, and gear reviews.
- Follow Photographers on Social Media: Follow photographers on Instagram, Facebook, and other social media platforms to see their work and learn from their techniques.
- Join Photography Communities: Join online photography communities and forums to connect with other photographers and share your work.
- Take Online Courses: Enroll in online courses to learn new skills and techniques from experienced instructors.
- Attend Workshops and Seminars: Attend photography workshops and seminars to learn from experts and network with other photographers.
- Experiment and Practice: Continuously experiment with new techniques and practice your skills to improve your photography.
21. How Can You Use the iPhone’s Native Editing Tools Effectively?
The iPhone’s native editing tools are surprisingly powerful and can greatly enhance your photos. Here’s how to use them effectively:
- Access Editing Tools: Open the Photos app, select the photo you want to edit, and tap “Edit.”
- Adjust Light: Use the “Adjust” tool to fine-tune exposure, brightness, contrast, highlights, and shadows.
- Adjust Color: Use the “Color” tool to adjust saturation, vibrance, and warmth.
- Apply Filters: Use the “Filters” tool to quickly apply different looks to your photos.
- Crop and Straighten: Use the “Crop” tool to crop your photo, adjust the aspect ratio, and straighten tilted horizons.
- Use Auto Enhance: Tap the magic wand icon to automatically enhance your photo with a single tap.
- Make Subtle Adjustments: Avoid over-editing your photos, which can make them look unnatural.
- Compare Before and After: Tap and hold the photo to see the original image and compare it to your edited version.
22. What are the Best Third-Party Camera Apps for iPhone Photography?
While the native Camera app is convenient, third-party camera apps offer more advanced features and manual controls. Here are some of the best:
- Halide Camera: A powerful manual camera app that gives you full control over ISO, shutter speed, focus, and white balance.
- ProCamera: Another excellent manual camera app with a wide range of advanced features and shooting modes.
- Camera+ 2: A versatile camera app with manual controls, RAW support, and advanced editing tools.
- FiLMiC Pro: A professional video recording app with manual controls, log gamma profiles, and advanced audio options.
- Moment – Pro Camera: A user-friendly camera app with manual controls and support for Moment lenses.
23. How Can You Use Leading Lines to Improve Your iPhone Photography?
Leading lines are a powerful compositional tool that can draw the viewer’s eye into your photos and create a sense of depth and perspective. Here’s how to use them effectively:
- Identify Leading Lines: Look for lines in your scene, such as roads, fences, rivers, or architectural elements.
- Position Yourself: Position yourself so that the leading lines converge towards your subject or focal point.
- Use Perspective: Use perspective to emphasize the length and direction of the leading lines.
- Create Depth: Use leading lines to create a sense of depth and draw the viewer into the scene.
- Experiment with Angles: Try different angles to see how they affect the placement and impact of the leading lines.
- Use in Landscapes: Leading lines are particularly effective in landscape photography, where they can guide the viewer’s eye through the scene.
 Wide angle interior shot of restaurant
24. What Are the Best iPhone Lenses for Expanding Your Creative Options?
While the iPhone’s built-in lenses are versatile, additional lenses can expand your creative options and allow you to capture different perspectives. Here are some of the best iPhone lenses:
- Wide Angle Lens: Captures a wider field of view, ideal for landscapes, interiors, and group photos. The Moment Wide Lens is a great option.
 iPhone photography lenses
 - Telephoto Lens: Brings distant subjects closer, ideal for wildlife, sports, and portraits.
- Macro Lens: Allows you to capture extreme close-ups, revealing intricate details. The Moment Macro Lens is a top choice.
 up close image of a tomato
25. How Can You Use Negative Space to Create Impactful iPhone Photos?
Negative space, also known as white space, is the empty area around your subject. It can be a powerful compositional tool for creating impactful and visually striking photos. Here’s how to use it effectively:
- Simplify Your Composition: Use negative space to simplify your composition and draw attention to your subject.
- Create Balance: Use negative space to create a sense of balance and harmony in your photos.
- Emphasize Your Subject: Use negative space to emphasize the size, shape, and texture of your subject.
- Create a Sense of Calm: Use negative space to create a sense of calm and serenity in your photos.
- Experiment with Placement: Experiment with different placements of your subject within the frame to see how they affect the impact of the negative space.
- Use in Portraits: Negative space can be particularly effective in portraits, where it can create a sense of intimacy and connection with the viewer.
26. What Are the Benefits of Shooting in RAW Format on Your iPhone?
Shooting in RAW format offers several benefits over shooting in JPEG, including:
- More Detail: RAW files capture more detail than JPEGs, allowing you to recover highlights and shadows more effectively.
- Greater Dynamic Range: RAW files have a wider dynamic range, allowing you to capture more detail in both the bright and dark areas of your photos.
- Non-Destructive Editing: Editing RAW files is non-destructive, meaning you can always revert to the original image.
- Better Color Accuracy: RAW files capture more accurate color information than JPEGs.
- More Editing Options: RAW files give you more flexibility when editing, allowing you to adjust white balance, exposure, and other settings with greater precision.
- Larger File Size: RAW files are larger than JPEGs, so they require more storage space.
27. How Can You Create Stunning Black and White Photos with Your iPhone?
Black and white photography can be a powerful way to create dramatic, timeless images. Here’s how to create stunning black and white photos with your iPhone:
- Shoot in RAW: Capture more detail and dynamic range by shooting in RAW format.
- Use a Third-Party App: Use a third-party editing app like Adobe Lightroom Mobile or Snapseed to convert your photos to black and white.
- Adjust Contrast: Increase the contrast to create a more dramatic look.
- Adjust Highlights and Shadows: Fine-tune the highlights and shadows to reveal detail and texture.
- Use Graduated Filters: Use graduated filters to darken the sky or other areas of your photo.
- Look for Strong Shapes and Textures: Black and white photography emphasizes shapes and textures, so look for scenes with strong visual elements.
28. What Are Some Creative iPhone Photography Projects to Try?
Looking for inspiration? Here are some creative iPhone photography projects to try:
- A Photo a Day: Challenge yourself to take and share a photo every day.
- Themed Projects: Choose a theme, such as “street photography,” “portraits,” or “landscapes,” and focus your efforts on capturing images related to that theme.
- Document Your Life: Capture everyday moments and create a visual diary of your life.
- Explore Your City: Discover new and interesting places in your city and document them through photography.
- Recreate Famous Photos: Challenge yourself to recreate famous photos using your iPhone.
- Collaborate with Other Photographers: Team up with other photographers and work on a joint project.
29. How Can You Use AI-Powered Features in iPhone Photography?
Newer iPhones incorporate AI-powered features that can greatly enhance your photography. Here’s how to use them:
- Scene Detection: The iPhone automatically detects the scene you’re shooting and optimizes settings for the best results.
- Smart HDR: Smart HDR intelligently balances the light and dark areas in your photos, revealing more detail in both highlights and shadows.
- Portrait Mode: Portrait Mode uses AI to create a shallow depth of field, blurring the background and making your subject stand out.
- Night Mode: Night Mode uses AI to brighten and sharpen images in low-light conditions.
- Photographic Styles: Photographic Styles allow you to customize the look of your photos with preset styles that are applied at the time of capture.
30. What are the Top Resources for Learning More About iPhone Photography?
There are countless resources available for learning more about iPhone photography. Here are some of the top ones:
- Online Courses: Platforms like Skillshare, Udemy, and CreativeLive offer a wide range of iPhone photography courses.
- Photography Blogs and Websites: Websites like dfphoto.net, Digital Photography School, and PetaPixel offer tips, tutorials, and gear reviews.
- YouTube Channels: Channels like Peter McKinnon, Sean Tucker, and Mango Street offer tutorials, reviews, and inspiration.
- Photography Books: Books like “The iPhone Photography Book” by Scott Kelby and “iPhone Photography for Dummies” by Mark Hemmings offer comprehensive guides to iPhone photography.
- Photography Communities: Online communities like Flickr, 500px, and Reddit’s r/photography offer a place to share your work and connect with other photographers.
Ready to take your iPhone photography to the next level? Visit dfphoto.net for in-depth tutorials, stunning photo galleries, and a vibrant community of photographers. Explore our resources, connect with fellow enthusiasts, and unlock your creative potential today. Address: 1600 St Michael’s Dr, Santa Fe, NM 87505, United States. Phone: +1 (505) 471-6001. Website: dfphoto.net.