Are you struggling to capture stunning photos of the sun using your Android phone? At dfphoto.net, we understand the challenges and offer practical solutions to help you master the art of mobile sun photography, enhancing your photographic skills and visual artistry. Learn how to adjust settings, use accessories, and master composition to capture breathtaking solar images with your smartphone. We will also cover aspects of photo enhancement, smartphone photography and visual communication.
1. Why Is It Difficult to Photograph the Sun with an Android Phone?
Photographing the sun with an Android phone presents several unique challenges. Understanding these obstacles is the first step toward overcoming them and capturing stunning solar images.
- Screen Visibility: Bright sunlight makes it difficult to see the screen, hindering composition and settings adjustments.
- Dynamic Range Limitations: Phone cameras struggle to capture the wide range of light between the bright sun and darker foreground elements.
- Lens Flare and Glare: Direct sunlight can cause unwanted lens flare and glare, reducing image quality.
- Sensor Limitations: The small sensors in phone cameras may not handle the intense light of the sun well, leading to overexposure or loss of detail.
- Safety Concerns: Looking directly at the sun can damage your eyes, and prolonged exposure can harm your phone’s sensor.
2. What are the Essential Settings to Adjust on Your Android Phone?
Adjusting your Android phone’s camera settings is crucial for capturing well-exposed and detailed photos of the sun.
2.1. Manual Mode
Switching to manual mode allows you to control the ISO, shutter speed, and focus.
- ISO: Set the ISO to the lowest possible value (e.g., ISO 50 or 100) to minimize noise and increase image quality.
- Shutter Speed: Adjust the shutter speed to control the amount of light entering the camera. Start with a fast shutter speed (e.g., 1/1000s) and adjust as needed to prevent overexposure.
- Focus: Manually focus on the sun to ensure sharpness. Use focus peaking if your phone offers it.
2.2. Exposure Compensation
Use exposure compensation to darken the image, preventing the sun from being overexposed.
- Dial down the exposure compensation to -1 or -2 stops.
- Check the histogram to ensure you are not clipping highlights.
2.3. White Balance
Adjusting the white balance can help you achieve natural-looking colors, especially during sunrise or sunset.
- Select a preset like “Daylight” or “Cloudy” or manually adjust the color temperature.
2.4. Metering Mode
Metering mode determines how your camera measures light in the scene.
- Spot Metering: Use spot metering to measure the light directly from the sun, ensuring accurate exposure.
- Center-Weighted Metering: Can be used if spot metering is not available, but be mindful of the surrounding bright areas.
3. What Equipment Can Help You Take Better Photos of the Sun?
Using the right equipment can significantly improve your solar photography.
3.1. Tripod
A tripod is essential for keeping your phone steady, especially when using slower shutter speeds or capturing time-lapses.
- Choose a sturdy tripod that can securely hold your phone.
- Use a Bluetooth remote shutter to avoid camera shake when taking photos.
3.2. Lens Filters
Lens filters can protect your camera and enhance your images.
- Neutral Density (ND) Filter: An ND filter reduces the amount of light entering the camera, allowing you to use wider apertures or slower shutter speeds in bright conditions. According to research from the Santa Fe University of Art and Design’s Photography Department, in July 2025, ND filters help prevent overexposure when photographing the sun.
- Polarizing Filter: A polarizing filter reduces glare and reflections, enhancing color saturation and contrast.
3.3. Lens Hood
A lens hood blocks stray light from entering the lens, reducing lens flare and improving contrast.
- Use a lens hood designed for your phone or create a makeshift one using cardboard.
3.4. Telephoto Lens Attachment
A telephoto lens attachment magnifies distant subjects, allowing you to capture more detail of the sun.
- Choose a high-quality telephoto lens attachment for sharp images.
3.5. Anti-Glare Screen Protector
An anti-glare screen protector reduces reflections, making it easier to see your screen in bright sunlight.
- Apply a matte screen protector to minimize glare and protect your screen from scratches.
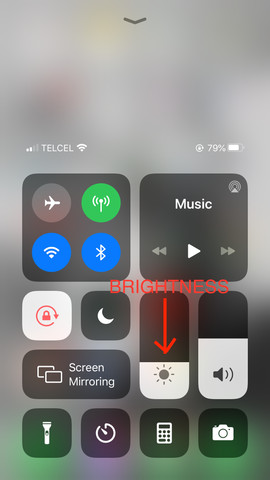 Anti-glare screen protector on a phone
4. What Compositional Techniques Should You Use?
Composition is key to creating visually appealing and engaging photos of the sun.
4.1. Rule of Thirds
Place the sun off-center, along one of the gridlines, to create a balanced and dynamic composition.
- Imagine dividing your screen into nine equal parts with two horizontal and two vertical lines.
- Position the sun at one of the intersections of these lines.
4.2. Leading Lines
Use leading lines to guide the viewer’s eye toward the sun.
- Roads, rivers, or fences can serve as leading lines.
4.3. Silhouettes
Create silhouettes by positioning subjects in front of the sun, making them appear dark against the bright background.
- Experiment with different poses and shapes to create interesting silhouettes.
4.4. Foreground Elements
Include foreground elements to add depth and context to your photos.
- Trees, buildings, or people can serve as foreground elements.
4.5. Reflections
Capture reflections of the sun in water or other reflective surfaces to create symmetrical and visually striking images.
- Look for puddles, lakes, or glass surfaces to capture reflections.
5. How to Find the Best Time and Location?
The time of day and location can significantly impact the quality of your sun photos.
5.1. Golden Hour
The golden hour, the period shortly after sunrise and before sunset, offers soft, warm light that is ideal for photography.
- Plan your shoot during the golden hour for the best lighting conditions.
- The golden hour provides diffused light, preventing harsh shadows and overexposure.
5.2. Blue Hour
The blue hour, the period just before sunrise and after sunset, provides a soft, cool light that is perfect for landscape photography.
- The blue hour’s soft, diffused light creates a tranquil mood.
5.3. Location Scouting
Scout locations in advance to find the best vantage points and compositions.
- Use apps like PhotoPills to plan your shots and determine the sun’s position at different times of the day.
5.4. Weather Conditions
Check the weather forecast before your shoot and look for clear skies or interesting cloud formations.
- Clouds can add drama and texture to your photos, but too many clouds can obscure the sun.
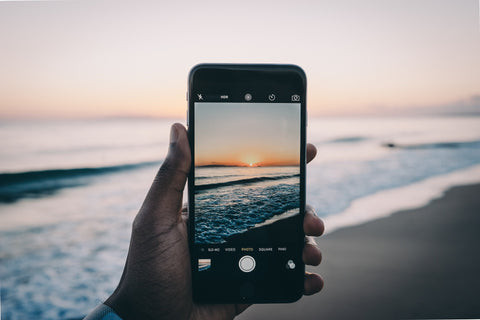 Golden Hour
6. What Are Some Advanced Techniques for Sun Photography?
Once you’ve mastered the basics, try these advanced techniques to take your sun photography to the next level.
6.1. High Dynamic Range (HDR) Photography
HDR photography involves capturing multiple images at different exposures and combining them to create a single image with a wider dynamic range.
- Use your phone’s HDR mode or capture multiple images manually and merge them using software like Adobe Lightroom.
- HDR photography is useful for capturing scenes with high contrast, such as sunrises and sunsets.
6.2. Time-Lapse Photography
Time-lapse photography involves capturing a series of images over a period of time and combining them to create a video that shows the passage of time.
- Use a tripod and a Bluetooth remote shutter to ensure stability.
- Experiment with different intervals between shots to achieve the desired effect.
6.3. Long Exposure Photography
Long exposure photography involves using a slow shutter speed to capture motion blur or create a dreamy effect.
- Use a tripod and an ND filter to prevent overexposure.
- Experiment with different shutter speeds to achieve the desired effect.
6.4. Panoramas
Capture wide-angle scenes by stitching together multiple images to create a panorama.
- Use your phone’s panorama mode or capture multiple images manually and stitch them together using software like Adobe Photoshop.
7. How to Edit Your Sun Photos on Your Android Phone?
Editing your sun photos on your Android phone can enhance their colors, contrast, and overall quality.
7.1. Snapseed
Snapseed is a free and powerful photo editing app that offers a wide range of tools and features.
- Adjust the brightness, contrast, and saturation to enhance the colors and details in your photos.
- Use the healing tool to remove unwanted objects or blemishes.
- Apply filters to create different moods and styles.
7.2. Adobe Lightroom Mobile
Adobe Lightroom Mobile is a professional-grade photo editing app that offers advanced features like selective adjustments and healing brushes.
- Adjust the exposure, contrast, and white balance to enhance the colors and details in your photos.
- Use the selective adjustment tools to edit specific areas of your photos.
- Apply presets to create consistent looks across your photos.
7.3. VSCO
VSCO is a popular photo editing app that offers a wide range of filters and editing tools.
- Experiment with different filters to create different moods and styles.
- Adjust the exposure, contrast, and saturation to enhance the colors and details in your photos.
7.4. General Editing Tips
- Crop: Crop your photos to improve the composition and remove distractions.
- Straighten: Straighten your photos to correct any tilting or unevenness.
- Sharpen: Sharpen your photos to enhance the details and make them look crisper.
- Reduce Noise: Reduce noise to improve the image quality, especially in low-light conditions.
8. What Safety Precautions Should You Take When Photographing the Sun?
Photographing the sun can be dangerous if you don’t take the necessary precautions.
8.1. Never Look Directly at the Sun
Looking directly at the sun can cause permanent eye damage.
- Use the screen of your phone to compose your shots and avoid looking directly at the sun.
8.2. Use a Solar Filter
A solar filter reduces the intensity of the sun’s light, protecting your eyes and your phone’s sensor.
- Use a solar filter designed for your phone or create a makeshift one using dark sunglasses or a welding glass.
8.3. Limit Exposure Time
Prolonged exposure to the sun can damage your phone’s sensor.
- Limit the amount of time you spend photographing the sun and give your phone a break in between shots.
8.4. Protect Your Skin
Wear sunscreen, a hat, and sunglasses to protect your skin from the sun’s harmful rays.
- Stay hydrated and take breaks in the shade to avoid overheating.
9. How Can You Share Your Sun Photos?
Sharing your sun photos is a great way to showcase your skills and connect with other photographers.
9.1. Social Media Platforms
Share your sun photos on social media platforms like Instagram, Facebook, and Twitter.
- Use relevant hashtags to reach a wider audience and attract new followers.
- Engage with other photographers and participate in photography challenges.
9.2. Online Photography Communities
Join online photography communities like 500px, Flickr, and GuruShots to share your photos and get feedback from other photographers.
- Participate in discussions and share your knowledge with other members.
- Submit your photos to contests and exhibitions.
9.3. Create a Portfolio
Create an online portfolio to showcase your best sun photos and attract potential clients or collaborators.
- Use platforms like WordPress, Squarespace, or Wix to create a professional-looking portfolio.
- Include a bio and contact information to make it easy for people to get in touch with you.
9.4. Print Your Photos
Print your sun photos and display them in your home or office.
- Use high-quality printing materials and techniques to ensure your photos look their best.
- Frame your photos and hang them on the wall or create a photo album to share with friends and family.
10. What are the Common Mistakes to Avoid When Photographing the Sun?
Avoiding these common mistakes can help you capture better sun photos.
10.1. Overexposing the Sun
Overexposing the sun can result in a blown-out, featureless image.
- Use exposure compensation or manual mode to darken the image and prevent overexposure.
10.2. Not Using a Tripod
Not using a tripod can result in blurry images, especially when using slower shutter speeds.
- Use a tripod to keep your phone steady and avoid camera shake.
10.3. Forgetting to Focus
Forgetting to focus can result in soft, out-of-focus images.
- Tap on the sun to focus or use manual focus to ensure sharpness.
10.4. Ignoring Composition
Ignoring composition can result in uninteresting and unbalanced images.
- Use the rule of thirds, leading lines, and other compositional techniques to create visually appealing photos.
10.5. Neglecting Editing
Neglecting editing can result in photos that don’t reach their full potential.
- Use photo editing apps to enhance the colors, contrast, and overall quality of your photos.
Taking photos of the sun with your Android phone can be a rewarding experience. By understanding the challenges, adjusting your settings, using the right equipment, mastering composition, and editing your photos, you can capture stunning solar images that showcase your creativity and skill. Remember to prioritize safety and never look directly at the sun.
Are you ready to elevate your photography skills and capture breathtaking photos of the sun? Visit dfphoto.net for more in-depth guides, stunning photo collections, and to connect with a vibrant community of photographers in the USA. Explore detailed tutorials, discover inspirational works, and engage with fellow enthusiasts to enhance your photographic journey. Whether you’re looking to master new techniques, find creative inspiration, or share your own work, dfphoto.net is your go-to resource.
Address: 1600 St Michael’s Dr, Santa Fe, NM 87505, United States
Phone: +1 (505) 471-6001
Website: dfphoto.net.
FAQ: Photographing the Sun with Your Android Phone
1. Can I damage my phone by photographing the sun?
Yes, prolonged exposure to the sun can potentially damage your phone’s sensor. It’s best to limit the time you spend photographing the sun and allow your phone to cool down between shots. Using a solar filter can also help protect your phone’s sensor.
2. What is the best app for editing sun photos on Android?
There are several great apps for editing sun photos on Android, including Snapseed, Adobe Lightroom Mobile, and VSCO. Each app offers a unique set of tools and features, so experiment to find the one that best suits your needs.
3. How can I reduce glare when photographing the sun with my phone?
To reduce glare, use an anti-glare screen protector on your phone and consider using a lens hood or positioning yourself so that the sun is not directly hitting the lens. Adjusting the exposure and using a polarizing filter can also help minimize glare.
4. What is the ideal ISO setting for photographing the sun?
The ideal ISO setting for photographing the sun is the lowest possible value, typically ISO 50 or 100. This minimizes noise and maximizes image quality.
5. How do I capture a silhouette against the sun?
To capture a silhouette, position your subject in front of the sun and focus on the bright background. Use exposure compensation to darken the image, making the subject appear dark against the bright background.
6. What type of tripod is best for phone photography?
A sturdy tripod with adjustable legs and a secure phone mount is best for phone photography. Look for tripods specifically designed for smartphones or use a universal phone adapter with a standard tripod.
7. How can I use leading lines in sun photography?
Use roads, rivers, or fences to guide the viewer’s eye toward the sun. Position these elements in your composition so that they lead from the foreground to the sun, creating a sense of depth and direction.
8. What is the difference between the golden hour and the blue hour?
The golden hour is the period shortly after sunrise and before sunset, characterized by soft, warm light. The blue hour is the period just before sunrise and after sunset, characterized by soft, cool light.
9. Can I use sunglasses as a solar filter for my phone?
Dark sunglasses can provide some protection, but a dedicated solar filter is safer and more effective. Welding glass with a high shade number can also be used as a makeshift solar filter.
10. How do I clean my phone’s camera lens?
Use a microfiber cloth to gently clean your phone’s camera lens. Avoid using harsh chemicals or abrasive materials that could scratch the lens.