Quickly capturing what’s on your iPhone screen is easier than you might think. Taking a photo of your screen, also known as a screenshot, is a handy feature for saving conversations, game scores, or anything you want to remember or share directly from your iPhone display. Whether you have the latest iPhone or an older model, the process is straightforward. This guide will walk you through exactly how to take a photo of your screen on any iPhone.
Taking a Screenshot on iPhones with Face ID (iPhone X and Later)
If your iPhone uses Face ID, meaning it doesn’t have a Home button on the front, taking a screenshot involves using the Side button and the Volume Up button. This method applies to iPhone models like iPhone 14, iPhone 13, iPhone 12, iPhone 11, iPhone XS, iPhone XR, and iPhone X.
Here’s how to capture your screen:
-
Simultaneously Press and Hold: Locate the Side button on the right side of your iPhone and the Volume Up button on the left. Press both of these buttons at the exact same time.
- alt: Guide arrows indicating the simultaneous press of the side button on the right and the volume up button on the left of an iPhone with Face ID to take a screen photo.
-
Quickly Release: Don’t hold the buttons down for too long. A brief press and release is all you need. Holding them might trigger other functions, like the emergency SOS feature.
-
Manage the Thumbnail: After successfully taking a screenshot, a small preview thumbnail will briefly appear in the bottom-left corner of your iPhone screen.
- Tap to Open and Edit: Tap the thumbnail immediately if you want to open, edit, or share your screenshot right away. This will allow you to crop, annotate, or use the share options.
- Swipe Left to Dismiss: If you don’t need to do anything with the screenshot immediately, simply swipe the thumbnail to the left. It will disappear and save automatically.
How to Screenshot on iPhones with Touch ID and Side Button (iPhone 6 to iPhone 8, iPhone SE 2nd & 3rd gen)
For iPhone models that have a Touch ID Home button and a Side button (like iPhone 8, iPhone 7, iPhone 6s, iPhone SE 2nd generation, and iPhone SE 3rd generation), the process is slightly different but still very simple.
Follow these steps to take a screen photo:
-
Press Side and Home Buttons Together: Find the Side button on the right side of your iPhone and the Home button at the bottom center of the screen. Press both of these buttons at the same time.
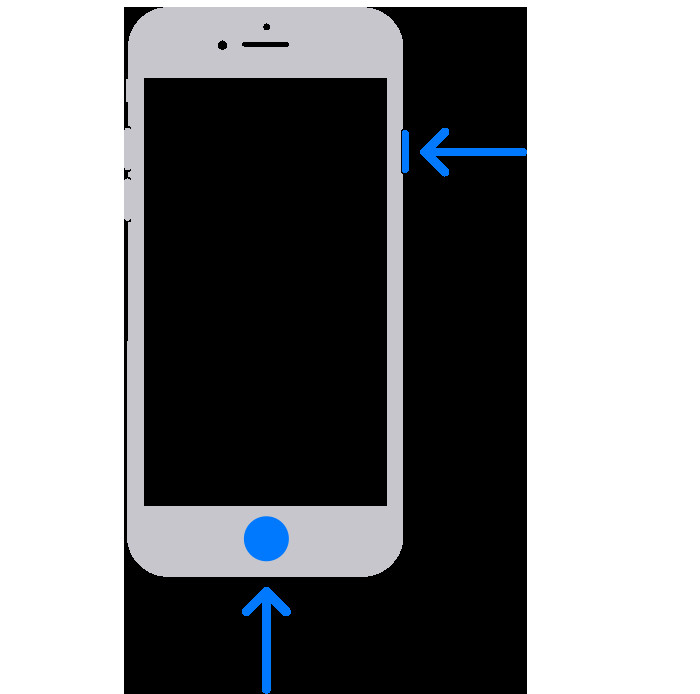 Image shows arrows pointing to the side and Home buttons
- alt: Instruction image showing arrows pointing to the simultaneous press of the side button and the home button on an iPhone with Touch ID to capture the screen.
-
Release Quickly: Just like with Face ID iPhones, release both buttons quickly after pressing them to ensure a screenshot is taken.
-
Interact with the Thumbnail: A thumbnail preview will appear in the bottom-left corner. Tap it to edit and share, or swipe left to dismiss and save automatically in your Photos app.
Taking a Screenshot on iPhones with Touch ID and Top Button (Older iPhones – iPhone SE 1st gen, iPhone 5s and earlier)
Older iPhone models, such as the original iPhone SE (1st generation), iPhone 5s, and earlier, feature a Top button instead of a Side button. The method for taking a screen photo is similar, just using the Top button instead.
Here’s how it works:
-
Press Top and Home Buttons Simultaneously: Locate the Top button on the top edge of your iPhone and the Home button at the bottom center. Press both buttons at the same time.
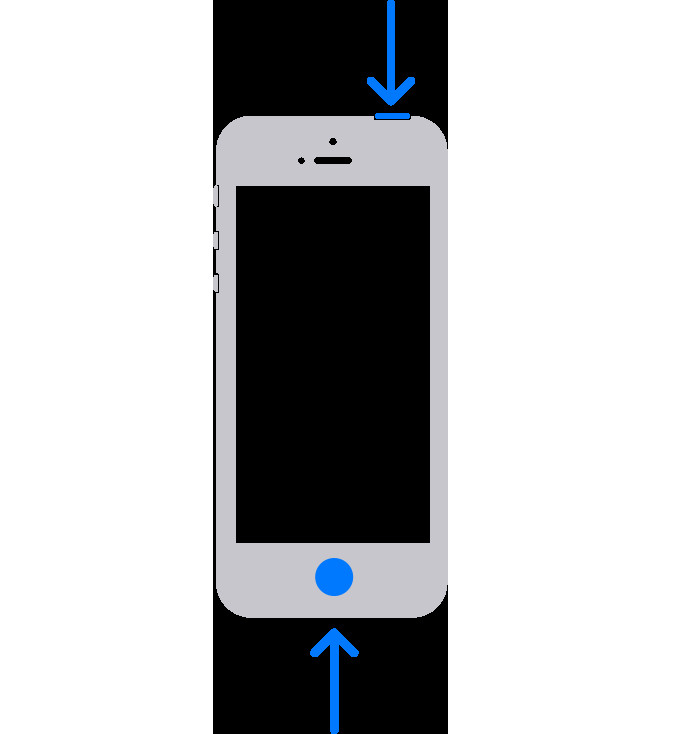 Image shows arrows pointing to the top and Home buttons
- alt: Guide image demonstrating the simultaneous press of the top button and the home button on an older iPhone with Touch ID to take a photo of the screen.
-
Quick Release: Ensure you release both buttons promptly after pressing them.
-
Handle the Thumbnail Preview: Look for the thumbnail in the bottom-left corner. Tap it to access editing and sharing options, or swipe it away to save the screenshot without further action.
Where to Find Your iPhone Screenshots
Once you take a photo of your screen, you might wonder where it’s saved. All screenshots are automatically saved to your Photos app.
To easily locate them:
- Open the Photos app on your iPhone.
- Tap on the Albums tab at the bottom.
- Scroll down to the Media Types section and tap on Screenshots.
In the Screenshots album, you will find all the screen photos you’ve taken, neatly organized and easily accessible for viewing, editing, or sharing.
Tips for Taking Perfect iPhone Screenshots
- Practice Makes Perfect: If you’re new to taking screenshots, practice a few times to get the timing right with pressing and releasing the buttons.
- Volume Button Side Matters: On Face ID iPhones, remember it’s the Volume Up button, not the Volume Down button, that you need to press with the Side button.
- Silence the Shutter Sound (If Needed): If you need to take a silent screenshot (in a quiet environment for example), ensure your iPhone is in silent mode before taking the screenshot.
- Quick Editing: Take advantage of the quick edit options when you tap the thumbnail to immediately crop or annotate your screenshot before sharing.
Taking a photo of your iPhone screen is a fundamental skill that enhances your iPhone usability. By understanding the simple button combinations for your specific iPhone model, you can easily capture and save anything on your screen.