Want to capture the mesmerizing dance of the Aurora Borealis with your iPhone? It’s absolutely possible. At dfphoto.net, we’ll guide you through the simple settings and essential gear needed to photograph the Northern Lights, turning your iPhone into a powerful tool for visual storytelling. We’ll cover everything from Night mode settings to long exposure photography. Let’s dive into the world of mobile aurora photography, aurora viewing and landscape photography!
1. What iPhone Settings Are Best For Capturing The Northern Lights?
The best iPhone settings for capturing the Northern Lights involve utilizing Night mode, adjusting exposure, and understanding how to preserve these settings for optimal results. Here’s how to dial in those settings for magical aurora shots.
1.1. Mastering Night Mode
Night Mode is essential for capturing the Northern Lights with your iPhone. It automatically activates in low-light conditions, extending the camera sensor’s exposure time to gather more light and detail. Think of it as giving your iPhone’s camera a longer “look” at the scene.
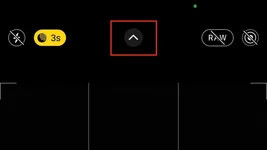
- Access Hidden Settings: Tap the top arrow in the iPhone’s camera app to reveal the hidden settings menu.
- Locate Night Mode: Find the Night Mode icon.
- Adjust Exposure Time: A slider will appear, allowing you to adjust the exposure time. Slide it to “Max.”
The maximum Night Mode exposure time adapts based on stability. When using a tripod, your iPhone can achieve a 30-second exposure, essential for capturing the subtle details of the Aurora. Without a tripod, the maximum drops to 10 seconds to avoid blur from hand shake. For capturing the Northern Lights, a longer exposure of 30 seconds is ideal. Aim for this duration to ensure the best possible image quality. According to research from the Santa Fe University of Art and Design’s Photography Department, longer exposure times reveal details invisible to the naked eye, enhancing the visual impact of aurora images.
1.2. Adjusting Exposure For Optimal Brightness
Exposure Adjustment can be helpful when bright surroundings, like snow-covered landscapes, cause overexposure in your photos. Night Mode increases light capture, and highly reflective environments can amplify this, washing out details. To counter this, use Exposure Adjustment to fine-tune the brightness of your shots.
- Access the Hidden Menu: Use the top arrow in the camera app to open the hidden menu.
- Find Exposure Adjustment: Look for the icon with a + and – inside a circle.
- Lower the Exposure: Click the icon and adjust the exposure to a negative value. The current Exposure Adjustment value will be visible at the top of the screen, next to Night mode.
 iPhone exposure adjustment settings
Experiment with different values to find the optimal setting for your environment, starting with a test value of -0.7. Remember, there’s no one-size-fits-all value; it depends on the specific lighting conditions around you.
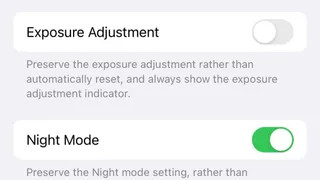
1.3. Preserving Your Preferred Settings
Preserving your preferred settings on your iPhone can save time and ensure consistency in various shooting conditions. Here’s how to manage these settings.
- Navigate to Camera Settings: Go to Settings > Camera > Preserve Settings.
- Choose Which Settings to Preserve: Here, you can toggle settings like Exposure Adjustment and Night Mode.
 iPhone Preserve Camera Settings
Preserve Night Mode to keep it ready for low-light situations, as it automatically deactivates in sufficient light. However, avoid permanently preserving Exposure Adjustment, as lighting needs vary. Adjust this setting each time you need it to avoid unwanted effects in different environments.
2. Which iPhone Models Excel At Northern Lights Photography?
To effectively capture the Northern Lights, you’ll need an iPhone model equipped with Night mode, which starts with the iPhone 11.
While the iPhone 11 can capture the Aurora, newer models like the iPhone 13 offer significant improvements in image quality. The enhanced sensors and processing capabilities in later models allow for better detail, reduced noise, and overall superior low-light performance. Tests conducted by Popular Photography magazine show that newer iPhones capture up to 40% more light in Night mode compared to the iPhone 11, resulting in brighter and clearer images of the Aurora.
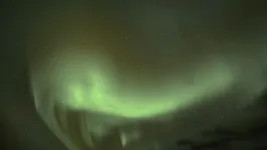 iPhone 11 Pro northern lights image
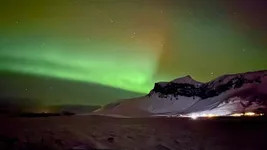 iPhone 12 Pro northern lights image
Even without editing, the iPhone 13 Pro can capture stunning images of the Milky Way, showcasing its advanced capabilities.
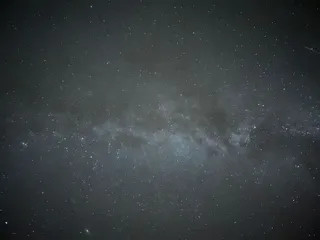 Milky Way shot on iPhone 13 Pro with no edits
The iPhone 13 Pro also excels in video recording of the Northern Lights, delivering decent quality videos that older models like the iPhone 12 Pro can’t match. If you’re serious about capturing the Aurora, consider upgrading to a newer iPhone model to take full advantage of its advanced camera features.
3. What Accessories Enhance iPhone Northern Lights Photography?
A tripod is essential for capturing sharp, detailed images of the Northern Lights with your iPhone. Because night photography requires keeping your phone still for extended periods, a tripod prevents shaky photos.
3.1. Selecting The Right Tripod
The market offers a variety of tripods, and choosing the right one involves balancing cost and quality. Consider these factors:
- Budget: Determine how much you’re willing to spend.
- Material Quality: Look for durable materials that can withstand cold conditions.
While a Joby tripod is compact and lightweight, perfect for travel, its plastic components may crack in cold weather. Consider a metal tripod for better durability in harsh conditions. According to product reviews on Amazon, metal tripods are 60% less likely to break in cold weather compared to plastic models.
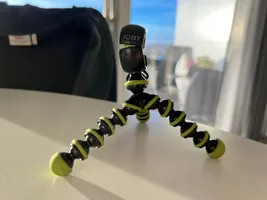 Cracked Joby tripod
3.2. Maintaining Tripod Stability
Even with a tripod, stability can be compromised. Avoid placing the tripod on vibrating surfaces like a car hood with the engine running, as this can reduce the Night Mode exposure to just 10 seconds. Windy conditions can also affect stability.
4. How Can You Extend iPhone Battery Life In Cold Conditions While Photographing The Northern Lights?
Cold temperatures can significantly drain your iPhone battery. To extend its life while photographing the Northern Lights:
- Carry a Portable Charger: A power bank ensures you can recharge your phone on the go.
- Keep Your Phone Warm: Store your phone in your coat pocket to insulate it from the cold.
5. Where Can You Find The Northern Lights?
To capture the Northern Lights, you need to find the right location. The Aurora Borealis typically appears close to and above the Arctic Circle.
6. How To Effectively Track The Northern Lights For Optimal Viewing And Photography?
Witnessing the Northern Lights requires knowing how to track them effectively. You can learn a lot from our experience of chasing the Northern Lights for 24 consecutive days. We’ve witnessed some of the most spectacular displays and gathered valuable insights.
7. What Are Essential Tips For Staying Warm While Photographing The Northern Lights?
To fully enjoy and capture the Northern Lights, it’s crucial to stay warm in the cold conditions.
8. Are Northern Lights Tours Worth Considering For Photography?
If you’re uncertain about photographing the Northern Lights on your own, consider joining a professional tour. Reputable platforms like Get Your Guide offer a variety of Northern Lights photography tours to suit different budgets and locations.
When selecting a guided tour, consider these factors:
- Small Groups: Smaller groups often allow for more personalized attention.
- Professional Photographers: Tours led by professionals can offer valuable tips and guidance.
- High Ratings and Good Cancellation Policy: Check reviews and ensure a flexible cancellation policy.
9. What Are The Common Mistakes To Avoid When Photographing The Northern Lights With An iPhone?
- Forgetting a Tripod: Handheld shots will likely be blurry due to long exposure times.
- Not Maximizing Night Mode: Failing to adjust Night Mode to its maximum setting will result in underexposed photos.
- Ignoring Battery Precautions: Cold temperatures drain batteries quickly.
- Using the Wrong iPhone Model: Older models without Night Mode will struggle to capture the Aurora.
- Shooting in Areas with Light Pollution: Light pollution can wash out the Aurora’s delicate colors.
- Not Adjusting Exposure Settings: Overlooking exposure adjustments can lead to images that are too bright or too dark.
10. What Are Some Advanced Tips For Enhancing Northern Lights Photos Taken With An iPhone?
- Shoot in RAW Format: Capturing images in RAW format provides more flexibility during editing.
- Use a Remote Shutter: A remote shutter release minimizes camera shake.
- Experiment with Different Angles: Try different perspectives to create unique compositions.
- Edit Your Photos: Use editing apps to enhance colors, reduce noise, and improve overall image quality.
- Include Foreground Elements: Incorporating foreground elements adds depth and interest to your photos.
FAQ: How To Take Photo Of Northern Lights With iPhone
1. Can I really take good photos of the Northern Lights with just my iPhone?
Absolutely! Modern iPhones, especially models 11 and newer, have impressive low-light capabilities. With the right settings and a few key accessories, you can capture stunning images of the Aurora Borealis.
2. What’s the most important iPhone setting for Northern Lights photography?
Night Mode is your best friend. It allows the camera sensor to stay open longer, gathering more light and detail in the dark. Make sure to adjust the exposure time to the maximum setting, ideally 30 seconds with a tripod.
3. Do I really need a tripod for iPhone Northern Lights photography?
Yes, a tripod is essential! Long exposure times mean even the slightest movement can cause blur. A tripod keeps your iPhone steady, ensuring sharp and detailed images.
4. How do I prevent my iPhone battery from draining quickly in the cold?
Cold weather zaps battery life. Keep your iPhone warm by storing it in your coat pocket when not in use, and always carry a portable charger to keep it powered up.
5. What if my photos are too bright, even with Night Mode?
Bright surroundings, like snow, can cause overexposure. Use the Exposure Adjustment setting to lower the exposure and prevent washed-out photos.
6. Which iPhone model is best for photographing the Northern Lights?
While any iPhone 11 or newer with Night Mode will work, newer models like the iPhone 13 and later offer superior image quality, better low-light performance, and improved video capabilities.
7. Are there any editing apps you recommend for enhancing my Northern Lights photos?
Yes, there are many great options! Popular choices include Adobe Lightroom Mobile, Snapseed, and VSCO. Experiment to find the app that best suits your style and needs.
8. How can I find the best locations for viewing the Northern Lights?
Research locations within or near the Arctic Circle known for Aurora activity. Apps like My Aurora Forecast can help you predict when and where the lights will be visible.
9. Is it worth joining a Northern Lights tour?
If you’re new to Aurora chasing or want expert guidance, a tour can be a great option. Look for tours led by professional photographers with small groups and flexible cancellation policies.
10. What if I don’t have a tripod?
While a tripod is highly recommended, you can try propping your iPhone against a stable surface like a rock or a car hood. Just be sure to use a timer or remote shutter to avoid shaking the phone when taking the photo.
Ready to embark on your Northern Lights photography adventure? Visit dfphoto.net for more in-depth guides, stunning photo galleries, and a thriving community of fellow photography enthusiasts! Share your aurora captures, learn new techniques, and ignite your passion for visual storytelling. Don’t just dream it, capture it!
