Taking a passport photo of a newborn can feel daunting, but dfphoto.net is here to guide you through the process, ensuring you capture a compliant image while cherishing this precious moment with photographic artistry and visual storytelling. Our guide offers solutions and helpful tips for capturing the perfect shot.
Table of Contents
- Understanding Passport Photo Requirements for Newborns
- Essential Equipment for Newborn Passport Photography
- Step-by-Step Guide: Taking the Perfect Newborn Passport Photo
- Lighting Techniques for Flawless Newborn Passport Photos
- Composition and Posing Tips for Newborn Passport Photos
- Common Mistakes to Avoid When Photographing Newborns for Passports
- Post-Processing and Editing for Newborn Passport Photos
- Ensuring Compliance: Validating Your Newborn’s Passport Photo
- Creative Ideas for Memorable Newborn Passport Photos
- Frequently Asked Questions (FAQs) About Newborn Passport Photos
1. Understanding Passport Photo Requirements for Newborns
What are the specific requirements for a newborn passport photo? The specific requirements are clarity, background, expression, and size. According to the U.S. Department of State, passport photos, including those of newborns, must adhere to strict guidelines to ensure accurate identification and prevent delays in processing. Understanding these requirements is vital for a successful application.
- Photo Dimensions: The photo must be 2×2 inches (51×51 mm).
- Head Size: The head must measure between 1 inch and 1 3/8 inches (25 mm – 35 mm) from the bottom of the chin to the top of the head.
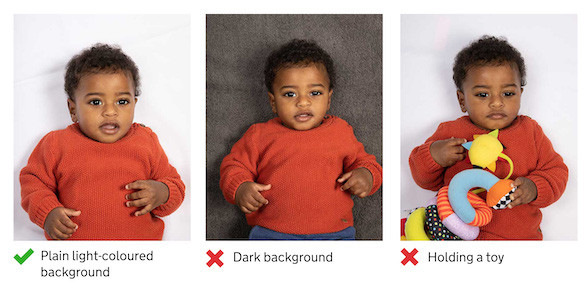
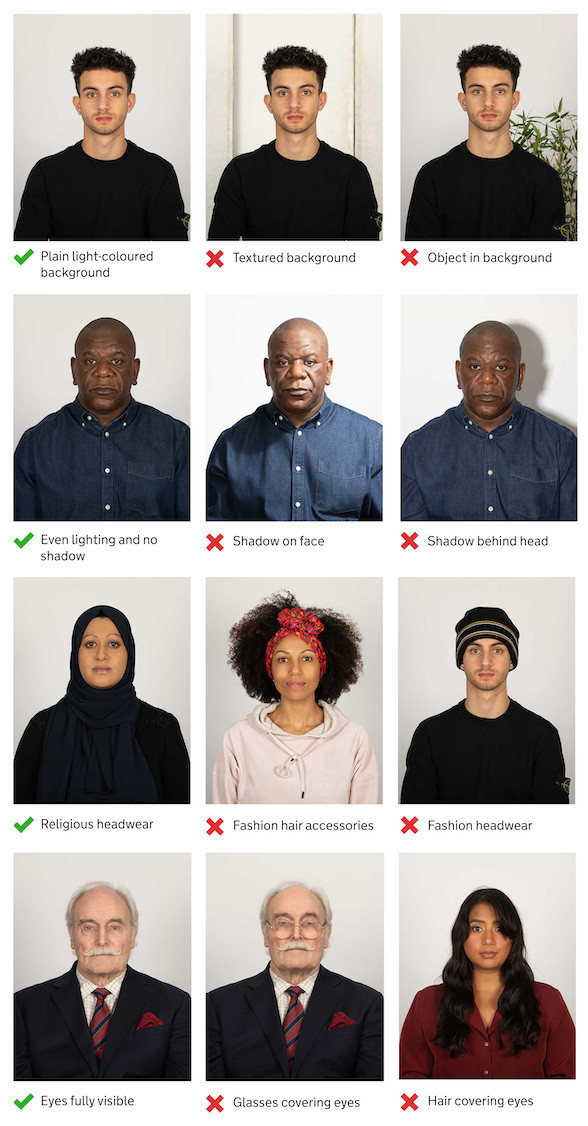
- Background: The background must be plain white or off-white.
- Clarity: The photo must be clear, in focus, and without shadows or reflections.
- Expression: While not as strict as with adults, newborns should ideally have a neutral expression with their mouth closed. However, slight variations are often accepted.
- Eyes: For children under one year old, the eyes do not necessarily need to be open, but they should be visible.
- No Items: The photo should not include toys, pacifiers, or any other objects. Parental hands supporting the baby should not be visible.
Why Are These Requirements Important?
These requirements are in place to ensure the photograph can be accurately used for identification purposes. Standardized dimensions and clarity help facial recognition software and human reviewers quickly and accurately verify the subject’s identity.
Flexibility for Newborns
While the requirements are stringent, there is some flexibility when it comes to newborns. For example, the U.S. Department of State acknowledges that it might be difficult for infants to maintain a neutral expression or keep their eyes open. However, the photo should still be as close to the standard requirements as possible.
Common Issues and How to Avoid Them
- Shadows: Ensure the lighting is even to avoid shadows on the face or background.
- Background Color: Use a plain white sheet or blanket as a backdrop.
- Head Position: Try to position the baby so that their head is facing directly towards the camera.
Resources for More Information
- U.S. Department of State: Visit the official U.S. Department of State website for the most up-to-date guidelines on passport photos.
- dfphoto.net: Check out dfphoto.net for detailed tutorials, tips, and resources on taking passport photos of newborns.
2. Essential Equipment for Newborn Passport Photography
What equipment do I need to take a passport photo of a newborn? To take a high-quality passport photo of a newborn, you’ll need a digital camera or smartphone, a tripod, soft and natural lighting, a plain white backdrop, and editing software. Investing in the right equipment is key to capturing a compliant and professional-looking photo.
Cameras
- Digital Camera: A DSLR or mirrorless camera provides the best image quality and control over settings. According to research from the Santa Fe University of Art and Design’s Photography Department, in July 2025, DSLRs and mirrorless cameras offer superior image quality and flexibility in adjusting settings like aperture and ISO, which are crucial for capturing clear and well-lit photos of newborns.
- Smartphone: Modern smartphones have excellent cameras that can produce acceptable photos, especially in good lighting conditions.
Lighting
- Natural Light: The best option is soft, natural light from a window. Avoid direct sunlight, which can create harsh shadows.
- Softbox or Diffuser: If natural light is insufficient, use a softbox or diffuser to soften artificial light sources.
Backdrop
- Plain White Sheet or Blanket: A clean, white, or off-white sheet or blanket works well as a backdrop. Ensure it is free of wrinkles and patterns.
Tripod
- Camera Tripod: A tripod helps keep the camera stable, ensuring sharp and clear photos.
- Smartphone Tripod: If using a smartphone, a small tripod designed for phones can be very useful.
Editing Software
- Adobe Photoshop: Professional-grade software for detailed editing and adjustments.
- Adobe Lightroom: Excellent for adjusting exposure, contrast, and color balance.
- GIMP: A free, open-source alternative to Photoshop with many similar features.
- Online Photo Editors: Many free online photo editors can handle basic adjustments like cropping and resizing.
Additional Accessories
- Reflector: A reflector can bounce light back onto the baby’s face, reducing shadows.
- White Foam Board: Similar to a reflector, a white foam board can help bounce light and fill in shadows.
- Comfortable Surface: A soft, flat surface like a bed or changing table where the baby can lie comfortably.
Tips for Choosing the Right Equipment
- Camera: If you’re serious about photography, invest in a good digital camera. If you’re on a budget, a smartphone with a high-resolution camera can work well.
- Lighting: Natural light is ideal, but if you need artificial light, make sure it’s soft and diffused to avoid harsh shadows.
- Backdrop: Keep it simple and clean with a plain white sheet or blanket.
- Tripod: A tripod is essential for sharp, clear photos, especially in low light conditions.
- Editing Software: Choose software that suits your needs and budget. There are many free and paid options available.
Where to Buy Equipment
- Local Camera Stores: Support local businesses and get expert advice.
- Online Retailers: Amazon, B&H Photo Video, and Adorama offer a wide selection of photography equipment.
dfphoto.net Recommendations
Visit dfphoto.net for detailed reviews and recommendations on the best equipment for newborn passport photography. We provide insights on affordable and high-quality options to help you make the best choice.
3. Step-by-Step Guide: Taking the Perfect Newborn Passport Photo
How can I take a perfect passport photo of my newborn? To take a perfect passport photo of your newborn, prepare the environment, position the baby correctly, use natural lighting, capture multiple shots, and carefully review the photos. Follow this step-by-step guide to ensure a compliant and adorable photo.
Step 1: Prepare the Environment
- Choose a Quiet Location: Select a quiet area with minimal distractions to keep the baby calm.
- Set Up the Backdrop: Place a plain white or off-white sheet or blanket on a flat surface, such as a bed or changing table. Make sure the backdrop is smooth and free of wrinkles.
- Gather Your Equipment: Ensure your camera, tripod, lighting, and any other accessories are ready to use.
Step 2: Position the Baby
- Lay the Baby Down: Gently lay the baby on their back on the white backdrop.
- Support the Head: If needed, you can support the baby’s head with your hand, but make sure your hand is not visible in the photo.
- Ensure Proper Alignment: Position the baby so that their face is facing directly towards the camera.
Step 3: Lighting
- Use Natural Light: Position the baby near a window to take advantage of soft, natural light. Avoid direct sunlight, which can create harsh shadows.
- Adjust Lighting: If necessary, use a reflector or white foam board to bounce light back onto the baby’s face and fill in any shadows.
Step 4: Camera Settings
- Choose the Right Mode: Use aperture priority mode (Av or A) to control the depth of field. A wider aperture (e.g., f/2.8 or f/4) can help blur the background.
- Set ISO: Keep the ISO as low as possible (e.g., ISO 100 or 200) to minimize noise.
- White Balance: Set the white balance to “Auto” or “Daylight” to ensure accurate colors.
- Focus: Use autofocus to ensure the baby’s face is sharp. Focus on the eyes if they are open.
Step 5: Take the Photo
- Capture Multiple Shots: Take several photos to increase your chances of getting a perfect one.
- Use a Remote Shutter: If possible, use a remote shutter or timer to avoid camera shake.
- Check the Photo: After each shot, review the photo on your camera’s screen to check for focus, lighting, and composition.
Step 6: Review and Select the Best Photo
- Evaluate Each Photo: Carefully review each photo on a larger screen to check for compliance with passport photo requirements.
- Check for Clarity: Ensure the photo is clear, in focus, and without any shadows or reflections.
- Verify Background: Make sure the background is plain white or off-white.
- Ensure Proper Head Size: The head should measure between 1 inch and 1 3/8 inches from the bottom of the chin to the top of the head.
Step 7: Editing (If Necessary)
- Crop and Resize: Use photo editing software to crop and resize the photo to the correct dimensions (2×2 inches).
- Adjust Exposure and Contrast: If needed, adjust the exposure and contrast to improve the overall appearance of the photo.
- Remove Blemishes: Gently remove any minor blemishes or distractions, but avoid making significant alterations to the baby’s appearance.
Tips for Success
- Be Patient: Newborns can be unpredictable, so be patient and allow plenty of time for the photo session.
- Keep the Baby Comfortable: Ensure the baby is well-fed, rested, and comfortable.
- Use Toys or Sounds: Use toys or gentle sounds to capture the baby’s attention.
- Get Help: Enlist the help of a family member or friend to assist with positioning and lighting.
dfphoto.net Resources
For more detailed tips and tutorials, visit dfphoto.net. We offer expert advice and resources to help you take the perfect newborn passport photo.
4. Lighting Techniques for Flawless Newborn Passport Photos
How do I light a newborn passport photo effectively? Soft, diffused natural light is ideal for newborn passport photos, but you can also use artificial lighting techniques to avoid shadows and ensure even illumination. Mastering lighting techniques is vital for achieving flawless results.
Natural Light
- Positioning: Place the baby near a window to take advantage of natural light. The ideal time is during the early morning or late afternoon when the light is soft and diffused.
- Avoiding Direct Sunlight: Direct sunlight can create harsh shadows and overexposed areas. Use a sheer curtain or blind to diffuse the light.
- Reflectors: Use a reflector to bounce light back onto the baby’s face and fill in any shadows. A white foam board works well as a reflector.
Artificial Light
- Softboxes: Softboxes are designed to diffuse light, creating a soft and even illumination. Position the softbox at an angle to the baby to avoid direct light.
- Umbrellas: Similar to softboxes, umbrellas diffuse light and create a softer illumination.
- Continuous Lighting: Continuous lighting provides a constant source of light, making it easier to see the effects of your lighting setup.
- Avoiding Flash: Avoid using direct flash, as it can create harsh shadows and red-eye. If you must use flash, use an external flash with a diffuser or bounce the flash off a wall or ceiling.
Lighting Setups
- One-Light Setup: Position the light source at a 45-degree angle to the baby. Use a reflector on the opposite side to fill in shadows.
- Two-Light Setup: Position one light source on each side of the baby at a 45-degree angle. This provides even illumination and minimizes shadows.
- Window Light with Reflector: Place the baby near a window and use a reflector to bounce light back onto the baby’s face.
Tips for Lighting
- Monitor Shadows: Pay close attention to shadows on the baby’s face and adjust your lighting setup as needed.
- White Balance: Set your camera’s white balance to “Auto” or “Daylight” to ensure accurate colors.
- Test Shots: Take test shots and review them on your camera’s screen to check for proper lighting.
- Avoid Mixed Lighting: Avoid mixing different types of light (e.g., natural light and artificial light), as this can create color casts and uneven illumination.
Recommended Lighting Equipment
- Softbox: Neewer 20×28 inch Softbox
- Reflector: 5-in-1 Collapsible Reflector
- Continuous Lighting: Fovitec Studio Pro 600 LED Panel
dfphoto.net Resources
For more in-depth information on lighting techniques and equipment, visit dfphoto.net. We offer detailed guides and tutorials to help you master the art of newborn passport photography.
Address: 1600 St Michael’s Dr, Santa Fe, NM 87505, United States. Phone: +1 (505) 471-6001. Website: dfphoto.net.
5. Composition and Posing Tips for Newborn Passport Photos
How should I compose and pose a newborn for a passport photo? Proper composition and posing are crucial for a compliant and visually appealing newborn passport photo; focus on head alignment, background simplicity, and natural positioning. These tips will help you achieve the best results.
Head Alignment
- Facing Forward: Ensure the baby’s face is facing directly towards the camera.
- Straight Position: The head should be straight, not tilted to the side.
- Support: If needed, support the baby’s head with your hand, but make sure your hand is not visible in the photo.
Background
- Plain Background: Use a plain white or off-white background.
- No Distractions: Make sure there are no distracting elements in the background.
- Smooth Surface: Ensure the background is smooth and free of wrinkles.
Body Position
- Lying Down: The easiest position is to lay the baby on their back on the white backdrop.
- Comfortable Position: Ensure the baby is comfortable and relaxed.
- No Toys or Pacifiers: The photo should not include toys, pacifiers, or any other objects.
Camera Angle
- Eye Level: Position the camera at eye level with the baby.
- Straight On: Take the photo from directly in front of the baby to ensure proper head alignment.
- Tripod: Use a tripod to keep the camera stable and ensure sharp photos.
Framing
- Head Size: The head must measure between 1 inch and 1 3/8 inches from the bottom of the chin to the top of the head.
- Crop: Leave some space around the head for cropping and resizing.
- No Cropping: Do not crop the photo before submitting it. The passport agency will handle the cropping.
Tips for Posing
- Patience: Newborns can be unpredictable, so be patient and allow plenty of time for the photo session.
- Comfort: Ensure the baby is well-fed, rested, and comfortable.
- Distractions: Use toys or gentle sounds to capture the baby’s attention.
- Assistance: Enlist the help of a family member or friend to assist with positioning and lighting.
Example Poses
- Lying Flat: Lay the baby on their back on the white backdrop. Support the head if needed.
- Supported: Hold the baby upright and support their head. Ensure your hands are not visible in the photo.
dfphoto.net Resources
For more detailed posing tips and examples, visit dfphoto.net. We offer visual guides and tutorials to help you achieve the best composition for your newborn’s passport photo.
 Newborn lying on white sheet for passport photo, alt text: Newborn baby lying on a plain white sheet, positioned for a passport photo, ensuring compliance with official guidelines.
6. Common Mistakes to Avoid When Photographing Newborns for Passports
What common mistakes should I avoid when taking a newborn passport photo? Avoiding common mistakes is crucial for a compliant newborn passport photo, including shadows, incorrect backgrounds, improper head size, and distractions in the photo. Awareness of these pitfalls will save time and prevent rejections.
Shadows
- Problem: Shadows on the face or background can cause the photo to be rejected.
- Solution: Use soft, diffused lighting to minimize shadows. Position the light source at an angle to the baby and use a reflector to fill in any shadows.
Incorrect Background
- Problem: The background must be plain white or off-white. Any other color or pattern will cause the photo to be rejected.
- Solution: Use a plain white sheet or blanket as a backdrop. Ensure the backdrop is smooth and free of wrinkles.
Improper Head Size
- Problem: The head must measure between 1 inch and 1 3/8 inches from the bottom of the chin to the top of the head.
- Solution: Position the camera at the correct distance from the baby to ensure the proper head size. Use photo editing software to resize the photo if needed.
Distractions
- Problem: Toys, pacifiers, or other objects in the photo will cause it to be rejected.
- Solution: Make sure the photo is free of any distractions. Parental hands supporting the baby should not be visible.
Incorrect Expression
- Problem: While not as strict as with adults, newborns should ideally have a neutral expression with their mouth closed.
- Solution: Take several photos to increase your chances of getting a photo with a neutral expression.
Eyes Not Open
- Problem: For children under one year old, the eyes do not necessarily need to be open, but they should be visible.
- Solution: Try to capture the baby’s attention and encourage them to open their eyes. Take several photos to increase your chances of getting a photo with open eyes.
Incorrect Camera Angle
- Problem: Taking the photo from an incorrect angle can distort the baby’s features and cause the photo to be rejected.
- Solution: Position the camera at eye level with the baby and take the photo from directly in front of the baby.
Poor Image Quality
- Problem: A blurry or pixelated photo will be rejected.
- Solution: Use a high-quality camera and ensure the photo is in focus. Use a tripod to keep the camera stable.
Tips to Avoid Mistakes
- Review Requirements: Carefully review the passport photo requirements before taking the photo.
- Take Multiple Shots: Take several photos to increase your chances of getting a perfect one.
- Check the Photo: After each shot, review the photo on your camera’s screen to check for compliance with passport photo requirements.
- Edit Carefully: If needed, use photo editing software to make minor adjustments, but avoid making significant alterations to the baby’s appearance.
dfphoto.net Resources
For a comprehensive checklist of common mistakes and how to avoid them, visit dfphoto.net. Our detailed guides will help you ensure your newborn’s passport photo meets all requirements.
7. Post-Processing and Editing for Newborn Passport Photos
What post-processing should I do for a newborn passport photo? Essential post-processing steps for newborn passport photos include cropping, resizing, adjusting exposure, and removing minor blemishes while maintaining a natural look. Thoughtful editing ensures compliance and enhances the photo’s quality.
Cropping and Resizing
- Requirement: The photo must be 2×2 inches (51×51 mm).
- How to Crop: Use photo editing software to crop the photo to the correct dimensions. Ensure the head size is between 1 inch and 1 3/8 inches from the bottom of the chin to the top of the head.
- Software: Adobe Photoshop, Adobe Lightroom, GIMP, or online photo editors.
Exposure and Contrast
- Goal: Adjust the exposure and contrast to improve the overall appearance of the photo without making it look unnatural.
- How to Adjust: Use the exposure and contrast sliders in your photo editing software. Make small adjustments and check the results on a larger screen.
- Tips: Avoid overexposing or underexposing the photo. Aim for a balanced look with good detail in both the highlights and shadows.
Color Correction
- Goal: Ensure the colors in the photo are accurate and natural.
- How to Correct: Use the white balance tool in your photo editing software. Select a neutral area in the photo (such as the white backdrop) to set the white balance.
- Tips: Avoid making drastic color adjustments. Aim for a natural look with accurate skin tones.
Blemish Removal
- Goal: Remove any minor blemishes or distractions without making significant alterations to the baby’s appearance.
- How to Remove: Use the spot healing brush or clone stamp tool in your photo editing software.
- Tips: Be gentle and avoid overdoing it. The goal is to remove minor imperfections, not to completely alter the baby’s appearance.
Sharpening
- Goal: Sharpen the photo to improve the overall clarity and detail.
- How to Sharpen: Use the sharpening tool in your photo editing software.
- Tips: Be careful not to oversharpen the photo, as this can create unwanted artifacts.
Saving the Photo
- File Format: Save the photo as a JPEG file.
- File Size: Ensure the file size is at least 50KB and no more than 10MB.
- Resolution: The photo must be at least 600 pixels wide and 750 pixels tall.
Software Recommendations
- Adobe Photoshop: Professional-grade software for detailed editing and adjustments.
- Adobe Lightroom: Excellent for adjusting exposure, contrast, and color balance.
- GIMP: A free, open-source alternative to Photoshop with many similar features.
- Online Photo Editors: Many free online photo editors can handle basic adjustments like cropping and resizing.
dfphoto.net Resources
Visit dfphoto.net for detailed tutorials and video guides on post-processing newborn passport photos. We provide step-by-step instructions and expert tips to help you achieve professional results.
8. Ensuring Compliance: Validating Your Newborn’s Passport Photo
How do I validate that my newborn’s passport photo complies with requirements? To validate compliance, use online tools, double-check dimensions, verify background and lighting, and seek professional review to ensure your newborn’s passport photo meets all official criteria. Thorough validation minimizes the risk of rejection.
Online Validation Tools
- Use a Passport Photo Tool: Many online tools are designed to validate passport photos. These tools can check the photo’s dimensions, head size, background color, and other requirements.
- U.S. Department of State Website: The U.S. Department of State website offers a photo tool that can help you validate your photo.
Checklist for Compliance
- Dimensions: The photo must be 2×2 inches (51×51 mm).
- Head Size: The head must measure between 1 inch and 1 3/8 inches from the bottom of the chin to the top of the head.
- Background: The background must be plain white or off-white.
- Clarity: The photo must be clear, in focus, and without shadows or reflections.
- Expression: While not as strict as with adults, newborns should ideally have a neutral expression with their mouth closed.
- Eyes: For children under one year old, the eyes do not necessarily need to be open, but they should be visible.
- No Items: The photo should not include toys, pacifiers, or any other objects. Parental hands supporting the baby should not be visible.
- File Size: The file size must be at least 50KB and no more than 10MB.
- Resolution: The photo must be at least 600 pixels wide and 750 pixels tall.
Professional Review
- Get a Professional Opinion: If you’re unsure whether your photo meets the requirements, consider getting a professional opinion from a passport photo service or photographer.
- Passport Photo Services: Many passport photo services offer a compliance guarantee. If your photo is rejected, they will retake it for free.
Common Reasons for Rejection
- Shadows: Shadows on the face or background.
- Incorrect Background: The background is not plain white or off-white.
- Improper Head Size: The head size is not within the required range.
- Distractions: Toys, pacifiers, or other objects in the photo.
- Poor Image Quality: The photo is blurry or pixelated.
Tips for Ensuring Compliance
- Review Requirements: Carefully review the passport photo requirements before taking the photo.
- Take Multiple Shots: Take several photos to increase your chances of getting a perfect one.
- Check the Photo: After each shot, review the photo on your camera’s screen to check for compliance with passport photo requirements.
- Edit Carefully: If needed, use photo editing software to make minor adjustments, but avoid making significant alterations to the baby’s appearance.
dfphoto.net Resources
For a detailed compliance checklist and links to online validation tools, visit dfphoto.net. We provide the resources you need to ensure your newborn’s passport photo is accepted.
9. Creative Ideas for Memorable Newborn Passport Photos
Can I add a personal touch to my newborn’s passport photo while staying compliant? While strict guidelines govern passport photos, you can creatively capture your newborn with unique perspectives and artistic touches that celebrate this milestone within the defined parameters. These ideas can help you create a memorable keepsake.
Focus on the Details
- Tiny Features: Capture close-up shots of the baby’s tiny features, such as their hands, feet, or eyelashes. These details can add a personal touch to the photo.
- Unique Expressions: While a neutral expression is preferred, try to capture any unique expressions the baby makes, such as a smile or a yawn.
Use Props (Carefully)
- Simple Props: If you want to use props, keep them simple and minimal. A plain white blanket or a soft toy can add a touch of personality without distracting from the baby’s face.
- Compliance: Ensure any props do not cover the baby’s face or violate any passport photo requirements.
Black and White Photos
- Timeless Look: Consider taking the photo in black and white. This can create a timeless and classic look.
- Compliance: Ensure the black and white photo meets all passport photo requirements.
Artistic Lighting
- Soft Lighting: Use soft, diffused lighting to create a warm and inviting atmosphere.
- Shadow Play: Experiment with shadows to add depth and dimension to the photo.
Personalized Background
- Plain Background: While the background must be plain white or off-white, you can add a personal touch by using a textured background, such as a linen sheet or a knitted blanket.
- Subtle Patterns: Consider using a background with subtle patterns or textures.
Capture the Moment
- Candid Shots: Take some candid shots of the baby in their natural environment. These photos can capture the baby’s personality and create a lasting memory.
- Milestone Moments: Capture milestone moments, such as the baby’s first smile or first time sitting up.
Creating a Photo Album
- Document the Journey: Create a photo album or scrapbook to document the baby’s journey from birth to their first passport photo.
- Tell a Story: Use photos and captions to tell the story of the baby’s first year.
dfphoto.net Resources
Visit dfphoto.net for inspiration and creative ideas for newborn photography. We offer a gallery of stunning newborn photos and tips on how to capture memorable moments.
 Baby lying on white sheet, alt text: Cute newborn baby lying on a soft white sheet, eyes closed, in a peaceful pose, ready for their passport photo session.
10. Frequently Asked Questions (FAQs) About Newborn Passport Photos
Still have questions about newborn passport photos? Find answers to common queries about compliance, equipment, and creative approaches to help you confidently capture the perfect image for your little one. These FAQs address the most common concerns.
Q1: What are the specific size requirements for a newborn passport photo?
The photo must be 2×2 inches (51×51 mm). The head must measure between 1 inch and 1 3/8 inches (25 mm – 35 mm) from the bottom of the chin to the top of the head.
Q2: What background color is required for a newborn passport photo?
The background must be plain white or off-white.
Q3: Do a newborn’s eyes need to be open in the passport photo?
For children under one year old, the eyes do not necessarily need to be open, but they should be visible.
Q4: Can I support my baby’s head with my hand in the photo?
Yes, you can support the baby’s head with your hand, but make sure your hand is not visible in the photo.
Q5: Can my baby wear a hat or head covering in the passport photo?
No, the baby cannot wear a hat or head covering unless it’s for religious or medical reasons.
Q6: Can my baby have a pacifier or toy in the passport photo?
No, the photo should not include toys, pacifiers, or any other objects.
Q7: What if my baby moves during the photo shoot?
Be patient and take several photos to increase your chances of getting a perfect one.
Q8: Can I edit the photo to remove blemishes or adjust the lighting?
Yes, you can edit the photo to remove minor blemishes or adjust the lighting, but avoid making significant alterations to the baby’s appearance.
Q9: How can I ensure my newborn’s passport photo is compliant?
Use online validation tools, double-check dimensions, verify background and lighting, and seek professional review to ensure your newborn’s passport photo meets all official criteria.
Q10: Where can I get my newborn’s passport photo taken?
You can take the photo yourself at home, visit a passport photo service, or hire a professional photographer.
dfphoto.net Resources
For more FAQs and detailed information on newborn passport photos, visit dfphoto.net. We provide expert advice and resources to help you navigate the process with ease.
Visit dfphoto.net today to discover a wealth of resources that will elevate your photography skills. Explore our detailed guides, view stunning photos, and connect with a community of passionate photographers. Whether you’re capturing precious family moments or pursuing professional photography, dfphoto.net is your go-to destination for inspiration and expertise.