Taking stunning photographs of the moon might seem daunting, but with the right techniques and equipment, you can capture breathtaking lunar images. In this guide, dfphoto.net will walk you through the essential steps, from selecting the right gear to mastering post-processing techniques, ensuring you create memorable moonshots. Whether you’re an amateur or a seasoned pro, this comprehensive guide to lunar photography will help you master celestial snapshots, turning your passion into artistry and achieving stunning visual effects.
1. Understanding Lunar Photography: A Beginner’s Guide
What is the best way to start learning about lunar photography?
Starting with the basics, understanding the moon’s phases, and recognizing the gear needed will help you master lunar photography. These steps are key to getting great moon photos.
1.1. Grasping the Lunar Cycle
The moon’s appearance changes over about 29.5 days, going from a sliver to full and back. Each phase has unique beauty and offers different light and shadows, making photo opportunities special, according to NASA’s Goddard Space Flight Center in July 2025. Planning shoots around these changes can greatly improve your moon photos.
1.2. Key Equipment for Capturing the Moon
To get the best moon photos, here’s what you’ll need:
- DSLR or Mirrorless Camera: These let you change settings and lenses, which is important for getting sharp, detailed images.
- Telephoto Lens: A lens with at least 200mm is essential for zooming in on the moon.
- Tripod: Keeps your camera steady to prevent blurring, especially with long exposures.
- Remote Shutter Release: Helps take photos without shaking the camera.
1.3. Initial Camera Settings
Start with these basic settings, but remember to adjust them for best results:
- ISO: Set it low (100-400) to avoid grain.
- Aperture: Choose f/8 to f/11 for good depth of field.
- Shutter Speed: Begin around 1/125 to 1/250 of a second, adjusting as needed to get the right exposure.
- Focus: Use manual focus for the sharpest images.
2. Gear Up: Essential Equipment for Moon Photography
What equipment is necessary for achieving high-quality moon photographs?
The right equipment is essential; a good camera, lens, and a steady tripod are vital for capturing detailed lunar images. These tools are the foundation for stunning moon photos.
2.1. Camera Body: DSLR vs. Mirrorless
Both DSLR and mirrorless cameras work well for moon photography. DSLRs have been around longer and are reliable, while mirrorless cameras are lighter and offer advanced features like electronic viewfinders, according to a 2024 comparison by Popular Photography. Your choice depends on your personal preferences and budget.
2.2. Lenses: The Key to Detail
A telephoto lens is a must. Here’s why:
- Focal Length: Aim for at least 200mm to fill the frame with the moon.
- Zoom Lenses: Offer flexibility to adjust magnification.
- Prime Lenses: Typically sharper but less versatile.
2.3. Tripods: Stability is Paramount
A sturdy tripod is non-negotiable, ensuring crisp, blur-free images. Key features include:
- Material: Carbon fiber tripods are lightweight but expensive. Aluminum is more affordable and still durable.
- Load Capacity: Make sure it can handle the weight of your camera and lens.
- Stability: Look for models with good reviews on stability.
2.4. Accessories: Enhancing Your Setup
Consider these extra tools:
- Remote Shutter Release: Prevents camera shake when you press the shutter.
- Lens Filters: UV filters protect your lens, while polarizing filters can reduce glare if needed.
- Extra Batteries: Long nights of shooting can drain power quickly.
3. Camera Settings: Mastering Manual Mode for Moon Shots
How do you adjust camera settings to capture the moon effectively?
Shooting in manual mode allows precise control over ISO, aperture, and shutter speed, essential for capturing the moon’s detail. Adjust these settings to match the lunar conditions.
3.1. Manual Mode: Taking Control
Switching to manual mode gives you complete control over your camera’s settings. This is important because automatic modes can be tricked by the dark sky, leading to overexposed moon photos.
3.2. ISO: Keeping Noise at Bay
- Low ISO: Set ISO to 100 or 200 to minimize digital noise.
- Trade-offs: Higher ISO settings can brighten the image but at the cost of image quality.
3.3. Aperture: Balancing Light and Sharpness
- Ideal Range: An aperture between f/8 and f/11 usually provides the best balance of sharpness and light.
- Depth of Field: This range ensures the entire moon is in focus.
3.4. Shutter Speed: Capturing Motion
- Faster Shutter Speed: Start with 1/125 or 1/250 of a second to avoid motion blur.
- Adjustments: Increase if the moon appears blurry, decrease if it’s too dark.
- Lunar Movement: The moon moves, so faster speeds help capture it sharply.
3.5. White Balance: Getting the Right Color
- Daylight Setting: Often works well for moon photos.
- Custom Adjustments: Adjust in post-processing if needed to correct color casts.
4. Focusing Techniques: Achieving Sharpness in Lunar Images
What are the best focusing techniques for capturing sharp moon images?
Manual focus, magnified live view, and focus peaking ensure sharp lunar images by overcoming autofocus limitations in low light. These techniques are key to precision focusing.
4.1. Why Manual Focus?
Autofocus can struggle in low light, making manual focus the better choice for moon photography.
4.2. Live View: Zooming In
- Engage Live View: Turn on your camera’s live view function.
- Magnify: Zoom in on the moon until it fills the screen.
- Precision: Adjust the focus ring until the lunar surface appears sharp.
4.3. Focus Peaking: Visual Assistance
- Highlighting: Focus peaking highlights the edges of in-focus areas.
- Ease of Use: Makes it easier to see when the moon is sharply focused.
- Availability: Check if your camera has this feature in the settings.
4.4. Test Shots: Confirming Sharpness
- Take a Photo: After focusing, take a test shot.
- Review: Zoom in on the image to check for sharpness.
- Adjust: Make small adjustments to the focus and take another shot.
4.5. Overcoming Challenges
- Atmospheric Conditions: Watch for atmospheric disturbances that can affect sharpness.
- Patience: Achieving perfect focus may take time and several attempts.
5. Composition Tips: Framing the Moon for Stunning Photos
How can you compose moon photos to make them visually appealing?
Using the rule of thirds, including foreground elements, and experimenting with different lunar phases can enhance the composition of your moon photos. These tips add depth and interest.
5.1. The Rule of Thirds: Creating Balance
- Divide the Frame: Imagine your frame divided into nine equal parts by two horizontal and two vertical lines.
- Placement: Position the moon along these lines or at their intersections.
- Visual Appeal: This creates a balanced and interesting composition.
5.2. Incorporating Foreground Elements
- Landscapes: Include trees, mountains, or buildings to provide context and scale.
- Silhouettes: Create silhouettes against the moon for dramatic effect.
- Depth: Foreground elements add depth and tell a story.
5.3. Different Lunar Phases
- Full Moon: Bright and detailed but can lack shadows.
- Crescent Moon: Offers beautiful, soft light and strong shadows.
- Gibbous Moon: A good balance of light and shadow.
5.4. Creative Angles and Perspectives
- Low Angles: Shooting from a low angle can make the moon appear larger and more impressive.
- Reflections: Look for opportunities to capture the moon’s reflection in water.
- Unique Viewpoints: Experiment with different locations and viewpoints.
5.5. Avoiding Distractions
- Clean Backgrounds: Try to minimize distracting elements in the background.
- Dark Skies: Choose locations with minimal light pollution.
6. Post-Processing Techniques: Enhancing Your Moon Images
What post-processing steps can significantly improve moon photos?
Adjusting exposure, contrast, and clarity in editing software enhances details and creates a captivating final image. These steps bring out the best in your moon shots.
6.1. Software Options
- Adobe Lightroom: Popular for its comprehensive editing tools.
- Adobe Photoshop: Offers advanced editing capabilities.
- Capture One: Another professional-grade option with excellent color handling.
- Free Alternatives: GIMP and RawTherapee are powerful free options.
6.2. Basic Adjustments
- Exposure: Slightly increase exposure to brighten the moon.
- Contrast: Boost contrast to enhance details and shadows.
- Highlights and Shadows: Adjust these to balance the light.
6.3. Detail Enhancement
- Clarity: Increase clarity to bring out texture on the moon’s surface.
- Sharpening: Apply sharpening carefully to avoid over-sharpening.
6.4. Color Adjustments
- White Balance: Fine-tune the white balance to achieve natural colors.
- Saturation: Adjust saturation to enhance or reduce color intensity.
6.5. Noise Reduction
- Apply Noise Reduction: Reduce noise, especially if you used a higher ISO.
- Balance: Be careful not to over-smooth the image.
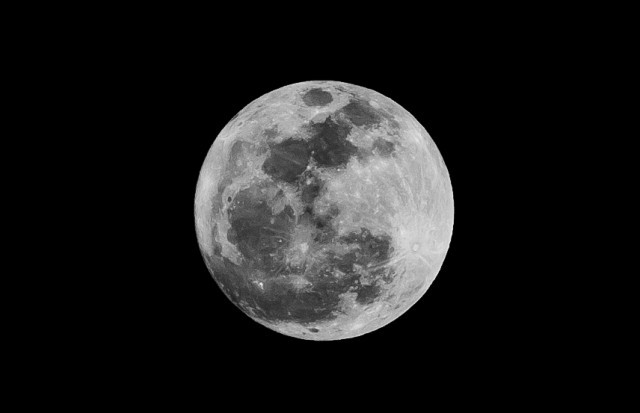 Final image of the moon edited to enhance details and clarity
6.6. Cropping and Composition
- Crop the Image: Crop to improve the composition.
- Straighten: Make sure the horizon is level.
7. Capturing Different Lunar Phases: Adapting Your Approach
How should your photography approach change for different phases of the moon?
Each lunar phase requires different settings and techniques; capturing crescent moons benefits from longer exposures, while full moons may need faster shutter speeds. Adapting to these changes is crucial.
7.1. New Moon: Invisible Opportunity
- Dark Skies: Use the new moon period to capture the Milky Way or other night sky objects.
7.2. Crescent Moon: Delicate Light
- Longer Exposures: Use longer exposures to capture the faint light.
- Foreground Elements: Incorporate foreground elements to add interest.
7.3. First Quarter Moon: Balancing Act
- Shadows: Use the strong shadows to highlight texture.
- Experiment: Try different angles and compositions.
7.4. Gibbous Moon: Almost Full
- Bright Light: Adjust settings to avoid overexposure.
- Details: Focus on capturing details of the lunar surface.
7.5. Full Moon: Bright and Bold
- Faster Shutter Speeds: Use faster shutter speeds to avoid overexposure.
- Polarizing Filter: Consider using a polarizing filter to reduce glare.
8. Overcoming Common Challenges in Moon Photography
What are common challenges in moon photography and how can you overcome them?
Overcoming issues like motion blur, atmospheric distortion, and light pollution requires specific strategies and techniques. Addressing these challenges improves image quality.
8.1. Motion Blur: The Moving Moon
- Cause: The moon’s movement can cause blur.
- Solution: Use faster shutter speeds and a stable tripod.
8.2. Atmospheric Distortion: Seeing Through the Air
- Cause: Heat and air turbulence can distort the image.
- Solution: Shoot when the air is calm, often right after sunset or before sunrise.
8.3. Light Pollution: The Urban Glow
- Cause: Artificial light can wash out the sky.
- Solution: Find dark locations away from city lights.
8.4. Overexposure: Too Much Light
- Cause: The moon is surprisingly bright.
- Solution: Use lower ISO settings and faster shutter speeds.
8.5. Underexposure: Not Enough Light
- Cause: Incorrect camera settings.
- Solution: Increase ISO, use a wider aperture, or slow down the shutter speed.
8.6. Focus Issues: Getting Sharpness
- Cause: Difficulty achieving sharp focus in low light.
- Solution: Use manual focus, live view, and focus peaking.
9. Advanced Techniques: Taking Your Lunar Photography to the Next Level
What advanced techniques can elevate your moon photography?
Stacking images, shooting lunar eclipses, and creating composite shots are advanced techniques that add depth and drama to your lunar photography. Mastering these techniques will set your work apart.
9.1. Image Stacking: Enhancing Detail
- Process: Combine multiple images to reduce noise and increase detail.
- Software: Use software like Autostakkert! or RegiStax.
- Benefits: Produces clearer and more detailed images.
9.2. Shooting Lunar Eclipses: A Rare Treat
- Preparation: Plan ahead and know the timing of the eclipse.
- Settings: Adjust settings as the moon darkens.
- Capture: Capture the different stages of the eclipse.
9.3. Creating Composite Shots: Adding Drama
- Foreground Integration: Combine a moon shot with a detailed foreground.
- Blending: Use Photoshop to blend the images seamlessly.
- Artistic Expression: Create unique and dramatic scenes.
9.4. Time-Lapse Photography: Documenting the Moon’s Journey
- Capture Intervals: Set your camera to take photos at regular intervals.
- Duration: Shoot for several hours to capture the moon’s movement.
- Combine Images: Use software to create a time-lapse video.
9.5. High Dynamic Range (HDR) Imaging: Balancing Light
- Multiple Exposures: Take multiple shots with different exposures.
- Combine: Use HDR software to combine them into one image.
- Balanced Lighting: Capture detail in both the bright and dark areas.
10. Inspiration and Resources: Finding Your Lunar Muse
Where can you find inspiration and resources to improve your moon photography?
Inspiration can be found in online communities, photography books, and workshops, all providing valuable learning opportunities and creative ideas. These resources help you grow as a photographer.
10.1. Online Communities: Sharing and Learning
- Flickr: Join groups dedicated to moon photography.
- Instagram: Follow photographers who specialize in lunar images.
- Forums: Participate in photography forums to ask questions and share tips.
10.2. Photography Books: In-Depth Knowledge
- “Night Photography: From Snapshots to Great Shots” by Alan Dyer: A guide to night photography.
- “The Photographer’s Guide to the Moon” by Michael Covington: Offers comprehensive info on lunar photography.
10.3. Workshops and Courses: Hands-On Experience
- Local Workshops: Check local photography clubs for workshops.
- Online Courses: Platforms like CreativeLive and Skillshare offer courses on night photography.
10.4. Observing the Work of Other Photographers
- Study Masters: Look at the work of famous photographers for inspiration.
- Analyze: Figure out how they achieved their results.
10.5. Experimentation and Practice: The Best Teacher
- Try New Things: Don’t be afraid to experiment with different techniques.
- Practice Regularly: The more you shoot, the better you’ll become.
11. Case Studies: Learning from Successful Moon Photos
What can we learn from analyzing successful moon photos?
Examining successful moon photos reveals effective techniques and creative approaches, providing insights into achieving similar results. Study these examples to enhance your skills.
11.1. Case Study 1: Detailed Full Moon Shot
- Photographer: Alan Dyer
- Technique: Image stacking to bring out detail.
- Key Settings: Low ISO, fast shutter speed, sharp focus.
- Lesson: Stacking images can dramatically improve detail.
11.2. Case Study 2: Crescent Moon with Landscape
- Photographer: Babak Tafreshi
- Technique: Combining a crescent moon with a detailed landscape.
- Key Settings: Longer exposure for the moon, careful blending in post-processing.
- Lesson: Foreground elements add depth and interest.
11.3. Case Study 3: Lunar Eclipse Sequence
- Photographer: Wally Pacholka
- Technique: Capturing the different stages of a lunar eclipse.
- Key Settings: Adjusting settings as the moon darkens.
- Lesson: Planning and timing are crucial for eclipse photography.
11.4. Case Study 4: Moon Reflection
- Photographer: Alexandre Deschaumes
- Technique: Capturing the moon’s reflection in water.
- Key Settings: Finding a calm body of water, using a low angle.
- Lesson: Reflections create stunning visual effects.
11.5. Key Takeaways
- Sharp Focus: Always prioritize sharp focus.
- Composition: Think carefully about composition.
- Post-Processing: Use post-processing to enhance detail and color.
- Experimentation: Don’t be afraid to try new things.
12. Ethical Considerations: Respecting the Night Sky
What ethical considerations should you keep in mind when photographing the moon?
Minimizing light pollution, respecting private property, and preserving dark sky locations are crucial ethical considerations for responsible moon photography. These practices ensure sustainability.
12.1. Minimizing Light Pollution
- Be Mindful: Avoid using bright lights that can disturb wildlife.
- Use Red Lights: Red lights are less disruptive to nocturnal animals.
- Turn Off Lights: Turn off lights when they’re not needed.
12.2. Respecting Private Property
- Permission: Always get permission before entering private property.
- Stay on Trails: Stay on marked trails to avoid damaging vegetation.
- Leave No Trace: Pack out everything you pack in.
12.3. Preserving Dark Sky Locations
- Support Conservation: Support organizations that protect dark sky locations.
- Educate Others: Educate others about the importance of preserving dark skies.
12.4. Wildlife Awareness
- Observe from a Distance: Observe wildlife from a safe distance.
- Avoid Disturbing Animals: Avoid disturbing animals or their habitats.
12.5. Community Respect
- Be Considerate: Be considerate of others who are enjoying the night sky.
- Share Information: Share your knowledge and experiences with others.
13. The Future of Moon Photography: Trends and Technologies
What are the emerging trends and technologies shaping the future of moon photography?
Advancements in camera technology, AI-assisted editing, and accessibility of space data are revolutionizing moon photography. Staying updated with these developments is essential.
13.1. Advancements in Camera Technology
- Higher Resolution Sensors: Capturing more detail than ever before.
- Improved Low-Light Performance: Shooting in darker conditions without noise.
- Better Image Stabilization: Reducing blur from camera shake.
13.2. AI-Assisted Editing
- Automated Adjustments: AI can help with exposure, color, and sharpening.
- Noise Reduction: AI-powered noise reduction is becoming more effective.
- Enhancements: AI can enhance details that were previously impossible to recover.
13.3. Space Data and Mapping
- Detailed Maps: Accessing detailed maps of the lunar surface.
- Predicting Conditions: Knowing when and where to find the best lighting.
13.4. Virtual and Augmented Reality
- Immersive Experiences: Creating virtual tours of the moon.
- Educational Tools: Using AR to teach about lunar phases.
13.5. Citizen Science
- Amateur Contributions: Amateurs can contribute to scientific research by sharing their images.
- Data Collection: Helping to map the lunar surface and track changes over time.
14. Conclusion: Embracing the Art of Lunar Photography
What is the most important takeaway for aspiring moon photographers?
The key is to combine technical knowledge with creative vision, continually experiment, and share your unique perspective of the moon with the world. Embrace the journey of learning.
Lunar photography is a fascinating blend of technical skill and artistic expression. By mastering the techniques discussed in this guide, you can capture stunning images that reveal the beauty and mystery of the moon. Remember to experiment, be patient, and share your work with others.
To further enhance your skills and explore a world of photographic inspiration, visit dfphoto.net. Discover detailed tutorials, breathtaking images, and a vibrant community of photographers ready to support your creative journey. Whether you’re looking to refine your technique, find your next project, or connect with fellow enthusiasts, dfphoto.net is your ultimate resource.
Address: 1600 St Michael’s Dr, Santa Fe, NM 87505, United States.
Phone: +1 (505) 471-6001.
Website: dfphoto.net.
15. Frequently Asked Questions (FAQ) About Moon Photography
What are the most common questions people have about moon photography?
Here are some frequently asked questions to help you understand the nuances of moon photography better. These FAQs cover various aspects, from equipment to techniques.
15.1. What is the best lens for photographing the moon?
A telephoto lens with a focal length of at least 200mm is ideal for capturing detailed images of the moon. Zoom lenses offer flexibility, while prime lenses often provide better image quality.
15.2. What camera settings should I use for moon photography?
Use manual mode with a low ISO (100-200), an aperture between f/8 and f/11, and a shutter speed of 1/125 to 1/250 of a second. Adjust as needed to achieve proper exposure.
15.3. How do I focus on the moon?
Switch to manual focus and use live view to zoom in on the moon. Adjust the focus ring until the lunar surface appears sharp. Focus peaking can also help.
15.4. Why are my moon photos blurry?
Blurriness can be caused by motion blur, atmospheric distortion, or incorrect focus. Use a faster shutter speed, a stable tripod, and manual focus techniques to improve sharpness.
15.5. How can I reduce noise in my moon photos?
Use a low ISO setting (100-200) to minimize noise. If necessary, apply noise reduction in post-processing, but be careful not to over-smooth the image.
15.6. What is the best time to photograph the moon?
The best time to photograph the moon depends on the phase. Full moons are bright and detailed, while crescent moons offer soft light and strong shadows.
15.7. How do I capture a lunar eclipse?
Plan ahead and know the timing of the eclipse. Adjust your camera settings as the moon darkens, and capture the different stages of the eclipse.
15.8. What is image stacking, and how does it improve moon photos?
Image stacking involves combining multiple images to reduce noise and increase detail. Use software like Autostakkert! or RegiStax to stack your images.
15.9. How can I incorporate foreground elements into my moon photos?
Include trees, mountains, or buildings to provide context and scale. Create silhouettes against the moon for a dramatic effect.
15.10. What ethical considerations should I keep in mind when photographing the moon?
Minimize light pollution, respect private property, and preserve dark sky locations. Be mindful of wildlife and avoid disturbing their habitats.