Taking photos on your Dell laptop is simpler than you might think, and dfphoto.net is here to show you how to master it, whether you’re aiming for professional photography or just capturing everyday moments. This guide will walk you through several methods, from using the built-in webcam to connecting external cameras, and teach you how to enhance your images with editing software. Discover stunning visuals and creative inspiration at dfphoto.net, learning about camera settings, photo composition, and image editing to enhance your skills in visual storytelling, perfect for digital photography and visual arts.
1. What Are the Basic Methods for Taking Photos on a Dell Laptop?
Capturing photos on your Dell laptop can be achieved through several methods, offering flexibility based on your needs. The primary ways include using the integrated webcam, employing the Print Screen function, or connecting an external camera.
1.1 Using the Integrated Webcam
Most Dell laptops come equipped with a built-in webcam, which is a convenient option for taking quick photos. To use it:
- Access the Camera Application: Open the Camera app by searching for it in the Windows search bar.
- Frame Your Shot: Position yourself or the subject in front of the laptop screen, adjusting the angle as needed.
- Capture the Photo: Click the photo icon within the Camera app to take your picture.
- Review and Save: The photo will be displayed for review, and you can save it to your desired location.
This method is ideal for selfies, video calls, and informal snapshots, making it accessible for users of all levels.
1.2 Employing the Print Screen Function
The Print Screen function is another method to “capture” an image on your screen, although it’s technically a screenshot rather than a direct photo. Here’s how to use it effectively:
- Press the PrtScr Key: Locate the Print Screen key on your keyboard, often labeled as “PrtScr” or a similar abbreviation.
- Capture the Screen: Press the Print Screen key. This copies the entire screen to your clipboard.
- Paste into an Image Editor: Open an image editing program like Microsoft Paint, Photoshop, or GIMP.
- Paste the Screenshot: Press Ctrl + V to paste the screenshot into the image editor.
- Crop and Save: Crop the desired area, make any necessary edits, and save the image.
The Print Screen method is useful for capturing specific content displayed on your screen, such as application windows or online images.
1.3 Connecting an External Camera
For higher-quality photos, connecting an external camera to your Dell laptop is an excellent option. This is particularly useful for photography enthusiasts or professionals.
- Connect the Camera: Use a USB cable to connect your external camera to your Dell laptop.
- Install Drivers (if needed): Windows will typically recognize the camera and install the necessary drivers automatically. If not, you may need to install drivers from the camera manufacturer’s website.
- Use Camera Software: Open the camera’s software on your laptop. This might be the software provided by the camera manufacturer or a third-party application.
- Adjust Settings: Configure the camera settings such as resolution, ISO, and white balance according to your preferences.
- Capture the Photo: Use the software to take photos, which will then be saved to your laptop.
Using an external camera allows you to leverage advanced features and better image quality, making it suitable for more serious photography projects. For inspiration and guidance, explore the vast collection of stunning photos and expert tutorials available at dfphoto.net.
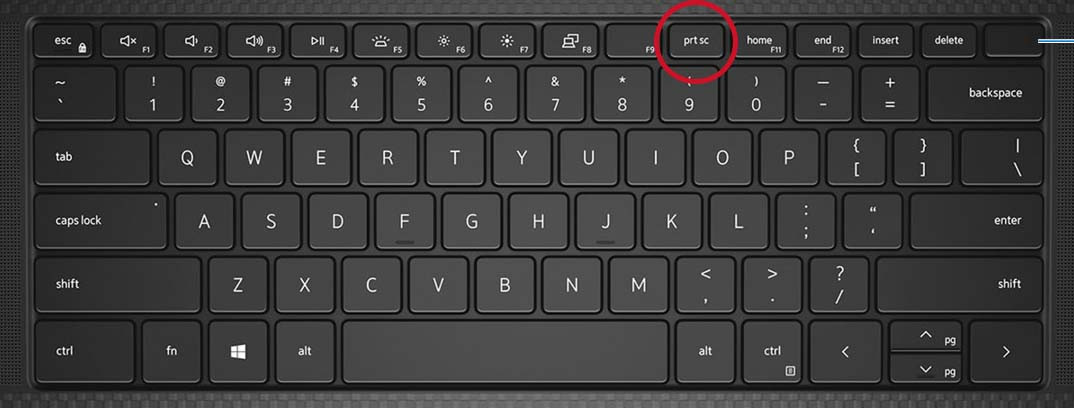
2. Where Can I Find the Print Screen Key on a Dell Laptop?
Finding the Print Screen key on your Dell laptop can vary slightly depending on the model and keyboard layout. Generally, it is located in the upper right area of the keyboard, but there are a few common variations.
2.1 Desktop Keyboards
On desktop keyboards, the Print Screen key is typically found in the upper right corner. It is often labeled as “Print Screen,” “PrtScrn,” “PrtSc,” or a similar abbreviation.
2.2 Laptop Keyboards
On laptop keyboards, the Print Screen key is commonly located on the Function Key row (F1-F12). You might need to press the Fn key in combination with the appropriate Function key (often F10 or F11) to activate the Print Screen function. Some laptops may label it directly as “PrtSc” on one of the Function keys.
2.3 Special Cases
Dell Wireless Keyboard and Mouse combo, model KM3322W, requires pressing the Fn key and the Insert key together to take a screenshot due to the absence of a dedicated Print Screen button. Some laptop keyboards might not have a separate Print Screen key. In this case, you can perform the Print Screen function by pressing and holding down the Fn + Insert keys together. For laptops with capacitive (illuminated) Function Key rows, press the Fn key to switch between the functions of the keys to locate the Print Screen key.
2.4 Illustration
Dell Precision 5550 mobile workstation keyboard
 Dell Precision 5550 mobile workstation keyboard
3. How Do I Take a Screenshot on Windows 10 and 11 Using the Print Screen Key?
Taking a screenshot on Windows 10 and 11 using the Print Screen key is a straightforward process, but there are several options depending on what you want to capture.
3.1 Capturing the Entire Screen
To capture the entire screen on Windows 10 and 11:
- Press the Windows Key + PrtSc Key: Simultaneously press the Windows logo key and the PrtSc key. On tablets, press the Windows logo button and the volume down button together.
- Locate the Screenshot: The screenshot is automatically saved in the Screenshots folder, which is located inside the Pictures folder in your user directory.
3.2 Capturing All Active Windows
To capture all active windows:
- Press the PrtSc Key: Simply press the PrtSc key. This captures the entire screen and copies it to the clipboard.
- Paste into an Image Editor: Open an image editor like Microsoft Paint or Photoshop.
- Paste the Screenshot: Press Ctrl + V to paste the screenshot into the image editor.
- Save the Image: Save the image to your desired location.
3.3 Capturing a Single Active Window
To capture only the currently active window:
- Select the Window: Click on the window you want to capture to make it the active window.
- Press Alt + PrtSc Keys: Press the Alt key and the PrtSc key together. This captures only the active window and copies it to the clipboard.
- Paste into an Image Editor: Open an image editor.
- Paste the Screenshot: Press Ctrl + V to paste the screenshot into the image editor.
- Save the Image: Save the image to your desired location.
Understanding these methods allows you to efficiently capture and save screenshots on your Dell laptop.
4. How Can I Paste and Edit a Screenshot on My Dell Laptop?
After capturing a screenshot using the Print Screen key, you’ll need to paste it into an application to use or edit it. Here’s how you can do that:
4.1 Using Microsoft Paint
Microsoft Paint is a basic but useful image editor that comes pre-installed on Windows. Here’s how to use it to paste and edit your screenshot:
- Open Microsoft Paint: Search for “Paint” in the Windows search bar and open the application.
- Paste the Screenshot: Press Ctrl + V to paste the screenshot into Paint.
- Edit the Screenshot: Use the tools in Paint to crop, resize, add text, or make other necessary edits.
- Save the Edited Image: Click “File” > “Save As,” choose a file format (such as JPEG or PNG), and save the image to your desired location.
Microsoft Paint is suitable for simple edits and quick annotations.
4.2 Using Adobe Photoshop
For more advanced editing, Adobe Photoshop is a powerful tool. Here’s how to use it to paste and edit your screenshot:
- Open Adobe Photoshop: Launch the Photoshop application.
- Create a New Document: Click “File” > “New.” Photoshop may automatically detect the size of the screenshot in your clipboard and suggest a new document size. If not, manually enter the dimensions.
- Paste the Screenshot: Press Ctrl + V to paste the screenshot into the new document.
- Edit the Screenshot: Use Photoshop’s extensive tools to make detailed edits, adjustments, and enhancements.
- Save the Edited Image: Click “File” > “Save As,” choose a file format, and save the image.
Photoshop offers advanced features for professional-level editing, including layers, filters, and color correction.
4.3 Using GIMP (GNU Image Manipulation Program)
GIMP is a free and open-source image editor that provides many of the features found in Photoshop. Here’s how to use it to paste and edit your screenshot:
- Open GIMP: Launch the GIMP application.
- Create a New Image: Click “File” > “Create” > “From Clipboard.” GIMP will automatically create a new image based on the screenshot in your clipboard.
- Edit the Screenshot: Use GIMP’s tools to edit the image, including cropping, resizing, adding layers, and applying filters.
- Save the Edited Image: Click “File” > “Export As,” choose a file format, and save the image to your desired location.
GIMP is a great alternative to Photoshop for users who need advanced editing capabilities without the cost.
4.4 Using Online Image Editors
There are also several online image editors that you can use to paste and edit your screenshots without installing any software:
- Open an Online Image Editor: Popular options include Pixlr, Canva, and Fotor.
- Create a New Image: Most online editors allow you to create a new image from your clipboard. Look for an option like “Create from Clipboard” or “Paste Image.”
- Paste the Screenshot: Follow the editor’s instructions to paste the screenshot into the new image.
- Edit the Screenshot: Use the online editor’s tools to make edits and enhancements.
- Save the Edited Image: Save the edited image to your computer.
Online image editors are convenient for quick edits and are accessible from any device with an internet connection. For further guidance on image editing techniques, explore the tutorials and resources at dfphoto.net.
5. What Is the Windows Snipping Tool and How Do I Use It on My Dell Laptop?
The Windows Snipping Tool is a built-in utility for taking screenshots with more control than the Print Screen key. It allows you to capture specific parts of your screen, making it a versatile tool for various tasks.
5.1 Opening the Snipping Tool
There are several ways to open the Snipping Tool on your Dell laptop:
- Search in the Windows Search Bar: Type “Snipping Tool” in the Windows search bar and click on the application when it appears.
- Use the Run Command: Press the Windows key + R to open the Run dialog box, type “snippingtool,” and press Enter.
5.2 Understanding the Snipping Tool Interface
The Snipping Tool interface is simple and intuitive. Here are the main components:
- New: Starts a new snip.
- Mode: Allows you to choose the type of snip you want to take (Free-form, Rectangular, Window, or Full-screen).
- Delay: Sets a delay in seconds before the snip is taken, useful for capturing pop-up menus or animations.
- Options: Opens the Snipping Tool settings, where you can customize various aspects such as the color of the border around the snip.
- Cancel: Cancels the current snip.
5.3 Different Snip Modes
The Snipping Tool offers four different snip modes:
- Free-form Snip: Allows you to draw a freeform shape around the area you want to capture.
- Rectangular Snip: Lets you drag a rectangle around the area you want to capture.
- Window Snip: Captures a specific window that you select.
- Full-screen Snip: Captures the entire screen.
5.4 Taking a Snip
Here’s how to take a snip using the Snipping Tool:
- Open the Snipping Tool: Launch the Snipping Tool using one of the methods described above.
- Choose a Snip Mode: Select the desired snip mode from the “Mode” dropdown menu.
- Start the Snip:
- For Free-form and Rectangular Snips: Click and drag your mouse around the area you want to capture.
- For Window Snip: Click on the window you want to capture.
- For Full-screen Snip: The entire screen will be captured automatically.
- Edit the Snip (Optional): After taking the snip, it will open in the Snipping Tool window, where you can use the pen, highlighter, and eraser tools to make annotations.
- Save the Snip: Click the “Save” icon (a floppy disk) to save the snip to your desired location.
5.5 Using the Snipping Tool with a Delay
The delay feature is useful for capturing screenshots of actions that are difficult to time, such as opening a context menu. Here’s how to use it:
- Open the Snipping Tool: Launch the Snipping Tool.
- Set a Delay: Choose a delay time (e.g., 5 seconds) from the “Delay” dropdown menu.
- Start the Snip: Click “New.”
- Perform the Action: Within the specified delay time, perform the action you want to capture (e.g., open a menu).
- Capture the Snip: The Snipping Tool will automatically capture the screen after the delay.
5.6 Saving and Sharing Snips
After taking a snip, you can save it in various formats such as PNG, JPEG, or GIF. You can also copy the snip to your clipboard and paste it into other applications, such as email or documents. To share a snip directly, you can use the “Send Snip” button (an envelope icon) to email it.
The Snipping Tool is a valuable utility for capturing and sharing screenshots on your Dell laptop, offering more flexibility and control than the Print Screen key alone.
6. How Do I Use the Webcam on My Dell Laptop to Take Photos?
Using the webcam on your Dell laptop is a convenient way to take photos, especially for quick snapshots or video calls. Here’s how to use it effectively:
6.1 Opening the Camera Application
The primary way to access your webcam is through the built-in Camera application in Windows:
- Search for the Camera App: Type “Camera” in the Windows search bar and click on the “Camera” app when it appears.
- Access from the Start Menu: Alternatively, you can find the Camera app in the Start Menu under the list of installed applications.
6.2 Adjusting Camera Settings
Before taking a photo, you may want to adjust the camera settings for optimal results:
- Access Settings: Within the Camera app, look for a settings icon (usually a gear or three dots). Click on it to open the settings menu.
- Adjust Video and Photo Quality: You can typically adjust the resolution and quality settings for both video and photos. Higher resolutions result in better image quality but may take up more storage space.
- Enable HDR (if available): If your webcam supports High Dynamic Range (HDR), enabling it can improve the dynamic range of your photos, capturing more detail in both bright and dark areas.
- Adjust Brightness and Contrast: Some Camera apps allow you to adjust brightness and contrast to improve the overall appearance of your photos.
- Enable Grid Lines: Turning on grid lines can help you compose your shots according to the rule of thirds, making your photos more visually appealing.
6.3 Taking a Photo
Once you have adjusted the settings, you can take a photo:
- Switch to Photo Mode: If the Camera app opens in video mode, look for a button or switch to change to photo mode.
- Frame Your Shot: Position yourself or your subject in front of the webcam, adjusting the angle and zoom as needed.
- Capture the Photo: Click the photo button (usually a camera icon) to take your picture.
- Review the Photo: The photo will be displayed for review. You can usually access it from within the Camera app or in the default save location (typically the Pictures folder).
6.4 Using Keyboard Shortcuts
Some Dell laptops may have keyboard shortcuts for quickly accessing the Camera app or taking photos:
- Check Function Keys: Look for a camera icon on one of the Function keys (F1-F12). Pressing the Fn key in combination with this Function key may open the Camera app or take a photo.
- Use the Windows Key + PrtSc Key: As mentioned earlier, pressing the Windows logo key and the PrtSc key together will take a screenshot of the entire screen, which can be useful if you want to quickly capture an image from the webcam preview.
6.5 Improving Webcam Photo Quality
Here are some tips for improving the quality of photos taken with your Dell laptop’s webcam:
- Ensure Good Lighting: Proper lighting is crucial for good photo quality. Try to take photos in a well-lit environment or use an external light source to illuminate your subject.
- Clean the Webcam Lens: Use a soft, lint-free cloth to gently clean the webcam lens. Dust and smudges can significantly reduce image quality.
- Adjust Your Position: Position yourself or your subject so that the webcam is at eye level. This can help you avoid unflattering angles.
- Use a Background: Choose a clean and uncluttered background to avoid distractions in your photos.
- Stay Still: Minimize movement while taking a photo to avoid blur.
6.6 Third-Party Webcam Software
If you want more advanced features or control over your webcam, you can use third-party webcam software:
- ManyCam: A popular choice that allows you to add effects, overlays, and virtual backgrounds to your webcam feed.
- CyberLink YouCam: Offers a range of features including facial beautification, augmented reality effects, and surveillance mode.
- OBS Studio: A free and open-source software commonly used for live streaming and recording, but it can also be used to capture high-quality photos and videos with your webcam.
Using the webcam on your Dell laptop is a simple and convenient way to take photos. By adjusting the camera settings, improving lighting, and using third-party software, you can significantly enhance the quality of your webcam photos. For inspiration and tips on photo composition, visit dfphoto.net.
7. How Can I Connect an External Camera to My Dell Laptop for Better Photo Quality?
Connecting an external camera to your Dell laptop can significantly improve the quality of your photos, especially if you are serious about photography or need high-resolution images.
7.1 Types of External Cameras
There are several types of external cameras you can connect to your Dell laptop:
- Digital Cameras: Including DSLRs, mirrorless cameras, and advanced compact cameras.
- Webcams: High-quality external webcams designed for better video conferencing and streaming.
- Document Cameras: Specialized cameras for capturing documents and objects in detail.
7.2 Connection Methods
The most common way to connect an external camera to your Dell laptop is via USB:
- USB Connection:
- Connect the Camera: Use a USB cable to connect your camera to one of the USB ports on your Dell laptop. Most digital cameras use a Mini-USB or USB-C port.
- Install Drivers (if needed): Windows will usually detect the camera automatically and install the necessary drivers. If not, you may need to install drivers from the camera manufacturer’s website.
- Turn on the Camera: Power on your camera and set it to the appropriate mode (usually “PC Connection” or “USB Transfer”).
- Access the Camera: You can access the camera through the File Explorer or by using the camera manufacturer’s software.
7.3 Using Camera Software
Once the camera is connected, you can use the camera software to control it and capture photos:
- Camera Manufacturer’s Software: Most camera manufacturers provide software for controlling their cameras from a computer. Examples include Canon EOS Utility, Nikon Camera Control Pro, and Sony Imaging Edge.
- Install the Software: Install the software from the CD that came with your camera or download it from the manufacturer’s website.
- Launch the Software: Open the software and connect your camera.
- Control the Camera: Use the software to adjust camera settings such as aperture, shutter speed, ISO, and white balance.
- Capture Photos: Use the software to take photos, which will be saved directly to your laptop.
- Third-Party Software: Alternatively, you can use third-party software to control your camera:
- Adobe Lightroom: A popular choice for photographers, offering advanced camera control and photo editing features.
- Capture One: Another professional photo editing software with excellent camera control capabilities.
- digiCamControl: A free and open-source software that supports a wide range of cameras.
7.4 Adjusting Camera Settings for Optimal Quality
To get the best possible photo quality from your external camera, adjust the following settings:
- Resolution: Set the camera to its highest resolution for maximum detail.
- ISO: Keep the ISO as low as possible (usually ISO 100 or 200) to minimize noise.
- Aperture: Adjust the aperture to control the depth of field. A wider aperture (e.g., f/2.8) will create a shallow depth of field, blurring the background, while a narrower aperture (e.g., f/8) will create a larger depth of field, keeping more of the image in focus.
- Shutter Speed: Adjust the shutter speed to control the amount of light that enters the camera. Faster shutter speeds are useful for capturing moving subjects, while slower shutter speeds can be used to create motion blur.
- White Balance: Set the white balance to match the lighting conditions. You can choose from presets such as “Daylight,” “Cloudy,” “Fluorescent,” or “Tungsten,” or use a custom white balance setting.
- File Format: Save your photos in RAW format for maximum flexibility in post-processing. RAW files contain all the data captured by the camera sensor, allowing you to make extensive adjustments without losing image quality.
7.5 Troubleshooting Connection Issues
If you encounter problems connecting your external camera to your Dell laptop, try the following troubleshooting steps:
- Check the USB Connection: Ensure that the USB cable is securely connected to both the camera and the laptop. Try using a different USB port.
- Install or Update Drivers: Make sure that the camera drivers are properly installed and up to date. You can download the latest drivers from the camera manufacturer’s website.
- Restart the Camera and Laptop: Sometimes, simply restarting the camera and laptop can resolve connection issues.
- Check Camera Settings: Verify that the camera is set to the correct mode for PC connection or USB transfer.
- Test with a Different USB Cable: The USB cable may be faulty. Try using a different USB cable to see if that resolves the issue.
Connecting an external camera to your Dell laptop is a great way to capture high-quality photos. By using the camera manufacturer’s software or third-party applications, adjusting the camera settings, and troubleshooting connection issues, you can get the best possible results. For inspiration and tips on using external cameras, explore the resources at dfphoto.net.
8. What Photo Editing Software Is Compatible With My Dell Laptop?
There are numerous photo editing software options compatible with your Dell laptop, ranging from free and basic tools to professional-grade applications.
8.1 Free Photo Editing Software
These options are great for users who need basic editing capabilities without the cost:
- Microsoft Photos: Included with Windows, Microsoft Photos offers basic editing features such as cropping, rotating, adjusting exposure, and applying filters.
- Pros: Easy to use, pre-installed on Windows.
- Cons: Limited features compared to more advanced software.
- GIMP (GNU Image Manipulation Program): A free and open-source image editor that provides many of the features found in Adobe Photoshop.
- Pros: Powerful, feature-rich, free.
- Cons: Steeper learning curve than simpler editors.
- Paint.NET: A simple and intuitive image editor with a range of features including layers, filters, and special effects.
- Pros: Easy to learn, good balance of features and simplicity.
- Cons: Not as advanced as GIMP or Photoshop.
- Fotor: A user-friendly photo editor with a range of editing tools and effects, as well as collage and design features.
- Pros: Intuitive interface, wide range of features.
- Cons: Contains ads, some features require a paid subscription.
8.2 Professional Photo Editing Software
These applications are designed for professional photographers and offer advanced editing capabilities:
- Adobe Photoshop: The industry standard for photo editing, offering a vast array of tools and features for retouching, compositing, and creating digital art.
- Pros: Most powerful and versatile photo editor, industry standard.
- Cons: Expensive, requires a subscription.
- Adobe Lightroom: Designed for photographers, Lightroom focuses on photo organization, batch processing, and non-destructive editing.
- Pros: Excellent organization tools, non-destructive editing, streamlined workflow.
- Cons: Requires a subscription, not as versatile as Photoshop for complex editing tasks.
- Capture One: A professional photo editing software known for its excellent RAW processing capabilities and advanced color editing tools.
- Pros: Superior RAW processing, advanced color editing, tethered shooting.
- Cons: Expensive, steeper learning curve than Lightroom.
- Affinity Photo: A powerful and affordable alternative to Photoshop, offering a range of professional-grade editing tools and features.
- Pros: Affordable, powerful, no subscription required.
- Cons: Not as widely used as Photoshop, so fewer tutorials and resources are available.
8.3 Online Photo Editors
These web-based applications allow you to edit photos directly in your browser:
- Pixlr E: A powerful online photo editor that offers many of the features found in desktop software like Photoshop.
- Pros: Feature-rich, similar to Photoshop, accessible from any device.
- Cons: Requires a stable internet connection, contains ads.
- Canva: A user-friendly design tool that includes photo editing features, as well as templates for creating social media graphics, presentations, and more.
- Pros: Easy to use, wide range of templates, good for social media graphics.
- Cons: Limited photo editing capabilities compared to dedicated photo editors.
- Photopea: A free online photo editor that closely resembles Photoshop, offering a similar interface and set of features.
- Pros: Free, similar to Photoshop, no installation required.
- Cons: Contains ads, requires a stable internet connection.
8.4 Choosing the Right Photo Editing Software
When choosing photo editing software for your Dell laptop, consider the following factors:
- Your Skill Level: If you are a beginner, start with a simple and user-friendly editor like Microsoft Photos, Paint.NET, or Fotor. If you are an experienced photographer, consider a professional-grade application like Photoshop, Lightroom, or Capture One.
- Your Budget: Free software like GIMP, Paint.NET, and Photopea are great options if you have a limited budget. If you are willing to pay, consider a subscription to Adobe Creative Cloud or a one-time purchase of Affinity Photo.
- Your Needs: Consider the types of editing tasks you will be performing. If you need basic adjustments and quick enhancements, a simple editor may suffice. If you need advanced retouching, compositing, or color correction, you will need a more powerful application.
- Your Workflow: Choose software that integrates well with your existing workflow. If you use other Adobe products, Lightroom and Photoshop may be a good choice. If you prefer a standalone application, consider Capture One or Affinity Photo.
There are many photo editing software options available for your Dell laptop, each with its own strengths and weaknesses. By considering your skill level, budget, needs, and workflow, you can choose the right software to help you achieve your photo editing goals. For tutorials and inspiration on photo editing techniques, visit dfphoto.net.
9. How Do I Optimize My Dell Laptop’s Camera Settings for Taking Photos?
Optimizing your Dell laptop’s camera settings can significantly improve the quality of your photos, whether you’re using the built-in webcam or an external camera. Here’s how to do it:
9.1 Adjusting Webcam Settings
For the built-in webcam, you can adjust the settings through the Camera app or the device manager.
- Through the Camera App:
- Open the Camera App: Launch the Camera app from the Start menu or by searching for it.
- Access Settings: Look for a gear icon or three dots within the app to access the settings menu.
- Adjust Video and Photo Quality: Set the resolution and quality settings to the highest available option for better image clarity.
- Enable HDR (if available): If your webcam supports HDR, enable it to improve the dynamic range of your photos.
- Adjust Brightness and Contrast: Fine-tune these settings to optimize the appearance of your photos in different lighting conditions.
- Enable Grid Lines: Use grid lines to help you compose your shots according to the rule of thirds.
- Through Device Manager:
- Open Device Manager: Right-click on the Start button and select “Device Manager.”
- Locate Your Webcam: Expand the “Cameras” or “Imaging devices” category to find your webcam.
- Access Properties: Right-click on your webcam and select “Properties.”
- Adjust Driver Settings: Go to the “Driver” tab and make sure the driver is up to date. You can also try uninstalling and reinstalling the driver to resolve any issues.
9.2 Optimizing External Camera Settings
For external cameras, you can adjust the settings through the camera’s software or the operating system.
- Using Camera Software:
- Install Camera Software: Install the software that came with your camera or download it from the manufacturer’s website.
- Connect Your Camera: Connect your camera to your Dell laptop via USB.
- Launch the Software: Open the camera software and adjust the following settings:
- Resolution: Set the resolution to the highest available option for maximum detail.
- ISO: Keep the ISO as low as possible (usually ISO 100 or 200) to minimize noise.
- Aperture: Adjust the aperture to control the depth of field. A wider aperture (e.g., f/2.8) will create a shallow depth of field, blurring the background, while a narrower aperture (e.g., f/8) will create a larger depth of field, keeping more of the image in focus.
- Shutter Speed: Adjust the shutter speed to control the amount of light that enters the camera. Faster shutter speeds are useful for capturing moving subjects, while slower shutter speeds can be used to create motion blur.
- White Balance: Set the white balance to match the lighting conditions. You can choose from presets such as “Daylight,” “Cloudy,” “Fluorescent,” or “Tungsten,” or use a custom white balance setting.
- File Format: Save your photos in RAW format for maximum flexibility in post-processing.
- Adjusting Display Settings:
- Open Display Settings: Right-click on the desktop and select “Display settings.”
- Adjust Brightness and Contrast: Fine-tune these settings to optimize the appearance of your photos on your laptop screen.
- Calibrate Display Color: Use the built-in color calibration tool to ensure accurate color reproduction.
9.3 Improving Lighting Conditions
Proper lighting is crucial for good photo quality. Here are some tips for improving lighting conditions:
- Use Natural Light: Take photos in natural light whenever possible. Position yourself or your subject near a window or outdoors in a shaded area.
- Avoid Direct Sunlight: Direct sunlight can create harsh shadows and overexposed highlights. Avoid taking photos in direct sunlight, especially during midday.
- Use Artificial Lighting: If natural light is not available, use artificial lighting to illuminate your subject. You can use lamps, softboxes, or LED panels to create even and flattering light.
- Avoid Backlighting: Backlighting occurs when the light source is behind your subject, causing them to appear dark. Try to position the light source in front of your subject or use a reflector to bounce light onto them.
9.4 Using Third-Party Software
Third-party software can help you optimize your camera settings and improve photo quality.
- Webcam Settings Software:
- Logitech Capture: If you have a Logitech webcam, use the Logitech Capture software to adjust settings such as exposure, focus, and white balance.
- OBS Studio: A free and open-source software that allows you to control various aspects of your webcam, including resolution, frame rate, and color correction.
- Display Calibration Software:
- Datacolor SpyderX: A hardware and software solution for calibrating your laptop display and ensuring accurate color reproduction.
- X-Rite i1Display: Another popular display calibration tool that helps you optimize your screen settings for photo editing.
By optimizing your Dell laptop’s camera settings, improving lighting conditions, and using third-party software, you can significantly enhance the quality of your photos. For inspiration and tips on photo composition and lighting, visit dfphoto.net.
10. How Can I Transfer Photos From My Camera to My Dell Laptop?
Transferring photos from your camera to your Dell laptop is a crucial step in the photography workflow, allowing you to edit, share, and back up your images.
10.1 Using a USB Cable
The most common method is using a USB cable:
- Connect the Camera: Use a USB cable to connect your camera to one of the USB ports on your Dell laptop. Most digital cameras use a Mini-USB or USB-C port.
- Turn on the Camera: Power on your camera and set it to the appropriate mode (usually “PC Connection” or “USB Transfer”).
- Wait for Detection: Windows will usually detect the camera automatically and display a notification.
- Access the Camera: You can access the camera through the File Explorer:
- Open File Explorer: Click on the File Explorer icon in the taskbar or press the Windows key + E.
- Locate the Camera: Look for the camera under “This PC” or “Devices and drives.” It may be labeled with the camera’s model name or as a removable disk.
- Browse the Files: Double-click on the camera to browse its files and folders. Your photos are typically stored in a folder named “DCIM.”
- Copy the Photos:
- Select the Photos: Select the photos you want to transfer by clicking on them while holding down the Ctrl key.
- Copy the Files: Right-