Taking passport photos might seem like a chore, often involving a trip to a photo booth or pharmacy and hoping for the best. But what if you could skip the hassle and take perfect, compliant passport photos right in the comfort of your own home? The answer is yes, you absolutely can! With a smartphone and a few simple steps, you can become your own passport photographer.
This guide will walk you through everything you need to know about How To Take Passport Photos At Home, ensuring they meet all official requirements and save you time and money. Forget unflattering photo booth experiences – let’s explore the easy way to get your passport pictures done.
Get a guaranteed compliant passport photo in just 3 minutes with PhotoAiD’s passport photo maker.
- Simply upload or snap a photo.
- Let PhotoAiD’s AI expertly check and perfect it.
- A dedicated compliance specialist will verify the result.
- Download instantly or order prints. It’s that simple!
Get your digital passport photo or high-quality prints with PhotoAiD® – your shortcut to perfect passport photos.
Key Benefits of PhotoAiD:
- 100% Acceptance Guarantee: Expert verification ensures compliance.
- 200% Money-Back Guarantee: Double your money back if not accepted.
- 3-Minute Process: Fast and efficient passport photo creation.
- Over 11,000,000 Satisfied Users: Join a community of happy travelers.
“Time was of the essence, and finding a photographer was impossible. PhotoAiD was a lifesaver! A quick selfie upload, and I had a compliant passport photo almost instantly. Even photos for my baby were a breeze!”
John
Excellent Reviews 7,022+ reviews on Trustpilot.
Learn more about hassle-free passport applications.
Understanding the Official Passport Photo Rules
Before you start snapping away, it’s crucial to understand the official guidelines for passport photos. These rules are in place to ensure your photo is accepted and doesn’t cause delays in your passport application. Let’s break down the key US passport photo requirements you need to follow when taking photos at home.
- Size Specifications: Your photo must be a square, measuring 2×2 inches (51×51 mm). Within this square, your head size is critical, measuring between 1 inch and 1.4 inches (25mm and 35mm) from the bottom of your chin to the top of your head.
- Positioning is Key: Face the camera directly, ensuring your head is centered in the frame. Your eyes and the camera lens should be at the same level. Make sure your shoulders are also visible in the shot.
- Facial Expression: A neutral expression is best. While a slight, closed-mouth smile is permitted, it’s safest to relax your facial muscles. Keep your eyes wide open and clearly visible.
- Photo Quality Matters: Aim for a high-quality image that’s sharp, clear, and free from any blur or pixelation. Lighting should be consistent across your face, avoiding shadows.
- Background Requirements: The background must be plain white or off-white, free from patterns, shadows, or any visible objects. A clean, simple backdrop is essential.
- No Digital Alterations: Absolutely no photo editing is allowed. This includes filters, removing blemishes, or altering your appearance in any way, unless done by a professional service like PhotoAiD.
- White Space Above Head: Ensure there’s a small amount of white space between the top of your head and the upper edge of the photo. This is usually automatically managed during cropping but good to keep in mind.
- Printing Guidelines: If you need printed photos, use high-quality glossy or matte photo paper for the best results.
Beyond these technical aspects, there are also guidelines regarding appearance for passport photos:
- Head Coverings: Head coverings are generally prohibited unless worn daily for religious or medical reasons. Hair accessories should be minimal; if bangs obscure your eyebrows or eyes, use a small bobby pin to keep them out of your face.
- Dress Code for Passport Photos: The passport photo dress code is quite flexible. Avoid white tops (as they can blend with the background), camouflage patterns, and uniforms. Darker, plain clothing is recommended.
- Eyeglasses: Prescription glasses are generally not allowed in current passport photos. Exceptions may be made for documented medical conditions, requiring a signed doctor’s note.
- Makeup: Makeup is permitted as long as it doesn’t distort your natural appearance. Avoid heavy makeup like contouring, false eyelashes, or dramatic smoky eyes. Steer clear of shimmery or glossy products that can cause light reflection and unwanted effects.
- Hairstyle: Passport photo hair is unrestricted as long as your face, including eyebrows and eyes, is fully visible.
- Jewelry: Discreet jewelry like earrings and necklaces is acceptable. However, avoid bulky or reflective jewelry that could cause glare or obscure your features. Simple, understated pieces are best.
Thinking it sounds complicated? It’s simpler than it seems! While the rules might appear extensive, taking a compliant passport photo at home is very achievable, especially with the right guidance and tools like PhotoAiD. Let’s get into the step-by-step process.
4 Easy Steps: How to Take a Passport-Size Photo at Home
Let’s break down the process into four manageable steps to show you just how easy it is to take your own passport photo at home.
Step 1: Prepare Yourself for the Photo Shoot
No need for mental preparation for an “ugly passport photo” fear! Getting ready is straightforward. Here’s a quick checklist to ensure you’re perfectly prepped:
- Clothing Choice: Wear plain, dark-colored clothing. This helps you stand out against the white background and keeps the focus on your face.
- Makeup Application: Keep makeup simple and natural. Avoid glossy finishes, heavy contouring, or fake lashes. The goal is to look like you, on a typical day.
- Head Accessories: Remove any headbands, decorative hair clips, or other head accessories unless they are for religious or medical reasons.
- Hair Styling: Keep hair away from your face. Tie it back or tuck it behind your ears to ensure your face is fully visible.
- Glasses Removal: Take off your eyeglasses unless you have a medical exemption and can provide documentation.
- Jewelry Check: Remove bulky or flashy jewelry that might cause glare or be distracting. Simple, minimal jewelry is generally fine.
Once you’ve ticked off everything on this list, you’re ready to set up your camera.
Step 2: Camera Setup for Passport Photos
Most smartphone cameras today are more than capable of taking passport-quality photos. Let’s ensure your camera settings are optimized.
For iOS Devices:
- Go to Settings → Camera → Formats.
- Under “Camera Capture,” select “Most Compatible” to ensure image compatibility.
- In “Photo Capture,” choose the highest photo mode available for maximum resolution.
For Android Devices:
- Open your Camera app and find the settings.
- Look for resolution settings (often symbolized by a gear icon).
- Select the highest resolution option available. On Samsung Galaxy devices, you might find resolution options at the top of the screen.
Front vs. Rear Camera?
While rear cameras generally offer higher resolution, modern front cameras are often excellent too. For instance, the iPhone 15’s front camera boasts 12MP, which is more than sufficient for a DIY passport photo. The key is good lighting and stability, not necessarily the highest-end camera.
Important: Avoid Camera Filters and Editing
Resist the urge to adjust exposure, saturation, or use any filters. Passport photos must be completely unedited to accurately represent your natural appearance.
Step 3: Taking the Photo – Lighting and Position are Key
Forget professional studio setups! You can achieve excellent passport photos at home with natural daylight and a stable setup. Here’s how:
- Optimal Lighting: Natural light is your best friend. Take your photo during daylight hours, ideally between 9 am and 1 pm for soft, even lighting.
- Camera Stabilization: Place your phone on a stable surface like a window sill or a table to prevent blur. Use a stack of books or a tripod if you have one to keep it steady and at eye level.
- Your Position: Sit on a chair or bed edge facing the light source (window). Ensure the camera lens is level with your eyes.
- Posture and Expression: Straighten your shoulders and look directly at the camera. A gentle, closed-mouth smile is acceptable, or maintain a neutral expression.
- Timer or Burst Mode: Set a timer for about 10 seconds to give yourself time to get into position and relax. Alternatively, use burst mode to take multiple shots quickly, increasing your chances of capturing the perfect photo.
Taking Photos with Assistance: If someone is helping you, have them stand facing the window at about a 30-degree angle to you. This prevents them from casting shadows on your face in the photo.
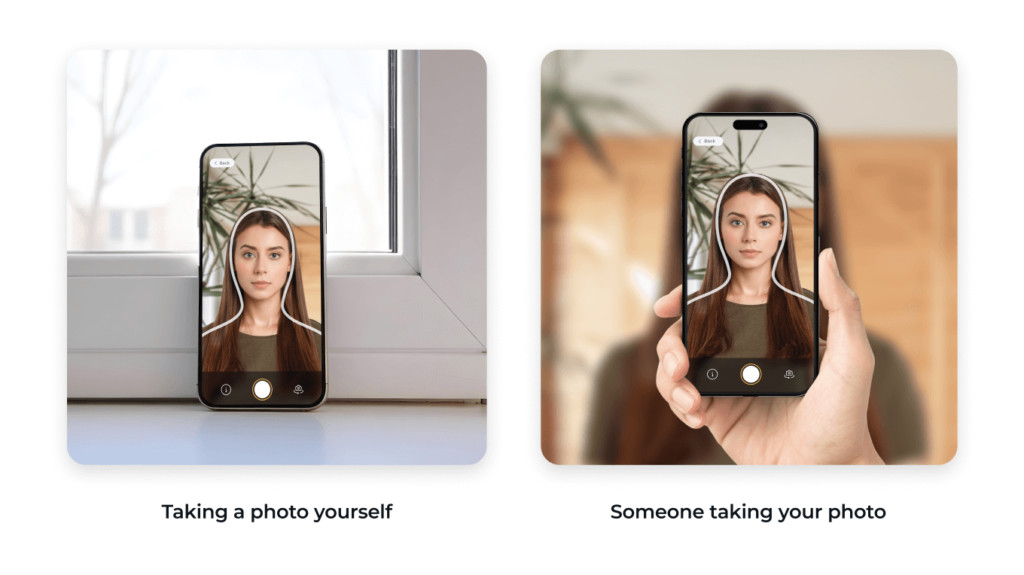 Taking a passport photo alone (stabilized camera) and with someone’s help (standing by a window)
Quick Upload Option: Many online passport photo services, like PhotoAiD, allow you to upload an existing image if you’ve already taken a suitable photo.
Step 4: Editing and Ensuring Compliance
Now that you have your photo, the final step is to ensure it meets all passport photo requirements. This involves cropping to the correct 2×2 inch size, verifying head dimensions and white space, and removing the background if necessary.
DIY Editing (With Caution):
You can try to edit the photo yourself using free online tools like PhotoAiD’s free photo cropper and background remover. However, be aware that free tools may not guarantee full compliance with official standards.
The Guaranteed Solution: Professional Passport Photo Services
For peace of mind and guaranteed acceptance, using a professional service like PhotoAiD® app for iOS or PhotoAiD® for Android is highly recommended. Here’s how PhotoAiD ensures your success:
- AI-Powered Compliance Check: Advanced AI technology automatically adjusts your photo to meet technical specifications – size, head measurements, background, and spacing.
- Expert Human Review: A real photo expert manually reviews your image against all official US passport photo requirements, providing a level of assurance that AI alone can’t offer.
- Fast and Convenient Delivery: Receive your digital passport photo instantly via email, along with a free printable template for 4×6-inch paper. Printed photos can also be ordered and are typically delivered within 2-3 business days.
- Acceptance Guarantee and Refund: In the rare event your photo is rejected, PhotoAiD offers a 200% refund and will assist you in taking a new, compliant photo.
Top 10 Don’ts for Home Passport Photos: Avoid These Mistakes
Knowing what not to do is just as important as knowing what to do. PhotoAiD researchers analyzed over 10,000 user photos to pinpoint the most frequent reasons for ID photo rejection. Here are the top 10 pitfalls to avoid when taking passport pictures at home:
- Poor Torso Visibility (33.5% Rejection Rate): Photos are too zoomed in, cutting off the upper shoulders. Ensure your upper shoulders are visible in the frame.
- Mouth Open (21.3% Rejection Rate): The mouth isn’t fully closed. Keep your mouth closed for a neutral expression.
- Uneven Lighting (14.7% Rejection Rate): Inconsistent lighting across the face. Ensure even lighting to avoid shadows.
- Low Resolution (13.2% Rejection Rate): Grainy or pixelated photos. Use high-resolution settings on your camera.
- Face Shadows (10.6% Rejection Rate): Shadows obscuring facial features. Optimize lighting to eliminate shadows.
- Insufficient Lighting (9.4% Rejection Rate): Crucial facial features are not clearly visible due to poor lighting. Ensure adequate lighting to illuminate your face.
- Blur (8.3% Rejection Rate): Out-of-focus pictures. Stabilize your camera and ensure proper focus.
- Side Lighting Imbalance (7.4% Rejection Rate): One side of the face is significantly brighter than the other. Aim for balanced, frontal lighting.
- Photo of a Photo (5.4% Rejection Rate): Submitting a picture of a physical photo instead of a digital copy. Always submit a digital image.
- Unnatural Facial Expression (4.3% Rejection Rate): Broad smiles or unnatural expressions that distort facial features. Maintain a neutral or slightly relaxed expression.
Avoid these common mistakes, and you’ll be well on your way to a successful DIY passport photo. For visual examples and further guidance, check out PhotoAiD’s ultimate guide with passport photo examples.
Taking Baby Passport Photos at Home: Tips for Success
Taking passport photos of babies, especially newborns, can seem daunting. However, home is often the most comfortable and stress-free environment for infants. Here’s how to take perfect baby passport photos at home.
Baby Positioning for Passport Photos
Babies must be the only subject in the photo – you cannot hold them. For infants who can’t sit up yet, here are a few options:
- Car Seat Method: Place a plain white sheet or blanket over a car seat and position your baby in it.
- Laying Down Method: Lay your baby on a white blanket on the floor and take the photo from directly above.
- Head Support Tip: Use a rolled-up white blanket or towel under the baby’s neck to help keep their head straight and in position.
Baby Facial Expression
Neutral expressions are ideal, but officials understand this is challenging with infants. Babies are allowed to have slightly open eyes or even grimace. Crying, however, is generally not acceptable.
Tips to Get Your Baby’s Attention:
- Toy Distraction: Hold a favorite toy above your phone to capture their attention and encourage them to look forward. It’s okay if their mouth is slightly open in curiosity.
- Background Sounds: Playing a soft cartoon sound in the background can also help direct their gaze. Angle the camera to get a clear, front-facing shot.
Avoid making funny faces or loud noises that might make the baby laugh or cry. The goal is a clear, forward-facing shot, even if it’s not perfectly posed.
 Taking an infant’s passport photo at home in three steps with PhotoAiD’s app.
DIY Passport Photos: Absolutely Achievable
Taking your own passport photo at home is not just possible, it’s often the most convenient, reliable, and stress-free option, especially for families and individuals with mobility challenges. All you need is your smartphone and a few minutes of your time.
The biggest advantages include convenience, cost-effectiveness, and control over the outcome. You avoid travel, waiting times, and can retake photos as needed until you’re satisfied.
Don’t just take our word for it. Read these Trustpilot reviews from real users who found home passport photos with PhotoAiD to be a game-changer:
“So convenient, especially for newborn photos! Doing it at home made life so much easier. PhotoAiD did all the hard work, and all I had to do was supply a photo from my end.” — Vie (AU)
“I am very pleased with PhotoAid’s service. The process was simple, and the photo checking service was so helpful. Being disabled, doing this from home was a huge benefit. Thank you!” — Gill Harvey (GB)
“Quick and easy! Able to take and print passport photos in the comfort of my home. This is the 3rd time using (for various family members), and it works perfectly each time.” — Tyra Ivy (US)
Frequently Asked Questions (FAQ)
Is a phone photo acceptable for a passport?
Yes, absolutely. Smartphones with cameras of 5 megapixels or higher are perfectly capable of taking passport-sized photos at home. Just ensure you adhere to all official passport photo guidelines.
Can I use a passport photo app?
Yes, using a passport photo app like PhotoAiD® for iOS or PhotoAiD® for Android simplifies the process. Photos created with PhotoAiD come with a 100% acceptance guarantee and a 200% refund if rejected.
Can I submit a passport photo that I took myself?
While selfies are not permitted, taking your own passport photo is acceptable. The key is to follow all passport photo criteria. If you’re unsure about meeting all requirements, PhotoAiD®’s photo experts are available 24/7 to assist you.
Can I print my own passport photo?
Yes, you can easily print passport photos on 4×6-inch paper at home or at local photo print stores like CVS or Walgreens. Use high-quality matte or glossy photo paper for printing.
Is it truly possible to take passport photos at home?
Definitely! You can take your own passport photo at home and use an app to ensure it’s 100% compliant. Here’s how simple it is with PhotoAiD®:
- Take a photo of yourself and upload it to the PhotoAiD app.
- Let the AI automatically remove the background, resize, and crop your image.
- Opt for a manual compliance check by a photo expert.
- Choose between a digital photo or printed copies.
- Download your DIY passport photo or wait for your prints to arrive.
Sources:
Sylwia Green
Sylwia is a seasoned writer specializing in English Studies and a member of SPJ. With nearly three years of experience crafting engaging content for international firms, she expertly blends her passion for writing with her professional career.
