Taking a passport photo with your phone is absolutely achievable, especially with the right guidance. At dfphoto.net, we provide the expertise to help you capture compliant and high-quality images, exploring photography techniques, visual arts, and the convenience of digital photography. Discover how to take a passport photo using your smartphone effortlessly, ensuring your application process is smooth and successful, leveraging mobile photography.
1. What Are The US Passport Photo Requirements?
Understanding US passport photo requirements is crucial for acceptance. According to the U.S. Department of State, your photo must be in color, 2×2 inches (51×51 mm) in size, and taken against a plain white or off-white background. Your facial expression should be neutral, with both eyes open and visible. It is essential to understand these standards to ensure your passport photo meets the necessary criteria, as detailed on dfphoto.net.
1.1 What Are The Key Specifications For Passport Photos?
The key specifications involve several critical elements. These include image size, background color, lighting, and facial expression. Your face should be fully visible, without shadows or glares, and the photo should be recent, typically within the last six months, as noted by the U.S. Department of State. Here is a detailed list:
- Size: 2×2 inches (51×51 mm)
- Color: Must be in color
- Background: Plain white or off-white
- Facial Expression: Neutral expression with both eyes open
- Visibility: Full face visible, without shadows or glares
- Recency: Taken within the last six months
1.2 Why Is Background Color Important?
Background color is critical because it ensures that the focus remains solely on the applicant. A plain white or off-white background eliminates distractions and provides a clear contrast, allowing facial features to be easily discernible. According to passport photo guidelines, any other color or pattern can lead to rejection.
1.3 What Are The Rules For Facial Expression?
The rules for facial expression require a neutral look to ensure accurate identification. Smiling widely, frowning, or making any exaggerated faces are not allowed. The U.S. Department of State emphasizes that a neutral expression helps avoid any ambiguity in facial recognition. A slight, natural smile might be acceptable, but it should not distort your facial features.
1.4 How Does Lighting Affect Passport Photos?
Lighting significantly impacts the quality and acceptability of your passport photo. Proper lighting means ensuring that your face is evenly lit, without shadows or harsh glares. Natural light is often recommended, but avoid direct sunlight, which can cause overexposure. According to photography experts at Santa Fe University of Art and Design’s Photography Department, diffused lighting from a window can work well.
2. What Equipment Do I Need To Take A Passport Photo With My Phone?
To take a passport photo with your phone, you’ll need a few essential tools. These include your smartphone with a decent camera, a stable tripod or stand, a plain white background, and good lighting. Having these items ensures that you can capture a high-quality, compliant photo, which you can then enhance using digital photography techniques detailed on dfphoto.net.
2.1 What Phone Camera Settings Are Ideal?
Ideal phone camera settings involve selecting the right resolution and turning off certain features. Use the highest resolution available to capture detailed images. Disable HDR (High Dynamic Range) mode to avoid over-processing and ensure natural colors. Also, turn off any filters or beauty modes that might alter your appearance.
2.2 Do I Need A Tripod?
Yes, a tripod is highly recommended. A tripod provides stability, which is essential for capturing sharp, clear images. It also allows you to position your phone at the correct height and angle, ensuring that your face is properly aligned in the photo.
2.3 How Important Is A White Background?
A plain white background is crucial for compliance with passport photo requirements. You can use a white wall, a white sheet, or even a large piece of white poster board. Ensure that the background is smooth and free from any patterns or shadows.
2.4 What Are The Best Lighting Options?
The best lighting options include natural and artificial sources. Natural light from a window is ideal, but avoid direct sunlight. If using artificial light, ensure it is soft and diffused to prevent harsh shadows. You might consider using a photography light box or softbox for even lighting.
3. How To Set Up The Perfect Photo Environment?
Setting up the perfect photo environment involves careful planning and attention to detail. This includes finding a well-lit location, preparing your background, and ensuring that your camera is properly positioned. By creating an ideal setting, you increase your chances of capturing a passport photo that meets all the necessary requirements.
3.1 Where Is The Best Location In My Home?
The best location in your home is typically near a window that provides soft, natural light. A room with a white or light-colored wall is also ideal. Avoid areas with strong shadows or direct sunlight. According to professional photographers, the time of day can also affect the quality of light, with early morning or late afternoon light often being the most flattering.
3.2 How To Create A DIY White Background?
Creating a DIY white background is simple and cost-effective. You can use a large white sheet, a roll of white paper, or a piece of white foam board. Hang the sheet or paper on a wall, ensuring it is smooth and wrinkle-free. Alternatively, lean the foam board against a wall.
3.3 How To Optimize Natural Lighting?
Optimizing natural lighting involves positioning yourself correctly in relation to the light source. Stand facing the window, but not directly in front of it, to avoid harsh shadows. Diffuse the light by using a sheer curtain or a white sheet to soften the light. The goal is to achieve even lighting across your face.
3.4 What If I Only Have Artificial Lighting?
If you only have artificial lighting, use soft, diffused lights to avoid harsh shadows. Position two lights on either side of you at a 45-degree angle. This setup provides balanced lighting. Avoid using direct, undiffused light, which can create unflattering shadows.
4. Step-By-Step Guide To Taking The Photo With Your Phone
Taking the photo with your phone involves several key steps to ensure compliance and quality. This includes positioning yourself correctly, adjusting the camera settings, and taking multiple shots. By following this step-by-step guide, you can capture a passport photo that meets all the official requirements.
4.1 How To Position Yourself For The Photo?
Position yourself so that your face is fully visible and centered in the frame. Stand about 2-3 feet away from the background to avoid shadows. Ensure that your shoulders are relaxed and that you are looking directly at the camera.
4.2 What Camera Settings Should I Adjust?
Adjust your camera settings to ensure the best possible image quality. Set the resolution to the highest available. Turn off HDR mode and any filters or beauty modes. If possible, adjust the white balance to match the lighting conditions.
4.3 How Many Photos Should I Take?
Take multiple photos to increase your chances of getting a perfect shot. Experiment with different angles and expressions. Taking at least 5-10 photos allows you to choose the best one.
4.4 What Common Mistakes Should I Avoid?
Avoid common mistakes such as poor lighting, incorrect posing, and using filters. Ensure that your face is fully visible, without shadows or glares. Maintain a neutral expression and avoid tilting your head or looking away from the camera.
 A woman posing naturally for her US passport photo taken with an Android phone, emphasizing a neutral expression and proper lighting
5. How To Edit Your Passport Photo On Your Phone?
Editing your passport photo on your phone involves cropping, resizing, and adjusting the background color if necessary. Use photo editing apps that allow precise adjustments to ensure compliance with passport photo requirements. Proper editing is essential to ensure your photo is accepted.
5.1 Which Apps Are Best For Editing Passport Photos?
Several apps are available for editing passport photos, including PhotoAiD, Passport Photo Maker, and ID Photo. These apps are designed to help you resize, crop, and adjust the background of your photo to meet official requirements. They also offer features such as automatic background removal and compliance checks.
5.2 How To Crop And Resize Your Photo?
Crop and resize your photo to meet the 2×2 inch (51×51 mm) requirement. Use a photo editing app that allows you to specify the dimensions precisely. Ensure that your head is centered and that the correct amount of space is visible above your head and below your chin.
5.3 How To Adjust The Background Color?
Adjust the background color to ensure it is plain white or off-white. If your photo has any patterns or objects in the background, use a background removal tool to eliminate them. Photo editing apps often have features that allow you to replace the background with a solid color.
5.4 How To Ensure The Photo Meets Requirements?
Ensure the photo meets all requirements by using a passport photo app that includes a compliance check feature. These apps automatically analyze your photo and identify any issues, such as incorrect size, background color, or facial expression. Follow the app’s recommendations to correct any problems before submitting your photo.
6. Printing Your Passport Photo
Printing your passport photo can be done at home or at a local store. Ensure that you use high-quality photo paper and that the print size is correct. Proper printing ensures that your photo meets the requirements and is accepted by the authorities.
6.1 Where Can I Print My Passport Photo?
You can print your passport photo at home using a color printer and photo paper, or at a local drugstore, retail store, or photo studio offering printing services. Common options include CVS, Walgreens, and Walmart.
6.2 What Type Of Paper Should I Use?
Use high-quality photo paper with a matte or glossy finish. Ensure that the paper is compatible with your printer and that it produces accurate colors. According to printing experts, using the correct type of paper can significantly improve the quality of your printed photos.
6.3 How To Print Multiple Photos On One Sheet?
To print multiple photos on one sheet, use a passport photo template. These templates are available online and allow you to arrange several copies of your photo on a single 4×6 inch sheet. This is a cost-effective way to print your passport photos.
6.4 What Are The Common Printing Mistakes To Avoid?
Avoid common printing mistakes such as using low-quality paper, printing at the wrong size, and using a printer with poor color accuracy. Ensure that your printer is properly calibrated and that you are using the correct settings. Always print a test sheet to check the quality before printing the final photos.
7. Using Passport Photo Apps For Convenience
Passport photo apps provide a convenient way to take and edit your passport photo using your smartphone. These apps offer features such as automatic resizing, cropping, and background removal, making the process quick and easy. They also often include compliance checks to ensure your photo meets all the requirements.
7.1 What Are The Benefits Of Using A Passport Photo App?
The benefits of using a passport photo app include convenience, speed, and accuracy. These apps allow you to take and edit your photo from anywhere, saving you time and money. They also provide features that ensure compliance with passport photo requirements, reducing the risk of rejection.
7.2 Which Apps Are Most Reliable?
Some of the most reliable passport photo apps include PhotoAiD, ID Photo, and Passport Photo Maker. These apps have received positive reviews and offer a range of features to help you create a compliant passport photo. They also often include customer support to assist you with any questions or issues.
7.3 Are These Apps Free?
While some passport photo apps offer free basic features, most require a fee for full functionality, such as compliance checks and background removal. However, the cost is typically lower than having your photo taken at a professional studio.
7.4 How Do These Apps Ensure Compliance?
These apps ensure compliance by using algorithms and expert reviews to analyze your photo and identify any issues. They check for correct size, background color, facial expression, and other requirements. They also provide guidance on how to correct any problems before submitting your photo.
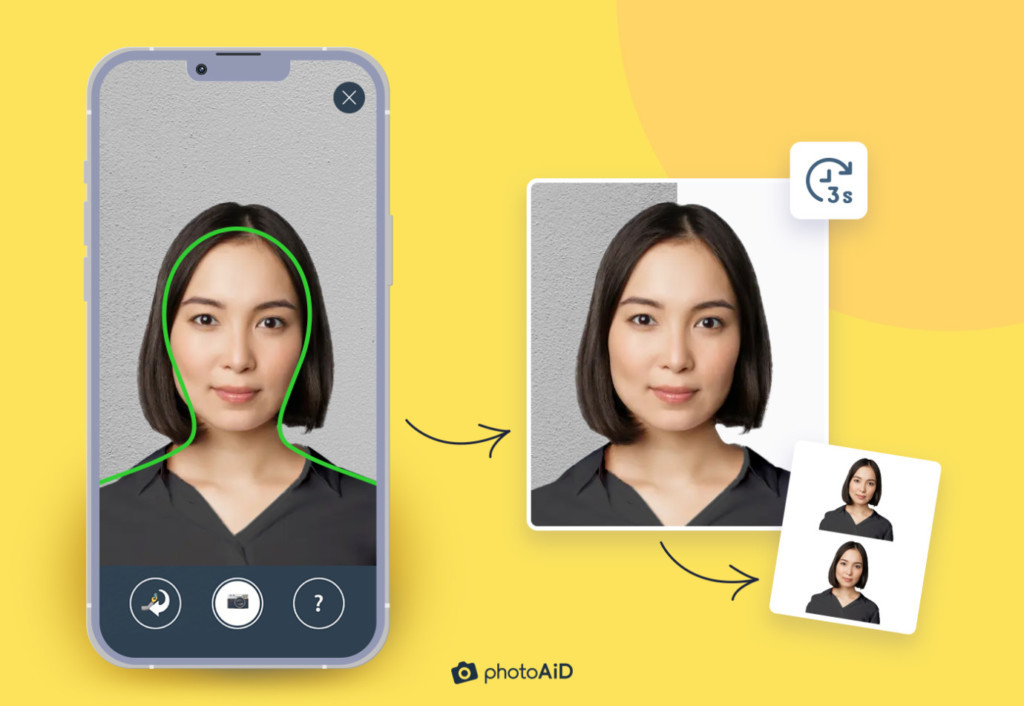 A photo taken with PhotoAiD’s mobile phone app and turned into a valid passport photograph in 3 seconds, showcasing the app's user-friendly interface and compliance features
8. Troubleshooting Common Issues
Troubleshooting common issues when taking a passport photo with your phone is essential to ensure compliance and acceptance. This includes addressing problems with lighting, background, facial expression, and image quality. By identifying and resolving these issues, you can increase your chances of getting a perfect passport photo.
8.1 What If The Lighting Is Too Dark Or Too Bright?
If the lighting is too dark, use additional light sources to brighten your face evenly. If the lighting is too bright, diffuse the light using a sheer curtain or a white sheet. Avoid direct sunlight, which can cause overexposure and harsh shadows.
8.2 How To Fix A Shadowy Background?
To fix a shadowy background, move further away from the background or use additional lights to illuminate the background evenly. Ensure that the background is smooth and free from any wrinkles or patterns.
8.3 What If My Photo Is Blurry?
If your photo is blurry, use a tripod to stabilize your phone and ensure that the camera is focused on your face. Clean the lens of your phone to remove any smudges or dirt. If necessary, increase the resolution of your camera.
8.4 How To Deal With Red Eye?
To deal with red eye, use a photo editing app that includes a red-eye removal tool. These tools automatically detect and correct red eye, ensuring that your eyes appear natural in the photo. Alternatively, avoid using flash photography, which can cause red eye.
9. Alternatives To Taking A Photo With Your Phone
While taking a passport photo with your phone is convenient, there are alternatives to consider. These include professional photography studios, retail stores offering photo services, and mobile passport photo services. Exploring these options can provide a higher level of assurance and quality.
9.1 What Are The Benefits Of Using A Professional Photographer?
The benefits of using a professional photographer include expertise, experience, and high-quality equipment. Professional photographers are familiar with passport photo requirements and can ensure that your photo meets all the official guidelines. They also have access to professional lighting and equipment, resulting in a higher-quality image.
9.2 Where Can I Find A Professional Photographer?
You can find a professional photographer at local photography studios, retail stores offering photo services, and online directories. Check reviews and ratings to ensure that you are choosing a reputable photographer.
9.3 What Are The Costs Involved?
The costs involved in using a professional photographer typically range from $15 to $30 per set of passport photos. While this is more expensive than taking a photo with your phone, it can provide a higher level of assurance and quality.
9.4 Are Mobile Passport Photo Services Available?
Yes, mobile passport photo services are available in some areas. These services send a photographer to your location to take your passport photo. This can be a convenient option if you are unable to visit a photography studio or retail store.
10. Understanding Passport Photo Rejection Reasons
Understanding passport photo rejection reasons is crucial to avoid delays in your application process. Common reasons for rejection include poor lighting, incorrect size, non-compliant background, and improper facial expression. Being aware of these issues helps you take a photo that meets all the requirements.
10.1 What Are The Most Common Rejection Reasons?
The most common rejection reasons for passport photos include:
- Poor lighting: Shadows or glares on the face
- Incorrect size: Photo is not 2×2 inches (51×51 mm)
- Non-compliant background: Background is not plain white or off-white
- Improper facial expression: Smiling, frowning, or making exaggerated faces
- Poor image quality: Photo is blurry or pixelated
10.2 How To Avoid Poor Lighting Issues?
To avoid poor lighting issues, use soft, diffused lighting and ensure that your face is evenly lit. Avoid direct sunlight, which can cause overexposure and harsh shadows. Use additional light sources if necessary to brighten your face.
10.3 How To Ensure The Correct Size?
To ensure the correct size, use a photo editing app that allows you to specify the dimensions precisely. Crop and resize your photo to 2×2 inches (51×51 mm). Ensure that your head is centered and that the correct amount of space is visible above your head and below your chin.
10.4 How To Comply With Background Requirements?
To comply with background requirements, use a plain white or off-white background. Avoid any patterns or objects in the background. If necessary, use a background removal tool to eliminate any distractions.
11. Tips For Specific Age Groups
Taking passport photos for specific age groups, such as infants and seniors, requires special considerations. This includes understanding the unique challenges and providing additional support to ensure compliance and quality.
11.1 How To Take A Baby’s Passport Photo?
Taking a baby’s passport photo requires patience and creativity. Lay the baby on a white sheet or blanket, ensuring that their face is fully visible. Use toys or sounds to get their attention and encourage them to look at the camera. It might be helpful to have another person assist you.
11.2 What Are The Challenges With Infants?
The challenges with infants include getting them to stay still, keeping their eyes open, and ensuring a neutral expression. Be patient and take multiple photos. It is often easier to take the photo when the baby is sleeping or calm.
11.3 How To Assist Seniors?
To assist seniors, provide a comfortable and supportive environment. Ensure that they are seated or standing in a well-lit area and that they are looking directly at the camera. Offer assistance with positioning and posing, if necessary.
11.4 What Considerations For The Elderly?
Considerations for the elderly include ensuring that they are comfortable and relaxed. Avoid using harsh lighting, which can be uncomfortable for sensitive eyes. Offer breaks and assistance as needed.
12. The Future Of Passport Photos
The future of passport photos involves advancements in technology and automation. This includes the use of artificial intelligence (AI) to ensure compliance and improve image quality. As technology evolves, the process of taking and submitting passport photos will become even more convenient and efficient.
12.1 How Will Technology Change Passport Photos?
Technology will change passport photos by automating many of the manual tasks involved in taking and editing photos. AI-powered apps will be able to automatically resize, crop, and adjust the background of your photo to meet official requirements. They will also be able to detect and correct common issues, such as poor lighting and improper facial expression.
12.2 What Role Will AI Play?
AI will play a significant role in ensuring compliance and improving image quality. AI-powered apps will be able to analyze your photo and identify any issues, providing guidance on how to correct them. They will also be able to automatically adjust the photo to meet all the official requirements.
12.3 Will Passport Photos Become Fully Digital?
Yes, passport photos are likely to become fully digital in the future. Many countries already accept digital passport photos, and this trend is expected to continue. Digital passport photos can be submitted online, eliminating the need for printing and mailing physical photos.
12.4 How Will This Affect Convenience?
This will significantly improve convenience by allowing you to take and submit your passport photo from anywhere, at any time. You will no longer need to visit a professional studio or retail store to get your photo taken. The entire process will be streamlined and automated, saving you time and money.
At dfphoto.net, we are committed to providing you with the latest information and resources to help you take the perfect passport photo with your phone. Explore our website to discover more tips, techniques, and tools for capturing high-quality images and enhancing your photography skills.
Address: 1600 St Michael’s Dr, Santa Fe, NM 87505, United States
Phone: +1 (505) 471-6001
Website: dfphoto.net
FAQ: Taking Passport Photos With Your Phone
1. Can I really take a passport photo with my phone?
Yes, you can take a passport photo with your phone, provided you follow all the official requirements for size, background, lighting, and facial expression. Using a smartphone with a good camera and a passport photo app can make the process easier.
2. What if my passport photo gets rejected?
If your passport photo gets rejected, review the rejection reasons and correct any issues with your photo. Common reasons for rejection include poor lighting, incorrect size, non-compliant background, and improper facial expression. Try taking a new photo or using a different editing app.
3. How much does it cost to use a passport photo app?
The cost to use a passport photo app varies, but most apps offer basic features for free and charge a fee for full functionality, such as compliance checks and background removal. The cost is typically lower than having your photo taken at a professional studio.
4. What are the best lighting conditions for a passport photo?
The best lighting conditions for a passport photo are soft, diffused natural light. Avoid direct sunlight, which can cause overexposure and harsh shadows. If using artificial light, ensure it is soft and evenly distributed.
5. What background is required for a US passport photo?
A plain white or off-white background is required for a US passport photo. Avoid any patterns or objects in the background. You can use a white wall, a white sheet, or a piece of white foam board.
6. How should I pose for my passport photo?
You should pose with a neutral expression, looking directly at the camera. Keep your shoulders relaxed and your face fully visible, without shadows or glares. Avoid smiling, frowning, or making any exaggerated faces.
7. Can I wear glasses in my passport photo?
As of November 1, 2016, glasses are no longer allowed in US passport photos, with very few medical exceptions. Ensure you remove your glasses before taking the photo.
8. How do I resize my passport photo on my phone?
You can resize your passport photo on your phone using a photo editing app or a passport photo app. These apps allow you to specify the dimensions precisely and crop your photo to meet the 2×2 inch (51×51 mm) requirement.
9. Is it better to use a professional photographer for my passport photo?
Using a professional photographer can provide a higher level of assurance and quality, as they are familiar with passport photo requirements and have access to professional equipment. However, taking a photo with your phone can be a convenient and cost-effective alternative.
10. What happens if I smile in my passport photo?
A neutral expression is required for a US passport photo. Smiling, frowning, or making exaggerated faces are not allowed. A slight, natural smile might be acceptable, but it should not distort your facial features.
Ready to take the perfect passport photo with your phone? Visit dfphoto.net for more tips, techniques, and tools to help you capture high-quality images and enhance your photography skills. Discover the art of visual storytelling and join our community of photography enthusiasts in the heart of Santa Fe, USA.
