Want to save time and money by taking your own passport photo? Your iPhone is a powerful tool that can help you achieve professional-quality results right from your home. No more expensive photo booths or rushed studio sessions! This comprehensive guide will walk you through every step of how to take a passport photo on your iPhone that meets official requirements and looks great.
Pressed for time and want guaranteed compliance? Try our passport photo app for iPhone and get a perfect ID photo in just a few minutes.
6 Simple Steps to Take a Passport Photo with Your iPhone
Taking passport photos at home with your iPhone is surprisingly easy. It’s just a matter of following a few key steps to ensure your photo is both acceptable and high-quality. Here’s a breakdown of the six essential steps:
- Understand the official passport photo guidelines.
- Optimize your iPhone camera settings for the best results.
- Find the perfect location with ideal lighting.
- Prepare yourself to look your best in the photo.
- Capture the passport photo using your iPhone.
- Edit and finalize your photo for submission.
Let’s dive into each step to ensure you take a passport photo on your iPhone that you can be confident in.
Step 1: Understanding Official Passport Photo Requirements
Before you even pick up your iPhone, it’s crucial to familiarize yourself with the official passport photo requirements. Think of these as the rules of the game – knowing them beforehand will save you time and potential rejection. While specific regulations can vary slightly by country, here are the general UK passport photo requirements that your iPhone photo must adhere to:
| Rule | Description |
|---|---|
| Size | Standard passport photo size is 35mm wide by 45mm tall. |
| Digital Dimensions & File Size | Your digital photo must be at least 600 pixels wide and 750 pixels tall. The file size should be between 50KB and 10MB. |
| Head Size | The measurement from the top of your head (crown) to the bottom of your chin must be between 29mm and 34mm. |
| Background | The background needs to be a plain, light color – ideally cream or light grey. Avoid any patterns, shadows, or distracting objects in the background. |
| Photo Quality | Photos must be in color, sharp, and well-exposed with good lighting and focus. Avoid pixelation, glare, or shadows on your face. Portrait mode or filters are not allowed. |
| Digital Editing | No digital alterations are permitted beyond basic cropping and resizing. You cannot remove red-eye, blemishes, or adjust skin tones. The photo must be a true representation of your appearance. |
| Facial Expression | Maintain a neutral expression with your eyes fully open and your mouth closed. Face the camera directly and avoid smiling or frowning. |
| Photo Composition | The photo should include your full face, head, and upper shoulders. There should be some clear space between the top of your head and the top edge of the photo. |
| Headwear | Head coverings are only allowed for religious or medical reasons. Remove hats, hair accessories, and prescription glasses (unless medically necessary and unavoidable). |
| Resolution | The recommended resolution is at least 300 DPI (dots per inch) for printed photos. |
| Recency | The photo must be taken within the last month to accurately reflect your current appearance. |
Important Note: When taking your photo with your iPhone, capture a bit more of your upper body than you think you need. Don’t worry about precise cropping at this stage, as passport agencies will handle the final cropping to ensure it meets exact specifications.
Want to see examples of what makes a good and bad passport photo?
Here are visual examples of acceptable and unacceptable passport photos to guide you:
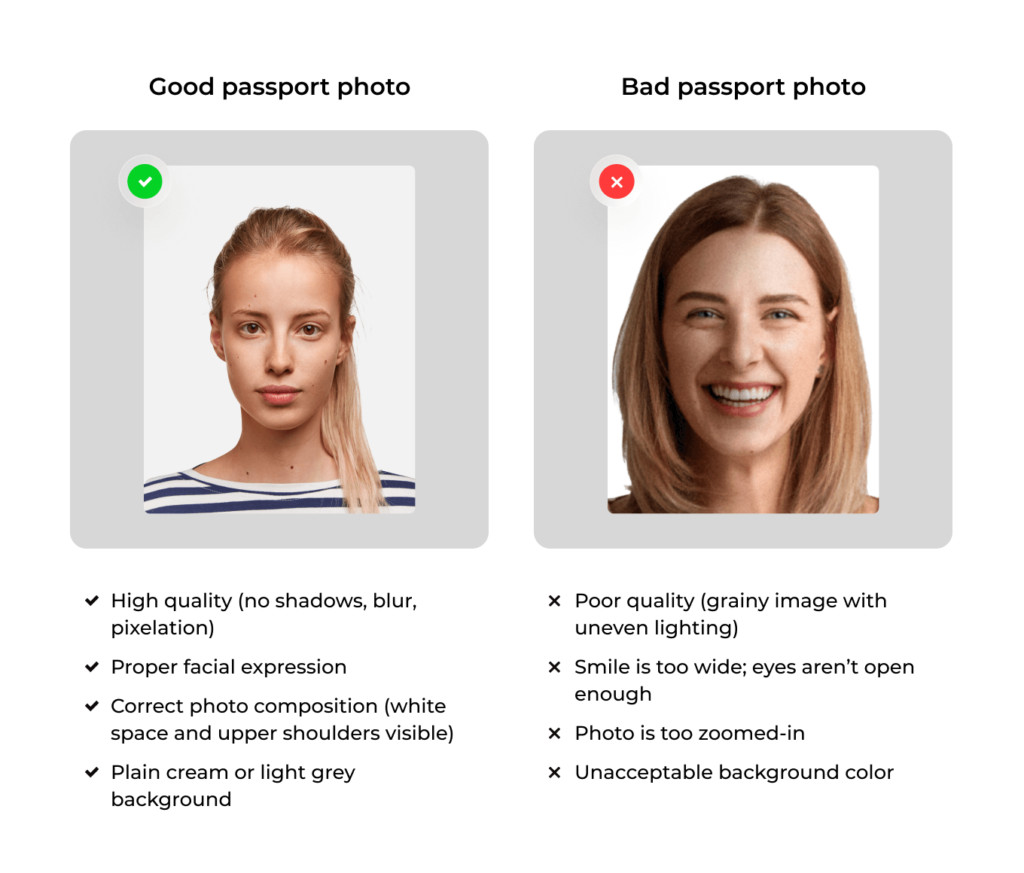 Examples illustrating good and bad UK passport photos. The 'good' example shows correct posture, expression, and background, while the 'bad' examples highlight common mistakes like poor lighting, smiling, and incorrect head size.
Step 2: Optimizing Your iPhone Camera Settings for Passport Photos
To ensure your iPhone captures a passport photo that is high quality and compliant, adjusting your camera settings is a smart move. Here’s how to optimize your iPhone camera:
- Access Camera Settings: Open the ‘Settings’ app on your iPhone and scroll down until you find ‘Camera.’ Tap on it.
- Choose Formats: Tap on ‘Formats.’
- Select ‘High Efficiency’: This format is generally recommended for saving space, but for passport photos, especially if you plan to print them, ‘Most Compatible’ (JPEG) might be preferable for wider compatibility at printing kiosks. Consider ‘High Efficiency’ if you are submitting digitally and need to manage file size.
- Maximize Photo Resolution: In ‘Photo Capture,’ go to ‘Photo Mode’ and select the highest resolution available for your rear camera. This will ensure your photo has enough detail and clarity for passport purposes.
These settings will help you capture a high-resolution, good-quality image. Now, let’s adjust composition settings for taking passport photos with your iPhone camera app:
- Return to Camera Settings: Go back to Settings → Camera.
- Find ‘Composition’: Locate the ‘Composition’ section.
- Enable ‘Grid’ and ‘Level’: Activate both ‘Grid’ and ‘Level’ by toggling the sliders to green. The ‘Grid’ overlay helps with centering your face, and ‘Level’ ensures your photo is straight and not tilted.
- Disable ‘Mirror Front Camera’: Turn off the ‘Mirror Front Camera’ option. This is important if you use the front camera, as mirroring can reverse your image, which might not be acceptable for official documents.
iPhone 15 Tip for Enhanced Quality: For iPhone 15 or newer models, consider this tip from professional photographer Dominic Bleijie (@dominic_bleijie96):
‘The improved sensor in the iPhone 15 is fantastic for headshots, perfect for passport photos. To get a sharper image with good depth, adjust your aperture to f/4.0 in the camera settings and focus on the face. This will give you a less shallow depth of field, making the face crisp and in focus.’
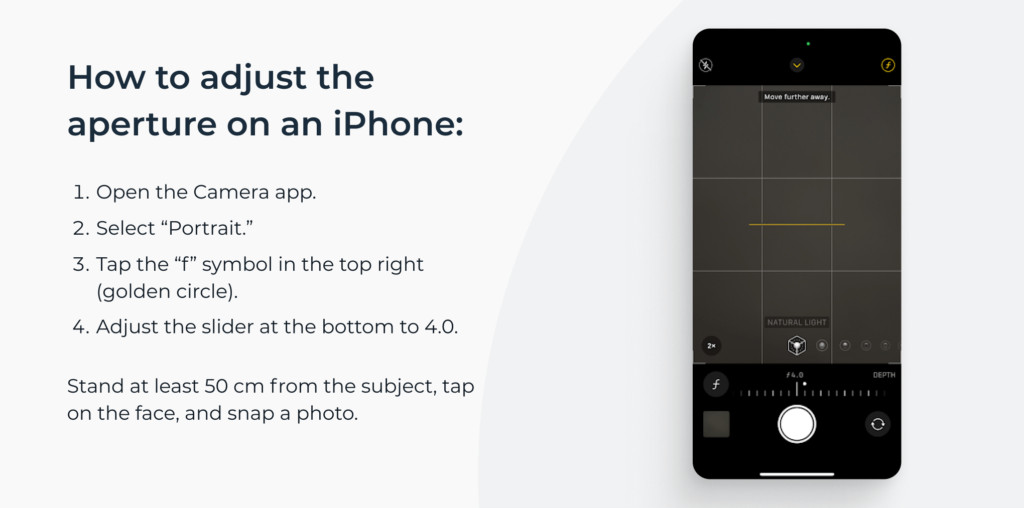 Screenshot illustrating how to adjust the aperture setting on an iPhone camera for taking high-quality passport photos. The aperture setting is highlighted within the camera app interface.
Step 3: Choosing the Right Location and Lighting
The location and lighting are critical when you take a passport photo on your iPhone. Good lighting can make a huge difference in the quality and acceptability of your photo.
- Ideal Setting: Choose a well-lit room, ideally one with a large window that lets in natural daylight. Position yourself facing the window to ensure even lighting on your face.
- Test Shots: Take a few test photos from different spots in the room to see where the lighting is most even and flattering. Look for a spot where there are minimal shadows on your face.
- Avoid Direct Sunlight: While natural light is best, avoid direct sunlight, which can be too harsh and create strong shadows or cause you to squint. A slightly overcast day or indirect window light is perfect.
Pro Lighting Tip: If you have access to professional lighting equipment like softbox lamps, position them on both sides of you, about 30 degrees from the front, to create soft, even illumination that eliminates shadows.
Step 4: Preparing Yourself for the Photoshoot
Now that your iPhone and photo setup are ready, it’s time to prepare yourself for your passport photoshoot. While passport photo requirements might seem strict, the key is to aim for a simple, clean, and neutral look. This will not only ensure compliance but also help you avoid unflattering passport photos.
Here’s how to prepare your appearance:
- Clothing: Wear plain, dark-colored clothing. Avoid busy patterns or prints. Steer clear of very low-cut tops or turtlenecks, as they can be unflattering in passport photos.
- Makeup: Keep makeup minimal and natural. Heavy makeup, contouring, shimmer, and glossy lips are generally not recommended. A light, matte finish is best.
- Glasses and Headwear: Remove prescription glasses and any head coverings unless they are worn for religious or medical reasons. This includes hair accessories. If you have a long fringe, use pins to keep it off your forehead.
- Jewelry: Opt for simple, understated jewelry. Small stud earrings or a thin necklace are usually fine. Avoid large, sparkly jewelry that can reflect light and cause issues with photo acceptance.
- Hair: Style your hair so that your face is clearly visible. Tuck hair behind your ears or tie it back if necessary. As long as your facial contours and eyebrows are visible, most hairstyles are acceptable.
Clothing Color Pro Tip: While white or light grey might seem like background-matching choices, they can sometimes blend too much with standard light backgrounds. If you prefer a white shirt, layer a dark jacket or cardigan over it to create contrast.
Step 5: Capturing the Passport Photo on Your iPhone
Ready to take the photo? If you prefer visual instructions, check out our short video tutorial on how to take a passport-sized photo with an iPhone. Here’s a quick recap of the steps:
- Stabilize Your iPhone: Place your iPhone on a stable surface like a table or windowsill. Using a tripod is even better for stability. If possible, ask someone else to take the photo for you.
- Position Yourself: Stand or sit about 50cm (approximately 20 inches) away from your iPhone.
- Posture and Gaze: Stand straight with your shoulders relaxed and look directly at the camera lens. Pro tip: Focus on the upper horizontal grid line on your iPhone screen. Your eyes should be level with or just above this line.
- Centering Your Face: Align your face so it is centered between the two vertical grid lines on the screen. This helps ensure your face is positioned correctly in the frame.
- Facial Expression: Maintain a neutral facial expression. Keep your mouth closed and relax your face. A very slight, subtle lift at the corners of your lips is sometimes acceptable, but avoid a full smile. Your eyes must be fully open.
- Take Multiple Shots: Take several photos, experimenting with slight adjustments to your position and expression. Pro tip: Use the camera timer set to 10 seconds when taking self-portraits. This gives you enough time to get into position and compose yourself.
Don’t hesitate to take plenty of photos. Unlike a professional photographer, your iPhone won’t charge extra for retakes! Once you have a photo you are satisfied with, you can move on to the final step of editing.
Step 6: Editing and Ensuring Passport Photo Compliance
The final step is editing your iPhone photo to ensure it meets all passport photo requirements. This typically involves:
- Background Removal: While not always necessary if you have a plain background, removing or further simplifying the background can be helpful.
- Resizing and Cropping: Your photo needs to be the correct size and dimensions for a passport photo.
You can use free online tools for basic editing, such as our free background remover and photo cropper. However, using generic tools doesn’t guarantee compliance with all intricate passport photo rules, especially regarding composition and spacing.
This is where PhotoAiD® excels.
Our specialized passport photo service is designed to make the editing process easy and error-free. Simply upload your iPhone photo, and our intelligent system will automatically adjust it to meet all official requirements.
The key difference with PhotoAiD® is human expert verification. Unlike other apps that rely solely on AI, our trained professionals manually review each photo to ensure it meets even the most minor official guidelines. This human touch ensures a much higher rate of acceptance. Try our passport photo app for iPhone to experience the difference and get a guaranteed compliant photo.
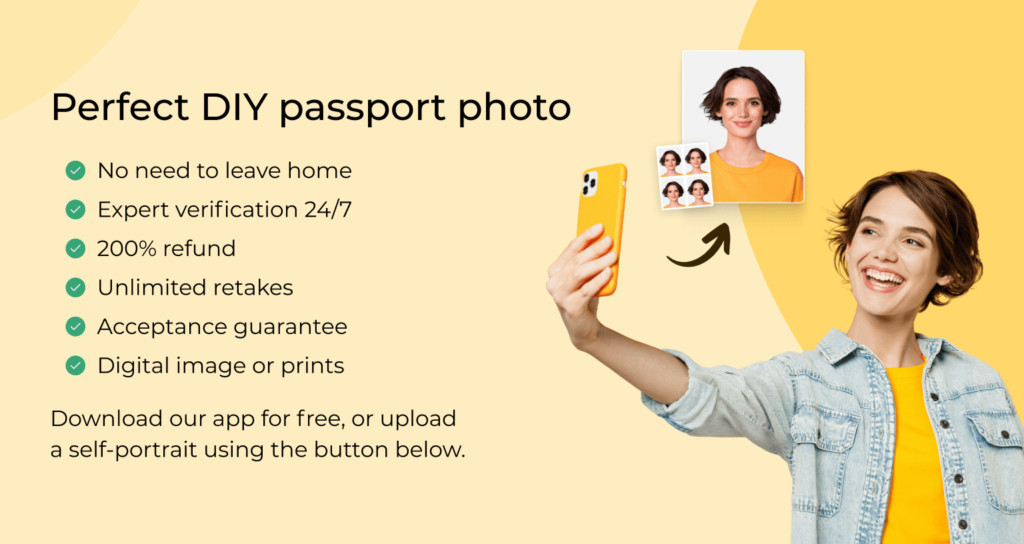 Graphic highlighting the benefits of using PhotoAiD for UK passport photos, emphasizing expert verification and a money-back guarantee. Features listed include compliance checks and refunds if the photo is rejected.
Here’s what users are saying about PhotoAiD® on Trustpilot:
Quick and easy to use with great guidance. So pleased I could do this at home and take as many photos as I like to get one I was happy with and could live with on my passport for the next 10years rather than waste lots of money on getting photos taken in photo booths or shops. It was also reassuring to have someone there to check the photo before it is sent to you. Excellent service and value – Fiona S (GB)
Just renewed two family passports, first when through with no problem. Second was initially rejected, emailed photoAid and received reply almost by return. Followed instructions and second application went through without any issues. Really helpful and great service – Hazel (GB)
Quite easy to get your passport photos ,just follow instructions and you can get photos in seconds or photos printed and sent to you.Also if a mistake is made you can make changes for free.Saved a trip to the photographer. – Jeanette Young (GB)
Expert Advice: Avoiding Common Passport Photo Mistakes Based on 10,000+ Photo Analyses
PhotoAiD has been a leader in passport photo services for over a decade, analyzing millions of ID photos. Recently, we conducted a detailed analysis of over 10,000 photos to identify the most frequent reasons for ID photo rejection.
Based on this extensive data, here are key tips to avoid common mistakes and take a great passport photo with your iPhone:
1. Mind Your Positioning and Framing
Avoid taking photos that are too close-up. Ensure your upper torso is visible in the frame. Face the camera directly, not at an angle, and keep your head straight. The camera should not be positioned significantly higher or lower than your eye level.
2. Prioritize Good and Even Lighting
Proper lighting is paramount. Your face needs to be evenly lit, without harsh shadows. To prevent shadows in your passport photo, make sure your light source is directly in front of you. Avoid under- or overexposed photos. Natural daylight is ideal, but avoid direct, harsh sunlight.
3. Maintain a Neutral Facial Expression
Relax your face and adopt a neutral expression. Large, toothy smiles are not acceptable, so keep your mouth closed. Also, avoid squinting – your eyes must be fully visible and level with the camera lens.
4. Ensure High Photo Quality and Sharpness
Hold your iPhone steady when taking the photo to prevent blurriness. Set your iPhone camera to its highest resolution setting and ensure good lighting to avoid grainy or pixelated photos.
5. Pay Attention to Your Appearance Details
Remember to remove prescription glasses (unless medically necessary) and ensure there’s no glare on lenses if you must wear them. Hairstyle is also important – make sure no hair is covering your eyes, eyebrows, or obscuring the contours of your face.
We highly recommend reviewing our detailed study on common ID photo rejection reasons for more examples and in-depth guidance.
Conclusion: iPhone Passport Photos Made Easy
Taking your own passport photo on your iPhone is not only possible but also incredibly convenient. As long as you follow the official passport photo guidelines, you can easily create a compliant photo in the comfort of your home.
Key takeaways for taking passport photos at home with an iPhone:
- iPhones from 2016 onwards (iPhone 7 and newer models) have camera quality suitable for passport photos.
- While having someone else take your photo is preferable, using the front camera is acceptable if done correctly.
- Remember that selfies are not permitted as passport photos. Compliance with specific requirements is essential.
- While you can use free tools to edit iPhone passport photos, they may not guarantee acceptance.
For the most reliable way to take passport photos on your iPhone, use PhotoAiD®’s UK passport photo checker. We guarantee 100% compliance, or we’ll refund 200% of your purchase price. Get your perfect passport photo in minutes!
Frequently Asked Questions (FAQs)
Can you take your own passport photo?
Yes! As long as you have a smartphone and a few minutes, you can take a photo that meets all official passport requirements. If you’re unsure how to take a passport photo at home, this guide on taking passport photos with an iPhone is designed to help.
Is there a free passport photo app for iPhone?
Many apps advertise “free” passport photo services. However, these often lack essential features like background removal or a compliance guarantee. For a comprehensive passport photo app for iPhone that offers a full suite of features and expert verification, try PhotoAiD®.
How do I crop a photo to passport size on an iPhone?
If you already have a DIY passport photo and need to crop it to the correct size, you have options:
- Use PhotoAiD® for manual checks and a compliance guarantee.
- Use a free online photo cropper tool (but without a compliance guarantee).
- Use professional photo editing software like Photoshop, Gimp, or Canva for manual adjustments.
Where is the best place to get a passport photo?
Depending on your budget and convenience preferences, you can consider:
- Professional photography studios (most expensive).
- Local photo booths in pharmacies or supermarkets (e.g., Boots, Tesco, ASDA).
- Passport acceptance facilities in your area.
- Taking a passport photo at home using a service like our UK passport photo checker (most convenient and often cost-effective).
How to take a passport photo with an iPhone for free?
Here’s how to attempt it for free, keeping in mind compliance is not guaranteed without expert review:
- Take a self-portrait with your iPhone, carefully following all official requirements.
- Use our free background remover to clean up the background.
- Use our online photo cropper to resize the image to passport dimensions for free.
Remember, free tools do not guarantee your photo will be accepted. Refer to our detailed guide on taking passport photos with an iPhone to maximize your chances of success.
How do I get a digital copy of my passport photo?
The easiest way to get a compliant digital passport photo is with PhotoAiD®. Simply take a photo and upload it to our app. After expert verification and payment, we’ll email you your digital photo.
If you prefer to use your own photo, ensure it meets these digital specifications:
- Minimum 600×750 pixels
- Minimum 300 DPI resolution
- File size between 50KB–10MB.
How useful was this post?
Click on a star to rate it!
Average rating 5 / 5. Number of votes: 1
No ratings yet! Be the first to rate this post.
Sources:
Sylwia Green
Sylwia is a skilled writer with a BA in English Studies and an active SPJ member. For nearly three years now, she’s been writing captivating articles for international companies, turning her lifelong passion into a career.
