Applying for your newborn’s first passport is an exciting step, and ensuring you have the correct passport photo is crucial for a smooth application process. Getting a compliant photo for a tiny baby might seem daunting, but it’s absolutely achievable at home. This guide will walk you through the process of taking passport photos for newborns, ensuring they meet all official requirements and helping you avoid any application delays.
Understanding the Rules for Newborn Passport Photos
Passport offices have specific regulations for photos to ensure they are recognizable and valid for identification. While the rules are generally the same for adults and children, there are some relaxed guidelines specifically for newborns and young children, acknowledging the challenges of photographing infants. Here are the key rules to keep in mind when taking a passport photo for your newborn:
- Recency: The photo must be recent, ideally taken within the last month. This ensures it accurately represents your baby’s current appearance.
- Quality: The photo needs to be clear, in focus, and in color. Avoid blurry or pixelated images. It should also be unaltered by any photo editing software.
- Size and Format: Digital photos must be at least 600 pixels wide and 750 pixels tall, with a file size between 50KB and 10MB.
- Background: The background must be plain and light-colored. A white or off-white sheet or blanket works perfectly.
- Content: The photo should only include your newborn, with no toys, dummies, or other people visible.
- Pose: For children under 6, including newborns, they do not have to look directly at the camera or have a plain expression. Babies under one year old do not even need to have their eyes open.
- No Head Coverings: Head coverings are generally not allowed unless it’s for religious or medical reasons.
- No Glasses: Babies should not wear glasses in their passport photos.
- No Shadows: Ensure there are no shadows on your baby’s face or in the background.
Step-by-Step Guide to Taking Newborn Passport Photos at Home
Taking your newborn’s passport photo at home is convenient and can be less stressful for both you and your baby. Here’s a step-by-step guide to help you capture the perfect shot:
Preparation is Key
- Choose the Right Time: Select a time when your baby is typically calm and content, often after feeding or a nap. Avoid times when they are likely to be fussy or tired.
- Gather Your Supplies: You’ll need:
- A plain white or light-colored sheet or blanket.
- A well-lit room with natural light is ideal. Avoid direct sunlight which can create harsh shadows.
- A camera or smartphone with a good resolution.
- Someone to assist you, if possible.
Taking the Photo
- Set up the Background: Lay the plain sheet or blanket on the floor or a bed in a well-lit area.
- Position Your Baby:
- Lying Down: For newborns, the easiest way is to lay them on their back on the sheet. Position yourself directly above them to take the photo looking down.
- Supported (If Needed): You can support your baby’s head with your hand if necessary, but ensure your hand is completely out of sight in the final photo.
- Clothing: Dress your baby in plain, light-colored clothing. Avoid busy patterns or dark colors that might blend with the background.
- Lighting: Ensure even lighting across your baby’s face. Soft, natural light from a window is best. Avoid using flash directly on your baby’s face.
- Take Multiple Shots: Babies move a lot! Take plenty of photos from slightly different angles to increase your chances of getting a perfect one.
Checking the Photo
- Review for Compliance: Check your photos against the rules mentioned earlier. Ensure:
- The background is plain and light.
- Your baby is alone in the photo.
- The photo is clear and in focus.
- There are no shadows on the face or background.
- Choose the Best Photo: Select the photo that best meets the requirements. Even if your baby’s eyes are closed, it’s acceptable for newborns.
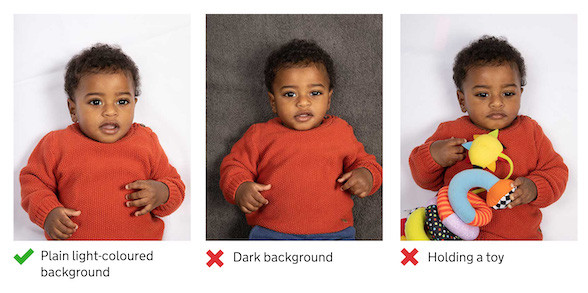 Example of an acceptable passport photo for a child, demonstrating correct positioning and background, and baby lying on a sheet.
Options for Professional Newborn Passport Photos
While home photos are convenient, you can also opt for professional services:
- Photo Booths and Shops: Many photo booths and shops offer passport photo services, including options for babies. They often provide a code for digital photos, which you can directly use for online passport applications. These are generally more likely to be approved, especially if you are unsure about taking photos at home.
Common Mistakes to Avoid
- Shadows: Shadows are a common reason for photo rejection. Ensure even lighting and avoid harsh shadows on the face or background.
- Background Clutter: Make sure the background is completely plain and free from any objects or patterns.
- Low-Quality Photos: Use a good quality camera or smartphone and ensure the photo is not blurry or pixelated.
- Not Following Size Requirements: Double-check the pixel dimensions and file size before submitting your photo.
- Forgetting Recency: Use a photo taken within the last month to accurately reflect your newborn’s appearance.
Conclusion
Taking a passport photo for your newborn doesn’t have to be stressful. By understanding the guidelines and following these simple steps, you can easily capture a compliant photo at home. Whether you choose to take the photo yourself or use a professional service, ensuring you have a correct passport photo will help ensure a smooth and timely passport application process for your little one. Remember to prioritize a clear, recent photo against a plain background, and you’ll be well on your way to getting your newborn’s passport sorted.