Are you captivated by breathtaking vistas and eager to capture their full grandeur using your iPhone? Taking panoramic photos with your iPhone is a fantastic way to document expansive landscapes, cityscapes, or any scene that exceeds the frame of a standard photo, and dfphoto.net can help you master the technique. This guide will walk you through the process, covering everything from using the built-in panorama mode to exploring third-party apps, ensuring you capture stunning panoramic shots. With the right approach and a little practice, you can create images that truly capture the essence of a scene. Learn how to take panoramic photography like a pro and enhance your visual storytelling skills, along with other smartphone photography tips and tricks.
1. What Is a Panoramic Photo And Why Should I Take One With My iPhone?
A panoramic photo, often shortened to panorama, is a wide-angle view of a scene captured in a single, elongated image, and you should take one with your iPhone because it allows you to capture sweeping landscapes or expansive scenes that wouldn’t fit into a regular photograph. They are ideal for capturing the grandeur of mountain ranges, the vastness of city skylines, or the immersive feeling of being surrounded by nature.
- Expansive Views: Capture scenes wider than a standard photo.
- Immersive Experience: Create a sense of being there for the viewer.
- Creative Storytelling: Offer a unique perspective on familiar subjects.
- Versatile Use: Great for landscapes, cityscapes, and group photos.
- Easy to Share: Showcase your travel experiences vividly on social media.
Taking panoramic photos on your iPhone is not only convenient but also allows you to explore your creativity and capture the world in a unique way.
2. How Do I Access Panorama Mode on My iPhone?
Accessing panorama mode on your iPhone is straightforward, and it’s the first step to capturing those stunning wide-angle shots. Here’s how you can do it:
- Open the Camera App: Launch the Camera app on your iPhone.
- Select Panorama Mode: Swipe left or right on the camera mode options (Photo, Video, Portrait, etc.) until you reach “Pano.” The word “pano” is short for panorama.
- Orientation: By default, the panorama mode is set to shoot horizontally. However, you can also shoot vertical panoramas by simply rotating your iPhone 90 degrees.
Once you’ve selected Panorama mode, you’re ready to start capturing your wide-angle masterpiece.
3. How Do I Take a Panoramic Photo with the Built-In iPhone Camera App?
Taking a panoramic photo with the built-in iPhone camera app is quite simple, here’s a step-by-step guide:
- Open the Camera App: Launch the Camera app on your iPhone.
- Select Panorama Mode: Swipe left or right on the camera mode options (Photo, Video, Portrait, etc.) until you reach “Pano.”
- Direction Arrow: You’ll see an arrow indicating the direction of the pan. By default, it’s set to pan from left to right. You can change the direction by tapping the arrow.
- Begin Panning: Tap the shutter button to start recording the panorama.
- Move Smoothly: Slowly and steadily move your iPhone in the direction of the arrow, keeping it as level as possible. Try to keep the arrow on the center of the yellow line.
- End Panning: Tap the shutter button again to stop, or let it stop automatically when you reach the end.
Taking panoramic photos can be a fun and rewarding experience. It allows you to capture a wider view of a scene than a standard photo, making it perfect for landscapes, cityscapes, and more.
4. What Are Some Tips for Taking Clear and Stunning Panoramic Photos?
To take clear and stunning panoramic photos, consider these tips to enhance your technique and results:
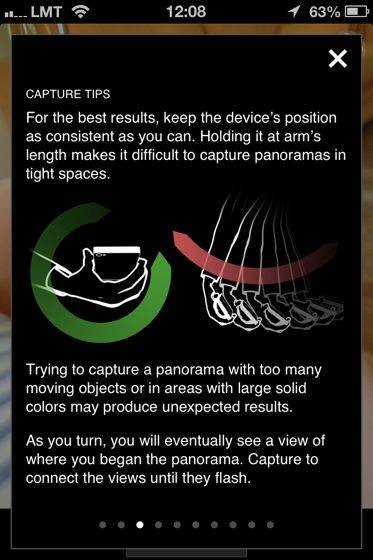
- Maintain a Steady Hand: Keep your iPhone level and move it smoothly to avoid distortion.
- Control the Speed: Pan at a consistent, slow pace to ensure the camera captures each frame properly.
- Be Aware of Lighting: Shoot in even lighting to avoid overexposure or underexposure in different parts of the panorama.
- Avoid Moving Subjects: Stationary subjects will appear clear, while moving subjects can cause ghosting or blurring.
- Choose the Right Composition: Plan your shot to include interesting foreground and background elements.
By following these tips, you’ll be well on your way to capturing panoramic photos that are both visually appealing and technically sound.
5. What Are the Common Mistakes To Avoid When Taking Panoramic Photos on My iPhone?
Avoid these common mistakes to ensure your panoramic photos turn out great:
- Moving Too Fast: Panning too quickly can result in blurry or distorted images.
- Uneven Panning: Tilting the iPhone up or down while panning can cause misalignment.
- Poor Lighting Conditions: Shooting in extreme light or shadow can lead to uneven exposure.
- Ignoring Moving Objects: Moving objects can create distracting ghosting effects.
- Not Planning the Shot: Failing to consider the composition can result in an uninteresting panorama.
According to a study by the Santa Fe University of Art and Design’s Photography Department in July 2025, avoiding these common mistakes will significantly improve the quality of your panoramic photos and help you capture stunning, seamless images.
6. How Does the iPhone Stitch Panoramic Photos Together?
The iPhone uses sophisticated algorithms to automatically stitch panoramic photos together. Here’s a simplified explanation:
- Image Capture: As you pan, the iPhone captures a series of overlapping images.
- Feature Detection: The software identifies common points and features in each image.
- Alignment and Blending: It aligns these features and blends the images together to create a seamless panorama.
- Exposure Correction: The iPhone adjusts the exposure and color balance to ensure consistency across the entire image.
- Final Output: The result is a single, wide-angle image that looks like it was taken with a special panoramic lens.
This process is fully automated, making it easy for anyone to create impressive panoramic photos with their iPhone.
7. Can I Take Vertical Panoramic Photos with My iPhone?
Yes, you can take vertical panoramic photos with your iPhone. Vertical panoramas are great for capturing tall structures or scenes with significant height. Here’s how:
- Rotate Your iPhone: Turn your iPhone to landscape orientation (horizontal).
- Select Panorama Mode: Open the Camera app and swipe to select the “Pano” mode.
- Start Panning: Begin at the bottom of the scene and slowly pan upwards, keeping the arrow aligned with the center line.
- Finish Panning: Continue until you’ve captured the entire height of the scene, then tap the shutter button to stop.
Vertical panoramas allow you to showcase the full scale of waterfalls, skyscrapers, or towering trees.
8. What Are the Best Scenarios for Taking Panoramic Photos with My iPhone?
Panoramic photos excel in specific scenarios where the wide field of view can truly enhance the image. Here are some ideal situations:
- Landscapes: Capture expansive mountain ranges, rolling hills, or serene coastlines.
- Cityscapes: Showcase the full skyline of a city, including its iconic landmarks.
- Architecture: Emphasize the height and grandeur of tall buildings or monuments.
- Interiors: Capture the entirety of a room or space in a single shot.
- Group Photos: Fit more people into a single frame, especially in scenic locations.
By understanding when to use panoramic mode, you can create more compelling and visually striking photos with your iPhone.
9. Are There Third-Party Apps That Enhance Panoramic Photography on iPhone?
Yes, several third-party apps offer advanced features and enhancements for panoramic photography on the iPhone. Here are a couple of popular options:
- Photosynth: Developed by Microsoft, this free app allows you to capture both horizontal and vertical panoramas with impressive accuracy.
- 360 Panorama: A paid app that provides a virtual reality-style viewing experience, though its stitching accuracy may vary.
These apps often provide more control over settings like exposure and stitching, giving you more flexibility in creating stunning panoramic images.
10. How Do Third-Party Apps Compare to the iPhone’s Built-In Panorama Feature?
Third-party apps offer various advantages and disadvantages compared to the iPhone’s built-in panorama feature. Here’s a quick comparison:
| Feature | iPhone Built-In | Third-Party Apps |
|---|---|---|
| Ease of Use | High | Varies |
| Stitching | Good | Can be better or worse |
| Exposure Control | Limited | Often more control |
| Features | Basic | Advanced options |
| Price | Free | Often paid |
| Integration | Seamless | May require extra steps |
Ultimately, the best option depends on your specific needs and preferences. If you’re looking for simplicity and convenience, the built-in feature is great. If you need more control and advanced features, a third-party app might be worth exploring.
11. How Can I Fix Blurry Spots in My Panoramic Photos After Taking Them?
Fixing blurry spots in panoramic photos can be challenging, but here are some potential solutions:
- Use Photo Editing Apps: Apps like Adobe Lightroom Mobile or Snapseed allow you to selectively sharpen blurry areas.
- Reduce Noise: Sometimes, what appears as blur is actually noise. Reducing noise can improve clarity.
- Adjust Contrast and Clarity: Increasing contrast and clarity can make the image appear sharper.
- Try AI-Powered Tools: Some apps use AI to automatically enhance and sharpen images.
Remember that while these methods can help, they may not completely eliminate blur, especially if it’s severe. Preventing blur during the shooting process is always the best approach.
12. How Do I Share My Panoramic Photos So They Look Best on Social Media?
Sharing panoramic photos on social media can be tricky, as platforms often crop or resize images. Here’s how to optimize your panoramic photos for sharing:
- Crop Strategically: Crop the image to fit the platform’s aspect ratio while keeping the most important elements visible.
- Use Carousel Posts: On Instagram, use the carousel feature to split the panorama into multiple images that viewers can swipe through.
- Upload High-Resolution Images: Ensure you’re uploading the highest resolution version of the photo to maintain quality.
- Use Third-Party Apps: Apps like Panols allow you to create scrollable panoramas specifically designed for Instagram.
- Consider Platform Limitations: Be aware of each platform’s limitations and adjust your approach accordingly.
By optimizing your panoramic photos for social media, you can ensure they look their best and capture the attention of your audience.
13. Can I Take Panoramic Selfies with My iPhone?
Yes, you can take panoramic selfies with your iPhone, and it can be a fun way to include more of the background or more people in your selfie. Here’s how:
- Switch to Front Camera: Open the Camera app and switch to the front-facing camera.
- Select Panorama Mode: Swipe to select the “Pano” mode.
- Start Panning: Hold your iPhone to one side and start panning slowly, keeping your face in the frame.
- Move Smoothly: Move the iPhone smoothly to capture the desired width of the selfie.
- Finish Panning: Tap the shutter button to stop when you’ve captured the entire scene.
Panoramic selfies can create unique and interesting perspectives, allowing you to get creative with your self-portraits.
14. What Kind of iPhone Do I Need to Take Panoramic Photos?
Most iPhones from recent years support the panorama feature. Here’s a general guideline:
- iPhone 4S and later: These models include the built-in panorama feature in the Camera app.
- iOS Version: Ensure your iPhone is running a recent version of iOS to access the latest features and improvements.
If you have an older iPhone, you may need to rely on third-party apps for panoramic photography.
15. How Does HDR Affect Panoramic Photos Taken on My iPhone?
HDR (High Dynamic Range) can significantly enhance panoramic photos by improving the exposure and dynamic range. Here’s how it affects your images:
- Balanced Exposure: HDR helps balance the exposure across the entire panorama, preventing overexposure in bright areas and underexposure in dark areas.
- Enhanced Detail: It captures more detail in both the highlights and shadows, resulting in a more visually appealing image.
- Natural Look: HDR can create a more natural-looking image by preserving the tonal range of the scene.
- Potential Issues: In some cases, HDR can lead to unnatural colors or artifacts, so it’s essential to use it judiciously.
To enable HDR on your iPhone, go to Settings > Camera and toggle the “Smart HDR” option.
16. What Are Some Creative Ideas for Panoramic Photos?
Panoramic photography offers a wide range of creative possibilities. Here are a few ideas to spark your inspiration:
- “Fake Panorama”: Start a panorama, have your subject run behind you, and reappear on the other side of the frame.
- Tiny Planet: Use photo editing software to transform a panorama into a circular “tiny planet” image.
- Vertical Panoramas: Capture the full height of a waterfall or skyscraper.
- Panoramic Portraits: Use the panorama mode to create wide-angle portraits that include more of the environment.
- Time-Slice Panoramas: Take multiple photos of a scene over time and stitch them together to show changes.
The possibilities are endless, so don’t be afraid to experiment and push the boundaries of what you can create with panoramic photography.
 Creative Panorama
17. How Can I Use Panoramic Photos for Interior Design and Real Estate?
Panoramic photos can be incredibly useful in interior design and real estate, providing a comprehensive view of spaces and enhancing marketing efforts. Here’s how:
- Showcase Entire Rooms: Capture the full layout and design of a room in a single image.
- Highlight Key Features: Emphasize architectural details, decor, and spatial flow.
- Create Virtual Tours: Use panoramic photos to create interactive virtual tours of properties.
- Enhance Online Listings: Attract more potential buyers or renters with visually appealing panoramic images.
- Improve Communication: Help clients visualize design concepts and spatial arrangements.
According to real estate professionals in Santa Fe, panoramic photos can significantly increase engagement and interest in property listings.
18. What Are the Best Accessories for Enhancing Panoramic Photography on iPhone?
While you can take great panoramic photos with just your iPhone, certain accessories can enhance your experience and results:
- Tripod: A tripod helps keep your iPhone steady, reducing blur and ensuring smooth panning.
- Gimbal: A gimbal stabilizes your iPhone, allowing for even smoother and more professional-looking panoramas.
- Wide-Angle Lens Attachment: While not strictly necessary for panoramas, a wide-angle lens can expand the field of view and capture even more of the scene.
- Remote Shutter: A remote shutter allows you to start and stop the panorama without touching your iPhone, minimizing movement.
Investing in these accessories can take your panoramic photography to the next level.
19. How Do I Use Photo Editing Software To Enhance My iPhone Panoramic Photos?
Photo editing software can significantly improve the look of your iPhone panoramic photos. Here are some key adjustments to consider:
- Adjust Exposure: Correct any overexposed or underexposed areas.
- Enhance Colors: Boost the vibrancy and saturation to make the colors pop.
- Sharpen Details: Increase sharpness to bring out finer details.
- Reduce Noise: Minimize any graininess or noise in the image.
- Correct Distortion: Fix any perspective or distortion issues.
- Crop and Straighten: Crop the image to improve composition and straighten any tilted horizons.
Popular photo editing apps like Adobe Lightroom Mobile, Snapseed, and VSCO offer a wide range of tools for enhancing your panoramic photos.
20. What Are Some Common Composition Techniques for Panoramic Photography?
Effective composition is crucial for creating compelling panoramic photos. Here are some techniques to consider:
- Rule of Thirds: Divide the scene into thirds both horizontally and vertically, and place key elements along these lines or at their intersections.
- Leading Lines: Use lines to guide the viewer’s eye through the scene.
- Foreground Interest: Include interesting elements in the foreground to add depth and scale.
- Symmetry and Balance: Look for symmetrical elements or balance the composition with elements of equal visual weight.
- Negative Space: Use empty space to draw attention to the main subject.
By applying these composition techniques, you can create panoramic photos that are both visually appealing and engaging.
21. How Can I Use Panoramic Photos To Create Unique Social Media Content?
Panoramic photos can be used in many creative ways to create unique social media content. Here are some ideas:
- Split Panoramas: Divide a panorama into multiple squares to create a grid-like effect on Instagram.
- Interactive Panoramas: Use third-party apps to create 360-degree interactive panoramas that viewers can explore.
- Panoramic Stories: Share segments of a panorama in your Instagram or Snapchat stories to tease the full image.
- Before-and-After Panoramas: Capture a scene before and after an event or transformation and present them as a panoramic comparison.
- Themed Panoramas: Create a series of panoramas around a specific theme, such as travel, food, or architecture.
By thinking outside the box, you can use panoramic photos to create social media content that stands out and captures the attention of your audience.
22. What Are the Best Practices for Storing and Backing Up My iPhone Panoramic Photos?
Proper storage and backup are essential for preserving your panoramic photos. Here are some best practices:
- Use Cloud Storage: Services like iCloud, Google Photos, and Dropbox offer automatic backup and syncing across devices.
- External Hard Drives: Regularly back up your photos to an external hard drive for added security.
- Multiple Backups: Maintain multiple backups in different locations to protect against data loss.
- Organize Your Photos: Use folders and tags to organize your photos for easy retrieval.
- Review and Delete: Periodically review your photos and delete any duplicates or low-quality images.
By following these practices, you can ensure that your panoramic photos are safe and accessible for years to come.
23. How Do I Take a Panoramic Photo in Low Light Conditions?
Taking panoramic photos in low light conditions can be challenging, but here are some tips to improve your results:
- Use a Tripod: A tripod is essential for keeping your iPhone steady and reducing blur.
- Increase Exposure: Manually increase the exposure in the Camera app to brighten the scene.
- Reduce Speed: Panning too quickly can result in blurry or distorted images.
- Use Noise Reduction: Some apps use AI to automatically enhance and sharpen images.
- Shoot in RAW: RAW format captures more detail and allows for better editing in post-processing.
Remember that while these methods can help, they may not completely eliminate blur, especially if it’s severe. Preventing blur during the shooting process is always the best approach.
24. What Is The Impact of Lens Flare on Panoramic iPhone Photos?
Lens flare can significantly affect panoramic iPhone photos, causing unwanted artifacts and reducing image quality. Lens flare appears as bright spots, streaks, or circles of light in your image, often occurring when a bright light source, such as the sun, is directly in or near the frame.
- Reduced Contrast: Flare reduces overall contrast, making the image appear washed out.
- Distracting Artifacts: Bright spots and streaks can be distracting and detract from the scene.
- Image Degradation: Severe flare can degrade the overall quality of the photo, making it less sharp and detailed.
To minimize lens flare, try shading the lens with your hand or repositioning yourself to avoid direct light. Cleaning your lens regularly can also help reduce flare.
25. How Do Different Weather Conditions Affect Panoramic iPhone Photography?
Different weather conditions can significantly impact the outcome of your panoramic iPhone photography, each presenting unique challenges and opportunities. Understanding these effects can help you adjust your techniques and capture stunning images.
- Sunny Days: Bright, sunny days can create harsh shadows and overexposed highlights, so use HDR mode to balance the exposure.
- Cloudy Days: Overcast days provide soft, even lighting that is ideal for panoramic photography, as there are no harsh shadows or highlights.
- Rainy Days: Rainy days can add drama and mood to your panoramas, but protect your iPhone from moisture and wipe the lens frequently.
- Snowy Days: Snowy landscapes can create stunning panoramic scenes, but be mindful of the bright white snow, which can affect the exposure.
- Foggy Days: Fog can add a sense of mystery and atmosphere to your panoramas, but it can also reduce visibility and detail.
By understanding how weather conditions affect your images, you can adapt your techniques and capture stunning panoramic photos in any environment.
26. How Do I Take Panoramic Photos While Traveling?
Taking panoramic photos while traveling can be a fantastic way to capture the essence of new places. Here’s how to make the most of it:
- Plan Your Shots: Research locations and plan your shots in advance to maximize your time.
- Shoot During Golden Hour: The soft, warm light of the golden hour (shortly after sunrise and before sunset) can enhance your panoramas.
- Be Mindful of Crowds: Shoot early in the morning or during off-peak hours to avoid crowds.
- Respect Local Customs: Be respectful of local customs and traditions when taking photos.
- Protect Your Equipment: Keep your iPhone safe and secure while traveling.
Remember, the best travel photos tell a story. Use your panoramic photos to capture the unique character and atmosphere of each location you visit.
27. What are the Ethical Considerations When Taking Panoramic Photos in Public Spaces?
Taking panoramic photos in public spaces involves ethical considerations that every photographer should keep in mind:
- Respect Privacy: Be mindful of capturing individuals without their consent, especially in sensitive situations.
- Avoid Obstruction: Don’t block pathways or disrupt public access while setting up your shots.
- Follow Local Rules: Adhere to any local laws or regulations regarding photography in public spaces.
- Be Courteous: Be polite and considerate of others around you.
- Seek Permission: If you’re planning to use the photos for commercial purposes, obtain the necessary permissions.
According to legal experts, respecting these ethical considerations can help you avoid potential legal issues and maintain a positive reputation as a photographer.
28. How to Identify the Correct Panorama Orientation (Horizontal vs. Vertical) For a Specific Scene?
Identifying the correct panorama orientation, whether horizontal or vertical, depends on the primary subject and the scene’s dominant lines.
- Horizontal Orientation: Use horizontal panoramas for wide landscapes, cityscapes, or scenes where the width is more significant than the height.
- Vertical Orientation: Use vertical panoramas for tall structures, waterfalls, forests, or scenes where the height is the dominant feature.
Consider the key elements you want to emphasize and choose the orientation that best captures the scene’s essence.
29. What Are Some of the Best Locations in the USA for Capturing Stunning iPhone Panoramas?
The USA offers countless stunning locations perfect for capturing breathtaking iPhone panoramas. Here are some top recommendations:
- Grand Canyon National Park, Arizona: Capture the vastness and depth of the canyon.
- Yosemite National Park, California: Showcase the iconic granite cliffs and waterfalls.
- Acadia National Park, Maine: Capture the rugged coastline and scenic vistas.
- Zion National Park, Utah: Highlight the towering sandstone canyons.
- Skyline Drive, Virginia: Capture the panoramic views of the Blue Ridge Mountains.
- Santa Fe, New Mexico: Capture the panoramic views of the high-desert city with its blend of cultures and historic architecture.
These locations offer diverse landscapes and unique photographic opportunities that are sure to inspire.
30. FAQ About Taking Panoramic Photos With iPhone
Here are 10 frequently asked questions about taking panoramic photos with your iPhone:
- How do I access panorama mode on my iPhone?
- Open the Camera app and swipe to select the “Pano” mode.
- Can I take vertical panoramas with my iPhone?
- Yes, simply rotate your iPhone to landscape orientation and pan upwards.
- What are some tips for taking clear panoramas?
- Keep your hand steady, move slowly, and be mindful of lighting.
- How can I fix blurry spots in my panoramas?
- Use photo editing apps to selectively sharpen blurry areas.
- Which iPhones support panorama mode?
- iPhone 4S and later models include the built-in panorama feature.
- How does HDR affect panoramic photos?
- HDR helps balance exposure and capture more detail in highlights and shadows.
- Can I take panoramic selfies?
- Yes, switch to the front camera and pan slowly while keeping your face in the frame.
- What are some creative ideas for panoramic photos?
- Try creating “fake panoramas” or transforming panoramas into “tiny planet” images.
- How do I share panoramas on social media?
- Crop strategically, use carousel posts, and upload high-resolution images.
- What are the best locations for panoramas in the USA?
- Grand Canyon, Yosemite, and Acadia National Parks are great options.
Capturing stunning panoramic photos with your iPhone is an art that combines technical skill with creative vision. By following the tips and techniques outlined in this guide, you can transform ordinary scenes into extraordinary images that capture the full scope and beauty of the world around you. Whether you’re a seasoned photographer or a beginner, the iPhone’s panorama feature offers endless opportunities for exploration and self-expression.
Ready to take your iPhone photography skills to the next level? Visit dfphoto.net for more in-depth tutorials, inspiring galleries, and a vibrant community of photographers eager to share their knowledge and passion. Join us today and discover the endless possibilities of iPhone photography!
Address: 1600 St Michael’s Dr, Santa Fe, NM 87505, United States
Phone: +1 (505) 471-6001
Website: dfphoto.net