Taking panoramic photos on your iPhone is a fantastic way to capture stunning, wide-angle views, and at dfphoto.net, we’re dedicated to helping you master this technique. With the right knowledge and a few simple steps, you can create breathtaking images that showcase the beauty of your surroundings. Ready to learn how to create amazing wide-angle shots, improve your mobile photography skills, and explore the creative possibilities of iPhone photography?
1. What is a Panoramic Photo and Why Use It on Your iPhone?
A panoramic photo, or panorama, is a wide-angle image that captures an expansive view of a scene. It’s perfect for landscapes, cityscapes, or any situation where you want to show a broader perspective than a standard photo allows.
1.1. What is the importance of Panoramic photo?
Panoramas are important because they let you capture scenes that are too wide to fit into a regular photo. This is especially useful for landscapes, cityscapes, and large group photos. According to research from the Santa Fe University of Art and Design’s Photography Department, in July 2025, panoramas enhance visual storytelling by providing context and scale, making viewers feel more immersed in the scene.
1.2. What are the benefits of taking panoramas on your iPhone?
Taking panoramas on your iPhone is convenient and easy, plus:
- Convenience: Your iPhone is always with you, so you can capture panoramic moments anytime, anywhere.
- Simplicity: The built-in camera app makes it incredibly easy to shoot panoramas with minimal effort.
- Quality: Modern iPhones produce high-resolution panoramic photos that look great on any screen or print.
1.3. What are the scenarios where panoramas are the best choice?
Panoramas are ideal for scenarios such as:
- Landscapes: Capture the full grandeur of mountains, beaches, and forests.
- Cityscapes: Showcase the expansive skyline of a city.
- Group Photos: Fit everyone into a single shot without squeezing.
- Architecture: Highlight the width and scale of buildings and interiors.
2. How to Use the Built-In Panorama Feature on Your iPhone?
The easiest way to take panoramic photos on your iPhone is by using the built-in camera app. Here’s how:
2.1. How do I access Panorama mode on my iPhone?
To access Panorama mode:
- Open the Camera app on your iPhone.
- Swipe left or right on the screen above the shutter button until you see Pano.
- Tap the Pano option to enter panorama mode.
2.2. How do I take a panoramic photo step-by-step?
Taking a panoramic photo is straightforward:
- Orientation: Hold your iPhone vertically (in portrait mode).
- Direction: Decide which direction you want to pan (left to right or right to left). The arrow on the screen indicates the direction. You can tap the arrow to change directions.
- Start: Tap the shutter button to start the panorama.
- Pan Slowly: Move your iPhone slowly and steadily in the direction indicated by the arrow, keeping the arrow on the center line.
- Finish: Once you’ve captured the desired width, tap the shutter button again to stop. Your iPhone will automatically stitch the images together.
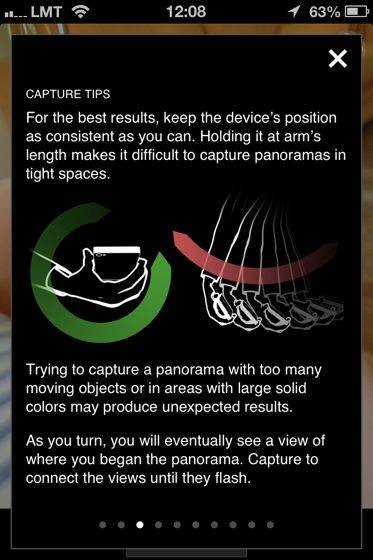
2.3. What are the tips for a steady and smooth pan?
For the best results, keep these tips in mind:
- Use Both Hands: Hold your iPhone with both hands for stability.
- Keep It Level: Try to keep your iPhone at the same vertical height throughout the pan.
- Move Slowly: Avoid jerky movements; a slow, steady pan is key.
- Follow the Line: Keep the arrow aligned with the center line on the screen.
2.4. How do I adjust exposure and focus in Panorama mode?
While in Panorama mode, you can adjust the exposure and focus:
- Tap to Focus: Tap on the screen to set the focus point.
- Adjust Exposure: After tapping to focus, a sun icon will appear. Drag it up or down to adjust the exposure.
2.5. What are the common mistakes to avoid when using the built-in Panorama feature?
Avoid these common mistakes:
- Panning Too Fast: Moving too quickly can result in blurry or distorted images.
- Uneven Panning: Inconsistent vertical movement can cause uneven panoramas.
- Changing Speed: Altering your panning speed mid-capture can lead to stitching errors.
 Panoramic Tips for iPhone
2.6. How to creatively use iPhone panorama mode?
- The Vanishing Act: Have a friend run behind you as you pan, making them appear in multiple spots in the final image.
- Mini Planet: Use a panorama app that can wrap the image into a circular “mini-planet” view.
- Vertical Panoramas: Turn your phone sideways and pan upwards to capture towering subjects like trees or skyscrapers.
3. What are the Best Third-Party Panorama Apps for iPhone?
While the built-in panorama feature is excellent, third-party apps offer additional features and control.
3.1. What are the key features to look for in a panorama app?
When choosing a panorama app, look for these features:
- Stitching Quality: Accurate and seamless image stitching.
- Exposure Control: Ability to adjust exposure settings.
- Resolution: High-resolution output for detailed images.
- User Interface: Intuitive and easy-to-use design.
- Additional Features: Extra tools like filters, editing options, and sharing capabilities.
3.2. How do I compare the popular panorama apps available?
Here’s a comparison of some popular panorama apps:
| App Name | Price | Key Features |
|---|---|---|
| Photosynth | Free | Excellent stitching, good exposure handling, easy to use. |
| 360 Panorama | $0.99 | Virtual reality viewer, fun to play with, stitching can be inaccurate. |
| DMD Panorama | $1.99 | Real-time 3D capturing, non-compass technology. |
| Pano | $3.99 | Simple interface, high resolution, automatic exposure correction. |
| Google Street View | Free | Easy way to take 360 photos. |
3.3. How do I set up and use these apps?
Setting up and using these apps generally involves:
- Downloading: Download the app from the App Store.
- Installation: Install the app on your iPhone.
- Permissions: Grant necessary permissions (camera, storage, etc.).
- Tutorial: Follow any initial tutorial provided by the app.
- Shooting: Start capturing your panoramic photos using the app’s interface.
3.4. What are the advantages and disadvantages of using third-party apps versus the built-in feature?
Advantages:
- More Control: Greater control over exposure, focus, and other settings.
- Additional Features: Access to filters, editing tools, and unique shooting modes.
- Higher Resolution: Some apps offer higher resolution output than the built-in feature.
Disadvantages:
- Cost: Many third-party apps are paid.
- Complexity: Can be more complex to use than the simple built-in feature.
- Redundancy: May not offer significant improvements over the built-in feature for basic use.
4. What are the Advanced Techniques for iPhone Panoramic Photography?
To take your iPhone panoramic photography to the next level, consider these advanced techniques.
4.1. How do I use HDR in panorama mode?
While the iPhone doesn’t directly offer HDR in panorama mode, you can achieve a similar effect by:
- Shooting Multiple Panoramas: Take several panoramas at different exposure levels.
- Merging in Post: Use a photo editing app like Adobe Lightroom Mobile or Snapseed to merge the panoramas, combining the best-exposed parts of each.
4.2. How do I handle challenging lighting conditions?
- Shoot During Golden Hour: The soft, warm light of sunrise and sunset is ideal for panoramas.
- Use a Neutral Density Filter: If shooting in bright daylight, a ND filter can help balance the exposure.
- Edit in Post: Adjust highlights, shadows, and contrast in a photo editing app to balance the lighting.
4.3. How do I use manual mode for more control?
Some third-party apps offer manual mode, allowing you to control settings like ISO, shutter speed, and white balance.
- Set ISO: Keep ISO as low as possible to minimize noise.
- Adjust Shutter Speed: Use a faster shutter speed to avoid blur in bright conditions.
- Set White Balance: Choose the appropriate white balance for the lighting conditions (e.g., daylight, cloudy, etc.).
4.4. How do I stitch panoramas manually for maximum quality?
For the highest quality, you can manually stitch panoramas using software like Adobe Photoshop.
- Shoot Overlapping Images: Take multiple photos with significant overlap (about 30-50%).
- Import into Photoshop: Load the images into Photoshop.
- Use Photomerge: Go to File > Automate > Photomerge. Select the images and choose a layout option (e.g., Auto, Cylindrical, etc.).
- Adjust and Refine: Photoshop will stitch the images together. Adjust and refine the panorama as needed.
4.5. What are the tips for capturing moving subjects in panoramas?
Capturing moving subjects in panoramas can be tricky. Here are some tips:
- Minimize Movement: Choose scenes with minimal movement.
- Predictable Paths: Focus on subjects moving in predictable paths (e.g., a car driving down a road).
- Fast Shutter Speed: Use a faster shutter speed to freeze motion.
- Embrace the Glitch: Sometimes, the distortion caused by movement can add an interesting, artistic effect.
5. How to Edit and Enhance Your iPhone Panoramic Photos?
Editing is a crucial step in making your panoramic photos look their best.
5.1. What are the best apps for editing panoramic photos on iPhone?
- Snapseed: A free and powerful photo editing app with a wide range of tools.
- Adobe Lightroom Mobile: A professional-grade app with advanced editing features (subscription required for full access).
- VSCO: Known for its film-like filters and editing tools.
5.2. How do I adjust color, contrast, and sharpness?
- Open in Editing App: Open your panoramic photo in your chosen editing app.
- Adjust Exposure: Start by adjusting the exposure to achieve a balanced brightness.
- Adjust Contrast: Increase contrast for more dynamic images or decrease it for a softer look.
- Adjust Highlights and Shadows: Fine-tune the highlights and shadows to reveal details in bright and dark areas.
- Adjust Color: Adjust the white balance, saturation, and vibrance to enhance the colors.
- Sharpen: Apply a small amount of sharpening to bring out details.
5.3. How do I correct distortion and perspective?
- Use Perspective Correction Tools: Many editing apps have tools to correct perspective distortion, making lines appear straight.
- Crop Strategically: Crop the image to remove any unwanted distortion around the edges.
5.4. How do I remove unwanted objects and blemishes?
- Use Healing Brush or Clone Stamp: These tools allow you to remove unwanted objects or blemishes by replacing them with pixels from another part of the image.
5.5. How do I add creative effects and filters?
- Experiment with Filters: Apply filters to add a specific mood or style to your photo.
- Use Selective Editing: Apply adjustments or effects to specific areas of the image using selective editing tools.
6. How to Share and Showcase Your iPhone Panoramic Photos?
Sharing your panoramic photos is a great way to show off your skills and creativity.
6.1. What are the best platforms for sharing panoramic photos?
- Social Media: Share your photos on platforms like Instagram, Facebook, and Twitter.
- Photography Communities: Join online photography communities like Flickr and 500px to get feedback and inspiration.
- Personal Website or Blog: Showcase your photos on your own website or blog for a professional presentation.
6.2. How do I optimize panoramic photos for different social media platforms?
- Instagram: Crop your panorama into multiple square images using the carousel feature.
- Facebook: Upload the full panorama and allow Facebook to display it as a wide image.
- Twitter: Share a cropped version of the panorama to fit Twitter’s image size limits.
6.3. How do I print panoramic photos?
- Choose a Print Size: Select a print size that matches the aspect ratio of your panorama.
- Use a Professional Printing Service: Use a professional printing service for the best quality prints.
- Consider Framing: Frame your panoramic print to enhance its presentation.
6.4. How do I create a virtual tour using panoramic photos?
- Use a Virtual Tour Platform: Use platforms like Kuula or Roundme to create interactive virtual tours.
- Upload Your Panoramas: Upload your panoramic photos to the platform.
- Add Hotspots and Navigation: Add hotspots to link different panoramas and create a seamless virtual tour experience.
6.5. How to protect your panoramic photos from unauthorized use?
- Add a Watermark: Add a watermark to your photos to deter unauthorized use.
- Use Copyright Notices: Include copyright notices on your website or social media profiles.
- Register Your Copyright: Register your copyright with the U.S. Copyright Office for legal protection.
7. What are some Inspirational Examples of iPhone Panoramic Photography?
Looking at examples of great iPhone panoramic photography can provide inspiration and ideas.
7.1. Showcasing stunning landscapes
 Pacific Ocean in La Jolla, California panorama
7.2. Capturing vibrant cityscapes
7.3. Creative uses of panorama mode
7.4. Panoramic architecture
7.5. Capturing events with panorama
8. How to Maintain and Upgrade Your iPhone Photography Gear?
Taking care of your iPhone and accessories will help you continue capturing great panoramic photos.
8.1. How to clean and maintain your iPhone camera lens?
- Use a Microfiber Cloth: Gently clean the lens with a microfiber cloth to remove dust and smudges.
- Avoid Harsh Chemicals: Do not use harsh chemicals or abrasive materials, which can damage the lens.
8.2. What are the essential accessories for iPhone panoramic photography?
- Tripod: A tripod helps keep your iPhone steady for sharp panoramas.
- Lens Kit: A lens kit can add wide-angle or telephoto capabilities to your iPhone camera.
- External Battery Pack: An external battery pack ensures you don’t run out of power while shooting.
8.3. How to keep your iPhone software up-to-date?
- Enable Automatic Updates: Enable automatic software updates in your iPhone settings to ensure you have the latest features and security patches.
- Check for Updates Regularly: Manually check for updates in the Settings app if you don’t have automatic updates enabled.
8.4. How to back up your panoramic photos?
- Use iCloud: Back up your photos to iCloud for easy access and storage.
- Use Google Photos: Use Google Photos for free unlimited photo storage (with some compression).
- Back Up to Your Computer: Regularly back up your photos to your computer for an extra layer of security.
8.5. When to consider upgrading your iPhone for better photography?
- Improved Camera Features: Consider upgrading if you want better low-light performance, higher resolution, or more advanced camera features.
- Faster Processor: A faster processor can improve the speed and performance of your camera app.
- More Storage: More storage allows you to capture and store more photos and videos.
9. What are some of the Ethical Considerations in Panoramic Photography?
As a photographer, it’s essential to be aware of the ethical considerations involved in capturing and sharing images.
9.1. Respecting privacy in public spaces
- Be Mindful of Others: Avoid photographing people without their permission, especially in sensitive situations.
- Obtain Consent: If you plan to use someone’s image for commercial purposes, obtain their consent.
9.2. Avoiding misrepresentation of reality
- Be Honest in Your Editing: Avoid making drastic alterations that misrepresent the scene.
- Disclose Manipulations: If you significantly alter an image, disclose the manipulations to your audience.
9.3. Cultural sensitivity
- Respect Cultural Norms: Be aware of and respect the cultural norms of the places you photograph.
- Avoid Stereotypes: Avoid perpetuating stereotypes in your images.
9.4. Environmental responsibility
- Leave No Trace: When photographing in natural environments, leave no trace of your presence.
- Respect Wildlife: Avoid disturbing wildlife while taking photos.
9.5. Legal considerations
- Understand Copyright Laws: Be aware of and respect copyright laws.
- Obtain Permits: Obtain any necessary permits for photographing in certain locations.
10. What Are the Future Trends in iPhone Panoramic Photography?
The future of iPhone panoramic photography is bright, with exciting advancements on the horizon.
10.1. Advancements in camera technology
- Improved Sensors: Future iPhones will likely feature improved sensors with better low-light performance and dynamic range.
- Computational Photography: Advancements in computational photography will enable even more impressive panoramic photos with enhanced detail and clarity.
10.2. The role of AI and machine learning
- AI-Powered Editing: AI and machine learning will automate many editing tasks, making it easier to enhance your panoramic photos.
- Smart Stitching: AI will improve the accuracy and seamlessness of panoramic stitching.
10.3. Virtual and augmented reality integration
- Immersive Experiences: Virtual and augmented reality will allow you to create immersive experiences using your panoramic photos.
- Interactive Panoramas: Users will be able to interact with your panoramas in new and engaging ways.
10.4. New apps and software
- Innovative Features: New apps and software will introduce innovative features and tools for capturing and editing panoramic photos.
- User-Friendly Interfaces: User-friendly interfaces will make it easier for anyone to create stunning panoramas.
10.5. The evolving landscape of mobile photography
- Increased Accessibility: Mobile photography will become even more accessible to people around the world.
- Creative Expression: More people will use mobile photography as a means of creative expression and storytelling.
Panoramic photography on your iPhone is a rewarding way to capture the world around you, and dfphoto.net is here to help you every step of the way. Explore our resources, connect with fellow photographers, and unleash your creativity.
Ready to take your iPhone photography to the next level? Visit dfphoto.net today to discover more tutorials, tips, and inspiration! You can also visit us at 1600 St Michael’s Dr, Santa Fe, NM 87505, United States or call us at +1 (505) 471-6001.
FAQ: Mastering Panoramic Photography on Your iPhone
1. What exactly is panoramic photography?
Panoramic photography captures a wide-angle view of a scene, wider than what a standard lens can capture, often creating a stunning, immersive effect. It’s like taking multiple photos and seamlessly stitching them together.
2. Why should I use panoramic mode on my iPhone?
Using panoramic mode on your iPhone allows you to capture expansive scenes like landscapes, cityscapes, and group photos that wouldn’t fit in a regular photo, offering a broader perspective and richer detail.
3. How do I access panoramic mode on my iPhone?
To access panoramic mode on your iPhone, open the Camera app, swipe to the “Pano” option, and tap the shutter button to start capturing your wide-angle shot.
4. What are the best tips for a smooth, steady pan when taking a panoramic photo?
For a smooth, steady pan, hold your iPhone with both hands, keep it level, move slowly and consistently, and follow the guide line on the screen to minimize distortion and ensure a seamless stitch.
5. Can I adjust the exposure and focus while in panoramic mode?
Yes, while in panoramic mode, you can tap on the screen to set the focus and then adjust the exposure by dragging the sun icon up or down, ensuring your panorama is perfectly lit.
6. What are some common mistakes to avoid when shooting panoramas on my iPhone?
Avoid panning too fast, moving unevenly, or changing your speed mid-capture, as these can lead to blurry, distorted, and poorly stitched panoramic photos.
7. Are there any third-party apps that offer better panoramic features than the built-in iPhone camera?
Yes, third-party apps like Photosynth and DMD Panorama offer advanced features like better stitching, real-time 3D capturing, and more control over exposure, giving you more creative options.
8. How can I handle challenging lighting conditions when shooting panoramas?
To handle challenging lighting, shoot during the golden hour for soft light, use a neutral density filter in bright daylight, and adjust highlights and shadows in post-editing to balance the lighting in your panorama.
9. What’s the best way to edit and enhance my iPhone panoramic photos?
Use apps like Snapseed or Adobe Lightroom Mobile to adjust color, contrast, and sharpness, correct distortion, remove unwanted objects, and add creative effects, ensuring your panoramic photos look their best.
10. How can I share my panoramic photos on social media effectively?
To share effectively, crop your panorama into multiple square images for Instagram’s carousel feature, upload the full panorama to Facebook, and share a cropped version on Twitter to fit each platform’s image size limits, showcasing your stunning wide-angle shots.