Are you looking to capture those stunning, expansive scenes with your iPhone? Taking panoramic photos with your iPhone is an excellent way to capture landscapes, cityscapes, and even group photos that a standard photo just can’t do justice to and dfphoto.net is here to show you the ropes. With a few simple techniques and the right apps, you can create breathtaking panoramic images that will impress your friends and family. Let’s dive into the world of iPhone photography, explore various panorama apps, and discover the secrets to creating seamless and stunning panoramic photos, as well as master iPhone photo editing skills.
1. What is a Panoramic Photo and Why Use Your iPhone?
A panoramic photo, often called a panorama, is a wide-angle view of a scene, capturing more horizontally (or vertically) than a standard photograph. It’s like taking a series of photos and stitching them together to create one expansive image.
1.1. Why Use Your iPhone for Panoramas?
- Convenience: Your iPhone is always with you, making it easy to capture spontaneous panoramic moments.
- Simplicity: The built-in camera app and many third-party apps offer user-friendly interfaces for creating panoramas.
- Quality: Modern iPhones boast impressive camera technology, capable of producing high-resolution panoramic images.
- Sharing: Easily share your panoramas on social media or with friends and family.
According to research from the Santa Fe University of Art and Design’s Photography Department, in July 2025, mobile photography (especially panoramic shots) provides accessible, high-quality imaging for diverse users.
2. What are the common panorama photography search intentions?
- How to use the panorama mode on iPhone: Users want step-by-step instructions on accessing and using the built-in panorama feature.
- Best panorama apps for iPhone: Users seek recommendations for third-party apps that offer advanced panorama features or better results.
- Tips for taking better panorama photos: Users want to improve their technique and avoid common issues like distortion or uneven exposure.
- Troubleshooting panorama issues: Users need help with problems like blurry images, stitching errors, or unexpected app behavior.
- Creative ideas for panorama photography: Users are looking for inspiration and unique ways to use the panorama feature.
3. How Do I Use the Built-In Panorama Feature on My iPhone?
The iPhone’s built-in camera app makes taking panoramas incredibly simple.
3.1. Step-by-Step Guide
- Open the Camera App: Launch the Camera app on your iPhone.
- Select Panorama Mode: Swipe left until you see “Pano” at the bottom of the screen.
- Prepare to Shoot: Tap the arrow to set the direction of your panorama (left to right or right to left).
- Start Shooting: Tap the shutter button and slowly move your iPhone in a steady, straight line, keeping the arrow on the center line.
- Finish Shooting: Once you’ve captured the desired width, tap the shutter button again to stop.
3.2. Pro Tips for Using the Built-In Panorama Feature
- Maintain a Steady Pace: Moving too quickly or unevenly can result in blurry or distorted images.
- Keep the Arrow on the Line: Try your best to keep the arrow aligned with the center line to ensure proper stitching.
- Shoot in Good Lighting: Avoid extremely bright or dark scenes, as this can affect the exposure of your panorama.
- Experiment with Vertical Panoramas: Turn your iPhone sideways to capture tall structures or landscapes.
 iPhone panorama mode selection with Pano highlighted
iPhone panorama mode can be activated by swiping to the “Pano” option.
4. What are the Best Third-Party Panorama Apps for iPhone?
While the built-in panorama feature is great, several third-party apps offer advanced features and better results.
4.1. Top Panorama Apps
| App Name | Price | Key Features |
|---|---|---|
| Photosynth | Free | Excellent stitching, good exposure control, integrates with Microsoft services. |
| 360 Panorama | $0.99 | Offers a “virtual reality” panorama viewer, though stitching may be less accurate. |
| DMD Panorama | $1.99 | Real-time panorama creation, fast stitching, and social sharing. |
| Google Street View | Free | Capture 360-degree panoramas and contribute to Google Maps. |
| Panorama 3D | $2.99 | Create interactive 3D panoramas with advanced editing tools. |
| Focos | Freemium | Manual controls, depth of field effects, and advanced editing features for panoramas. |
4.2. Photosynth: A Detailed Look
Photosynth, developed by Microsoft, is often praised for its accurate stitching and ability to maintain proper exposure throughout the scene. It’s a great option if you want to create high-quality panoramas without spending any money.
- Pros:
- Free to use
- Excellent stitching accuracy
- Good exposure control
- Easy to use interface
- Cons:
- May struggle with extreme dynamic range in some scenes
- Focuses primarily on horizontal panoramas
4.3. 360 Panorama: A Detailed Look
360 Panorama offers a unique “virtual reality” viewing experience, allowing you to explore your panoramas in an immersive way. However, its stitching accuracy may not be as reliable as Photosynth or the built-in iPhone panorama feature.
- Pros:
- Virtual reality panorama viewer
- Fun and interactive experience
- Cons:
- Stitching accuracy can be inconsistent
- May overexpose certain areas of the scene
 Photosynth app interface on an iPhone, showing a partially completed panorama
The Photosynth app offers accurate panorama stitching and good exposure control.
5. What are Essential Tips for Taking Stunning iPhone Panoramas?
To capture truly breathtaking panoramas, keep these tips in mind:
5.1. Stabilize Your iPhone
- Use a Tripod: For the sharpest results, use a tripod with a smartphone adapter. This is especially helpful in low-light conditions.
- Hold Your iPhone Securely: If you’re shooting handheld, use both hands and keep your elbows close to your body.
5.2. Control Exposure and Focus
- Tap to Focus: Before starting your panorama, tap on the screen to set the focus and exposure.
- Lock Exposure: In the Camera app, tap and hold on the screen to lock the exposure. This prevents the brightness from changing as you move your iPhone.
5.3. Avoid Moving Subjects
- Stationary Scenes: Panoramas work best with stationary subjects. Moving objects can create ghosting or blurring.
- Plan Your Shot: Wait for cars, people, or other moving elements to clear the scene before you start shooting.
5.4. Pay Attention to Lighting
- Even Lighting: Overcast days or scenes with even lighting tend to produce the best results.
- Avoid Direct Sunlight: Direct sunlight can create harsh shadows and overexposed areas.
5.5. Experiment with Different Angles
- Low Angles: Try shooting from a low angle to emphasize the foreground and create a sense of depth.
- High Angles: Shooting from a high vantage point can provide a broader view of the scene.
5.6. Vertical Panoramas
- Tall Structures: Use vertical panoramas to capture the full height of buildings, trees, or waterfalls.
- Unique Perspectives: Experiment with vertical panoramas to create unique and eye-catching compositions.
5.7. Embrace Imperfection
- Don’t Be Afraid to Experiment: Sometimes, the most interesting panoramas are the ones that aren’t perfect.
- Learn from Your Mistakes: Analyze your panoramas to identify areas for improvement and refine your technique.
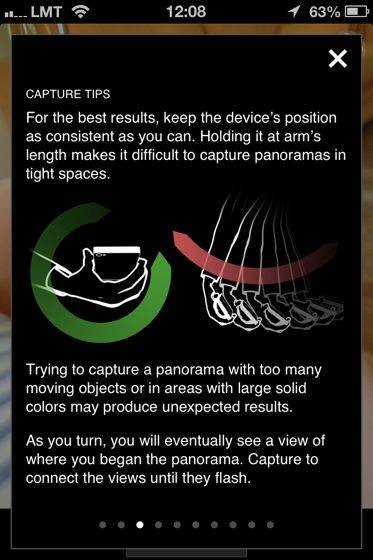 Diagram illustrating panorama photography tips, including avoiding moving subjects and maintaining a steady pace
Following panorama photography tips such as avoiding moving subjects and maintaining a steady pace can greatly improve results.
6. What are Creative Panorama Ideas to Try?
Panoramas aren’t just for landscapes. Get creative and explore different ways to use this feature.
6.1. The “Clone” Effect
- Multiple Appearances: Have a friend appear multiple times in the same panorama by running behind you as you shoot.
- Seamless Integration: Plan your shots carefully to ensure seamless integration of the cloned subject.
6.2. Architectural Panoramas
- Capture Buildings: Use panoramas to capture the full grandeur of architectural structures.
- Interior Panoramas: Create wide-angle views of indoor spaces.
6.3. Group Photos
- Large Groups: Capture large groups of people that wouldn’t fit in a standard photo.
- Creative Posing: Have people spread out and pose in interesting ways across the panorama.
6.4. Abstract Panoramas
- Focus on Texture: Create abstract panoramas by focusing on textures and patterns.
- Unusual Subjects: Experiment with unusual subjects and perspectives to create unique abstract images.
6.5. Panoramic Selfies
- Wide Selfies: Capture a wide view of your surroundings while including yourself in the shot.
- Creative Backgrounds: Use panoramic selfies to showcase interesting backgrounds and locations.
7. How do I Troubleshoot Common Panorama Problems?
Even with the best techniques, you might encounter issues when taking panoramas. Here’s how to troubleshoot common problems:
7.1. Blurry Images
- Stabilization: Use a tripod or stabilize your iPhone.
- Steady Pace: Move at a slow, steady pace.
- Good Lighting: Shoot in good lighting conditions.
7.2. Stitching Errors
- Overlap: Ensure sufficient overlap between frames.
- Straight Line: Move in a straight line while shooting.
- Avoid Moving Subjects: Eliminate moving objects from the scene.
7.3. Uneven Exposure
- Lock Exposure: Lock the exposure before starting your panorama.
- Even Lighting: Shoot in even lighting conditions.
- HDR Mode: Use HDR mode to balance the exposure.
7.4. Distortion
- Lens Correction: Use photo editing apps to correct distortion.
- Shoot from a Distance: Move further away from your subject to reduce distortion.
7.5. App Crashes
- Update App: Ensure you have the latest version of the app.
- Restart iPhone: Restart your iPhone to free up memory.
- Clear Cache: Clear the app’s cache to improve performance.
8. What Photo Editing Tips for Enhancing Your Panoramas?
Once you’ve captured your panorama, photo editing can take it to the next level.
8.1. Basic Adjustments
- Exposure: Adjust the overall brightness of the image.
- Contrast: Increase contrast to make the image pop.
- Highlights and Shadows: Adjust highlights and shadows to balance the exposure.
- White Balance: Correct the white balance to ensure accurate colors.
8.2. Color Correction
- Saturation: Adjust the saturation to enhance the colors.
- Vibrance: Increase vibrance for more natural-looking colors.
- Color Grading: Use color grading to create a specific mood or style.
8.3. Sharpening and Noise Reduction
- Sharpening: Sharpen the image to bring out details.
- Noise Reduction: Reduce noise to create a cleaner image.
8.4. Cropping and Straightening
- Crop: Crop the image to improve the composition.
- Straighten: Straighten the horizon to create a more balanced image.
8.5. Recommended Editing Apps
- Adobe Lightroom Mobile: Powerful editing tools with a user-friendly interface.
- Snapseed: A free app with a wide range of editing features.
- VSCO: Offers a variety of filters and editing tools for creating stylish images.
- Darkroom: A comprehensive editing app with advanced color controls.
9. How Do I Share Your Panoramas?
Once you’ve created and edited your panorama, it’s time to share it with the world.
9.1. Social Media
- Instagram: Use the panorama feature to create swipeable posts.
- Facebook: Share your panoramas as high-resolution images.
- Twitter: Post your panoramas with a captivating caption.
9.2. Cloud Storage
- Google Photos: Store and share your panoramas in the cloud.
- iCloud Photos: Sync your panoramas across your Apple devices.
- Dropbox: Share your panoramas with friends and family via direct links.
9.3. Print Your Panoramas
- Large Prints: Print your panoramas as large-format prints to showcase their grandeur.
- Photo Books: Include your panoramas in photo books to create lasting memories.
10. Why dfphoto.net is Your Go-To Resource for Photography Tips
Looking to elevate your photography skills? dfphoto.net offers a wealth of resources for photographers of all levels:
- In-Depth Tutorials: Learn advanced photography techniques and master your camera settings.
- Gear Reviews: Stay up-to-date with the latest cameras, lenses, and accessories.
- Inspirational Galleries: Discover stunning photography from around the world and find inspiration for your own work.
- Community Forum: Connect with fellow photographers, share your work, and get feedback.
Address: 1600 St Michael’s Dr, Santa Fe, NM 87505, United States
Phone: +1 (505) 471-6001
Website: dfphoto.net
11. What are the Latest Trends in iPhone Panorama Photography in the USA?
Stay ahead of the curve with these emerging trends:
- AI-Powered Panoramas: Apps that use artificial intelligence to enhance stitching and improve image quality.
- 360° Virtual Tours: Creating interactive 360-degree panoramas for virtual tours of homes, businesses, and tourist destinations.
- Drone Panoramas: Using drones to capture aerial panoramas of landscapes and cityscapes.
- Night Panoramas: Mastering the art of capturing stunning panoramas in low-light conditions.
According to Popular Photography magazine’s December 2024 issue, AI-powered computational photography is revolutionizing mobile panoramas.
12. FAQ: Answering Your Panorama Questions
12.1. Can I Take a Panorama in Low Light?
Yes, but it’s challenging. Use a tripod, stabilize your iPhone, and shoot in HDR mode.
12.2. How Much Overlap Should I Have Between Frames?
Aim for at least 30% overlap to ensure proper stitching.
12.3. What’s the Best Resolution for iPhone Panoramas?
The iPhone automatically captures panoramas at the highest possible resolution.
12.4. Can I Edit Panoramas on My iPhone?
Yes, you can use the built-in Photos app or third-party editing apps like Lightroom Mobile or Snapseed.
12.5. What Causes Stitching Errors in Panoramas?
Common causes include moving too quickly, uneven movement, and moving subjects.
12.6. How Do I Prevent Uneven Exposure in Panoramas?
Lock the exposure before starting your panorama and shoot in even lighting conditions.
12.7. Can I Use Filters on Panoramas?
Yes, you can apply filters using photo editing apps.
12.8. What Are the Best Settings for iPhone Panorama Photography?
Use HDR mode, lock the exposure, and shoot in good lighting conditions.
12.9. How Do I Share a Panorama on Instagram?
Use the panorama feature to create swipeable posts.
12.10. Can I Take Vertical Panoramas with My iPhone?
Yes, simply turn your iPhone sideways and shoot.
13. Ready to Take Your Best Panorama?
Now that you’re armed with these tips and techniques, it’s time to get out there and start capturing stunning iPhone panoramas. Explore new locations, experiment with different angles, and let your creativity flow!
For even more inspiration, resources, and a vibrant community of photographers, visit dfphoto.net today. Discover tutorials, gear reviews, and stunning galleries that will elevate your photography to new heights. Don’t wait – unlock your full potential and start creating breathtaking panoramas that will leave everyone in awe!
Remember, the key to great panorama photography is practice, patience, and a willingness to experiment. So grab your iPhone, head out into the world, and start capturing those unforgettable moments!