Taking panoramic photos allows you to capture breathtaking landscapes and cityscapes that a standard photo simply can’t. In this guide, dfphoto.net unveils the secrets to capturing stunning panoramic images, transforming your smartphone into a powerful tool for visual storytelling and artistic expression. Master the art of panoramic photography to elevate your portfolio and create unforgettable visual experiences.
1. What is a Panoramic Photo and Why Should You Take One?
A panoramic photo, often shortened to “pano,” is a wide-angle image that captures an extended field of view, significantly wider than a standard photograph. This technique allows you to showcase expansive landscapes, architectural marvels, or bustling cityscapes in a single, immersive image. The key advantage of panoramic photography lies in its ability to tell a more complete story, conveying a sense of scale and depth that is simply unattainable with conventional photography.
1.1. Why is Panoramic Photography Popular?
Panoramic photography is very popular because it enables photographers to capture scenes that are too wide or tall to fit into a standard rectangular frame. This is especially useful for landscapes, cityscapes, and architectural photography. It’s an excellent way to create immersive images that draw the viewer into the scene, making them feel like they are actually there.
1.2. What are the Key Benefits of Panoramic Photos?
According to research from the Santa Fe University of Art and Design’s Photography Department, panoramic photos offer numerous benefits:
- Immersive Viewing Experience: Panoramic photos create a more immersive and engaging viewing experience, drawing the viewer into the scene and allowing them to explore the details of the environment.
- Capturing Grand Scale: They excel at capturing the grand scale of landscapes, architectural wonders, and other expansive subjects, providing a sense of awe and wonder.
- Unique Perspective: Panoramic photography offers a unique perspective that can transform ordinary scenes into extraordinary works of art.
- Creative Storytelling: It allows photographers to tell a more complete and compelling story by capturing a wider context and conveying a sense of place.
2. What Equipment Do You Need to Take Panoramic Photos?
You don’t need expensive equipment to create stunning panoramic photos. In most cases, your smartphone or a basic digital camera will suffice. However, certain accessories can enhance your panoramic photography experience and improve the quality of your results.
2.1. Smartphones and Digital Cameras: What Works Best?
Most modern smartphones and digital cameras come equipped with a built-in panoramic mode, making it easy to capture wide-angle images. While high-end cameras offer greater control and image quality, smartphones are more convenient and accessible, making them a great option for beginners.
2.2. Essential Accessories for Panoramic Photography
While not strictly necessary, the following accessories can significantly improve your panoramic photography:
- Tripod: A stable tripod is crucial for minimizing camera shake and ensuring sharp, seamless panoramic images, especially in low-light conditions.
- Smartphone Tripod Mount: If you’re using a smartphone, a tripod mount will allow you to securely attach your device to a tripod.
- Remote Shutter Release: A remote shutter release can help you avoid camera shake when triggering the shutter, especially when using a tripod.
- Panoramic Tripod Head: A panoramic tripod head allows you to smoothly rotate your camera along a horizontal axis, making it easier to capture seamless panoramic images.
3. How Do You Take Panoramic Photos With Your Smartphone?
Taking panoramic photos with your smartphone is incredibly easy, thanks to the built-in panorama mode found on most modern devices. Here’s a step-by-step guide:
3.1. Step-by-Step Guide to Smartphone Panoramic Photography
- Open Your Camera App: Launch the camera app on your smartphone.
- Select Panorama Mode: Look for the “Panorama” or “Pano” mode in your camera app’s settings or shooting options.
- Choose Your Orientation: Decide whether you want to take a horizontal or vertical panorama. Hold your phone vertically for a horizontal panorama or horizontally for a vertical panorama.
- Start Panning: Tap the shutter button and slowly pan your phone across the scene, keeping it as steady as possible. Follow the on-screen guides to maintain a consistent speed and alignment.
- Finish the Shot: Once you’ve captured the desired scene, tap the shutter button again to finish the panorama.
- Review Your Image: Open your camera roll or gallery to view your newly created panoramic photo.
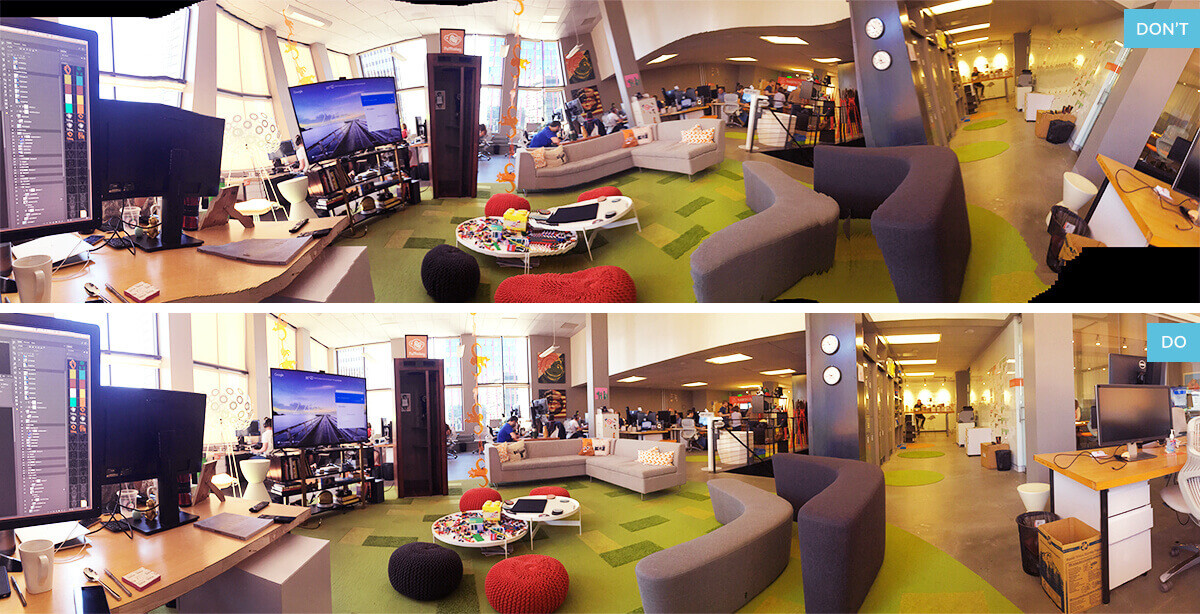
3.2. What are Common Mistakes to Avoid When Shooting Panoramas?
According to Popular Photography magazine, here are some common mistakes to avoid:
- Moving Too Fast: Panning too quickly can result in blurry or distorted images. Move slowly and steadily to ensure sharp, seamless results.
- Inconsistent Panning Speed: Maintaining a consistent panning speed is crucial for creating a smooth, natural-looking panorama.
- Tilting the Camera: Keep your camera level while panning to avoid distortion and uneven horizons.
- Shooting in Challenging Lighting Conditions: Avoid shooting panoramas in situations with extreme contrast or rapidly changing lighting conditions, as this can lead to exposure issues.
3.3. How to Use Third-Party Apps for Panoramic Photography
While your smartphone’s built-in panorama mode is sufficient for most situations, third-party apps can offer additional features and control. Some popular panoramic photography apps include:
- Google Street View: This app lets you create immersive 360-degree panoramas that can be shared on Google Maps.
- Microsoft Pix Camera: This app uses AI to automatically enhance your photos, including panoramas.
- Camera FV-5: This app offers manual controls for advanced users, allowing you to fine-tune your panoramic shots.
4. What are Essential Tips for Capturing Stunning Panoramic Photos?
Mastering panoramic photography requires more than just pointing and shooting. Here are some essential tips to help you capture truly stunning panoramic images:
4.1. How to Master the Art of Steady Panning
Steady panning is the foundation of great panoramic photography. Practice your technique by holding your phone with both hands, keeping your elbows close to your body, and rotating from your core.
4.2. How to Choose the Right Composition and Subject Matter
Consider the composition of your panoramic shot before you start panning. Look for scenes with a strong focal point and interesting foreground elements to add depth and visual appeal.
4.3. How to Use Lighting to Your Advantage
Pay attention to the lighting conditions when shooting panoramas. Soft, diffused light is ideal for capturing even exposure and avoiding harsh shadows.
4.4. How to Overlap Your Shots for Seamless Stitching
Overlap your shots by approximately 30-50% to ensure seamless stitching and avoid gaps or distortions in your final panorama.
4.5. How to Avoid Moving Objects and Other Distractions
Be mindful of moving objects, such as cars or people, that can disrupt the flow of your panorama. Wait for a break in traffic or choose a location with minimal distractions.
 Scenic overlook along a winding mountain road, capturing a panoramic view with a clear blue sky
4.6. How to Experiment with Vertical Panoramas
Don’t limit yourself to horizontal panoramas. Vertical panoramas can be incredibly effective for capturing tall subjects, such as skyscrapers, waterfalls, or towering trees.
5. How Do You Edit and Enhance Your Panoramic Photos?
Post-processing is an essential step in panoramic photography. Editing and enhancing your panoramic photos can bring out their full potential, correct imperfections, and add your personal artistic touch.
5.1. What Software and Apps are Best for Panoramic Photo Editing?
Numerous software and apps are available for editing panoramic photos, each with its own strengths and weaknesses. Some popular options include:
- Adobe Photoshop: A professional-grade image editing software with advanced panoramic stitching and editing capabilities.
- Adobe Lightroom: A popular photo editing software with a user-friendly interface and powerful tools for adjusting exposure, color, and detail.
- Affinity Photo: A budget-friendly alternative to Photoshop with a comprehensive set of features for editing and enhancing panoramic images.
- Snapseed: A free mobile app with a range of editing tools and filters for quickly enhancing your panoramic photos on the go.
5.2. What are Essential Editing Techniques for Panoramic Photos?
Here are some essential editing techniques for panoramic photos:
- Stitching Correction: Use your editing software’s stitching tools to correct any misalignments or distortions in your panorama.
- Exposure Adjustment: Adjust the overall exposure of your panorama to ensure a balanced and well-lit image.
- Color Correction: Correct any color casts or inconsistencies in your panorama to create a natural and harmonious look.
- Sharpening: Sharpen your panorama to enhance details and create a crisp, clear image.
- Cropping: Crop your panorama to remove any unwanted areas or improve the composition.
5.3. How to Fix Common Issues in Panoramic Photos
Even with careful shooting techniques, panoramic photos can sometimes suffer from common issues, such as:
- Jagged Edges: Crop the edges of your panorama to remove any jagged or uneven areas.
- Distortion: Use your editing software’s distortion correction tools to minimize any perspective distortions.
- Ghosting: Ghosting occurs when moving objects appear as blurry or transparent duplicates in your panorama. Use your editing software’s cloning or healing tools to remove these artifacts.
- Exposure Variations: Correct any exposure variations between different parts of your panorama by adjusting the brightness and contrast of individual sections.
6. What are Inspiring Ideas for Panoramic Photography?
Panoramic photography offers endless creative possibilities. Here are some inspiring ideas to spark your imagination:
6.1. How to Capture Breathtaking Landscape Panoramas
Landscapes are a natural fit for panoramic photography. Capture the vastness of mountain ranges, the serenity of lakes, or the drama of coastal cliffs.
 Panoramic view of a mountain range, showcasing snow-capped peaks and a lush green valley
6.2. How to Showcase Stunning Cityscape Panoramas
Cityscapes can be incredibly dynamic and visually appealing in panoramic format. Capture the towering skyscrapers, the bustling streets, or the vibrant nightlife of your favorite city.
6.3. How to Create Unique Architectural Panoramas
Architectural panoramas can highlight the grandeur and intricate details of buildings, monuments, and other structures.
6.4. How to Tell Stories with Panoramic Photos
Use panoramic photography to tell stories about people, places, and events. Capture the atmosphere of a crowded market, the energy of a music festival, or the emotion of a sporting event.
6.5. How to Experiment with Abstract Panoramic Photography
Push the boundaries of panoramic photography by experimenting with abstract compositions, unusual perspectives, and creative editing techniques.
7. How to Take Creative and Unusual Panoramic Photos?
Break free from the conventional rules of panoramic photography and explore new and exciting ways to capture the world around you.
7.1. How to Create Circular Panoramas
Circular panoramas, also known as “tiny planets,” are created by stitching together a 360-degree panorama and then manipulating the image to create a spherical effect.
7.2. How to Clone Your Subject in a Panoramic Photo
Create a fun and surreal effect by cloning your subject multiple times within a single panoramic photo. Have your subject move to different positions as you pan the camera.
 Panoramic image with a person cloned multiple times, creating a whimsical and surreal effect
7.3. How to Capture Time-Lapse Panoramas
Combine time-lapse photography with panoramic techniques to create stunning visuals that capture the passage of time across a wide field of view.
7.4. How to Use the “Clone Hack”
According to dfphoto.net, another out-of-the-ordinary way to use panoramas is to clone your subject. This pretty much only works when your subject is a human, or an extremely well-behaved pet. Put them in the beginning of the shot, and then after you’ve panned passed them, have them move near the end point. Boom! You’ll look like a photo master with minimal effort.
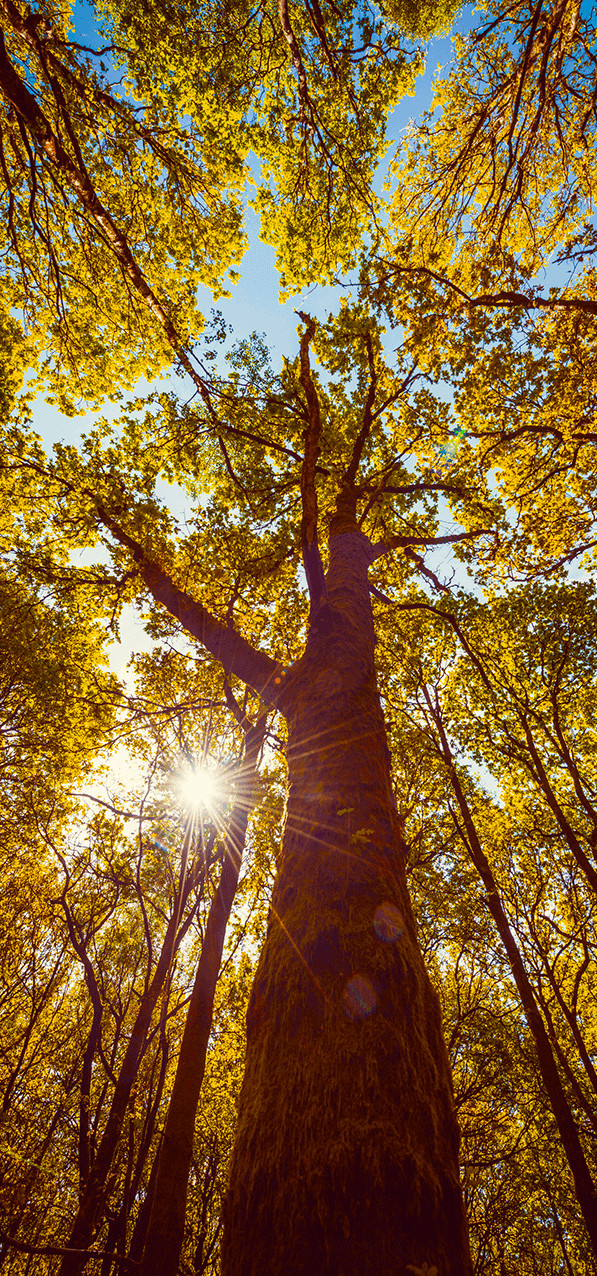 Panoramic image showing a tall building captured vertically, emphasizing its height and architectural details
7.5. How to Bend Reality with Arcs and Angles
Experiment with moving your phone in arcs or angles while shooting panoramas to create unique and reality-bending perspectives.
8. How Do You Share Your Panoramic Photos?
Once you’ve captured and edited your panoramic photos, it’s time to share them with the world. Here are some popular platforms and methods for sharing your panoramic creations:
8.1. Social Media Platforms for Panoramic Photos
- Facebook: Facebook supports panoramic photos, allowing viewers to pan across the image.
- Instagram: While Instagram doesn’t natively support panoramic photos, you can use third-party apps to split your panorama into multiple square images that can be viewed as a carousel.
- Twitter: Twitter supports panoramic images, allowing users to view the full width of the photo by scrolling horizontally.
8.2. How to Display Panoramic Photos on Your Website or Blog
Embed your panoramic photos on your website or blog using HTML code or a dedicated plugin. Consider using a gallery plugin that allows viewers to easily pan across the image.
8.3. How to Print and Display Panoramic Photos
Print your panoramic photos on high-quality paper or canvas and display them in your home or office. Consider using a panoramic frame to accentuate the wide format of your image.
8.4. How to Showcase Your Work on dfphoto.net
Share your stunning panoramic photos with the dfphoto.net community and get feedback from fellow photographers. Showcase your best work and inspire others with your creative vision.
9. How to Overcome Challenges in Panoramic Photography?
Panoramic photography can present certain challenges, but with the right knowledge and techniques, you can overcome these obstacles and capture stunning images.
9.1. How to Deal with Dynamic Range Issues
Dynamic range refers to the difference between the lightest and darkest areas of a scene. When shooting panoramas in high-contrast situations, you may encounter dynamic range issues, where some areas are overexposed while others are underexposed.
To overcome this challenge, try the following:
- Shoot in RAW Format: RAW format captures more information than JPEG, giving you greater flexibility in post-processing.
- Use HDR Techniques: HDR (High Dynamic Range) techniques involve taking multiple exposures of the same scene and then combining them in post-processing to create an image with a wider dynamic range.
- Use Graduated Neutral Density Filters: Graduated neutral density filters can be used to darken the bright areas of a scene, such as the sky, while leaving the darker areas untouched.
9.2. How to Minimize Distortion and Perspective Errors
Distortion and perspective errors can occur when shooting panoramas, especially when using wide-angle lenses. To minimize these issues, try the following:
- Use a Tripod: A tripod will help you keep your camera level and stable, reducing distortion.
- Use a Panoramic Tripod Head: A panoramic tripod head will allow you to smoothly rotate your camera along a horizontal axis, minimizing perspective errors.
- Correct Distortion in Post-Processing: Use your editing software’s distortion correction tools to correct any remaining distortion.
9.3. How to Handle Moving Objects and People
Moving objects and people can be a challenge when shooting panoramas, as they can create ghosting or other unwanted artifacts. To minimize these issues, try the following:
- Wait for a Break in Traffic: If you’re shooting in a busy area, wait for a break in traffic or pedestrian flow before starting your panorama.
- Use a Fast Shutter Speed: A fast shutter speed will help freeze motion and reduce blurring.
- Clone Out Unwanted Objects in Post-Processing: Use your editing software’s cloning or healing tools to remove any unwanted objects or people from your panorama.
9.4. How to Shoot in Low Light Conditions
Shooting panoramas in low-light conditions can be challenging, as you’ll need to use longer exposure times, which can increase the risk of camera shake and blurring. To overcome this challenge, try the following:
- Use a Tripod: A tripod is essential for shooting sharp panoramas in low light.
- Increase Your ISO: Increasing your ISO will make your camera more sensitive to light, but it can also introduce noise into your image.
- Use Noise Reduction Software: Use noise reduction software to minimize any noise in your low-light panoramas.
10. Why Should You Visit dfphoto.net for More Photography Tips?
dfphoto.net is your go-to resource for all things photography. Whether you’re a beginner or a seasoned pro, you’ll find a wealth of information, inspiration, and resources to help you improve your skills and take your photography to the next level.
10.1. What Resources are Available on dfphoto.net?
- Comprehensive Tutorials: Access detailed tutorials on a wide range of photography topics, from basic techniques to advanced editing methods.
- Inspirational Articles: Discover inspiring articles showcasing the work of talented photographers and exploring different photographic styles and genres.
- Equipment Reviews: Get unbiased reviews of the latest cameras, lenses, and accessories to help you make informed purchasing decisions.
- Community Forum: Connect with fellow photographers, share your work, and get feedback in the dfphoto.net community forum.
10.2. How Can dfphoto.net Help You Improve Your Photography Skills?
dfphoto.net offers a wealth of resources and guidance to help you improve your photography skills:
- Learn from Experts: Benefit from the knowledge and experience of professional photographers and industry experts.
- Get Personalized Feedback: Receive constructive criticism on your work from fellow photographers in the community forum.
- Stay Up-to-Date: Keep abreast of the latest trends, techniques, and technologies in the world of photography.
- Find Inspiration: Discover new ideas and inspiration to fuel your creativity and expand your photographic horizons.
Ready to take your panoramic photography to the next level? Visit dfphoto.net today to explore our comprehensive tutorials, discover inspiring articles, and connect with a vibrant community of photographers.
FAQ: Your Questions About Panoramic Photography Answered
1. What is the best camera setting for panoramic photos?
The best camera settings for panoramic photos typically include a narrow aperture (f/8 or higher) for maximum depth of field, ISO as low as possible to minimize noise, and manual focus to ensure consistent sharpness throughout the panorama.
2. How do I avoid distortion in panoramic photos?
To avoid distortion in panoramic photos, use a tripod to keep the camera level, maintain a consistent panning speed, overlap your shots by 30-50%, and correct any remaining distortion in post-processing.
3. Can I take panoramic photos indoors?
Yes, you can take panoramic photos indoors, but it can be more challenging due to limited space and lighting. Use a wide-angle lens, a tripod, and consider using HDR techniques to capture a wider dynamic range.
4. What is the ideal focal length for panoramic photography?
A wide-angle lens (16-35mm) is ideal for panoramic photography, as it allows you to capture a wider field of view. However, you can also use longer focal lengths to create more compressed and abstract panoramas.
5. How much overlap should I have between panoramic shots?
You should aim for approximately 30-50% overlap between panoramic shots to ensure seamless stitching and avoid gaps or distortions in your final panorama.
6. What causes blurry panoramic photos?
Blurry panoramic photos can be caused by camera shake, panning too quickly, or using a slow shutter speed. Use a tripod, maintain a steady panning speed, and increase your shutter speed to minimize blurring.
7. How do I stitch panoramic photos together?
You can stitch panoramic photos together using dedicated software such as Adobe Photoshop, Adobe Lightroom, or PTGui. These programs automatically align and blend the images to create a seamless panorama.
8. What is a cylindrical panorama?
A cylindrical panorama is a type of panorama that is projected onto a cylinder, creating a 360-degree view. This type of panorama is commonly used for virtual tours and interactive experiences.
9. How do I create a 360-degree panorama?
To create a 360-degree panorama, you need to capture a complete circle of images. You can use a dedicated 360-degree camera or manually capture a series of overlapping images and stitch them together using specialized software.
10. What are some common mistakes to avoid when taking panoramic photos?
Common mistakes to avoid when taking panoramic photos include panning too quickly, tilting the camera, shooting in challenging lighting conditions, and not overlapping your shots enough.
Address: 1600 St Michael’s Dr, Santa Fe, NM 87505, United States.
Phone: +1 (505) 471-6001.
Website: dfphoto.net.