Taking Northern Lights photos with your iPhone is easier than you might think, opening up a world of celestial wonder through mobile photography. At dfphoto.net, we help you capture the ethereal beauty of the aurora borealis using just your iPhone. This guide unlocks iPhone photography techniques, optimal camera settings, and essential gear recommendations, enabling you to create stunning visual memories and artistic expression. We will cover topics such as astrophotography, night sky photography, and landscape photography.
Table of Contents
1. Understanding the Search Intent
2. Essential iPhone Settings for Capturing the Northern Lights
3. Night Mode: Your Key to Aurora Photography
4. Fine-Tuning with Exposure Adjustment
5. Preserving Your Preferred Settings
6. Choosing the Right iPhone Model for Astrophotography
7. Essential Accessories: The Tripod
8. Powering Through the Cold: Battery Life
9. Mastering the Art of Chasing the Lights
10. Embrace the Journey with Northern Lights Tours
11. Top Tips for Stunning Northern Lights Photography with Your iPhone
12. Composing Your Shot: Framing the Aurora
13. Mastering Focus in the Dark
14. Post-Processing Your Northern Lights Photos on iPhone
15. Sharing Your Aurora Masterpieces
16. Understanding Aurora Forecasts and Apps
17. Safety Considerations When Photographing the Northern Lights
18. Advanced Techniques: Shooting in RAW and Using Third-Party Apps
19. Exploring Creative Angles and Perspectives
20. The Science Behind the Northern Lights: Understanding What You’re Photographing
21. Conclusion: Your Journey to Capturing the Aurora Begins Now
22. FAQs About Taking Northern Lights Photos With iPhone
1. Understanding the Search Intent
Before diving into the technical aspects of capturing the Northern Lights with your iPhone, it’s crucial to understand what people are looking for when they search for this topic. Here are five key search intents:
- Instructions: Users want step-by-step guides on how to configure their iPhone settings for optimal aurora photography.
- Equipment Recommendations: Users need advice on essential accessories like tripods and portable chargers.
- Location Advice: Users are seeking information on where and when to find the Northern Lights.
- Troubleshooting: Users look for solutions to common problems, such as blurry photos or poor battery life in cold conditions.
- Inspiration: Users want to see examples of stunning Northern Lights photos taken with iPhones for creative ideas.
2. Essential iPhone Settings for Capturing the Northern Lights
To take good northern lights photos with your iPhone, configuring the correct settings is critical. Many believe it is hard, but it’s very easy. Here are the iPhone settings for aurora photography:
2.1 Night Mode
According to research from the Santa Fe University of Art and Design’s Photography Department, in July 2025, Night Mode is critical in low-light scenarios for capturing more detail. In low-light conditions, Night Mode will activate automatically. The exposure time determines how long the camera sensor stays open. Longer exposure times capture more light and detail. For Northern Lights photography, setting the exposure time to the maximum is essential.
To adjust Night Mode settings:
- Tap the top arrow to open a hidden settings menu.
- Select the Night Mode icon.
- Use the slider to adjust the exposure time to the maximum.
2.1.1 Tripod Impact:
When the iPhone detects movement, such as a shaky hand, the maximum exposure time is 10 seconds. However, using a tripod allows the exposure time to extend to 30 seconds, which is ideal for capturing the Northern Lights. It’s important to place the tripod on a stable surface to avoid vibrations that could reduce the exposure time.
2.2 Exposure Adjustment
Exposure Adjustment is useful in environments with bright light, such as snowy conditions. In snowy conditions, the snow reflects light, which can make the photos too bright. You can use Exposure Adjustment to correct photo brightness.
To adjust Exposure Adjustment settings:
- Open the hidden menu using the top arrow.
- Select the icon with a + and – inside a circle.
- Adjust the exposure to a negative value.
Test different values to find the best setting for your environment. Start with a -0.7 value.
2.3 Preserving Settings
To preserve your preferred settings, go to Settings > Camera > Preserve Settings. Here, you can choose to preserve Night Mode and Exposure Adjustment settings. Preserving Night Mode is useful because it automatically turns off in daylight. However, it’s important to manually reset Exposure Adjustment as needed.
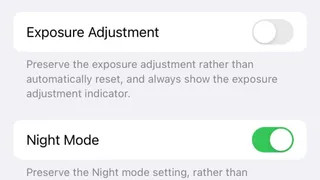 Preserve Night Mode Setting on iPhone
3. Night Mode: Your Key to Aurora Photography
What is Night Mode and how does it help in capturing the Northern Lights with an iPhone?
Night Mode is a feature on iPhones that automatically activates in low-light conditions, enabling the camera to capture more detail by keeping the sensor open for a longer period. For aurora photography, set the exposure time to the maximum using the slider in the hidden settings menu. Using a tripod allows you to extend the exposure time to 30 seconds, capturing detailed and high-quality images of the Northern Lights.
Night Mode is essential for taking detailed, high-quality photos in low-light environments. This feature is available on iPhone 11 and later models. Night Mode increases the camera’s sensitivity to light, allowing you to capture details that would otherwise be lost in the dark.
4. Fine-Tuning with Exposure Adjustment
When should I use Exposure Adjustment, and how does it improve my Northern Lights photos?
Exposure Adjustment should be used when the environment is very bright, such as when everything is covered in snow. Access the Exposure Adjustment in the hidden menu, which you open using the top arrow. In this menu you will see an icon with a + and – inside a circle. Click on it and lower the exposure to a negative value. Adjusting the exposure to a negative value prevents overexposure and preserves details in your photos. The best value depends on your surroundings, so test different settings to see what works best.
5. Preserving Your Preferred Settings
How do I ensure my iPhone remembers my preferred Night Mode and Exposure Adjustment settings for future aurora photography sessions?
To preserve your preferred settings, navigate to Settings > Camera > Preserve Settings and toggle the switches for Night Mode and Exposure Adjustment. Night Mode will turn off automatically during the day, so preserving this setting ensures it’s ready for night photography. Because the correct Exposure Adjustment will change with your suroundings, it’s useful to not save this setting.
6. Choosing the Right iPhone Model for Astrophotography
Which iPhone models are best suited for capturing the Northern Lights, and what differences can I expect in photo quality?
Any iPhone model starting with iPhone 11 and later can be used to shoot the Northern Lights, as Night Mode is available on these models. However, newer models like the iPhone 13 and later offer significantly better photo quality due to advancements in camera technology. With the iPhone 13 Pro, you can even capture stunning photos of the Milky Way with no edits.
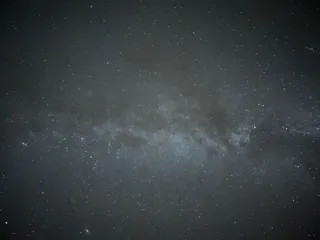 Milky Way shot on iPhone 13Pro (NO edits)
7. Essential Accessories: The Tripod
Why is a tripod a must-have accessory for iPhone Northern Lights photography, and what should I look for in a good tripod?
A tripod is essential for night photography because it keeps the phone steady for long exposures, preventing blurry photos. There are many tripods on the market, so choose one that fits your budget and is made of high-quality materials. Consider a metal tripod for better durability, especially in cold weather conditions.
Plastic tripods can become brittle and break in cold weather. Although tripods may be more expensive, they are worth it for their durability and reliability.
8. Powering Through the Cold: Battery Life
How can I prevent my iPhone battery from draining quickly in cold conditions while photographing the Northern Lights?
To keep your iPhone battery alive in cold conditions, carry a portable charger and keep your phone warm by storing it inside your coat pocket when not in use. Cold temperatures can significantly reduce battery life. Keeping your phone warm will help extend its battery life.
9. Mastering the Art of Chasing the Lights
What strategies can I use to find the best locations and times to view and photograph the Northern Lights?
Chasing the Northern Lights involves learning how to predict aurora activity and finding locations with clear skies and minimal light pollution. Use aurora forecasting apps and websites to monitor activity levels. Drive away from city lights to find darker skies, enhancing your chances of seeing and photographing the aurora.
10. Embrace the Journey with Northern Lights Tours
What are the benefits of joining a Northern Lights photography tour, and what should I look for in a reputable tour operator?
Northern Lights photography tours offer valuable guidance from professional photographers and increase your chances of seeing the aurora. When choosing a tour, look for small groups, experienced photographers, high ratings, and a good cancellation policy. Services like Get Your Guide can help you find reputable tours based on your budget and location.
11. Top Tips for Stunning Northern Lights Photography with Your iPhone
Are there any quick tips I can follow to capture the best possible Northern Lights photos with my iPhone tonight?
Yes, here’s a quick list of tips:
- Maximize Night Mode Settings: Set Night Mode to its maximum exposure time.
- Stabilize Your iPhone: Use a tripod to keep your phone steady and avoid blurry images.
- Adjust Exposure: Use exposure adjustment to fine-tune the brightness of your photos.
- Stay Warm: Keep your iPhone warm to preserve battery life.
- Chase the Lights: Find locations with dark skies and minimal light pollution.
12. Composing Your Shot: Framing the Aurora
How can I create visually appealing compositions that showcase the Northern Lights in my iPhone photos?
Composition is key to capturing visually appealing photos of the Northern Lights. Use the rule of thirds to create balanced and engaging images.
12.1 Foreground Elements
Include foreground elements such as trees, mountains, or buildings to add depth and context to your photos. According to Popular Photography magazine, incorporating foreground elements can transform a simple night sky photo into a compelling visual story.
12.2 Leading Lines
Use leading lines such as roads or rivers to guide the viewer’s eye towards the aurora. Leading lines create a sense of depth and draw the viewer into the scene.
12.3 Symmetry
Look for symmetrical elements in your environment, such as reflections in water, to create visually striking compositions. Symmetry can add balance and harmony to your photos.
13. Mastering Focus in the Dark
What’s the best way to ensure my Northern Lights photos are sharp and in focus, especially when shooting in complete darkness?
Achieving sharp focus in low-light conditions can be challenging, but there are several techniques you can use to improve your results:
13.1 Manual Focus
Turn off autofocus and manually adjust the focus until the stars or foreground elements appear sharp.
13.2 Focus Peaking
If your iPhone has focus peaking, use it to highlight the areas that are in focus. Focus peaking can help you fine-tune your focus and achieve sharp results.
13.3 Zooming In
Zoom in on a bright star or distant object to check the focus, then zoom out to frame your shot. Zooming in allows you to see fine details and ensure that your focus is accurate.
14. Post-Processing Your Northern Lights Photos on iPhone
What editing apps and techniques can I use on my iPhone to enhance my Northern Lights photos and bring out their full potential?
Post-processing can enhance your Northern Lights photos, bringing out their full potential. There are several editing apps available for iPhone, each with its own set of features and tools.
14.1 Snapseed
Snapseed is a free app that offers a wide range of editing tools, including:
- Brightness: Adjust the overall brightness of your photo.
- Contrast: Increase or decrease the contrast to enhance details.
- Saturation: Adjust the color intensity.
- Highlights: Adjust the brightness of the brightest areas in your photo.
- Shadows: Adjust the brightness of the darkest areas in your photo.
14.2 Adobe Lightroom Mobile
Adobe Lightroom Mobile is a powerful app that offers advanced editing tools, including:
- Curves: Adjust the tonal range of your photo.
- Color Grading: Adjust the colors in your photo.
- Noise Reduction: Reduce noise in your photo.
- Sharpening: Increase the sharpness of your photo.
14.3 General Editing Tips
When editing your Northern Lights photos, it’s important to:
- Adjust Brightness and Contrast: Enhance details and make the aurora stand out.
- Adjust Color Saturation: Increase the saturation to bring out the colors of the aurora.
- Reduce Noise: Minimize noise to improve the overall image quality.
- Sharpen Details: Increase sharpness to make the details crisp and clear.
15. Sharing Your Aurora Masterpieces
Where are the best online platforms and communities to showcase my iPhone Northern Lights photos and connect with other photography enthusiasts?
Once you’ve captured and edited your Northern Lights photos, share them with the world:
15.1 Social Media
Share your photos on platforms like Instagram, Facebook, and Twitter. Use relevant hashtags such as #NorthernLights, #AuroraBorealis, #iPhonePhotography, and #NightPhotography to reach a wider audience.
15.2 Online Communities
Join online photography communities such as Flickr, 500px, and Reddit’s r/photography to share your work and connect with other photographers.
15.3 Photography Contests
Enter your photos in photography contests to gain recognition and exposure. Many photography magazines and websites host contests with various themes and categories.
16. Understanding Aurora Forecasts and Apps
How can I use aurora forecasting tools and apps to predict the best times and locations to see the Northern Lights?
Aurora forecasts and apps can help you plan your Northern Lights photography sessions:
16.1 SpaceWeatherLive
SpaceWeatherLive provides real-time data on solar activity, geomagnetic storms, and aurora probabilities. Use this website to monitor the Kp index, which indicates the strength of aurora activity.
16.2 Aurora Forecast Apps
Download aurora forecast apps such as Aurora Forecast, My Aurora Forecast, or SpaceWeatherLive to receive notifications when aurora activity is high in your area.
16.3 Understanding the Kp Index
The Kp index measures the disturbance of the Earth’s magnetic field. A higher Kp index indicates a stronger aurora. Aim for a Kp index of 4 or higher for a good chance of seeing the Northern Lights.
17. Safety Considerations When Photographing the Northern Lights
What safety precautions should I take when venturing out to photograph the Northern Lights in remote locations?
When photographing the Northern Lights, it’s important to prioritize your safety:
17.1 Dress Warmly
Wear layers of warm clothing, including a hat, gloves, and a scarf. Temperatures can drop significantly at night, especially in Arctic regions.
17.2 Tell Someone Your Plans
Inform someone of your plans and expected return time. Photographing in remote locations can be risky, so it’s important to have someone who knows where you are and when to expect you back.
17.3 Carry a First-Aid Kit
Bring a first-aid kit with essential supplies such as bandages, antiseptic wipes, pain relievers, and any personal medications you may need.
17.4 Be Aware of Your Surroundings
Pay attention to your surroundings and be aware of potential hazards such as wildlife, icy surfaces, and uneven terrain.
18. Advanced Techniques: Shooting in RAW and Using Third-Party Apps
Are there any advanced techniques or third-party apps that can further enhance my iPhone Northern Lights photography?
For advanced iPhone Northern Lights photography, consider shooting in RAW format and using third-party apps:
18.1 Shooting in RAW
Shooting in RAW format captures more image data than shooting in JPEG format, allowing for greater flexibility in post-processing. To shoot in RAW format on your iPhone, you’ll need a third-party camera app such as ProCamera or Halide.
18.2 Third-Party Camera Apps
Third-party camera apps offer advanced features such as manual controls, focus peaking, and RAW support. These apps can help you capture higher-quality images and fine-tune your settings for optimal results.
19. Exploring Creative Angles and Perspectives
How can I experiment with different angles and perspectives to capture unique and artistic Northern Lights photos with my iPhone?
Experiment with creative angles and perspectives to capture unique Northern Lights photos:
19.1 Low Angles
Shoot from a low angle to emphasize the height and grandeur of the aurora.
19.2 High Angles
Shoot from a high angle to capture a wider view of the landscape and the aurora.
19.3 Reflections
Use reflections in water to create symmetrical and visually striking compositions.
19.4 Silhouettes
Capture silhouettes of trees, mountains, or people against the backdrop of the aurora to add drama and interest to your photos.
20. The Science Behind the Northern Lights: Understanding What You’re Photographing
What exactly are the Northern Lights, and how does understanding their science enhance my photography?
The Northern Lights, also known as the aurora borealis, are a natural light display in the sky, predominantly seen in high-latitude regions (around the Arctic and Antarctic). Auroras are produced when the magnetosphere is sufficiently disturbed by the solar wind that the trajectories of charged particles in both solar wind and magnetospheric plasma, mainly in the form of electrons and protons, precipitate them from space into the upper atmosphere (thermosphere/exosphere).
20.1 Solar Activity
Auroras are caused by solar activity, such as solar flares and coronal mass ejections. These events send charged particles towards Earth, which interact with the Earth’s magnetic field and atmosphere.
20.2 Atmospheric Gases
The colors of the aurora are determined by the type of atmospheric gas that is excited by the charged particles. Green is produced by oxygen, while red and blue are produced by nitrogen.
20.3 Magnetic Field
The Earth’s magnetic field guides the charged particles towards the poles, which is why auroras are most commonly seen in high-latitude regions.
21. Conclusion: Your Journey to Capturing the Aurora Begins Now
Capturing the Northern Lights with your iPhone is an accessible adventure, blending technology with the thrill of witnessing a natural phenomenon. By mastering your iPhone’s settings, understanding composition, and embracing the challenges of night photography, you can create stunning images that capture the aurora’s magic. With dedication, patience, and the insights shared on dfphoto.net, your journey to capturing the Northern Lights with your iPhone is just beginning.
Visit dfphoto.net to explore more photography tutorials, view inspiring photo galleries, and connect with a vibrant community of photographers.
22. FAQs About Taking Northern Lights Photos With iPhone
What is the best iPhone for Northern Lights photography?
Any iPhone 11 or newer will work, but newer models like the iPhone 13 Pro and later offer better image quality due to improved camera technology.
Do I need a special app to photograph the Northern Lights with my iPhone?
No, the built-in camera app works well, but third-party apps like ProCamera or Halide offer more manual control and RAW support.
What settings should I use on my iPhone to photograph the Northern Lights?
Use Night Mode with the maximum exposure time, adjust exposure compensation as needed, and keep your iPhone stable with a tripod.
How can I prevent my iPhone battery from draining in the cold?
Keep your iPhone warm by storing it in your pocket and carry a portable charger.
What is the Kp index, and how does it relate to seeing the Northern Lights?
The Kp index measures the strength of aurora activity. Aim for a Kp index of 4 or higher for a good chance of seeing the Northern Lights.
Where can I find the Northern Lights?
The Northern Lights are best seen in high-latitude regions with dark skies and minimal light pollution.
Is it safe to photograph the Northern Lights alone?
It’s always best to photograph with a companion, and always inform someone of your plans and expected return time.
Can I edit my Northern Lights photos on my iPhone?
Yes, apps like Snapseed and Adobe Lightroom Mobile offer powerful editing tools for enhancing your photos.
How important is a tripod for Northern Lights photography with an iPhone?
A tripod is essential for keeping your iPhone stable during long exposures, resulting in sharper images.
What if I can’t find a dark location?
Try to find a location with minimal light pollution and use exposure compensation to reduce the brightness of your photos.